基础知识:
https://www.yuque.com/liaoyuanyang/web/vue
VUE CLI 脚手架
优点:
脚手架是通过webpack搭建的开发环境
使用ES6语法
项目文件在环境中编译,而不是浏览器
实现页面自动刷新
环境要求:
nodejs ≥ 6.9
npm ≥ 3.10
安装
$ npm install -g vue-cli
$ vue --version
使用
$ vue init <template-name> <project-name>
比如,
$ vue init webpack my-project
$ cd my-project
$ npm install
$ npm run dev
执行流程
index.html --> main.js --> App.vue
精简App.vue文件
// 1、模板:html结构 template子元素有且只能有一个
<template>
  <div id="app">
    <h1>{{ title }}</h1>
  </div>
</template>
// 2、行为:处理逻辑
<script>
export default {
  name: 'App',
  data() {
    return {
      title: 'Hello VUE!'
    }
  }
}
</script>
// 3、样式:解决
<style>
</style>
Vue.js规定:在定义组件的选项时,data 和 el选项必须使用函数。 另外,如果data选项指向某个对象,这意味着所有的组件实例共用一个data。 我们应当使用一个函数作为 data 选项,让这个函数返回一个新对象: Vue.component('my-component', { data: function() { return { title: 'Hello VUE!' } } })
组件的注册
全局
// 在 main.js 中全局注册组件
import Users from './components/Users'
Vue.component('users', Users);
局部
<script>
// 局部注册组件
import Users from './components/Users'
export default {
name: 'App',
data() {
return {
title: 'Hello VUE!'
}
},
components: {
"users": Users
}
}
</script>
组件CSS作用域
<!-- Add "scoped" attribute to limit CSS to this component only -->
如果在 <sytle> 中不加 scoped 则后面的属性覆盖前面的,否则每个组件各自用各自的样式。
<style scoped>
...
</style>
Vue 属性传值Props
父传子
<!-- 给子组件传值 -->
<users v-bind:users="users"></users>
export default {
name: "App",
data() {
return {
title: "Hello VUE!",
users: [
{ name: "Henry", position: "WEB", show: true },
{ name: "Bucky", position: "PHP", show: false },
{ name: "Emily", position: "C", show: true },
{ name: "Tom", position: "JAVA", show: true },
{ name: "Jerry", position: "Python", show: true },
{ name: "Tim", position: "Go", show: false },
{ name: "Bob", position: "C#", show: true }
]
}
}
};
export default {
name: "Users",
// 获取父组件的传递的值
// props: ["users"],
// 官方推荐的标准写法
props: {
users: {
type: Array,
required: true
}
},
data() {
return {
};
}
};
传值和传引用
传值:string、number、boolean
引用(会改变相关数据):array、object
事件传值
<!-- 子传父 -->
<template>
<div class="header">
<h1>{{ title }}</h1>
<!-- 1、监听事件 -->
<p @click="changeTitle">{{ app_title }}</p>
</div>
</template>
methods: {
changeTitle: function() {
// 2、触发事件
this.$emit("titleChanged", "子传父");
}
}
<!-- v-on 子传父 v-bind 父传子 -->
<app-header v-on:titleChanged="updateTitle($event)" v-bind:app_title="title"></app-header>
methods: {
updateTitle: function(title){
this.title = title;
}
}
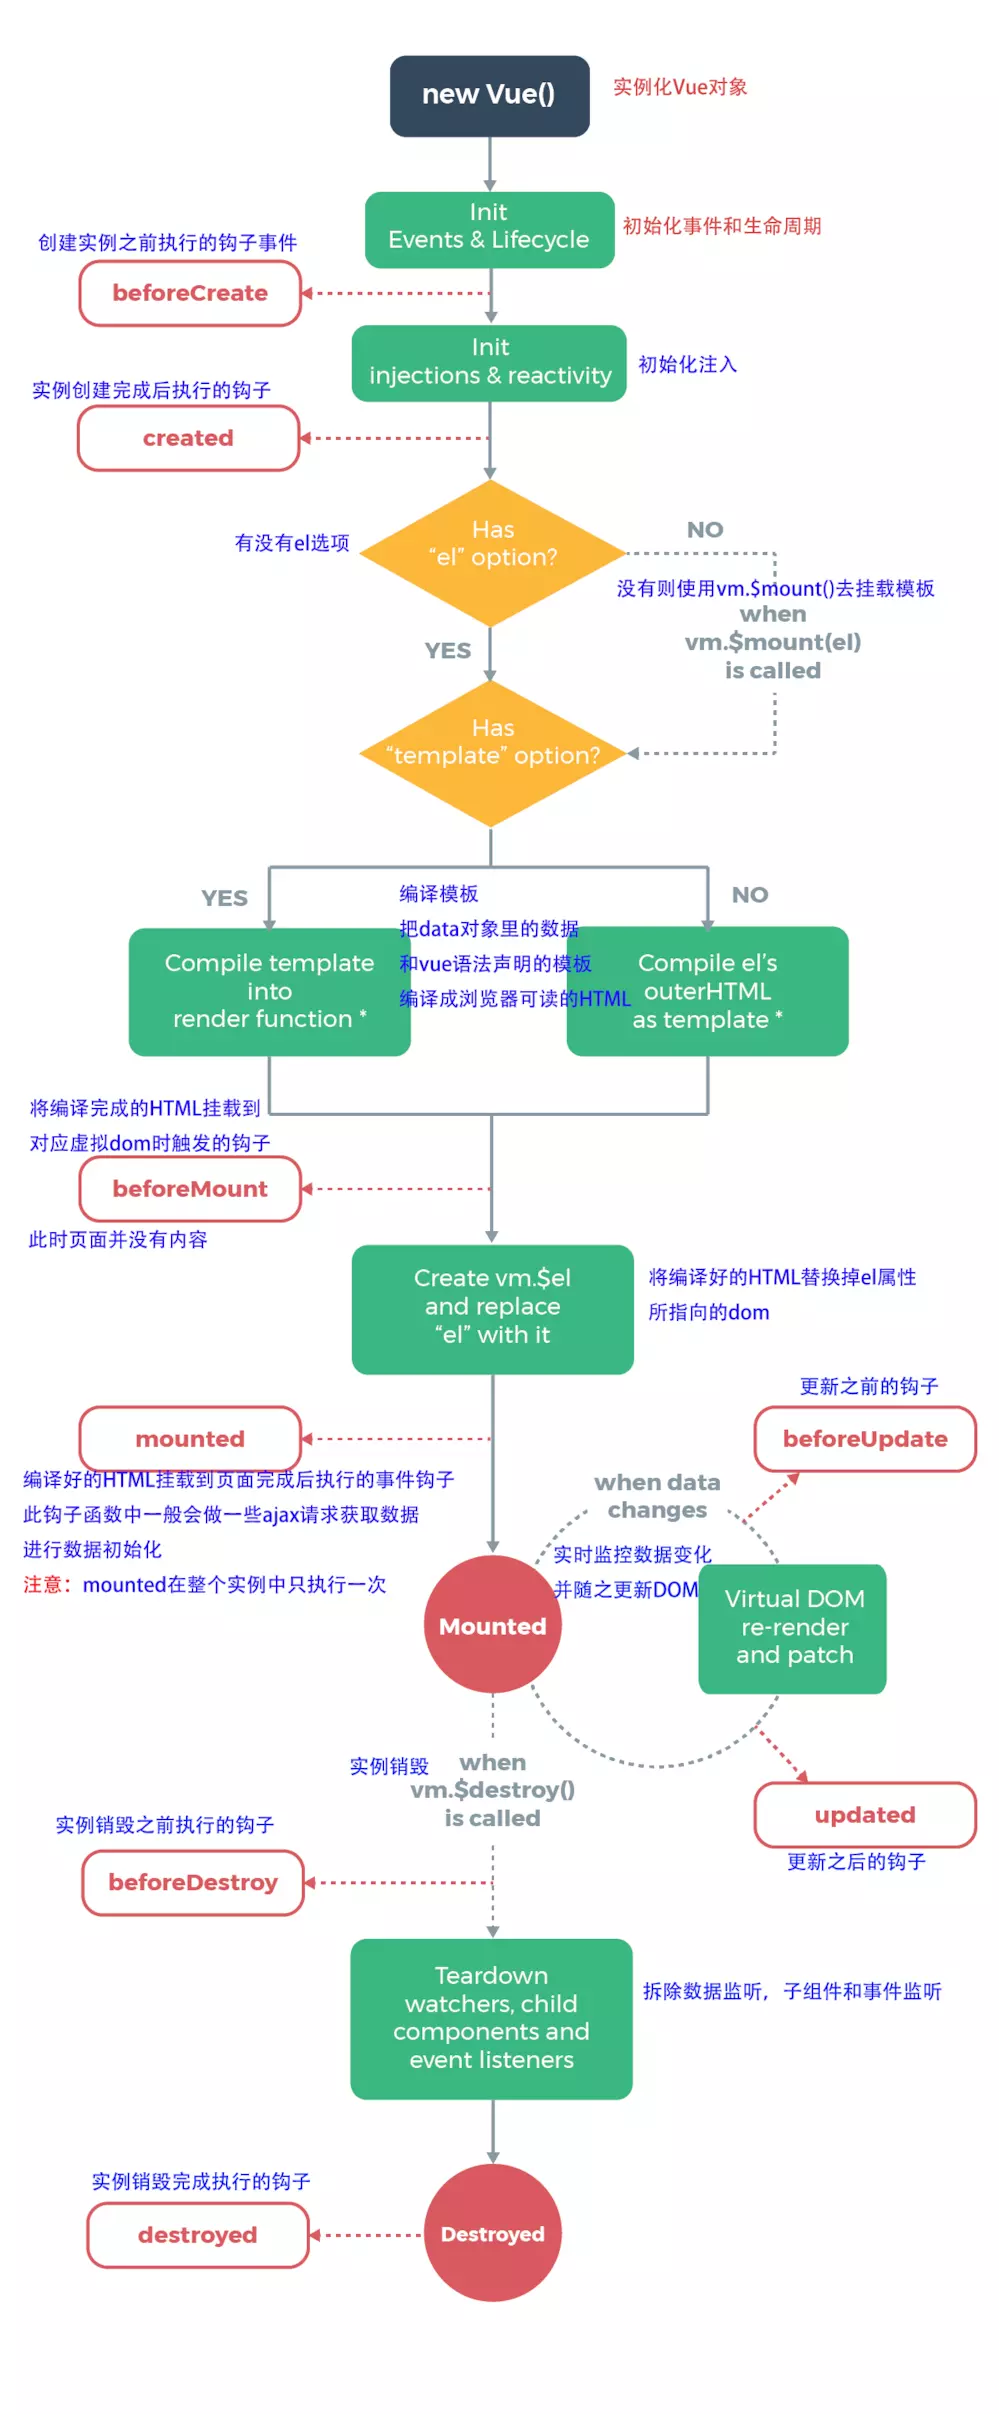
生命周期

生命周期钩子的函数:
beforeCreate: 组件实例化之前;可做加载动画
created: 组件创建、属性绑定、DOM未生成;可做数据请求,付给属性,结束加载动画
beforeMount: 组件挂在之前,页面仍未显示,虚拟DOM已配置;
mounted: 组件挂在之后,页面已显示;
beforeUpdate: 组件更新之前,页面仍未更新,虚拟DOM已配置;
updated: 组件更新之后,显示新的页面;
beforeDestory: 组件销毁之前;
destoryed: 组件销毁之后;
路由和Http
路由:
安装:$ npm install vue-router --save-dev
main.js中
import VueRouter from 'vue-router'
Vue.use(VueRouter)
// 配置路由
const router = new VueRouter({
routes: [
{path:'/', component: Home},
{path:'/hello', component: HelloWorld},
{path: '*', redirect: '/' } // miss路由
],
// 去除url地址中的 #
mode: "history"
});
new Vue({
router,
el: '#app',
components: { App },
template: '<App/>'
})
App组件中
// 在APP组件中
<!-- 路由匹配到的组件将渲染在这里 -->
<router-view></router-view>
跳转
<a href="/">Home</a>
<router-link to="/">Home</router-link>
// router-link 默认是 a 标签,可使用 tag 属性来改变,如 tag=“div”
// v-bind:to 动态绑定值
<router-link v-bind:to="homeLink" tag="div">主页</router-link>
<script>
export default {
  data (){
    return {
        homeLink: '/'
    }
  }
}
</script>
// 或者如有注册时,name属性绑定
const routes = [
  { path: '/', name:'homeLink', component: Home },
]
<router-link v-bind:to="{name:'homeLink'}">主页</router-link>
跨域处理:
// 在根目录下config的index.js中的proxyTable属性配置跨域请求
proxyTable: {
    '/apis': { //替换代理地址名称
        target: 'http://php.test', //代理地址
            changeOrigin: true, //可否跨域
                pathRewrite: {
                    '^/apis': '' //重写接口,去掉/apis
                }
    }
},
Http:
安装 vue-resource: $ npm install vue-resource --save-dev
注:此插件已不再维护
import VueSource from 'vue-resource'
Vue.use(VueSource)
created: function(){
    this.$http.get("https://jsonplaceholder.typicode.com/users")
    .then((data) => {
        // 赋值
        this.users = data.body;
    })
  }
安装 axios: $ npm install axios 安装 qs: $ npm install --save qs
import Axios from 'axios'
import Qs from 'qs'
Axios.defaults.headers.common['token'] = 'xxxxxxxxxx'
Axios.defaults.headers.post['Content-Type'] = 'application/x-www-form-urlencoded'
// 转为数组形式 而不是json
Axios.defaults.transformRequest = [ function (data) {
data = Qs.stringify(data);
return data;
}]
Vue.prototype.$axios = Axios
// 使用axios
this.$axios.post("/apis/api/hello.php", {
username: "tome",
password: 123456
}).then(result => {
console.log(result.data);
});
使用fetch
// 或者使用fetch()
fetch("/apis/api/hello.php", { //即亲求 http://php.test/api/hello.php
    method: "post",
    headers: {
        "Content-Type": "application/json",
        token: "xxxxxxxxxx"
    },
    // 以post方法 request payload json形式发送的数据 php后台获取数据为:
    // $post = json_decode(file_get_contents('php://input'), true);
    body: JSON.stringify({ username: "tom", password: 123456 })
}).then(result => {
    // console.log(result)
    return result.json();
}).then(data => {
    console.log(data);
});
搭建脚手架
$ vue init webpack-simple xxx
路由跳转
<script>
export default {
  methods: {
    goToMenu: function() {
      // 跳转到上一个页面
      this.$router.go(-1);
      // 指定跳转的地址
      this.$router.replace('/menu');
      // 指定跳转路由的名字下
      this.$router.replace({name:'menuLink'});
      // 通过push跳转
      this.$router.push('/menu');
      this.$router.push({name:'menuLink'});
    }
  }
};
</script>
二级路由和三级路由
// children属性定义 三级路由雷同
const routes = [
  {
    path: '/about', name: 'aboutLink', component: About, children: [
      { path: 'history',name:'historyLink', component: History }, // /about/history
      { path: '/delivery',name:'deliveryLink', component: Delivery },// /delivery
    ]
  }
]
导航守卫
全局守卫
// 全局守卫
router.beforeEach((to, from, next) => {
if (to.path == '/login' || to.path == '/register') {
// 正常展示
next();
} else {
alert('请先登录!');
next('/login');
}
})
路由独享
const routes = [
  {
    path: '/admin', name: 'adminLink', component: Admin, beforeEnter: (to, from, next) => {
      // 路由独享守卫
      alert('请先登录');
      next('/login');
      // next(false);
    }
  },
]
组件内守卫
<script>
export default {
  data() {
    return {
      name: "Herry"
    };
  },
  beforeRouteEnter: (to, from, next) => {
    // 此时还获取不到data
    alert("Hello " + this.name);
    // 回调
    next(vm => {
      alert("Hello " + vm.name);
    });
  },
  beforeRouteLeave: (to, from, next) => {
    // 离开
    if (confirm("确定离开吗")) {
      next();
    } else {
      next(false);
    }
  }
};
</script>
复用router-view
// App.vue中复用orderingGuide、deliver、history组件
<div class="container">
    <div class="row">
        <div class="col-sm-12 col-md-4">
            <router-view name="orderingGuide"></router-view>
        </div>
        <div class="col-sm-12 col-md-4">
            <router-view name="deliver"></router-view>
        </div>
        <div class="col-sm-12 col-md-4">
            <router-view name="history"></router-view>
        </div>
    </div>
</div>
// 路由组测分离到单独文件 routes.js
// 复用其他路由组件 把 components 属性值改为对象形式并把组件组测进来
// 此时 Home组件就可以复用 router-view 了
export const routes = [
  {
    path: '/', name: 'homeLink', components: {
      default: Home,
      'orderingGuide': OrderingGuide,
      'deliver': Delivery,
      'history': History
    }
  },
]
// 并在main.js中引入
import {routes} from './routes'
控制滚动行为
// main.js
const router = new VueRouter({
  routes,
  mode: 'history',
  // 只在支持 history.pushState 的浏览器中
  scrollBehavior(to, from, savedPosition) {
    return { x: 0, y: 100 };
    return { selector: '.btn' }; // 跳转到 .btn 样式位置
  }
})
Vuex
概述
主要应用于Vue.js中管理数据状态的一个库
通过创建一个集中的数据存储,供程序中所有组件访问
安装
$ npm install vuex --save
使用
// 创建 store.js
import Vue from 'vue'
import Vuex from 'vuex'
Vue.use(Vuex)
export const store = new Vuex.store({
// 严格模式
strict: true,
// 存储数据
state: {
products: [
{ name: "马云", price: 200 },
{ name: "马化腾", price: 140 },
{ name: "马冬梅", price: 20 },
{ name: "马蓉", price: 10 }
]
},
// 获取数据
getters: {
newLists: (state) => {
var newLists = state.lists.map(change => {
return {
name: '**' + change.name + '**',
price: change.price / 2
}
});
return newLists;
}
},
// 出发事件时调用
mutations: {
reducePrice:(state) => {
state.lists.forEach(element => {
element.price -= 1;
});
}
},
// 异步操作和传参
actions: {
// 传参 payload
reducePrice: (context, payload) => {
// 异步
setTimeout(function () {
// 提交 mutations 中的方法
context.commit("reducePrice", payload);
}, 3000)
}
}
});
main.js中引入
import Vue from 'vue'
import App from './App.vue'
import {store} from './store/store'
new Vue({
store:store,
el: '#app',
render: h => h(App)
})
组件一中使用state中的lists 数据
<template>
<div id="productListOne">
<h2>Product List One</h2>
<ul>
<li v-for="list in lists">
<span class="name">{{ list.name }}</span>
<span class="price">${{ list.price }}</span>
</li>
</ul>
</div>
</template>
<script>
export default {
computed: {
lists(){
return this.$store.state.lists;
}
}
};
</script>
组件二中使用getters中的newLists函数
<template>
<div id="productListOne">
<h2>Product List One</h2>
<ul>
<li v-for="list in newlists">
<span class="name">{{ list.name }}</span>
<span class="price">${{ list.price }}</span>
</li>
</ul>
</div>
</template>
<script>
export default {
computed: {
// 使用getters中的函数,改变store中的值
newlists(){
return this.$store.getters.newLists;
}
}
};
</script>
组件三中使用mutations中的函数
<template>
<div id="productListOne">
<h2>Product List Two</h2>
<ul>
<li v-for="list in lists">
<span class="name">{{ list.name }}</span>
<span class="price">${{ list.price }}</span>
</li>
</ul>
<!-- 定义事件 -->
<button v-on:click="reducePrice">商品降价</button>
</div>
</template>
<script>
export default {
computed: {
lists() {
return this.$store.state.lists;
}
},
methods: {
reducePrice: function() {
// this.$store.state.lists.forEach(element => {
// element.price -= 1;
// });
// 出发vuex中的事件
this.$store.commit("reducePrice");
}
}
};
</script>
组件四中使用actions,功能类似与mutations
<template>
<div id="productListOne">
<h2>Product List Two</h2>
<ul>
<li v-for="list in lists">
<span class="name">{{ list.name }}</span>
<span class="price">${{ list.price }}</span>
</li>
</ul>
<button v-on:click="reducePrice(3)">商品降价</button>
</div>
</template>
<script>
export default {
computed: {
lists() {
return this.$store.state.lists;
}
},
methods: {
reducePrice: function(amount) {
// 出发action且传参
this.$store.dispatch('reducePrice', amount);
}
}
};
</script>
Vuex-Mapping Actions & Getters
安装语法支持:$ npm install babel-preset-stage-2 --save-dev
// babelrc文件中设置 stage-2
import {mapGetters} from 'vuex'
import {mapActions} from 'vuex'
methods: {
reducePrice: function(amount) {
this.$store.dispatch("reducePrice", amount);
},
// 简化
Tips
谷歌插件Vue.js devtools
问题:[npm ERR! code ELIFECYCLE]
-
npm cache clean --force -
delete
node_modulesfolder -
delete
package-lock.jsonfile -