一、fetch 是 XMLHttpRequest 的替代方案。说白了就是除了 ajax 获取后台数据之外也可以用fetch 来获取。
二、fetch 的支持性还不是很好。挂载于BOM中可以通过浏览器直接访问。
1.支持情况
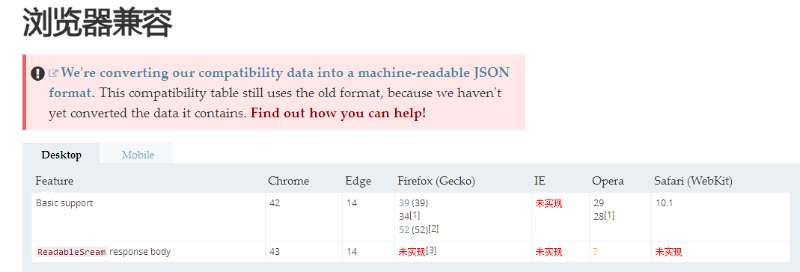
当然,如果不支持fetch也没有问题,可以使用第三方的ployfill来实现只会fetch:whatwg-fetch
三、JSON-SERVER模拟后台接口
1.初始化项目 npm init
2.安装JSON-SERVER: npm install --save-dev json-server
3.在跟目录下面创建一个db.json 写入
{
  "posts": [
    { "id": 1, "title": "json-server", "author": "typicode" }
  ],
  "comments": [
    { "id": 1, "body": "some comment", "postId": 1 }
  ],
  "profile": { "name": "typicode" }
}
4.在package.json 中添加一段代码
"scripts": {
  "server": "json-server db.json", // 新加行
  "test": "..."
}
5.npm run server

三个接口已经生成,支持post(新增) delete(删除) put(修改) get(查询);
关于JSON-SERVER 其他的配置我就不说了。有兴趣的自己去官网查看下。目前只是模拟一个后台接口。
四、GET请求。
1.
fetch('http://10.63.68.93:3000/profile', {
        method: 'GET'
    }).then((res)=>{
          return res.json()
    }).then(res => {
        console.log(res) //Object {name: "typicode"}
    })
2.get 请求参数的传递
把参数带在URL上面
 fetch('http://10.63.68.93:3000/profile?a=2&b=1', {
        method: 'GET'
    }).then((res)=>{
          return res.json()
    }).then(res => {
        console.log(res) //Object {name: "typicode"}
    })
五、POST请求
1.与GET请求类似,POST请求的指定也是在fetch的第二个参数中:
fetch('http://10.63.68.93:3000/comments', {
        method: 'POST'
    }).then((res)=>{
        return res.json()
    }).then(res => {
        console.log(res) //Object {name: "typicode"}
    })
2.POST请求的参数传递
var paramsString = "q=URLUtils.searchParams&topic=api"
    var searchParams = new URLSearchParams(paramsString);
    fetch('http://10.63.68.93:3000/posts', {
        method: 'POST',
        body: searchParams // 这里是请求对象   具体api 去看fetch 官网的 URLSearchParams
    }).then((res)=>{
        return res.json()
    }).then(res => {
        console.log(res)
    })
六、设置请求头
let myHeaders = new Headers();

myHeaders.append('Content-Type', 'text/xml');

myHeaders.get('Content-Type');
// should return 'text/xml'
var paramsString = "q=URLUtils.searchParams&topic=api"
    var searchParams = new URLSearchParams(paramsString);
    let myHeaders = new Headers();

    myHeaders.append('Content-Type', 'text/xml');

    myHeaders.get('Content-Type');
    /*
    myHeaders = new Headers({
  "Content-Type": "text/plain",
  "Content-Length": content.length.toString(),
  "X-Custom-Header": "ProcessThisImmediately",
});

     */
    // should return 'text/xml'
    fetch('http://10.63.68.93:3000/posts', {
        method: 'POST',
        headers:myHeaders,
        body: searchParams // 这里是请求对象   具体api 去看fetch 官网的 URLSearchParams
    }).then((res)=>{
        return res.json()
    }).then(res => {
        console.log(res)
    })
七、强制带cookie
默认情况下, fetch 不会从服务端发送或接收任何 cookies, 如果站点依赖于维护一个用户会话,则导致未经认证的请求(要发送 cookies,必须发送凭据头).
八、fetch 封装ajax请求
/**
 * 将对象转成 a=1&b=2的形式
 * @param obj 对象
 */
function obj2String(obj, arr = [], idx = 0) {
  for (let item in obj) {
    arr[idx++] = [item, obj[item]]
  }
  return new URLSearchParams(arr).toString()
}

/**
 * 真正的请求
 * @param url 请求地址
 * @param options 请求参数
 * @param method 请求方式
 */
function commonFetcdh(url, options, method = 'GET') {
  const searchStr = obj2String(options)
  let initObj = {}
  if (method === 'GET') { // 如果是GET请求,拼接url
    url += '?' + searchStr
    initObj = {
      method: method,
      credentials: 'include'
    }
  } else {
    initObj = {
      method: method,
      credentials: 'include',
      headers: new Headers({
        'Accept': 'application/json',
        'Content-Type': 'application/x-www-form-urlencoded'
      }),
      body: searchStr
    }
  }
  fetch(url, initObj).then((res) => {
    return res.json()
  }).then((res) => {
    return res
  })
}

/**
 * GET请求
 * @param url 请求地址
 * @param options 请求参数
 */
function GET(url, options) {
  return commonFetcdh(url, options, 'GET')
}

/**
 * POST请求
 * @param url 请求地址
 * @param options 请求参数
 */
function POST(url, options) {
  return commonFetcdh(url, options, 'POST')
}