-
疯狂创客圈 经典图书 : 《Netty Zookeeper Redis 高并发实战》 面试必备 + 面试必备 + 面试必备 【博客园总入口 】
-
疯狂创客圈 经典图书 : 《SpringCloud、Nginx高并发核心编程》 大厂必备 + 大厂必备 + 大厂必备 【博客园总入口 】
-
入大厂+涨工资必备: 高并发【 亿级流量IM实战】 实战系列 【 SpringCloud Nginx秒杀】 实战系列 【博客园总入口 】
无锁编程(Lock Free)框架 系列文章:
- 1 前置知识:伪共享 原理&实战
- 2 disruptor 使用和原理 图解
- 3 akka 使用和原理 图解
- 4 camel 使用和 原理 图解
1 disruptor 是什么?
Disruptor是英国外汇交易公司LMAX开发的一个高性能队列,研发的初衷是解决内存队列的延迟问题(在性能测试中发现竟然与I/O操作处于同样的数量级)。
基于Disruptor开发的系统单线程能支撑每秒600万订单,2010年在QCon演讲后,获得了业界关注。2011年,企业应用软件专家Martin Fowler专门撰写长文介绍。同年它还获得了Oracle官方的Duke大奖。
目前,包括Apache Storm、Camel、Log4j 2在内的很多知名项目都应用了Disruptor以获取高性能。
需要特别指出的是,这里所说的队列是系统内部的内存队列,而不是Kafka这样的分布式队列。另外,本文所描述的Disruptor特性限于3.3.4。
2 Java内置队列的问题
介绍Disruptor之前,我们先来看一看常用的线程安全的内置队列有什么问题。Java的内置队列如下表所示。
| 队列 | 有界性 | 锁 | 数据结构 |
|---|---|---|---|
| ArrayBlockingQueue | bounded | 加锁 | arraylist |
| LinkedBlockingQueue | optionally-bounded | 加锁 | linkedlist |
| ConcurrentLinkedQueue | unbounded | 无锁 | linkedlist |
| LinkedTransferQueue | unbounded | 无锁 | linkedlist |
| PriorityBlockingQueue | unbounded | 加锁 | heap |
| DelayQueue | unbounded | 加锁 | heap |
队列的底层一般分成三种:数组、链表和堆。其中,堆一般情况下是为了实现带有优先级特性的队列,暂且不考虑。
从数组和链表两种数据结构来看,基于数组线程安全的队列,比较典型的是ArrayBlockingQueue,它主要通过加锁的方式来保证线程安全;基于链表的线程安全队列分成LinkedBlockingQueue和ConcurrentLinkedQueue两大类,前者也通过锁的方式来实现线程安全,而后者以及上面表格中的LinkedTransferQueue都是通过原子变量compare and swap(以下简称“CAS”)这种不加锁的方式来实现的。
但是对 volatile类型的变量进行 CAS 操作,存在伪共享问题,具体请参考专门的文章:
Disruptor 使用了类似上面的方案,解决了伪共享问题。
3 Disruptor框架是如何解决伪共享问题的?
在Disruptor中有一个重要的类Sequence,该类包装了一个volatile修饰的long类型数据value,无论是Disruptor中的基于数组实现的缓冲区RingBuffer,还是生产者,消费者,都有各自独立的Sequence,RingBuffer缓冲区中,Sequence标示着写入进度,例如每次生产者要写入数据进缓冲区时,都要调用RingBuffer.next()来获得下一个可使用的相对位置。对于生产者和消费者来说,Sequence标示着它们的事件序号,来看看Sequence类的源码:
class LhsPadding {
protected long p1, p2, p3, p4, p5, p6, p7;
}
class Value extends LhsPadding {
protected volatile long value;
}
class RhsPadding extends Value {
protected long p9, p10, p11, p12, p13, p14, p15;
}
public class Sequence extends RhsPadding {
static final long INITIAL_VALUE = -1L;
private static final Unsafe UNSAFE;
private static final long VALUE_OFFSET;
static {
UNSAFE = Util.getUnsafe();
try {
VALUE_OFFSET = UNSAFE.objectFieldOffset(Value.class.getDeclaredField("value"));
} catch(final Exception e) {
throw new RuntimeException(e);
}
}
```
public Sequence() {
this(INITIAL_VALUE);
}
public Sequence(final long initialValue) {
UNSAFE.putOrderedLong(this, VALUE_OFFSET, initialValue);
}
```
}
从第1到11行可以看到,真正使用到的变量value,它的前后空间都由8个long型的变量填补了,对于一个大小为64字节的缓存行,它刚好被填补满(一个long型变量value,8个字节加上前/后个7long型变量填补,7*8=56,56+8=64字节)。这样做每次把变量value读进高速缓存中时,都能把缓存行填充满(对于大小为64个字节的缓存行来说,如果缓存行大小大于64个字节,那么还是会出现伪共享问题),保证每次处理数据时都不会与其他变量发生冲突。
Disruptor 的使用场景
Disruptor的最常用的场景就是“生产者-消费者”场景,对场景的就是“一个生产者、多个消费者”的场景,并且要求顺序处理。
当前业界开源组件使用Disruptor的包括Log4j2、Apache Storm等,它可以用来作为高性能的有界内存队列,基于生产者消费者模式,实现一个/多个生产者对应多个消费者。它也可以认为是观察者模式的一种实现,或者发布订阅模式。
举个例子,我们从MySQL的BigLog文件中顺序读取数据,然后写入到ElasticSearch(搜索引擎)中。在这种场景下,BigLog要求一个文件一个生产者,那个是一个生产者。而写入到ElasticSearch,则严格要求顺序,否则会出现问题,所以通常意义上的多消费者线程无法解决该问题,如果通过加锁,则性能大打折扣。
实战:Disruptor 的 使用实例
我们从一个简单的例子开始学习Disruptor:生产者传递一个long类型的值给消费者,而消费者消费这个数据的方式仅仅是把它打印出来。
定义一个Event
首先定义一个Event来包含需要传递的数据:
public class LongEvent {
    private long value;
    public long getValue() {
        return value;
    }

    public void setValue(long value) {
        this.value = value;
    }
}
由于需要让Disruptor为我们创建事件,我们同时还声明了一个EventFactory来实例化Event对象。
public class LongEventFactory implements EventFactory {
    @Override
    public Object newInstance() {
        return new LongEvent();
    }
}
定义事件处理器(disruptor会回调此处理器的方法)
我们还需要一个事件消费者,也就是一个事件处理器。这个事件处理器简单地把事件中存储的数据打印到终端:
/**
 */public class LongEventHandler implements EventHandler<LongEvent> {
    @Override
    public void onEvent(LongEvent longEvent, long l, boolean b) throws Exception {
        System.out.println(longEvent.getValue());
    }
}
定义事件源: 事件发布器 发布事件
事件都会有一个生成事件的源,这个例子中假设事件是由于磁盘IO或者network读取数据的时候触发的,事件源使用一个ByteBuffer来模拟它接受到的数据,也就是说,事件源会在IO读取到一部分数据的时候触发事件(触发事件不是自动的,程序员需要在读取到数据的时候自己触发事件并发布):
public class LongEventProducer {
    private final RingBuffer<LongEvent> ringBuffer;
    public LongEventProducer(RingBuffer<LongEvent> ringBuffer) {
        this.ringBuffer = ringBuffer;
    }

    /**
     * onData用来发布事件,每调用一次就发布一次事件事件
     * 它的参数会通过事件传递给消费者
     *
     * @param bb
     */public void onData(ByteBuffer bb) {
            //可以把ringBuffer看做一个事件队列,那么next就是得到下面一个事件槽
            long sequence = ringBuffer.next();

        try {
            //用上面的索引取出一个空的事件用于填充
            LongEvent event = ringBuffer.get(sequence);// for the sequence
            event.setValue(bb.getLong(0));
        } finally {
            //发布事件
            ringBuffer.publish(sequence);
        }
    }
}
很明显的是:当用一个简单队列来发布事件的时候会牵涉更多的细节,这是因为事件对象还需要预先创建。
发布事件最少需要两步:
获取下一个事件槽,发布事件(发布事件的时候要使用try/finnally保证事件一定会被发布)。
如果我们使用RingBuffer.next()获取一个事件槽,那么一定要发布对应的事件。如果不能发布事件,那么就会引起Disruptor状态的混乱。尤其是在多个事件生产者的情况下会导致事件消费者失速,从而不得不重启应用才能会恢复。
Disruptor 3.0提供了lambda式的API。这样可以把一些复杂的操作放在Ring Buffer,所以在Disruptor3.0以后的版本最好使用Event Publisher或者Event Translator(事件转换器)来发布事件。
Disruptor3.0以后的事件转换器(填充事件的业务数据)
public class LongEventProducerWithTranslator {
    //一个translator可以看做一个事件初始化器,publicEvent方法会调用它
    //填充Event
    private static final EventTranslatorOneArg<LongEvent, ByteBuffer> TRANSLATOR =
            new EventTranslatorOneArg<LongEvent, ByteBuffer>() {
                public void translateTo(LongEvent event, long sequence, ByteBuffer bb) {
                    event.setValue(bb.getLong(0));
                }
            };

    private final RingBuffer<LongEvent> ringBuffer;
    public LongEventProducerWithTranslator(RingBuffer<LongEvent> ringBuffer) {
        this.ringBuffer = ringBuffer;
    }

    public void onData(ByteBuffer bb) {
        ringBuffer.publishEvent(TRANSLATOR, bb);
    }
}
上面写法的另一个好处是,Translator可以分离出来并且更加容易单元测试。Disruptor提供了不同的接口(EventTranslator, EventTranslatorOneArg, EventTranslatorTwoArg, 等等)去产生一个Translator对象。很明显,Translator中方法的参数是通过RingBuffer来传递的。
组装起来
最后一步就是把所有的代码组合起来完成一个完整的事件处理系统。Disruptor在这方面做了简化,使用了DSL风格的代码(其实就是按照直观的写法,不太能算得上真正的DSL)。虽然DSL的写法比较简单,但是并没有提供所有的选项。如果依靠DSL已经可以处理大部分情况了。
注意:这里没有使用时间转换器,而是使用简单的 事件发布器。
public class LongEventMain {
    public static void main(String[] args) throws InterruptedException {
        // Executor that will be used to construct new threads for consumers
        Executor executor = Executors.newCachedThreadPool();
        // The factory for the event
        LongEventFactory factory = new LongEventFactory();
        // Specify the size of the ring buffer, must be power of 2.
        int bufferSize = 1024;
        // Construct the Disruptor
        Disruptor<LongEvent> disruptor = new Disruptor<LongEvent>(factory, bufferSize, executor);

        // Connect the handler
        disruptor.handleEventsWith(new LongEventHandler());
        // Start the Disruptor, starts all threads running
        disruptor.start();
        // Get the ring buffer from the Disruptor to be used for publishing.
        RingBuffer<LongEvent> ringBuffer = disruptor.getRingBuffer();

        LongEventProducer producer = new LongEventProducer(ringBuffer);

        ByteBuffer bb = ByteBuffer.allocate(8);
        for (long l = 0; true; l++) {
            bb.putLong(0, l);

            //发布事件
            producer.onData(bb);
            Thread.sleep(1000);
        }
    }
}
在Java 8使用Disruptor
Disruptor在自己的接口里面添加了对于Java 8 Lambda的支持。大部分Disruptor中的接口都符合Functional Interface的要求(也就是在接口中仅仅有一个方法)。所以在Disruptor中,可以广泛使用Lambda来代替自定义类。
public class LongEventMainJava8 {
    /**
     * 用lambda表达式来注册EventHandler和EventProductor
     * @param args
     * @throws InterruptedException
     */public static void main(String[] args) throws InterruptedException {
        // Executor that will be used to construct new threads for consumers
        Executor executor = Executors.newCachedThreadPool();
        // Specify the size of the ring buffer, must be power of 2.
        int bufferSize = 1024;// Construct the Disruptor
        Disruptor<LongEvent> disruptor = new Disruptor<>(LongEvent::new, bufferSize, executor);
        // 可以使用lambda来注册一个EventHandler
        disruptor.handleEventsWith((event, sequence, endOfBatch) -> System.out.println("Event: " + event.getValue()));
        // Start the Disruptor, starts all threads running
        disruptor.start();
        // Get the ring buffer from the Disruptor to be used for publishing.
        RingBuffer<LongEvent> ringBuffer = disruptor.getRingBuffer();

        LongEventProducer producer = new LongEventProducer(ringBuffer);

        ByteBuffer bb = ByteBuffer.allocate(8);for (long l = 0; true; l++) {
            bb.putLong(0, l);
            ringBuffer.publishEvent((event, sequence, buffer) -> event.setValue(buffer.getLong(0)), bb);
            Thread.sleep(1000);
        }
    }
}
由于在Java 8中方法引用也是一个lambda,因此还可以把上面的代码改成下面的代码:
public class LongEventWithMethodRef {
    public static void handleEvent(LongEvent event, long sequence, boolean endOfBatch)
    {
        System.out.println(event.getValue());
    }

    public static void translate(LongEvent event, long sequence, ByteBuffer buffer)
    {
        event.setValue(buffer.getLong(0));
    }

    public static void main(String[] args) throws Exception
    {
        // Executor that will be used to construct new threads for consumers
        Executor executor = Executors.newCachedThreadPool();
        // Specify the size of the ring buffer, must be power of 2.
        int bufferSize = 1024;
        // Construct the Disruptor
        Disruptor<LongEvent> disruptor = new Disruptor<>(LongEvent::new, bufferSize, executor);
        // Connect the handler
        disruptor.handleEventsWith(LongEventWithMethodRef::handleEvent);
        // Start the Disruptor, starts all threads running
        disruptor.start();
        // Get the ring buffer from the Disruptor to be used for publishing.
        RingBuffer<LongEvent> ringBuffer = disruptor.getRingBuffer();

        LongEventProducer producer = new LongEventProducer(ringBuffer);

        ByteBuffer bb = ByteBuffer.allocate(8);
        for (long l = 0; true; l++)
        {
            bb.putLong(0, l);
            ringBuffer.publishEvent(LongEventWithMethodRef::translate, bb);
            Thread.sleep(1000);
        }
    }
}
Disruptor如何实现高性能?
Disruptor实现高性能主要体现了去掉了锁,采用CAS算法,同时内部通过环形队列实现有界队列。
-
环形数据结构
为了避免垃圾回收,采用数组而非链表。同时,数组对处理器的缓存机制更加友好。 -
元素位置定位
数组长度2^n,通过位运算,加快定位的速度。下标采取递增的形式。不用担心index溢出的问题。index是long类型,即使100万QPS的处理速度,也需要30万年才能用完。 -
无锁设计
每个生产者或者消费者线程,会先申请可以操作的元素在数组中的位置,申请到之后,直接在该位置写入或者读取数据。整个过程通过原子变量CAS,保证操作的线程安全。
使用Disruptor,主要用于对性能要求高、延迟低的场景,它通过“榨干”机器的性能来换取处理的高性能。如果你的项目有对性能要求高,对延迟要求低的需求,并且需要一个无锁的有界队列,来实现生产者/消费者模式,那么Disruptor是你的不二选择。
原理:Disruptor 的内部Ring Buffer环形队列
RingBuffer是什么
RingBuffer 是一个环(首尾相连的环),用做在不同上下文(线程)间传递数据的buffer。
RingBuffer 拥有一个序号,这个序号指向数组中下一个可用元素。

Disruptor使用环形队列的优势:
Disruptor框架就是一个使用CAS操作的内存队列,与普通的队列不同,Disruptor框架使用的是一个基于数组实现的环形队列,无论是生产者向缓冲区里提交任务,还是消费者从缓冲区里获取任务执行,都使用CAS操作。
使用环形队列的优势:
第一,简化了多线程同步的复杂度。学数据结构的时候,实现队列都要两个指针head和tail来分别指向队列的头和尾,对于一般的队列是这样,想象下,如果有多个生产者同时往缓冲区队列中提交任务,某一生产者提交新任务后,tail指针都要做修改的,那么多个生产者提交任务,头指针不会做修改,但会对tail指针产生冲突,例如某一生产者P1要做写入操作,在获得tail指针指向的对象值V后,执行compareAndSet()方法前,tail指针被另一生产者P2修改了,这时生产者P1执行compareAndSet()方法,发现tail指针指向的值V和期望值E不同,导致冲突。同样,如果多个消费者不断从缓冲区中获取任务,不会修改尾指针,但会造成队列头指针head的冲突问题(因为队列的FIFO特点,出列会从头指针出开始)。
环形队列的一个特点就是只有一个指针,只通过一个指针来实现出列和入列操作。如果使用两个指针head和tail来管理这个队列,有可能会出现“伪共享”问题(伪共享问题在下面我会详细说),因为创建队列时,head和tail指针变量常常在同一个缓存行中,多线程修改同一缓存行中的变量就容易出现伪共享问题。
第二,由于使用的是环形队列,那么队列创建时大小就被固定了,Disruptor框架中的环形队列本来也就是基于数组实现的,使用数组的话,减少了系统对内存空间管理的压力,因为它不像链表,Java会定期回收链表中一些不再引用的对象,而数组不会出现空间的新分配和回收问题。
原理:Disruptor的等待策略
Disruptor默认的等待策略是BlockingWaitStrategy。这个策略的内部适用一个锁和条件变量来控制线程的执行和等待(Java基本的同步方法)。BlockingWaitStrategy是最慢的等待策略,但也是CPU使用率最低和最稳定的选项。然而,可以根据不同的部署环境调整选项以提高性能。
SleepingWaitStrategy
和BlockingWaitStrategy一样,SpleepingWaitStrategy的CPU使用率也比较低。它的方式是循环等待并且在循环中间调用LockSupport.parkNanos(1)来睡眠,(在Linux系统上面睡眠时间60µs).然而,它的优点在于生产线程只需要计数,而不执行任何指令。并且没有条件变量的消耗。但是,事件对象从生产者到消费者传递的延迟变大了。SleepingWaitStrategy最好用在不需要低延迟,而且事件发布对于生产者的影响比较小的情况下。比如异步日志功能。
YieldingWaitStrategy
YieldingWaitStrategy是可以被用在低延迟系统中的两个策略之一,这种策略在减低系统延迟的同时也会增加CPU运算量。YieldingWaitStrategy策略会循环等待sequence增加到合适的值。循环中调用Thread.yield()允许其他准备好的线程执行。如果需要高性能而且事件消费者线程比逻辑内核少的时候,推荐使用YieldingWaitStrategy策略。例如:在开启超线程的时候。
BusySpinW4aitStrategy
BusySpinWaitStrategy是性能最高的等待策略,同时也是对部署环境要求最高的策略。这个性能最好用在事件处理线程比物理内核数目还要小的时候。例如:在禁用超线程技术的时候。
原理:并行模式
单一写者模式
在并发系统中提高性能最好的方式之一就是单一写者原则,对Disruptor也是适用的。如果在你的代码中仅仅有一个事件生产者,那么可以设置为单一生产者模式来提高系统的性能。
public class singleProductorLongEventMain {
    public static void main(String[] args) throws Exception {
        //.....// Construct the Disruptor with a SingleProducerSequencer

        Disruptor<LongEvent> disruptor = new Disruptor(factory,
                bufferSize,
                ProducerType.SINGLE, // 单一写者模式,
                executor);//.....
    }
}
一次生产,串行消费
比如:现在触发一个注册Event,需要有一个Handler来存储信息,一个Hanlder来发邮件等等。

/**
  * 串行依次执行
  * <br/>
  * p --> c11 --> c21
  * @param disruptor
  */
 public static void serial(Disruptor<LongEvent> disruptor){
     disruptor.handleEventsWith(new C11EventHandler()).then(new C21EventHandler());
     disruptor.start();
 }
菱形方式执行
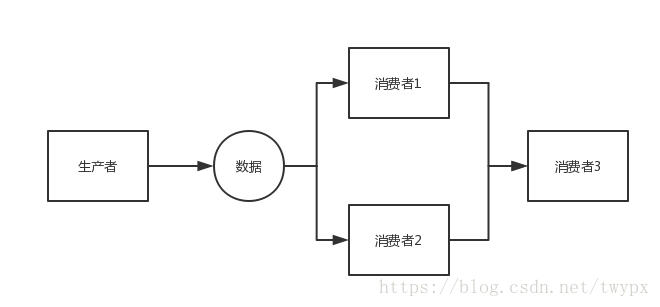
 public static void diamond(Disruptor<LongEvent> disruptor){
     disruptor.handleEventsWith(new C11EventHandler(),new C12EventHandler()).then(new C21EventHandler());
     disruptor.start();
 }
链式并行计算
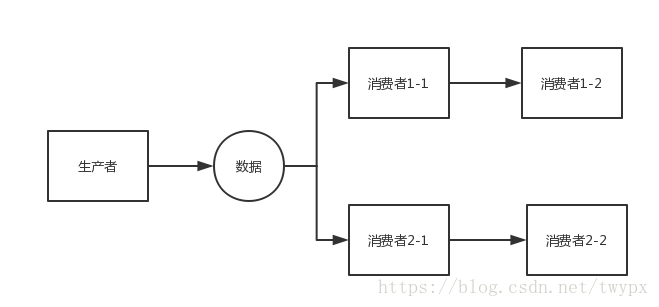
 public static void chain(Disruptor<LongEvent> disruptor){
     disruptor.handleEventsWith(new C11EventHandler()).then(new C12EventHandler());
     disruptor.handleEventsWith(new C21EventHandler()).then(new C22EventHandler());
     disruptor.start();
 }
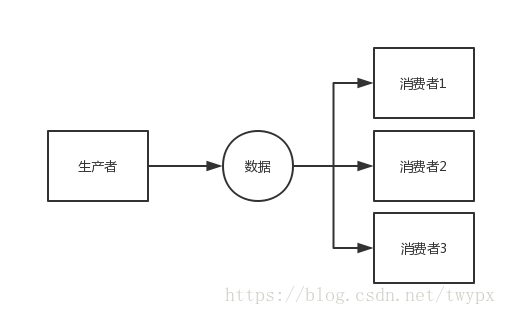
相互隔离模式
 public static void parallelWithPool(Disruptor<LongEvent> disruptor){
     disruptor.handleEventsWithWorkerPool(new C11EventHandler(),new C11EventHandler());
     disruptor.handleEventsWithWorkerPool(new C21EventHandler(),new C21EventHandler());
     disruptor.start();
 }
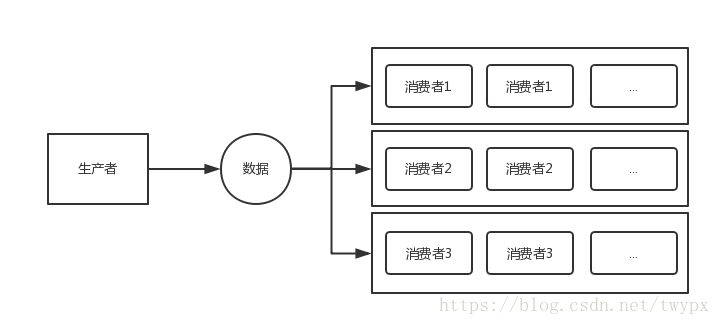
航道模式
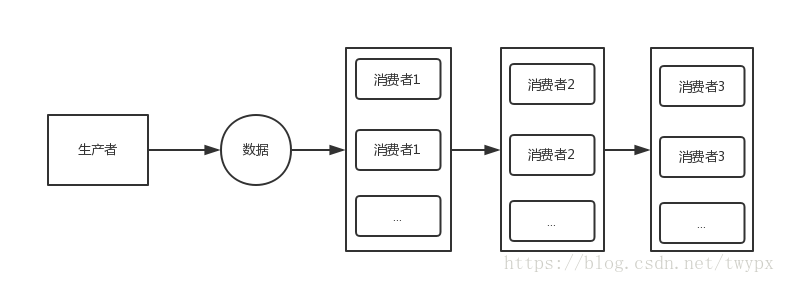
/**
  * 串行依次执行,同时C11,C21分别有2个实例
   * <br/>
   * p --> c11 --> c21
   * @param disruptor
   */
  public static void serialWithPool(Disruptor<LongEvent> disruptor){
      disruptor.handleEventsWithWorkerPool(new C11EventHandler(),new C11EventHandler()).then(new C21EventHandler(),new C21EventHandler());
      disruptor.start();
  }
回到◀疯狂创客圈▶
疯狂创客圈 - Java高并发研习社群,为大家开启大厂之门