Vue 引入 TypeScript
vue init airyland/vux2 projectName
增加开发包的依赖
npm install typescript ts-loader --save-dev
增加运行依赖包(安装vue的官方插件)
npm i vue-class-component vue-property-decorator --save
说明:
vue-class-component:强化 Vue 组件,使用 TypeScript/装饰器 增强 Vue 组件
vue-property-decorator:在 vue-class-component 上增强更多的结合 Vue 特性的装饰器
ts-loader:TypeScript 为 Webpack 提供了 ts-loader,其实就是为了让webpack识别 .ts .tsx文件
配置 webpack
首先找到./build/webpack.base.conf.js
1.找到entry.app 将main.js 改成 main.ts, 顺便把项目文件中的main.js也改成main.ts, 里面内容保持不变
如下所示
entry: {
  app: './src/main.ts'
}
2.找到resolve.extensions 里面加上.ts 后缀 (是为了之后引入.ts的时候不写后缀)
如下所示
resolve: {
    extensions: ['.js', '.vue', '.json', '.ts'],
    alias: {
      '@': resolve('src')
    }
}
3.找到module.rules 添加webpack对.ts的解析
module: {
  rules: [
    {
      test: /.(js|vue)$/,
      loader: 'eslint-loader',
      enforce: 'pre',
      include: [resolve('src'), resolve('test')],
      options: {
        formatter: require('eslint-friendly-formatter')
      }
    },
	// 从这里复制下面的代码就可以了
    {
      test: /.tsx?$/,
      loader: 'ts-loader',
      exclude: /node_modules/,
      options: {
        appendTsSuffixTo: [/.vue$/],
      }
    },
	// 复制以上的
  }
}
ts-loader 会检索当前目录下的 tsconfig.json 文件,根据里面定义的规则来解析.ts文件(就跟.babelrc的作用一样)
添加 tsconfig.json
接下来在根路径下创建tsconfig.json文件
这里有一份参考的 tsconfig.json 配置
{
  // 编译选项
  "compilerOptions": {
    // 输出目录
    "outDir": "./output",
    // 是否包含可以用于 debug 的 sourceMap
    "sourceMap": true,
    // 以严格模式解析
    "strict": true,
    // 采用的模块系统
    "module": "esnext",
    // 如何处理模块
    "moduleResolution": "node",
    // 编译输出目标 ES 版本
    "target": "es5",
    // 允许从没有设置默认导出的模块中默认导入
    "allowSyntheticDefaultImports": true,
    // 将每个文件作为单独的模块
    "isolatedModules": false,
    // 启用装饰器
    "experimentalDecorators": true,
    // 启用设计类型元数据(用于反射)
    "emitDecoratorMetadata": true,
    // 在表达式和声明上有隐含的any类型时报错
    "noImplicitAny": false,
    // 不是函数的所有返回路径都有返回值时报错。
    "noImplicitReturns": true,
    // 从 tslib 导入外部帮助库: 比如__extends,__rest等
    "importHelpers": true,
    // 编译过程中打印文件名
    "listFiles": true,
    // 移除注释
    "removeComments": true,
    "suppressImplicitAnyIndexErrors": true,
    // 允许编译javascript文件
    "allowJs": true,
    // 解析非相对模块名的基准目录
    "baseUrl": "./",
    // 指定特殊模块的路径
    "paths": {
      "jquery": [
        "node_modules/jquery/dist/jquery"
      ]
    },
    // 编译过程中需要引入的库文件的列表
    "lib": [
      "dom",
      "es2015",
      "es2015.promise"
    ]
  }
}
顺便贴一份自己的配置
{
  "include": [
    "src/**/*"
  ],
  "exclude": [
    "node_modules"
  ],
  "compilerOptions": {
    "allowSyntheticDefaultImports": true,
    "experimentalDecorators": true,
    "allowJs": true,
    "module": "esnext",
    "target": "es5",
    "moduleResolution": "node",
    "isolatedModules": true,
    "lib": [
      "dom",
      "es5",
      "es2015.promise"
    ],
    "sourceMap": true,
    "pretty": true
  }
}
让 ts 识别 .vue
由于 TypeScript 默认并不支持 *.vue 后缀的文件,所以在 vue 项目中引入的时候需要创建一个 vue-shim.d.ts 文件,放在项目项目对应使用目录下,例如 src/vue-shim.d.ts
declare module "*.vue" {
  import Vue from "vue";
  export default Vue;
}
意思是告诉 TypeScript *.vue 后缀的文件可以交给 vue 模块来处理。
而在代码中导入 *.vue 文件的时候,需要写上 .vue 后缀。原因还是因为 TypeScript 默认只识别 *.ts 文件,不识别 *.vue 文件:
import Component from 'components/component.vue'
改造 .vue 文件
在这之前先让我们了解一下所需要的插件(下面的内容需要掌握es7的装饰器, 就是下面使用的@符号)
vue-class-component
vue-class-component 对 Vue 组件进行了一层封装,让 Vue 组件语法在结合了 TypeScript 语法之后更加扁平化:
<template>
  <div>
    <input v-model="msg">
    <p>msg: {{ msg }}</p>
    <p>computed msg: {{ computedMsg }}</p>
    <button @click="greet">Greet</button>
  </div>
</template>

<script lang="ts">
  import Vue from 'vue'
  import Component from 'vue-class-component'

  @Component
  export default class App extends Vue {
    // 初始化数据
    msg = 123

    // 声明周期钩子
    mounted () {
      this.greet()
    }

    // 计算属性
    get computedMsg () {
      return 'computed ' + this.msg
    }

    // 方法
    greet () {
      alert('greeting: ' + this.msg)
    }
  }
</script>
上面的代码跟下面的代码作用是一样的
export default {
  data () {
    return {
      msg: 123
    }
  }

  // 声明周期钩子
  mounted () {
    this.greet()
  }

  // 计算属性
  computed: {
    computedMsg () {
      return 'computed ' + this.msg
    }
  }

  // 方法
  methods: {
    greet () {
      alert('greeting: ' + this.msg)
    }
  }
}
vue-property-decorator
vue-property-decorator 是在 vue-class-component 上增强了更多的结合 Vue 特性的装饰器,新增了这 7 个装饰器:
@Emit@Inject@Model@Prop@Provide@Watch@Component(从vue-class-component继承)
在这里列举几个常用的@Prop/@Watch/@Component, 更多信息,详见官方文档
import { Component, Emit, Inject, Model, Prop, Provide, Vue, Watch } from 'vue-property-decorator'

const s = Symbol('baz')

@Component
export class MyComponent extends Vue {

  @Emit()
  addToCount(n: number){ this.count += n }

  @Emit('reset')
  resetCount(){ this.count = 0 }

  @Inject() foo: string
  @Inject('bar') bar: string
  @Inject(s) baz: string

  @Model('change') checked: boolean

  @Prop()
  propA: number

  @Prop({ default: 'default value' })
  propB: string

  @Prop([String, Boolean])
  propC: string | boolean

  @Provide() foo = 'foo'
  @Provide('bar') baz = 'bar'

  @Watch('child')
  onChildChanged(val: string, oldVal: string) { }

  @Watch('person', { immediate: true, deep: true })
  onPersonChanged(val: Person, oldVal: Person) { }
}
上面的代码相当于:
const s = Symbol('baz')

export const MyComponent = Vue.extend({
  name: 'MyComponent',
  inject: {
    foo: 'foo',
    bar: 'bar',
    [s]: s
  },
  model: {
    prop: 'checked',
    event: 'change'
  },
  props: {
    checked: Boolean,
    propA: Number,
    propB: {
      type: String,
      default: 'default value'
    },
    propC: [String, Boolean],
  },
  data () {
    return {
      foo: 'foo',
      baz: 'bar'
    }
  },
  provide () {
    return {
      foo: this.foo,
      bar: this.baz
    }
  },
  methods: {
    addToCount(n){
      this.count += n
      this.$emit("add-to-count", n)
    },
    resetCount(){
      this.count = 0
      this.$emit("reset")
    },
    onChildChanged(val, oldVal) { },
    onPersonChanged(val, oldVal) { }
  },
  watch: {
    'child': {
      handler: 'onChildChanged',
      immediate: false,
      deep: false
    },
    'person': {
      handler: 'onPersonChanged',
      immediate: true,
      deep: true
    }
  }
})
开始修改App.vue文件
- 在
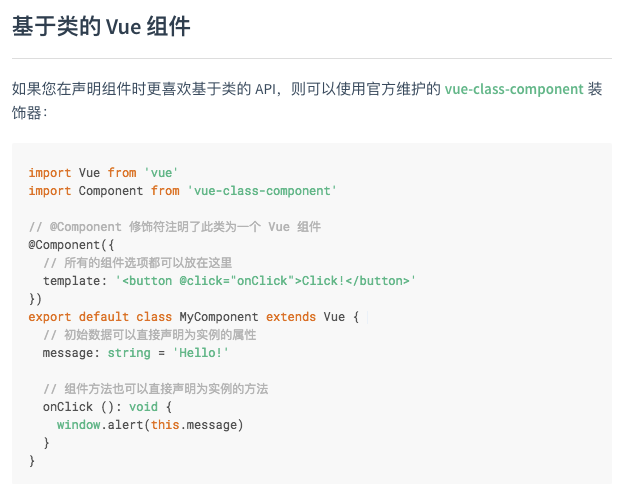
script标签上加上lang="ts", 意思是让webpack将这段代码识别为typescript而非javascript - 修改vue组件的构造方式( 跟
react组件写法有点类似, 详见官方 ), 如下图 - 用
vue-property-decorator语法改造之前代码
当然也可以直接复制下面的代码替换就可以了
<template>
  <div id="app">
    <img src="./assets/logo.png">
    <router-view/>
  </div>
</template>

<script lang="ts">
import Vue from 'vue'
import Component from 'vue-class-component'

@Component({})
export default class App extends Vue {
}
</script>

<style>
#app {
  font-family: 'Avenir', Helvetica, Arial, sans-serif;
  -webkit-font-smoothing: antialiased;
  -moz-osx-font-smoothing: grayscale;
  text-align: center;
  color: #2c3e50;
  margin-top: 60px;
}

</style>
接下来用相同的方式修改HelloWorld.vue即可
npm run dev
这个时候运行项目就应该能正常跑起来了
到这里我们的配置就已经结束了