1.Job组成部分
Job 其实是由 3 个部分组成:
JobDetail: 用于描述这个Job是做什么的
实现Job的类: 具体干活的
JobDataMap: 给 Job 提供参数用的
JobDataMap 除了usingJobData 方式之外,还可以是其他方式

2.Job并发
默认的情况下,无论上一次任务是否结束或者完成,只要规定的时间到了,那么下一次就开始。
有时候会做长时间的任务,比如数据库备份,这个时候就希望上一次备份成功结束之后,才开始下一次备份,即便是规定时间到了,也不能开始,因为这样很有可能造成 数据库被锁死 (几个线程同时备份数据库,引发无法预计的混乱)。
那么在这种情况下,给数据库备份任务增加一个注解就好了:
@DisallowConcurrentExecution

3.Job 异常
任务里发生异常是很常见的。 异常处理办法通常是两种:
1. 当异常发生,那么就通知所有管理这个 Job 的调度,停止运行它
2. 当异常发生,修改一下参数,马上重新运行
public class ExceptionJob1 implements Job {
    @Override
    public void execute(JobExecutionContext jobExecutionContext) throws JobExecutionException {
        int i = 0;
        try {
            //故意发生异常
            System.out.println(100/i);
        } catch (Exception e) {
            System.out.println("发生了异常,取消这个Job 对应的所有调度");
            JobExecutionException je =new JobExecutionException(e);
            je.setUnscheduleAllTriggers(true);
            throw je;
        }
    }

}
public class ExceptionJob2 implements Job {
    static int i = 0;
    @Override
    public void execute(JobExecutionContext jobExecutionContext) throws JobExecutionException {
        try {
            //故意发生异常
            System.out.println("运算结果"+100/i);
        } catch (Exception e) {
            System.out.println("发生了异常,修改一下参数,立即重新执行");
            i = 1;
            JobExecutionException je =new JobExecutionException(e);
            je.setRefireImmediately(true);      //立即重新执行作业
            throw je;
        }
    }
}
public class ExceptionTest {
    public static void main(String[] args) throws Exception{
        exceptionHandle1();
        exceptionHandle2();
    }
    private static void exceptionHandle1() throws Exception {
        Scheduler scheduler = StdSchedulerFactory.getDefaultScheduler();

        Trigger trigger = newTrigger().withIdentity("trigger1", "group1")
                .startNow()
                .withSchedule(simpleSchedule()
                        .withIntervalInSeconds(2)
                        .withRepeatCount(10))
                .build();

        //定义一个JobDetail
        JobDetail job = newJob(ExceptionJob1.class)
                .withIdentity("exceptionJob1", "someJobGroup")
                .build();

        //调度加入这个job
        scheduler.scheduleJob(job, trigger);

        //启动
        scheduler.start();

        //等待20秒,让前面的任务都执行完了之后,再关闭调度器
        Thread.sleep(20000);
        scheduler.shutdown(true);
    }

    private static void exceptionHandle2() throws Exception {
        Scheduler scheduler = StdSchedulerFactory.getDefaultScheduler();

        Trigger trigger = newTrigger().withIdentity("trigger1", "group1")
                .startNow()
                .withSchedule(simpleSchedule()
                        .withIntervalInSeconds(2)
                        .withRepeatCount(10))
                .build();

        //定义一个JobDetail
        JobDetail job = newJob(ExceptionJob2.class)
                .withIdentity("exceptionJob1", "someJobGroup")
                .build();

        //调度加入这个job
        scheduler.scheduleJob(job, trigger);

        //启动
        scheduler.start();

        //等待20秒,让前面的任务都执行完了之后,再关闭调度器
        Thread.sleep(20000);
        scheduler.shutdown(true);
    }
}

4.中断 Job
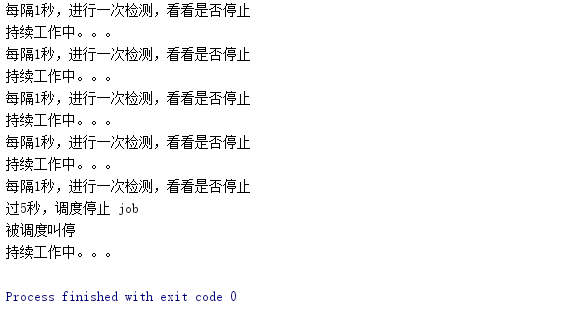
在业务上,有时候需要中断任务,那么这个Job需要实现 InterruptableJob 接口,然后就方便中断了
public class StoppableJob implements InterruptableJob {

    private boolean stop = false;

    @Override
    public void interrupt() throws UnableToInterruptJobException {
        System.out.println("被调度叫停");
        stop = true;
    }

    @Override
    public void execute(JobExecutionContext jobExecutionContext) throws JobExecutionException {
        while(true){

            if(stop)
                break;
            try {
                System.out.println("每隔1秒,进行一次检测,看看是否停止");
                Thread.sleep(1000);
            } catch (InterruptedException e) {
                // TODO Auto-generated catch block
                e.printStackTrace();
            }
            System.out.println("持续工作中。。。");
        }
    }

}
测试
public class Stop {
    public static void main(String[] args) throws Exception{

        Scheduler scheduler = StdSchedulerFactory.getDefaultScheduler();

        Trigger trigger = newTrigger().withIdentity("trigger1", "group1")
                .startNow()
                .build();

        //定义一个JobDetail
        JobDetail job = newJob(StoppableJob.class)
                .withIdentity("exceptionJob1", "someJobGroup")
                .build();

        //调度加入这个job
        scheduler.scheduleJob(job, trigger);

        //启动
        scheduler.start();

        Thread.sleep(5000);
        System.out.println("过5秒,调度停止 job");

        //key 就相当于这个Job的主键
        scheduler.interrupt(job.getKey());

        //等待20秒,让前面的任务都执行完了之后,再关闭调度器
        Thread.sleep(20000);
        scheduler.shutdown(true);
    }
}
