Wp8对原来的WP7做了大量的优化...其中一个就包括Protocol Association,也就是通过uri来打开另外一个程序,这也就是说,我们可以做一个程序来启动另外一个程序了,如微信,QQ之类的,当然必须要有一个前提,也就是要被启动的程序必须注册一个URI关联。
我们可以通过一个实例来说明.首先给程序注册下URI关联。

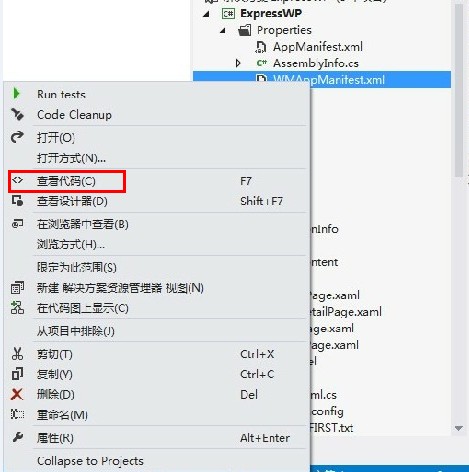
选择WMAppManifest.xml点击查看代码,在Tokens后面添加Extensions属性。
    <Extensions>
      <Protocol Name="expressforwp" NavUriFragment="encodedLaunchUri=%s" TaskID="_default" />
    </Extensions>
这时候我们就注册成功了一个Protocol,完整的代码如下。
<?xml version="1.0" encoding="utf-8"?>
<Deployment xmlns="http://schemas.microsoft.com/windowsphone/2012/deployment" AppPlatformVersion="8.0">
  <DefaultLanguage xmlns="" code="zh-CN" />
  <App xmlns="" ProductID="{1eb6ffbc-41f5-4ea7-898c-206161851360}" Title="快递" RuntimeType="Silverlight" Version="1.0.0.0" Genre="apps.normal" Author="Simon Chen" Description="快递" Publisher="Simon Chen" PublisherID="{2185411b-82c2-4959-a78d-788fdefaf757}">

    <IconPath IsRelative="true" IsResource="false">Assets\ApplicationIcon.png</IconPath>
    <Capabilities>
      <Capability Name="ID_CAP_PUSH_NOTIFICATION" />
      <Capability Name="ID_CAP_SENSORS" />
      <Capability Name="ID_CAP_WEBBROWSERCOMPONENT" />
      <Capability Name="ID_CAP_NETWORKING" />
      <Capability Name="ID_CAP_IDENTITY_DEVICE" />
      <Capability Name="ID_CAP_IDENTITY_USER" />
      <Capability Name="ID_CAP_ISV_CAMERA" />
    </Capabilities>
    <Tasks>
      <DefaultTask Name="_default" NavigationPage="View/MainPage.xaml" />
      <ExtendedTask Name="BackgroundTask">
        <BackgroundServiceAgent Specifier="ScheduledTaskAgent" Name="ExpressWP.Background" Source="ExpressWP.Background" Type="ExpressWP.Background.ScheduledAgent" />
      </ExtendedTask>
    </Tasks>
    <Tokens>
      <PrimaryToken TokenID="ExpressWPToken" TaskName="_default">
        <TemplateFlip>
          <SmallImageURI IsResource="false" IsRelative="true">Assets\Tiles\FlipCycleTileSmall.png</SmallImageURI>
          <Count>0</Count>
          <BackgroundImageURI IsResource="false" IsRelative="true">Assets\Tiles\FlipCycleTileMedium.png</BackgroundImageURI>
          <Title>快递</Title>
          <BackContent>
          </BackContent>
          <BackBackgroundImageURI>
          </BackBackgroundImageURI>
          <BackTitle>
          </BackTitle>
          <LargeBackgroundImageURI IsRelative="true" IsResource="false">Assets\Tiles\FlipCycleTileLarge.png</LargeBackgroundImageURI>
          <LargeBackContent />
          <LargeBackBackgroundImageURI IsRelative="true" IsResource="false">
          </LargeBackBackgroundImageURI>
          <DeviceLockImageURI>
          </DeviceLockImageURI>
          <HasLarge>True</HasLarge>
        </TemplateFlip>
      </PrimaryToken>
    </Tokens>
    <Extensions>
      <Protocol Name="expressforwp" NavUriFragment="encodedLaunchUri=%s" TaskID="_default" />
    </Extensions>

    <ScreenResolutions>
      <ScreenResolution Name="ID_RESOLUTION_WVGA" />
      <ScreenResolution Name="ID_RESOLUTION_WXGA" />
      <ScreenResolution Name="ID_RESOLUTION_HD720P" />
    </ScreenResolutions>
  </App>
</Deployment>
这时候我们可以在后台添加一个处理Uri的类AssociationUriMapper,代码如下
 class AssociationUriMapper : UriMapperBase
    {
        private string tempUri;

        public override Uri MapUri(Uri uri)
        {
            tempUri = uri.ToString();

            if (tempUri.Contains("expressforwp"))
            {

                int tempIndex = tempUri.IndexOf("expressforwp") + 15;
                string id = tempUri.Substring(tempIndex);

                return new Uri("/View/MainPage.xaml?Code=" + id, UriKind.Relative);
            }
            return uri;

        }
    }
再在App.xaml中应用这个Uri处理
RootFrame.UriMapper = new AssociationUriMapper();
好了,这样就成功注册了这个UriMapper,这时候我们可以在Mainpage的OnNavigatedTo事件中来处理请求,具体代码如下。
      protected override void OnNavigatedTo(System.Windows.Navigation.NavigationEventArgs e)
        {
base.OnNavigatedTo(e);

            if (NavigationContext.QueryString.ContainsKey("Code"))
            {
                var code = NavigationContext.QueryString["Code"];

            }
        }
好了,这样就大功告成了,我们现在可以做一个新的app来启动它,只要添加下列代码即可
Windows.System.Launcher.LaunchUriAsync(new Uri("expressforwp:main"));
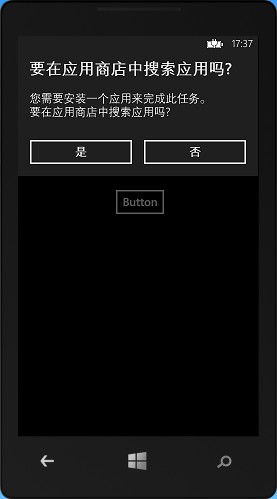
如果要启动的app没有被安装会提示去市场搜索,如下图

注册protocol association总的来说还是比较简单的,但是大家要注意下面几点:
protocol的名称:自定义的 URI 方案的前缀。包含数字、小写字母、句点 (‘.’) 或连字符 (‘-’) 且长度介于 2 和 39 个字符的字符
NavUriFragment:必须始终等于 encodedLaunchUri=%s
TaskID:必须始终等于 _default