kvm虚拟化


安装kvm管理工具
安装:
yum install libvirt virt-install qemu-kvm -y
介绍:
libvirt服务:管理kvm虚拟机的生命周期
virt-install工具:创建安装虚拟机
qemu-kvm工具:使用qemu-img为虚拟机提供硬盘
安装kvm虚拟机准备条件
在window上安装TightVNC
tightvnc官网:http://www.tightvnc.com
vnc是一个跨平台的远程桌面软件,待会安装kvm虚拟机系统的时候使用
启动libvirtd服务
systemctl start libvirtd.service
systemctl status libvirtd.service
安装kvm虚拟机
建议虚拟机内存不要低于1024M,否则安装系统特别慢!
virt-install --virt-type kvm --os-type=linux --os-variant rhel7 --name centos7 --memory 1024
--vcpus 1 --disk /opt/centos2.raw,format=raw,size=10 --cdrom /opt/CentOS-7-x86_64-DVD-1708.iso
--network network=default --graphics vnc,listen=0.0.0.0 --noautoconsole

执行添加虚拟机后马上用tightvnc 连接到虚拟机进行系统安装 10.0.0.11:5900默认端口 5900

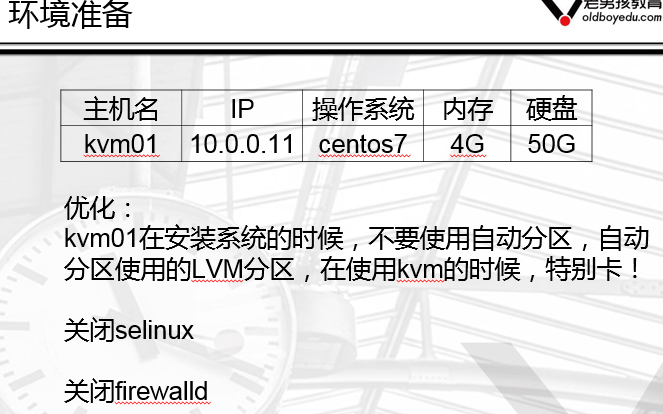
环境准备

查看虚拟机列表
virsh list 运行的列表
virsh list --all 所有的虚拟机列表
启动虚拟机
virsh start centos7 虚拟机名字centos7
关闭虚拟机
virsh shutdown centos7
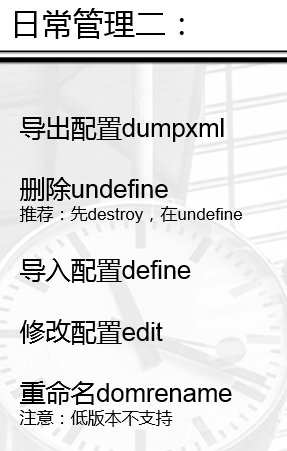
备份配置文件
virsh dumpxml centos7 >centos7.xml 重定向到文件保存
删除虚拟机
virsh undefine centos7
恢复虚拟机
virsh define centos7.xml
当磁盘名字或路径改变时 不能正常启动虚拟机,需要修改配置文件 使用新的路径
不推荐使用vim修改 它不带语法提示,推荐使用自带的编辑命令
virsh edit centos7
搜索磁盘配置 修改 /disk
更改虚拟机名字
virsh domrename centos7 web01

挂起虚拟机
virsh suspend web01

恢复挂起状态
virsh resume web01
查询虚拟机vnc端口号
virsh vncdisplay web01
返回的是 :0 它是从5900一直递增的 也可以使用10.0.0.11:0 进行连接
开机启动虚拟机
virsh autostart web01
需要保证libvirtd服务是开机启动的
取消开机启动
virsh autostart --disable web01
kvm虚拟机console登陆

在centos7的kvm虚拟机中执行:
grubby --update-kernel=ALL --args="console=ttyS0,115200n8"
reboot重启生效
验证宿主机连接虚拟机
virsh console web01 按回车 回到宿主机 Ctrl+] 中括号
思考
centos6的虚拟机如何实现console连接呢?
kvm虚拟磁盘格式转换和快照管理
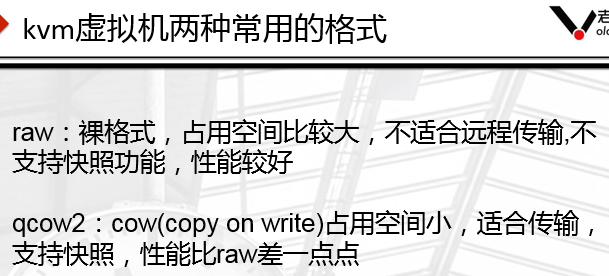
qemu-img的常用命令
创建虚拟磁盘
qemu-img create test.raw 10G
qemu-img create -f qcow2 test.qcow2 10G
查看虚拟磁盘信息
qemu-img info test.raw
调整虚拟磁盘容量大小
qemu-img resize test.raw +5G
磁盘格式转换
qemu-img convert -f raw -O qcow2 test.raw oldboy.qcow2

快照管理
创建快照
virsh snapshot-create centos7
查看快照
virsh snapshot-list centos7
还原快照
virsh snapshot-revert centos7 --snapshotname 1516574134
删除快照
virsh snapshot-delete centos7 --snapshotname 1516636570
kvm虚拟机的克隆
完整克隆
实现方法:
virt-clone -o web01 --auto-clone
链接克隆
实现方法:
shell脚本
克隆的步骤:
1:克隆虚拟磁盘文件
cp centos7.qcow2 web03.qcow2
2:生成新的虚拟机配置文件
name修改
uuid删掉
disk路径/opt/web03.qcow2
mac地址删除
3:测试启动
virsh define web01.xml
链接克隆实战
qemu-img create -f qcow2 -b cetnos7.qcow2 web04.qcow2
virt-install --virt-type kvm --os-type=linux --os-variant rhel7 --name web02
--memory 1024 --vcpus 1 --disk /opt/web04.qcow2,format=qcow2,size=10
--boot hd --network network=default --graphics vnc,listen=0.0.0.0 --noautoconsole
kvm虚拟机的桥接网络

创建桥接网络
1:virsh iface-bridge eth0 br0
基于桥接网络创建虚拟机
2:virt-install --virt-type kvm --os-type=linux --os-variant rhel7 --name web04
--memory 1024 --vcpus 1 --disk /opt/web04.qcow2,format=qcow2,size=10 --boot hd
--network bridge=br0 --graphics vnc,listen=0.0.0.0 --noautoconsole
将已有的虚机修改为桥接网络
1:virsh edit centos7
<interface type='bridge'>
<mac address='52:54:00:55:aa:fa'/>
<source bridge='br0’/>
2:修改虚拟机ip地址
/etc/sysconfig/network-scripts/ifcfg-eth0


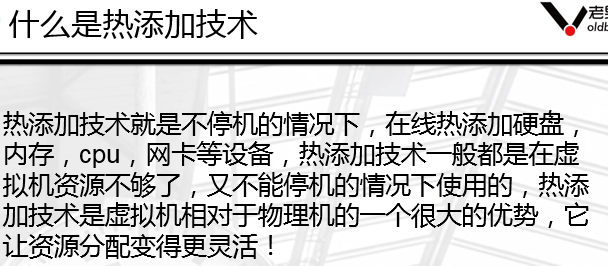
kvm虚拟机的热添加技术
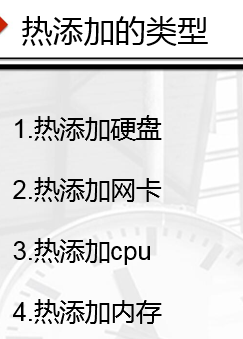
热添加硬盘
创建硬盘
qemu-img create -f qcow2 centos7-add01.qcow2 5G
热添加硬盘
virsh attach-disk web01 /opt/centos7-add01.qcow2 vdb --live --cache=none --subdriver=qcow2
添加网卡
virsh attach-interface web04 --type bridge --model virtio --source br0
热添加cpu
安装参数:
virt-install --virt-type kvm --os-type=linux --os-variant rhel7 --name web04
--memory 1024 --vcpus 1,maxvcpus=4 --disk /opt/web04.qcow2,format=qcow2,size=10
--boot hd --network bridge=br0 --graphics vnc,listen=0.0.0.0 --noautoconsole
热添加cpu
virsh setvcpus web04 --count=2
热添加内存
安装参数
virt-install --virt-type kvm --os-type=linux --os-variant rhel7 --name web04
--memory 512,maxmemory=2048 --vcpus=1,maxvcpus=2
--disk /opt/web04.qcow2,format=qcow2,size=10 --boot hd --network bridge=br0
--graphics vnc,listen=0.0.0.0 --noautoconsole
热添加内存
virsh setmem web04 1G
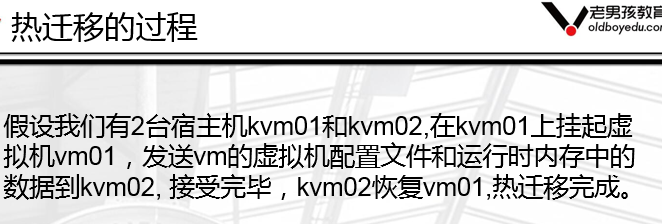
kvm虚拟机的热迁移