基础控件
Android的控件和控件样式非常特别,它是一种内联特别高的设计模式,换句话说,它是非常烂的设计。。。。
但在这种特别的关系里还是有一定的规律的,下面我们一起来看看控件的使用方式。
首先我们定义一个ImageButton,如下:
<ImageButton
    android:src="@drawable/toolbar_upload_photo_normal"
    android:layout_gravity="right|center_vertical"
    android:layout_width="wrap_content"
    android:layout_height="wrap_content"
    android:background="@drawable/btn_weight" />
重点,我们来看这句,background="@drawable/btn_weight;背景色指向了一个资源,为什么用说指向的是个资源呢?因为btn_weight并不是个图片,而是个XML文件。。。。如下图:如上代码所示,我们定义了ImageButton,并且设置了他的Src地址,该地址指向了一个图片。

那么我们看看btn_weight到底是什么把。
<?xml version="1.0" encoding="UTF-8"?>
<selector  xmlns:android="http://schemas.android.com/apk/res/android">
    <item android:state_window_focused="false" android:state_enabled="true" android:drawable="@drawable/btn_weight_normal" />
    <item android:state_enabled="false" android:drawable="@drawable/btn_weight_disable" />
    <item android:state_pressed="true" android:drawable="@drawable/btn_weight_press" />
    <item android:state_focused="true" android:drawable="@drawable/btn_weight_press" />
    <item android:drawable="@drawable/btn_weight_normal" />
</selector>
没错,这种设置方法,确实很绕,按钮按下的事件和背景样式混在了一起设置,但在Android里,我们只能去适应它。如上述代码所示,btn_weight里设置了按钮按下时和常规时的背景色。
----------------------------------------------------------------------------------------------------
好了,现在基础控件写完了,有没有感觉自己从现代化城市回到了农耕社会。。。。
相信我,用Xamarin开发,你在农耕社会还有个犁耙,用AS开发,你会发现你只能用手挖。。。。
GridView
首先,Android的GridView是我见过最奇葩的列表使用方式。。。
然后,我们开始学习使用它把。
先找到GridView控件,代码如下:
GridView my_grid = this.FindControl<GridView>("my_grid");

IListAdapter adapter = new GridAdapter(this, this.Resources);my_grid.Adapter = adapter;//配置适配器
接着,我们定义一个适配器,并把他赋值给GridView的的Adapter属性,代码如下:
嗯,这里看上去代码还算简洁,但接下来就不一样了,让我们来看看这个奇葩的适配器吧。
首先,我们看下适配器代码:
public class GridAdapter : BaseAdapter
    {
        private DisplayMetrics localDisplayMetrics;
        private LayoutInflater inflater;
        private Resources resources;
        public GridAdapter(Context context)
        {
            resources = context.Resources;
            localDisplayMetrics = resources.DisplayMetrics;
            inflater = LayoutInflater.From(context);
        }
        public override int Count => 9;
        public override Object GetItem(int position)
        {
            return null;
        }
        public override long GetItemId(int position)
        {
            return position;
        }
        public override View GetView(int paramInt, View paramView, ViewGroup paramViewGroup)
        {
            paramView = inflater.Inflate(Resource.Layout.activity_label_item, null);
            TextView text = (TextView)paramView.FindViewById(Resource.Id.activity_name);
            switch (paramInt)
            {
                case 0:
                    {
                        text.Text = "local";
                        Drawable draw = this.resources.GetDrawable(Resource.Drawable.home_button_local);
                        draw.SetBounds(0, 0, draw.IntrinsicWidth, draw.IntrinsicHeight);
                        text.SetCompoundDrawables(null, draw, null, null);
                        break;
                    }
                case 1:
                    {
                        text.Text = "search";
                        Drawable draw = this.resources.GetDrawable(Resource.Drawable.home_button_search);
                        draw.SetBounds(0, 0, draw.IntrinsicWidth, draw.IntrinsicHeight);
                        text.SetCompoundDrawables(null, draw, null, null);
                        break;
                    }
                case 2:
                    {
                        text.Text = "checkin";
                        Drawable draw = this.resources.GetDrawable(Resource.Drawable.home_button_checkin);
                        draw.SetBounds(0, 0, draw.IntrinsicWidth, draw.IntrinsicHeight);
                        text.SetCompoundDrawables(null, draw, null, null);
                        break;
                    }
                case 3:
                    {
                        text.Text = "promo";
                        Drawable draw = this.resources.GetDrawable(Resource.Drawable.home_button_promo);
                        draw.SetBounds(0, 0, draw.IntrinsicWidth, draw.IntrinsicHeight);
                        text.SetCompoundDrawables(null, draw, null, null);
                        break;
                    }
                case 4:
                    {
                        text.Text = "tuan";
                        Drawable draw = this.resources.GetDrawable(Resource.Drawable.home_button_tuan);
                        draw.SetBounds(0, 0, draw.IntrinsicWidth, draw.IntrinsicHeight);
                        text.SetCompoundDrawables(null, draw, null, null);
                        break;
                    }

                case 5:
                    {
                        text.Text = "rank";
                        Drawable draw = this.resources.GetDrawable(Resource.Drawable.home_button_rank);
                        draw.SetBounds(0, 0, draw.IntrinsicWidth, draw.IntrinsicHeight);
                        text.SetCompoundDrawables(null, draw, null, null);
                        break;
                    }
                case 6:
                    {
                        text.Text = "history";
                        Drawable draw = this.resources.GetDrawable(Resource.Drawable.home_button_history);
                        draw.SetBounds(0, 0, draw.IntrinsicWidth, draw.IntrinsicHeight);
                        text.SetCompoundDrawables(null, draw, null, null);
                        break;
                    }
                case 7:
                    {
                        text.Text = "myzone";
                        Drawable draw = this.resources.GetDrawable(Resource.Drawable.home_button_myzone);
                        draw.SetBounds(0, 0, draw.IntrinsicWidth, draw.IntrinsicHeight);
                        text.SetCompoundDrawables(null, draw, null, null);
                        break;
                    }
                case 8:
                    {
                        text.Text = "more";
                        Drawable draw = this.resources.GetDrawable(Resource.Drawable.home_button_more);
                        draw.SetBounds(0, 0, draw.IntrinsicWidth, draw.IntrinsicHeight);
                        text.SetCompoundDrawables(null, draw, null, null);
                        break;
                    }
            }
            paramView.SetMinimumHeight((int)(96.0F * localDisplayMetrics.Density));
            paramView.SetMinimumWidth(((-12 + localDisplayMetrics.WidthPixels) / 3));
            return paramView;
        }
    }
然后我们通过LayoutInflater(布局填充类),将xml布局文件实例化为它对应的View对象,以供后续使用。代码如上所示,适配器的构造函数接受了一个参数,是适配器所属Activity,主要用于在适配器里调用Activy的信息。
然后我们重写BaseAdapter类的一些属性和方法。
其中重写的Count属性需要特别注意,他代表我们列表的显示数,他是需要赋值的。这里的事例为其定义了一个常数9。
接下来我们重点看下GetView方法。
GetView这个方法干了很多事,作为C#开发者,从字面上是很难理解它是干什么的;不过我们可以联想思考,我们暂时把他理解为行的导入事件,这样就很形象了吧。
因为,至于为什么会叫GetView,我想,大概是因为他即干了行绑定数据的事,又干了行视图布局的事,所以没有更合适的命名,才这么叫的吧。
这也是为什么我感觉他奇葩的原因,因为在之前的Activity和布局中已经混淆了视图和数据,然后,在控件里,我们又一次把数据和布局搅和在了一起。。。。
下面我们看看它是如何混淆,不,他是如何工作的吧。
首先,在行导入的GetView中,我们找到要填充的布局XML——activity_label_item.xml。
paramView = inflater.Inflate(Resource.Layout.activity_label_item, null);
然后,我们通过paramInt来判断当前行,正常情况,在这里找到Activity的数据集合,找到集合的对应行赋值即可了。接着,我们找这个行布局内的控件,然后为他赋值,这里activity_label_item.xml很简单,只有一个Textview,也就是说,这里我们需要做的就是给他赋值。
Demo里我们做了一下特殊处理,我们为行视图添加了图片。
运行结果如下图:
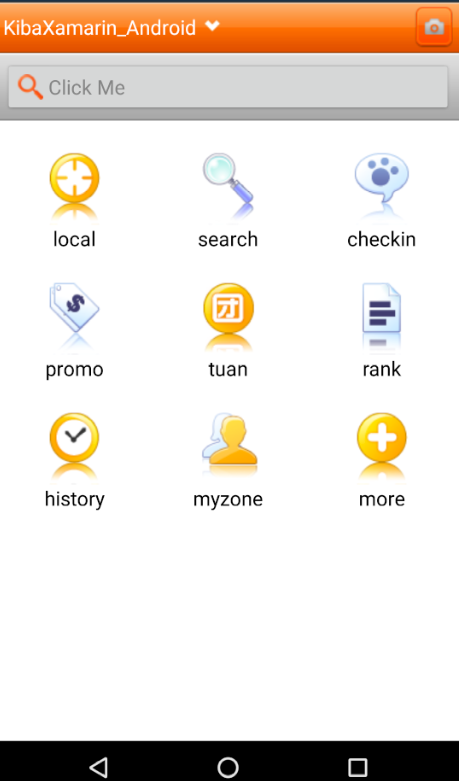
如图所示,列表已经创建完成了。
下面我们为列表添加点击事件;代码如下:
my_grid.ItemClick += (s, e) =>
{
    this.ShowToast("Click Me" + e.Id);
};
代码很简单,也很简洁,实现效果如下:
如上图所示,我们成功的实现了点击事件。
到此,控件的基础应用就讲完了,下一篇继续讲解Android软件的部署。
----------------------------------------------------------------------------------------------------
相关文章:
C#-Xamarin的Android项目开发(一)——创建项目
代码已经传到Github上了,欢迎大家下载。
Github地址:https://github.com/kiba518/KibaXamarin_Android
----------------------------------------------------------------------------------------------------
原文连接:https://www.cnblogs.com/kiba/
欢迎添加个人微信号:Like若所思。
欢迎关注我的公众号,不仅为你推荐最新的博文,还有更多惊喜和资源在等着你!一起学习共同进步!
