jta:Java Transaction API,即是java中对事务处理的api 即 api即是接口的意思
atomikos:Atomikos TransactionsEssentials 是一个为Java平台提供增值服务的并且开源类事务管理器
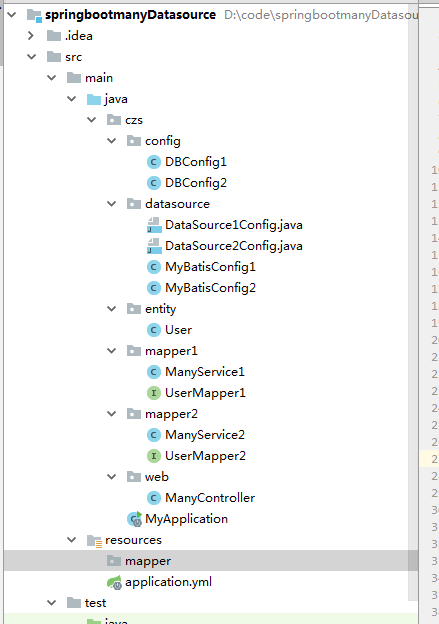
1.结构
2.pom依赖
我这里使用本地数据库是mysql8,
    <parent>
        <groupId>org.springframework.boot</groupId>
        <artifactId>spring-boot-starter-parent</artifactId>
        <!--<version>2.0.0.RELEASE</version>-->
        <version>2.1.0.RELEASE</version>
        <relativePath/> <!-- lookup parent from repository -->
    </parent>

    <properties>
        <project.build.sourceEncoding>UTF-8</project.build.sourceEncoding>
        <project.reporting.outputEncoding>UTF-8</project.reporting.outputEncoding>
        <java.version>1.8</java.version>
    </properties>

    <dependencies>
        <dependency>
            <groupId>org.springframework.boot</groupId>
            <artifactId>spring-boot-starter-jdbc</artifactId>
        </dependency>
        <dependency>
            <groupId>org.springframework.boot</groupId>
            <artifactId>spring-boot-starter-web</artifactId>
        </dependency>
        <!-- https://mvnrepository.com/artifact/org.mybatis.spring.boot/mybatis-spring-boot-starter -->
        <dependency>
            <groupId>org.mybatis.spring.boot</groupId>
            <artifactId>mybatis-spring-boot-starter</artifactId>
            <version>1.3.0</version><!-- 1.3.0以上的版本没有@MapperScan以及@Select注解 -->
        </dependency>
        <!-- automatic+jta的分布式事务管理 -->
        <!-- https://mvnrepository.com/artifact/org.springframework.boot/spring-boot-starter-jta-atomikos -->
        <dependency>
            <groupId>org.springframework.boot</groupId>
            <artifactId>spring-boot-starter-jta-atomikos</artifactId>
        </dependency>

        <dependency>
            <groupId>org.springframework.boot</groupId>
            <artifactId>spring-boot-devtools</artifactId>
            <scope>runtime</scope>
        </dependency>
        <dependency>
            <groupId>mysql</groupId>
            <artifactId>mysql-connector-java</artifactId>
            <!--boot 2.1默认 mysql8的版本; boot 2.0默认mysql5版本-->
            <version>8.0.13</version>
            <!--<version>5.1.46</version>-->
            <!--<scope>runtime</scope>-->
        </dependency>

        <dependency>
            <groupId>org.projectlombok</groupId>
            <artifactId>lombok</artifactId>
            <optional>true</optional>
            <version>1.18.2</version>
        </dependency>
        <dependency>
            <groupId>org.springframework.boot</groupId>
            <artifactId>spring-boot-starter-test</artifactId>
            <scope>test</scope>
        </dependency>
        <dependency>
            <groupId>org.springframework.boot</groupId>
            <artifactId>spring-boot-configuration-processor</artifactId>
            <optional>true</optional>
        </dependency>

    </dependencies>
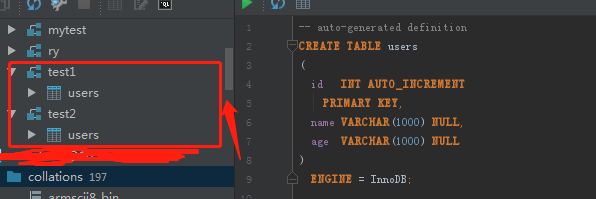
3.创建本地数据库+表
4.application.yml
server:
  port: 8080
  servlet:
  #    # 项目contextPath
    context-path: /manyDatasource

spring:
  application:
      name: manyDatasource
  datasource:
#  spring.datasource.test1
#    druid:
      test1:
#      jdbc-url,url,jdbcurl哪个合适用哪个
        jdbcurl: jdbc:mysql://localhost:3306/test1?serverTimezone=GMT%2B8&useUnicode=true&characterEncoding=utf-8
        username: root
        password: 123456
        initial-size: 1
        min-idle: 1
        max-active: 20
        test-on-borrow: true
#        driver-class-name: com.mysql.jdbc.Driver
#        下面是最新的mysql8版本推荐的驱动
        driver-class-name: com.mysql.cj.jdbc.Driver
        type: com.alibaba.druid.pool.DruidDataSource
#        下面是另外加的配置数据源的参数
        minPoolSize: 3
        maxPoolSize: 25
        maxLifetime: 20000
        borrowConnectionTimeout: 30
        loginTimeout: 30
        maintenanceInterval: 60
        maxIdleTime: 60

      test2:
        jdbcurl: jdbc:mysql://localhost:3306/test2?serverTimezone=GMT%2B8&useUnicode=true&characterEncoding=utf-8
        username: root
        password: 123456
        driver-class-name: com.mysql.cj.jdbc.Driver
        type: com.alibaba.druid.pool.DruidDataSource
        minPoolSize: 3
        maxPoolSize: 25
        maxLifetime: 20000
        borrowConnectionTimeout: 30
        loginTimeout: 30
        maintenanceInterval: 60
        maxIdleTime: 60

mybatis:
    mapper-locations: classpath:mapper/*.xml

#设置静态资源路径,多个以逗号分隔
spring.resources.static-locations: classpath:static/,file:static/

# 日志配置
logging:
  level:
    czs: debug
    org.springframework: WARN
    org.spring.springboot.dao: debug
5.实体类
ps.使用lombok插件挺方便的~ id数据库主键自增
@Data
public class User {
    private Integer id;
    private String name;
    private long age;
}
6.mapper接口
UserMapper1:
public interface UserMapper1 {
    // 查询语句
    @Select("SELECT * FROM users WHERE NAME = #{name}")
    User findByName(@Param("name") String name);

    // 添加
    @Insert("INSERT INTO users(NAME, AGE) VALUES(#{name}, #{age})")
    int insert(@Param("name") String name, @Param("age") Integer age);
}
UserMapper2:
public interface UserMapper2 {
    // 查询语句
    @Select("SELECT * FROM users WHERE NAME = #{name}")
    User findByName(@Param("name") String name);

    // 添加
    @Insert("INSERT INTO users(NAME, AGE) VALUES(#{name}, #{age})")
    int insert(@Param("name") String name, @Param("age") Integer age);
}
7.service
ManyService1:
@Service
public class ManyService1 {

    @Autowired
    private UserMapper1 userMapper1;
    @Autowired
    private UserMapper2 userMapper2;

 /*   @Transactional(transactionManager = "test1TransactionManager",rollbackFor = Exception.class)
    public int insert(String name, Integer age) {
        int i = userMapper1.insert(name, age);
        System.out.println("userMapper1.insert结束~ :" + i);
       // int a = 1 / 0;//手动异常
        return i;
    }*/

    // 开启事务,由于使用jta+atomikos解决分布式事务,所以此处不必再指定事务
    @Transactional
    public int insert(String name, Integer age) {
        int insert = userMapper1.insert(name, age);
        //int i = 1 / age;// 赋值age为0故意引发事务
        return insert;
    }

    //http://localhost:8080/manyDatasource/insertDb1AndDb2?name=tom3&age=2
    // 开启事务,由于使用jta+atomikos解决分布式事务,所以此处不必再指定事务
    @Transactional
    public int insertDb1AndDb2(String name, Integer age) {
        int insert = userMapper1.insert(name, age);
        int insert2 = userMapper2.insert(name, age);
        int i = 1 / age;// 赋值age为0故意引发事务
        return insert + insert2;
    }


}
ManyService2:
@Service
public class ManyService2 {

    @Autowired
    private UserMapper2 userMapper2;

    @Transactional(transactionManager = "test2TransactionManager",rollbackFor = Exception.class)
    public int insert(String name, Integer age) {
        int i = userMapper2.insert(name, age);
        System.out.println("userMapper2.insert结束~ :" + null);
        int a = 1 / 0;//手动异常
        return i;
    }

}
8.Controller
@RestController
public class ManyController {

    @Autowired
    private ManyService1 manyService1;

    @Resource
    private ManyService2 manyService2;

    @RequestMapping(value = "datasource1")
    public int datasource1(String name, Integer age) {
        return manyService1.insert(name, age);
    }

    @RequestMapping(value = "datasource2")
    public int datasource2(String name, Integer age) {
        return manyService2.insert(name, age);
    }

    /**
     * @Param:
     * @Description: 这里测试两个service两个数据源的事务(不加上atomikos插件的情况下测试,
     *使用DataSource1Config和DataSource2Config 两个配置类, 关闭DBConfig1, DBConfig2和MyBatisConfig1, MyBatisConfig1两个类)
     * @Author: zyf    2019/5/10
     */
    //http://localhost:8080/manyDatasource/testManyTrans?name=tom4&age=2
    @RequestMapping(value = "testManyTrans")
    public int testManyTrans(String name, Integer age) {
        int i = 0;
        int i1 = manyService1.insert(name, age);
        System.out.println("manyService1.insert :" + i1);

        /*
        第二个事务中会手动造成一个异常~,
        但是第一个事务执行完毕了,保存到了数据库
        */
        int i2 = manyService2.insert(name, age);
        System.out.println("manyService2.insert :" + i2);
        return i;
    }


    /**
     * @Param:
     * @Description: 这里测试使用atomikos插件测试多数据源事务
     * @Author: zyf    2019/5/10
     */
    //http://localhost:8080/manyDatasource/insertDb1AndDb2?name=tom5&age=2
    //http://localhost:8080/manyDatasource/insertDb1AndDb2?name=tom6&age=0  //测试除数为0后的事务管理
    @RequestMapping(value = "insertDb1AndDb2")
    public int insertDb1AndDb2(String name, Integer age) {
        return manyService1.insertDb1AndDb2(name, age);
    }


}
9.配置数据源(*******重点总是在最后********)
DBConfig1:
@Data
@ConfigurationProperties(prefix = "spring.datasource.test1") // 注意这个前缀要和application.yml文件的前缀一样
public class DBConfig1 {
   // @Value("${mysql.datasource.test1.jdbcurl}")
   //@Value("${jdbcurl}")
    private String jdbcurl;
    //private String url;
    // 比如这个url在properties中是这样子的mysql.datasource.test1.username = root
    private String username;
    private String password;
    private int minPoolSize;
    private int maxPoolSize;
    private int maxLifetime;
    private int borrowConnectionTimeout;
    private int loginTimeout;
    private int maintenanceInterval;
    private int maxIdleTime;
    private String testQuery;
}
DBConfig2:
@Data
@ConfigurationProperties(prefix = "spring.datasource.test2")// 注意这个前缀要和application.yml文件的前缀一样
public class DBConfig2 {
    //@Value("${spring.datasource.test2.jdbcurl}")
    //@Value("${jdbcurl}")
    //private String url;
    private String jdbcurl;
    private String username;
    private String password;
    private int minPoolSize;
    private int maxPoolSize;
    private int maxLifetime;
    private int borrowConnectionTimeout;
    private int loginTimeout;
    private int maintenanceInterval;
    private int maxIdleTime;
    private String testQuery;

}
上面两个配置类作用: 将application.yml配置文件中配置自动封装到实体类字段中,然后赋值给atomikos类型的数据源.(下面两个具体配置数据源)
MyBatisConfig1:
// 配置数据源
    //@Bean(name = "testDataSource")  //test1DataSource
    @Bean(name = "test1DataSource")  //test1DataSource
    public DataSource testDataSource(DBConfig1 testConfig) throws SQLException {
        MysqlXADataSource mysqlXaDataSource = new MysqlXADataSource();
        //mysqlXaDataSource.setUrl(testConfig.getUrl());
        mysqlXaDataSource.setUrl(testConfig.getJdbcurl());
        mysqlXaDataSource.setPinGlobalTxToPhysicalConnection(true);
        mysqlXaDataSource.setPassword(testConfig.getPassword());
        mysqlXaDataSource.setUser(testConfig.getUsername());
        mysqlXaDataSource.setPinGlobalTxToPhysicalConnection(true);

        // 将本地事务注册到创 Atomikos全局事务
        AtomikosDataSourceBean xaDataSource = new AtomikosDataSourceBean();
        xaDataSource.setXaDataSource(mysqlXaDataSource);
        xaDataSource.setUniqueResourceName("test1DataSource");

        xaDataSource.setMinPoolSize(testConfig.getMinPoolSize());
        xaDataSource.setMaxPoolSize(testConfig.getMaxPoolSize());
        xaDataSource.setMaxLifetime(testConfig.getMaxLifetime());
        xaDataSource.setBorrowConnectionTimeout(testConfig.getBorrowConnectionTimeout());
        xaDataSource.setLoginTimeout(testConfig.getLoginTimeout());
        xaDataSource.setMaintenanceInterval(testConfig.getMaintenanceInterval());
        xaDataSource.setMaxIdleTime(testConfig.getMaxIdleTime());
        xaDataSource.setTestQuery(testConfig.getTestQuery());
        return xaDataSource;
    }

    @Bean(name = "test1SqlSessionFactory")
    public SqlSessionFactory testSqlSessionFactory(@Qualifier("test1DataSource") DataSource dataSource)
            throws Exception {
        SqlSessionFactoryBean bean = new SqlSessionFactoryBean();
        bean.setDataSource(dataSource);
        return bean.getObject();
    }

    @Bean(name = "test1SqlSessionTemplate")
    public SqlSessionTemplate testSqlSessionTemplate(
            @Qualifier("test1SqlSessionFactory") SqlSessionFactory sqlSessionFactory) throws Exception {
        return new SqlSessionTemplate(sqlSessionFactory);
    }
MyBatisConfig2 :
@Configuration
@MapperScan(basePackages = "czs.mapper2", sqlSessionTemplateRef = "test2SqlSessionTemplate")
public class MyBatisConfig2 {

    // 配置数据源
    @Bean(name = "test2DataSource")
    public DataSource testDataSource(DBConfig2 testConfig) throws SQLException {
        MysqlXADataSource mysqlXaDataSource = new MysqlXADataSource();
        //mysqlXaDataSource.setUrl(testConfig.getUrl());
        mysqlXaDataSource.setUrl(testConfig.getJdbcurl());
        mysqlXaDataSource.setPinGlobalTxToPhysicalConnection(true);
        mysqlXaDataSource.setPassword(testConfig.getPassword());
        mysqlXaDataSource.setUser(testConfig.getUsername());
        mysqlXaDataSource.setPinGlobalTxToPhysicalConnection(true);

        AtomikosDataSourceBean xaDataSource = new AtomikosDataSourceBean();
        xaDataSource.setXaDataSource(mysqlXaDataSource);
        xaDataSource.setUniqueResourceName("test2DataSource");

        xaDataSource.setMinPoolSize(testConfig.getMinPoolSize());
        xaDataSource.setMaxPoolSize(testConfig.getMaxPoolSize());
        xaDataSource.setMaxLifetime(testConfig.getMaxLifetime());
        xaDataSource.setBorrowConnectionTimeout(testConfig.getBorrowConnectionTimeout());
        xaDataSource.setLoginTimeout(testConfig.getLoginTimeout());
        xaDataSource.setMaintenanceInterval(testConfig.getMaintenanceInterval());
        xaDataSource.setMaxIdleTime(testConfig.getMaxIdleTime());
        xaDataSource.setTestQuery(testConfig.getTestQuery());
        return xaDataSource;
    }

    @Bean(name = "test2SqlSessionFactory")
    public SqlSessionFactory testSqlSessionFactory(@Qualifier("test2DataSource") DataSource dataSource)
            throws Exception {
        SqlSessionFactoryBean bean = new SqlSessionFactoryBean();
        bean.setDataSource(dataSource);
        return bean.getObject();
    }

    @Bean(name = "test2SqlSessionTemplate")
    public SqlSessionTemplate testSqlSessionTemplate(
            @Qualifier("test2SqlSessionFactory") SqlSessionFactory sqlSessionFactory) throws Exception {
        return new SqlSessionTemplate(sqlSessionFactory);
    }
}
10.测试
http://localhost:8080/manyDatasource/insertDb1AndDb2?name=tom5&age=2
结果: test1和test2数据库都插入数据~
http://localhost:8080/manyDatasource/insertDb1AndDb2?name=tom6&age=0 (两个insert操作后,手动异常)
结果: test1和test2数据库都未插入数据~
GitHub传送门: https://github.com/ColoZhu/springbootmanyDatasource
参考出处: https://blog.csdn.net/qq_36138324/article/details/81612890