赶上别人的唯一方法多收集资料,多整理资料。
1.自己的canvas的功能函数。
http://www.cnblogs.com/coding4/p/7824714.html
2.canvas资料。
http://www.cnblogs.com/coding4/p/8721687.html
1.
var c=document.getElementById("myCanvas");
var ctx=c.getContext("2d");
--------------------------------------------------------------
画矩形。
context.fillRect(X左上,Y左上,宽,高) //绘制实心形状矩形
// ps:
context.fillStyle=" #ffffaa" //填充颜色
context.strokeStyle = “#000” //描边颜色
context.strokeRect(X左上,Y左上,宽,高)//绘制空心矩形 默认是黑色
context.clearRect(X左上,Y左上,宽,高) //清楚指定区域 并且完全透明
--------------------------------------------------------------
划线。
context.beginPath()
ctx.moveTo(0,0);
ctx.lineTo(200,100);
ctx.stroke();//必须
context.closePath()
// ps:
ctx.fill();//闭合
context.lineWidth=10 ;//线的宽度
context.lineCap = 'butt' //定义上下文 线的端点 默认 butt , round square 状态堆栈
context.lineJoin = 'miter' //定义两条线相交产生的拐角 默认值 miter 在连接处边缘延长相接, bevel 对角线斜角, round 连接处是一个圆 状态堆栈
context.beginPath()//开始路径
stroke() 方法会实际地绘制出通过 moveTo() 和 lineTo() 方法定义的路径。默认颜色是黑色。
context.closePath()//结束路径
--------------------------------------------------------------
画圆
ctx.arc(95,50,40,0,2*Math.PI,false);//x,y,半径,开始的角度,结束的角度
ctx.stroke();//必须
// ps:
圆的最后一个参数默认是false表示顺时针,如果为true表示顺时针。
--------------------------------------------------------------
文本
- fillText(text,x,y) - 在 canvas 上绘制实心的文本
- strokeText(text,x,y) - 在 canvas 上绘制空心的文本
ctx.fillText("ttttt",100,20)
//ps:
context.font="20px SimSum" //设置字体大小
context.textBaseline ='top' //字体对其方式
--------------------------------------------------------------
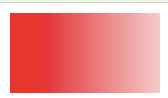
线性渐变。
// 创建渐变
var grd=ctx.createLinearGradient(0,0,200,0);
grd.addColorStop(0,"red");
grd.addColorStop(1,"white");
// 填充渐变
ctx.fillStyle=grd;
ctx.fillRect(10,10,150,80);
--------------------------------------------------------------
镜像渐变。
/ 创建渐变
var grd=ctx.createRadialGradient(75,50,5,90,60,100);
grd.addColorStop(0,"red");
grd.addColorStop(1,"white");
// 填充渐变
ctx.fillStyle=grd;
ctx.fillRect(10,10,150,80);

--------------------------------------------------------------
3.
4.
5.
context.bezierCurveTo(cp1x,cp1y,cp2x,cp2y,x,y); //

简单的做法
context.moveTo(150,0);
context.bezierCurveTo(0,125,300,175,300,300)
context.quadraticCurveTo(cpx,cpy,x,y);

7.
context.arcTo(x1,y1,x2,y2,r);
//x1 弧的起点的 x 坐标
y1 弧的起点的 y 坐标
x2 弧的终点的 x 坐标
y2 弧的终点的 y 坐标
r 弧的半径
8.
9.
context.clip() //裁剪
10.
drawImage(image, x, y)
drawImage(image, x, y, width, height)
drawImage(image, sourceX, sourceY, sourceWidth, sourceHeight,destX, destY, destWidth, destHeight)//sourceX, sourceY 图像开始裁剪的左上角坐标 sourceWidth, sourceHeight,截取图片的宽高 destX, destY, 画布上的左上角X Y坐标 destWidth, destHeigh剪切的图片在画布上面的大小
11.
context.save() //保存当前状态到堆栈
context.beginPath();
context.rect(0, 0, 500, 500);
context.clip();
context.beginPath();
context. restore() //调出最后储存的堆栈恢复画布


12.demo需要记住的代码
<!DOCTYPE html>
<html lang="en">
<head>
	<meta charset="UTF-8">
	<title>Document</title>
	<style>
	body { background: url(http://pic.qiantucdn.com/58pic/18/25/22/85258PIC5ZN_1024.jpg); background-size: cover; }
		#app{}
		#btn{position: absolute;bottom: 100px;left:50%;transform: translateX(-50%);z-index: 10;opacity: 0.5;}
		button{padding:5px;}
	</style>
</head>
<body>
	<canvas id="app"></canvas>
	<div id="btn">
		<!-- <button></button> -->
	</div>
	<script>
		var WINDOW_WIDTH = window.innerWidth;
		var WINDOW_HEIGHT = window.innerHeight;
		var canvas = document.querySelector('#app')
		var context = canvas.getContext('2d')
		function iframeResize(){
			WINDOW_WIDTH = window.innerWidth;
		    WINDOW_HEIGHT = window.innerHeight;
            context.fillRect(0, 0, WINDOW_WIDTH, WINDOW_HEIGHT);
		    canvas.width = WINDOW_WIDTH
		    canvas.height = WINDOW_HEIGHT
		}
		function addEvent(){
			/*document.addEventListener('mousemove',documentMousemove,false);
			document.addEventListener('mousedown',documentMousedown,false);
			document.addEventListener('mouseup',documentMouseup,false);
			canvas.addEventListener('touchstar',canvasTouchStar,false);
			canvas.addEventListener('touchmove',canvasTouchMove,false);
			*/
			window.addEventListener('resize',iframeResize,false)
		}
		var count = 100;
		var rains = [];
		window.onload = function(){
			iframeResize();
			addEvent();
		}

	</script>
</body>
</html>
13.随机生成颜色,以后封装一个函数。
color:'rgba('+Math.ceil(Math.random()*255)+','+Math.ceil(Math.random()*255)+','+Math.ceil(Math.random()*255)+',1)',
14.利用canvas 透明渐变的这个特点,每次都会比上一次变化一点。
有些render函数中,没有使用clearRect函数而是用了
context.fillStyle = 'rgba(0,0,0,0.05)';
context.fillRect(0,0,WIDTH,HEIGHT);
这个我们仔细看,fillStyle透明度0.05,每次都是上一次的的0.05透明度。
如果是0的话,是完全透明,这样每次的就不会覆盖,0.05的话,每次还是会有一点点覆盖的,渐渐的会消失
15.记住这两种球屏幕宽高的写法,
var WINDOW_WIDTH = window.innerWidth;
var WINDOW_HEIGHT = window.innerHeight;
或者
var WINDOW_WIDTH = Math.min(800,document.body.offsetWidth);
var WINDOW_HEIGHT = Math.min(600,document.body.offsetHeight);
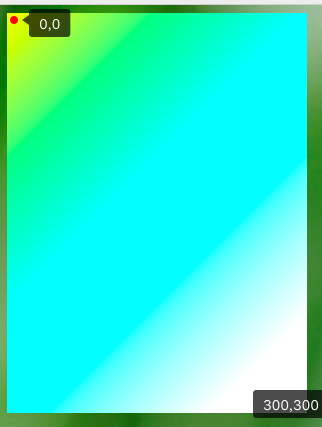
16.createLinearGradient 这个函数表示是线性的渐变,怎么理解线性渐变呢
当你context.createLinearGradient(0,0,0,300) 这个表示从0,0到0,300的直线出来的样子就是这个,
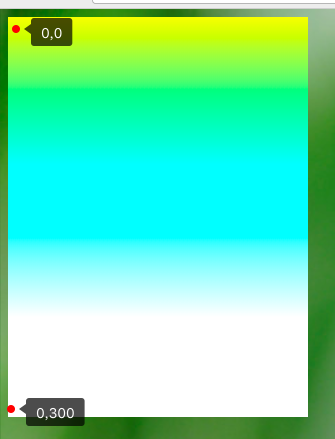
当你context.createLinearGradient(0,0,300,0) 这个表示从0,0到300,0的直线出来的样子就是这个

当你context.createLinearGradient(0,0,300,300) 这个表示从0,0到300,300的直线出来的样子就是这个
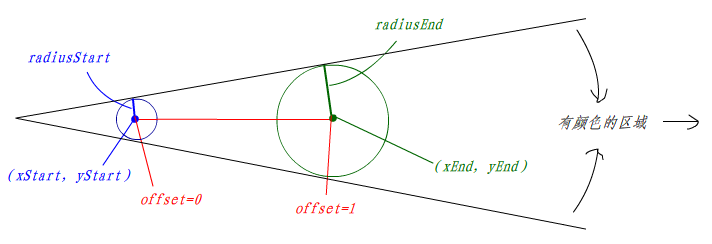
17.

var grd=ctx.createRadialGradient(100,100,10,150,150,100);
grd.addColorStop(0,"red");
grd.addColorStop(1,"white");
如果你的起始圆的范围超过了终点圆的范围,那么规律如下图,参照这篇博客https://www.cnblogs.com/vajoy/p/3914131.html
18.
<!DOCTYPE html>
<html lang="en">
<head>
    <meta charset="UTF-8">
    <title>Document</title>
    <style>
    #btn{position: absolute;bottom: 100px;left:50%;transform: translateX(-50%);z-index: 10;opacity: 0.5;}
    button{padding:5px;}
    </style>
</head>
<body>
    <div id="btn"></div>
    <script>
        window.onload = function(){
            var piao = new Piao()
            var cxt = piao.cxt;
            cxt.fillStyle = "black";
            cxt.beginPath()
            cxt.fillRect(0,0,piao.canvasWidth,piao.canvasHeight)
            cxt.stroke()
            cxt.closePath()
        }
        function Piao(){
            this.canvas = null //容器canvas
            this.canvasWidth = null
            this.canvasHeight = null
            this.isBody = false //容器是不是document.body
            this.cxt = null     //context
            this._init();
        }
        Piao.prototype = {
            constructor:'Piao',
            _init:function(){
                window.requestAnimFrame = ( function() {
                    return window.requestAnimationFrame ||
                           window.webkitRequestAnimationFrame ||
                           window.mozRequestAnimationFrame ||
                            function( callback ) {
                                window.setTimeout( callback, 1000 / 60 );
                            };
                })();
                //创建元素
                this._createCanvas();
                //添加事件
                this._addEvent();
            },
            _createCanvas:function(container){
                if(typeof container == 'string'){
                    container = document.querySelector(container)
                }
                if(!container){
                    container = container || document.body;
                    this.isBody = true;
                }
                var ele = document.createElement("canvas");
                ele.id = "canvas";
                ele.value = "sorry,your browser can not support canvas!";
                //ele.style.width = 100%;
                //ele.style.height = 100%;
                this.cxt = ele.getContext('2d');
                container.appendChild(ele);
                this.canvas = ele;
            },
            _addEvent:function(){
                /*
                    document.addEventListener('mousemove',documentMousemove,false);
                    document.addEventListener('mousedown',documentMousedown,false);
                    document.addEventListener('mouseup',documentMouseup,false);
                    canvas.addEventListener('touchstar',canvasTouchStar,false);
                    canvas.addEventListener('touchmove',canvasTouchMove,false);
                */
                window.addEventListener('resize',this._windowResizeEvent.bind(this),false)
                this._windowResizeEvent();
            },
            _windowResizeEvent:function(){
                if(this.isBody){
                    this.canvas.width = this.canvasWidth = window.innerWidth;
                    this.canvas.height = this.canvasHeight = window.innerHeight;
                }
            }
        }
    </script>
</body>
</html>
19.在位置 (10,10) 处绘制一个矩形,将新的 (0,0) 位置设置为 (70,70)。再次绘制新的矩形(请注意现在矩形从位置 (80,80) 开始绘制):
var c=document.getElementById("myCanvas");
var ctx=c.getContext("2d");
ctx.fillRect(10,10,100,50);
ctx.translate(70,70);
ctx.fillRect(10,10,100,50);
20. CanvasRenderingContext2D 函数
21.关于
21.