Binding用于绑定控件属性的值。
Binding的模型
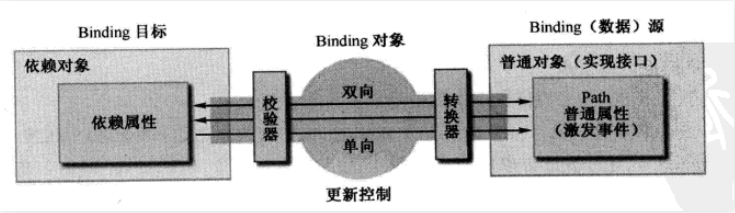
从Binding模型中可以看出,Binding对象作为目标和源之间的桥梁,除了著名的双向绑定特征外,WPF还在Binding中添加了一些机制方便我们更加方便的处理数据,比如校验器和转换器。
下面就来看看Binding对象到底实现了哪些属性?

1.TargetObject和Property属性默认不需要设置,在设置Binding的时候,WPF框架本身会根据你设置的属性及其控件自动引用。
2.Source属性设置:绑定一个数据源,一般是一个对象。常用的是DataContext和ItemSource。
①DataContext:每一个UI元素都有一个DataContext属性,这个属性属于依赖属性,也就是他是依赖在UI控件树的,当前控件没有指定DataContext时就会去父控件继续绑定。一般我们会将ViewModel赋给DataContext。
②ItemSource:列表控件绑定的对象。
另外还有XML数据、RelativeSource(相对自身可以指定层级的数据源)等形式绑定数据源。
3.Path属性:绑定数据源内的属性。
4.ElementName可以指定绑定UI元素为源,Converter转换器(数据源的属性类型转换成目标属性的类型),Validation校验器(设置一些规则校验数据),Mode绑定模式。
示例:
(一)ElementName、Mode
<StackPanel Orientation="Vertical" VerticalAlignment="Center">
    <TextBox x:Name="box1" />
    <TextBox x:Name="box2" Text="{Binding ElementName=box1,Path=Text,Mode=TwoWay}"/>
</StackPanel>
运行此示例,可以发现虽然Mode绑定为TwoWay模式,还是只能实现box2随box1内容同步,而在box1获取焦点时,才会同步box2的内容。从而看出,TwoWay并不是表示实时双向绑定。
可以选择box1和box2相互绑定的方式实现双向绑定。
<StackPanel Orientation="Vertical" VerticalAlignment="Center">
    <TextBox x:Name="box1" Text="{Binding ElementName=box2,Path=Text}"/>
    <TextBox x:Name="box2" Text="{Binding ElementName=box1,Path=Text}"/>
</StackPanel>
(二)Source、Converter
首先我们先新建一个Student的Model及Gender枚举类型表示学生的性别。
 public class Student
 {
     public int Number { get; set; }
     public string Name { get; set; }
     public Gender Gender { get; set; }
     public string Address { get; set; }
 }

 public enum Gender
 {
     Male,
     Female
 }
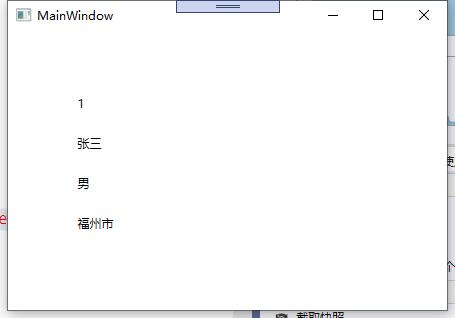
界面需要展示学生的编号、姓名、性别及住址,我们可以使用Binding绑定相应TextBlock的Text属性。
	<Window.Resources>
        <Style TargetType="TextBlock">
            <Setter Property="Height" Value="30"/>
            <Setter Property="Width" Value="300"/>
            <Setter Property="Margin" Value="5"/>
            <Setter Property="HorizontalAlignment" Value="Center"/>
        </Style>
    </Window.Resources>
    <Grid>
        <StackPanel Orientation="Vertical" VerticalAlignment="Center">
            <TextBlock Text="{Binding Number}"/>
            <TextBlock Text="{Binding Name}"/>
            <TextBlock Text="{Binding Gender}"/>
            <TextBlock Text="{Binding Address}"/>
        </StackPanel>
    </Grid>
在后台代码中,我们只需要在构造当前Window时,给当前Window的DataContext属性添加一个Student类型的Model,这个Model可以来自http请求或其他的控件、本地数据库等等。
 public MainWindow()
 {
      InitializeComponent();
      DataContext = new Student
 	  {
           Number = 1,
           Name = "张三",
           Gender = Gender.Male,
           Address = "福州市"
      };
 }
运行程序,看到我们正确的在界面显示了绑定的属性的值:

可以看到,枚举类型并没有正确的显示成我们想要的男或女的文本形式,这时候我们就可以用到Converter。新建一个类,继承IValueConverter。
    public class GenderToStringConverter : IValueConverter
    {
        public object Convert(object value, Type targetType, object parameter, CultureInfo culture)
        {
            var gender = (Gender)value;
            switch (gender)
            {
                case Gender.Male:
                    return "男";
                case Gender.Female:
                    return "女";
            }
            return null;
        }

        public object ConvertBack(object value, Type targetType, object parameter, CultureInfo culture)
        {
            throw new NotImplementedException();
        }
    }
在界面中需要在Resources中引用,并设置一个key,然后在相应的Binding中添加Converter引用。
<Window.Resources>
    <local:GenderToStringConverter x:Key="GenderToStringConverter"/>
    <Style TargetType="TextBlock">
        <Setter Property="Height" Value="30"/>
        <Setter Property="Width" Value="300"/>
        <Setter Property="Margin" Value="5"/>
        <Setter Property="HorizontalAlignment" Value="Center"/>
    </Style>
</Window.Resources>
<Grid>
    <StackPanel Orientation="Vertical" VerticalAlignment="Center">
        <TextBlock Text="{Binding Number}"/>
        <TextBlock Text="{Binding Name}"/>
        <TextBlock Text="{Binding Gender,Converter={StaticResource GenderToStringConverter}}"/>
        <TextBlock Text="{Binding Address}"/>
    </StackPanel>
</Grid>
这下按照我们的想法正确的展示了。
有这样一个需求,在同一个界面中,有多个地方都Binding了Student的Name属性,那么我希望后台更改Student对象的Name值的时候,前台界面所绑定的地方全部都要更新。
现在我们实现了Binding数据,但是如果数据有变化,我们界面上的相应属性并不会实时的发生变化,这时候我们就需要引入一个ViewModel层连接View和Model,使View和Model能够实时双向通信。ViewModel继承INotifyPropertyChanged,用于通知属性变化。
INotifyPropertyChanged用于通知属性变化
用于通知属性更改的接口,需要实现PropertyChanged事件,一般常在属性的set访问器中。做到当属性值发生改变之后,通知相应名称的属性的属性值变化。
①新建一个MainWindowViewModel
public class MainWindowViewModel : INotifyPropertyChanged
{
    public event PropertyChangedEventHandler PropertyChanged;
    private string _name;
    public string Name
    {
        get
        {
            return _name;
        }
        set
        {
            _name = value;
            if (this.PropertyChanged != null)
            {
                this.PropertyChanged(this, new PropertyChangedEventArgs(nameof(Name)));
            }
        }
    }
}
②View界面代码修改成
<StackPanel Orientation="Vertical" VerticalAlignment="Center">
      <TextBlock Text="{Binding Name}"/>
      <TextBox Text="{Binding Name}" TextChanged="TextBox_TextChanged"/>
      <TextBox Text="{Binding Name}" TextChanged="TextBox_TextChanged"/>
</StackPanel>
③View.cs后台界面代码为
public partial class MainWindow : Window
{
    private MainWindowViewModel MainWindowViewModel;
    public MainWindow()
    {
        InitializeComponent();
        MainWindowViewModel = new MainWindowViewModel();
        DataContext = MainWindowViewModel;
    }

    private void TextBox_TextChanged(object sender, TextChangedEventArgs e)
    {
        if (sender is TextBox textBox)
        {
             MainWindowViewModel.Name = textBox.Text;
        }
    }
}
最终我们实现效果
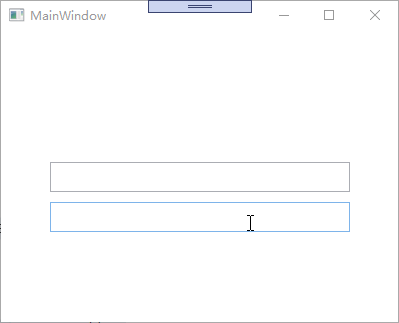
可以看到我们成功地实现了双向绑定,这使得所有绑定ViewModel中Name的属性都会实时更新,并且在后台代码中我们并没有去改变View的值,试想,我们从服务端获取到一个新的Model数据,那么我们只需要把新Model的属性赋值给ViewModel中的对应属性,ViewModel就会更新界面元素。