一、引言
1.1 初始化配置
为了使用SSM框架去开发,准备SSM框架的模板配置。
1.2 整合第三方框架
为了Spring整合第三方框架,单独的去编写xml文件。
1.3 后期维护
后期SSM项目后期xml文件特别多,维护xml文件的成本是很高的
1.4 部署工程
SSM工程部署也是很麻烦,依赖第三方的容器
1.5 敏捷式开发
基于Java的SSM开发方式是很笨重,而现在的python,php,NodeJS的敏捷式开发已经盖过Java一头
二、SpringBoot介绍
SpringBoot是由Pivotal团队研发的,SpringBoot并不是一门新技术,只是将之前常用的Spring,SpringMVC,data-jpa等常用的框架封装到了一起,帮助你隐藏这些框架的整合细节,实现敏捷开发。
SpringBoot就是一个工具集。
| LOGO |
|---|
 |
SpringBoot特点:
- SpringBoot项目不需要模板化的配置。
- SpringBoot中整合第三方框架时,只需要导入相应的starter依赖包,就自动整合了。
- SpringBoot默认只有一个.properties的配置文件,不推荐使用xml,后期会采用.java的文件去编写配置信息。
- SpringBoot工程在部署时,采用的是jar包的方式,内部自动依赖Tomcat容器,提供了多环境的配置。
- 后期要学习的微服务框架SpringCloud需要建立在SpringBoot的基础上。
2.1 约定优于配置
这是形容springBoot最常用的描述,也有人解读为:约定大于配置,约定好于配置,习惯大于配置等。
用springBoot框架开发程序时,框架提供的默认值会让我们的项目开发起来效率更快,如果默认值满足不了我们的需求,我们可以使用Properties配置文件和YAML配置文件来重写默认值来满足我们的需求,所以约定大于配置,是说通过约定来较少配置,从而提升开发效率。
而且约定大于配置,并不是一种新的思想,在JDK5.0发布,采用元数据 ,引入注解的概念(也称之为标注),就代表简化配置的开始,就是初期的一种 “约定优于配置” 的体现;所以约定优于配置这一设计理念,从 Spring 的注解版本就已经开始了。引入注解就是为了减少一些默认配置,引入注解也就代表着简化配置的开始,官方说基于 spring 的基础就是这个事实。
2.2 SpringBoot中的约定
1、Maven的目录结构。默认有resources文件夹,存放资源配置文件。src-main-resources,src-main-java。默认的编译生成的类都在targe文件夹下面
2、spring boot默认的配置文件必须是,也只能是application.命名的yml文件或者properties文件,且唯一
3、application.yml中默认属性。数据库连接信息必须是以spring: datasource: 为前缀;多环境配置。该属性可以根据运行环境自动读取不同的配置文件;端口号、请求路径等
4、SpringBoot 约定,当你导入 spring-boot-starter-web 后,就约定了你是一个 web 开发环境。就约定了你会使用 SpringMVC。至于其它的也约定你会需要,都给你默认导入进来。当你觉得不合适的时候,可以用更少的改动,满足你的需要。
5、当我们导入spring-boot-starter-web后,就会自动帮我们导入springMVC的相关依赖和一个内置的tomcat容器,以及spring-boot-starter-logging依赖。这使得在开发阶段可以直接通过 main 方法或是 JAR 包独立运行一个 WEB 项目。
6、SpringBoot 约定以 starter 的形式减少依赖,于是相继推出了不少常用的 starter。
三、SpringBoot快速入门【重点】
3.1 快速构建SpringBoot
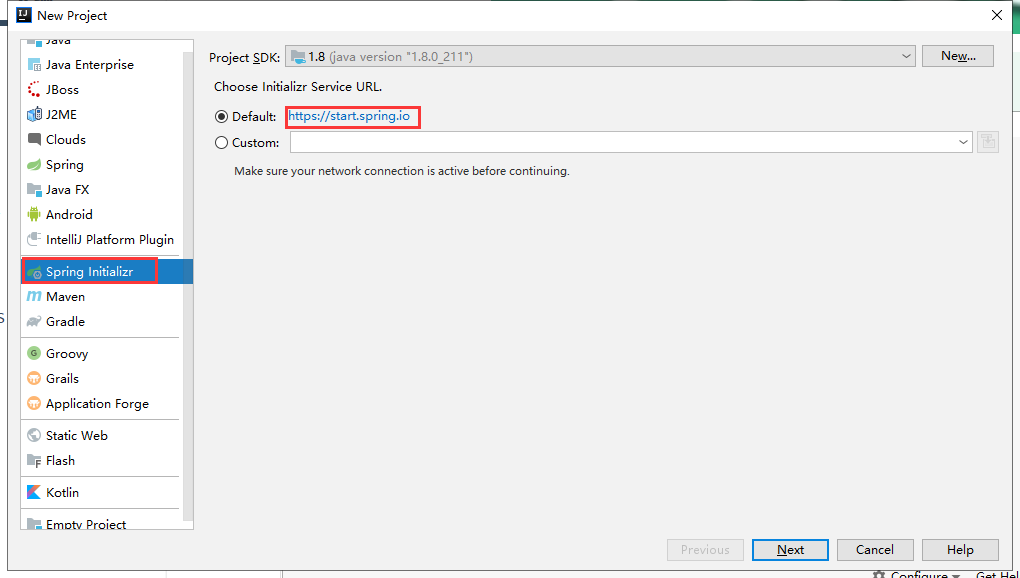
3.1.1 选择构建项目的类型
| 选择构建项目的类型 |
|---|
 |
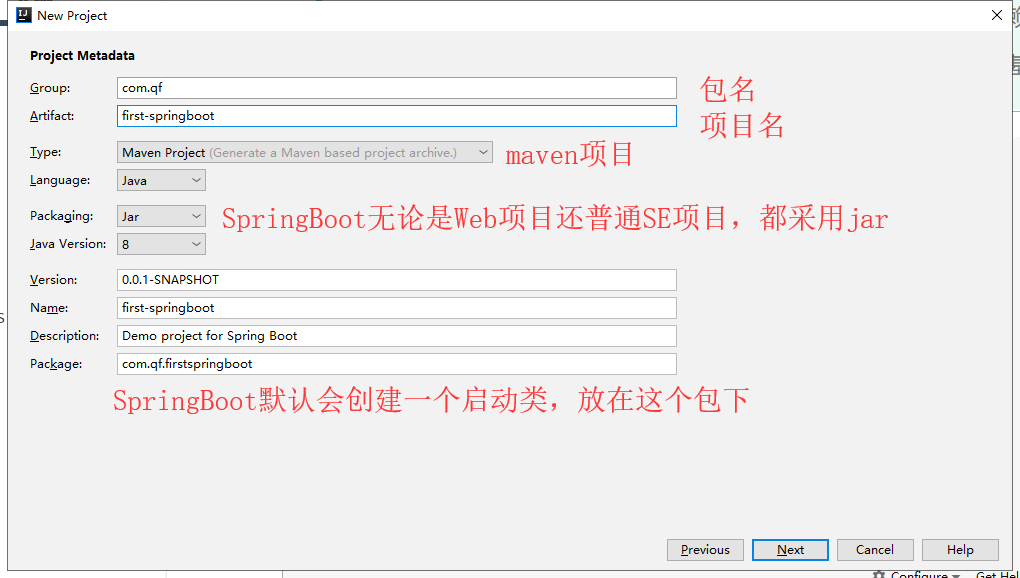
3.1.2 项目的描述
| 项目的描述 |
|---|
 |
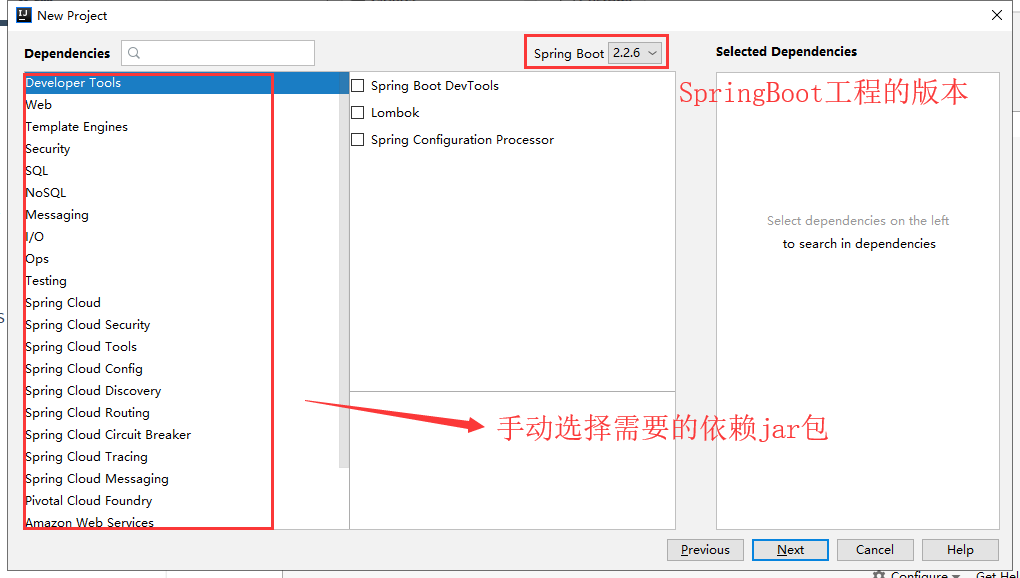
3.1.3 指定SpringBoot版本和需要的依赖
| 指定SpringBoot版本和需要的依赖 |
|---|
 |
3.1.4 导入依赖
<dependency>
    <groupId>org.springframework.boot</groupId>
    <artifactId>spring-boot-starter</artifactId>
</dependency>
<!-- 将上述内容修改为下面的效果 -->
<dependency>
    <groupId>org.springframework.boot</groupId>
    <artifactId>spring-boot-starter-web</artifactId>
</dependency>
3.1.5 编写了Controller
@RestController
public class TestController {

    @GetMapping("/test")
    public String test(){
        return "Hello SpringBoot!";
    }

}
3.1.6 测试
| 效果 |
|---|
 |
3.2 SpringBoot的目录结构
3.2.1 pom.xml文件
- 指定了一个父工程: 指定当前工程为SpringBoot,帮助我们声明了starter依赖的版本。
- 项目的元数据:包名,项目名,版本号。
- 指定了properties信息:指定了java的版本为1.8
- 导入依赖:默认情况导入spring-boot-starter,spring-boot-starter-test
- 插件:spring-boot-maven-plugin
3.2.2 .gitignore文件
默认帮我们忽略了一些文件和目录,避免提交到Git仓库中
3.2.3 src目录
-src
  -main
    -java
      -包名
        启动类.java			# 需要将controller类,放在启动类的子包中或者同级包下
    -resources
      -static				  # 存放静态资源的
      -templates			   # 存储模板页面的
      application.properties	 # SpringBoot提供的唯一的配置文件
  -test   				      # 只是为了测试用的
3.3 SpringBoot三种启动方式
3.3.1 运行启动类的main方法
运行main方法即可
3.3.2 maven命令
mvn spring-boot:run
3.3.3 采用jar包的方式运行
将当前项目打包成一个jar文件,并通过java -jar jar文件
3.3.5 采用war包的方式运行
pom配置
<artifactId>day64-sboot-01-mybatis-tx</artifactId>
	<version>0.0.1-SNAPSHOT</version>
	<packaging>war</packaging>

 	<dependency>
			<groupId>org.springframework.boot</groupId>
			<artifactId>spring-boot-starter-web</artifactId>
			<!-- 移除嵌入式tomcat插件 -->
			<exclusions>
				<exclusion>
					<groupId>org.springframework.boot</groupId>
					<artifactId>spring-boot-starter-tomcat</artifactId>
				</exclusion>
			</exclusions>
		</dependency>

		<!-- 添加servlet支持-->
		<dependency>
			<groupId>javax.servlet</groupId>
			<artifactId>javax.servlet-api</artifactId>
			<version>3.1.0</version>
		</dependency>

		<!--添加Tomcat-->
		<dependency>
			<groupId>org.springframework.boot</groupId>
			<artifactId>spring-boot-starter-tomcat</artifactId>
			<scope>provided</scope>
		</dependency>
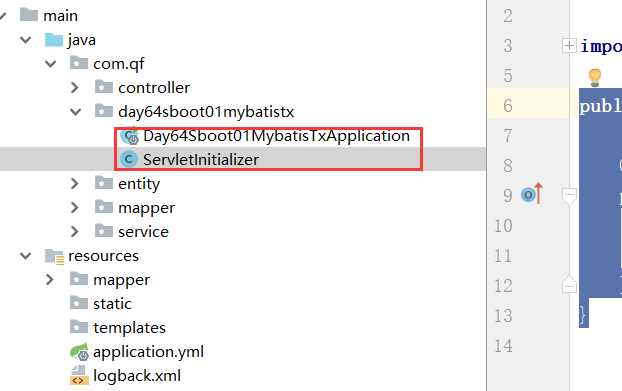
修改主启动类配置
public class ServletInitializer extends SpringBootServletInitializer {

	@Override
	protected SpringApplicationBuilder configure(SpringApplicationBuilder application) {
		return application.sources(Day64Sboot01MybatisTxApplication.class);
	}
}
原理是该项目被打成war包后放入到webapps下面,tomat启动的时候就会调用这个方法,从而初始化项目。这个类要和SpringBoot的主启动类放在一起。
打包
mvn package
四、SpringBoot常用注解【重点】
4.1 @Configuration和@Bean
之前使用SSM去开发时,在xml文件中编写bean标签,但是SpringBoot不推荐使用xml文件。
@Configuration注解相当于beans标签
@Bean注解相当于bean标签
id=“方法名 | 注解中的name属性(优先级更高)”
class=“方法的返回结果”
@Configuration   // 代表当前类是一个配置类
public class UserConfig {


    @Bean(name = "user1")       // 构建一个实例,放到spring容器中
    public User user(){
        User user = new User();
        user.setId(1);
        user.setName("张三");
        return user;
    }

    /*
    <beans ....>            @Configuration
        <bean id="user1" class="com.lq.firstspringboot.entity.User" />
    </beans>
     */
}
4.2 @SpringBootApplication
@SpringBootApplication就是一个组合注解:
- @SpringBootConfiguration就是@Configuration注解,代表启动类就是一个配置类。
- @EnableAutoConfiguration帮你实现自动装配的,SpringBoot工程启动时,运行一个SpringFactoriesLoader的类,加载META-INF/spring.factories配置类(已经开启的),通过SpringFactoriesLoader中的load方法,以for循环的方式,一个一个加载。
- 好处:无需编写大量的整合配置信息,只需要按照SpringBoot提供好了约定去整合即可。
- 坏处:如果说你导入了一个starter依赖,那么你就需要填写他必要的配置信息。
- 手动关闭自动装配指定内容:@SpringBootApplication(exclude = QuartzAutoConfiguration.class)
- @ComponentScan就相当于<context:component-scan basePackage=“包名” />,帮助扫描注解的。

五、SpringBoot常用配置【重点】
5.1 SpringBoot的配置文件格式
SpringBoot的配置文件支持properties和yml,甚至他还支持json。
更推荐使用yml文件格式:
yml文件,会根据换行和缩进帮助咱们管理配置文件所在位置
yml文件,相比properties更轻量级一些
yml文件的劣势:
严格遵循换行和缩进
在填写value时,一定要在: 后面跟上空格
applicaiton.properties
user.username=root
#时间
user.birthday=2016-12-12

#数组
user.loves[0]=book
user.loves[1]=code
user.loves[2]=java

#list
user.emails[0]=a@qf.com
user.emails[1]=b@qf.com
user.emails[2]=c@qf.commo

#map
user.userMap[k1]=v1
user.userMap[k2]=v2
application.yml
server:
  port: 8888
  servlet:
    context-path: /abc
user:
 username: 张三
 loves:
    - java
    - book
 id: 10
 emails:
    - a1@qf.com
    - a2@qf.com
 userMap:
    k1: v1
    k2: v2
 birthda: 2019-12-12
User.java
@Data
@Component
@ConfigurationProperties(prefix = "user")
public class User {

    private Integer id;

    private String username;

    private String  loves[];

    private List<String> emails;

    private Map<String,String> userMap;

    @DateTimeFormat(pattern = "yyyy-MM-dd")
    private Date birthday;
}
5.2 多环境配置
在application.yml文件中添加一个配置项:
spring:
  profiles:
    active: 环境名
在resource目录下,创建多个application-环境名.yml文件即可
在部署工程时,通过 java -jar jar文件 --spring.profiles.active=环境
5.3 引入外部配置文件信息
和传统的SSM方式一样,通过@Value的注解去获取properties/yml文件中的内容。
如果在yml文件中需要编写大量的自定义配置,并且具有统一的前缀时,采用如下方式
// Java程序
@ConfigurationProperties(prefix = "aliyun")
@Component
@Data
public class AliyunProperties {

   private String xxxx;

   private ... ...;
}

// 配置文件
aliyun:
  xxxx: xxxxxxxxx
  ...
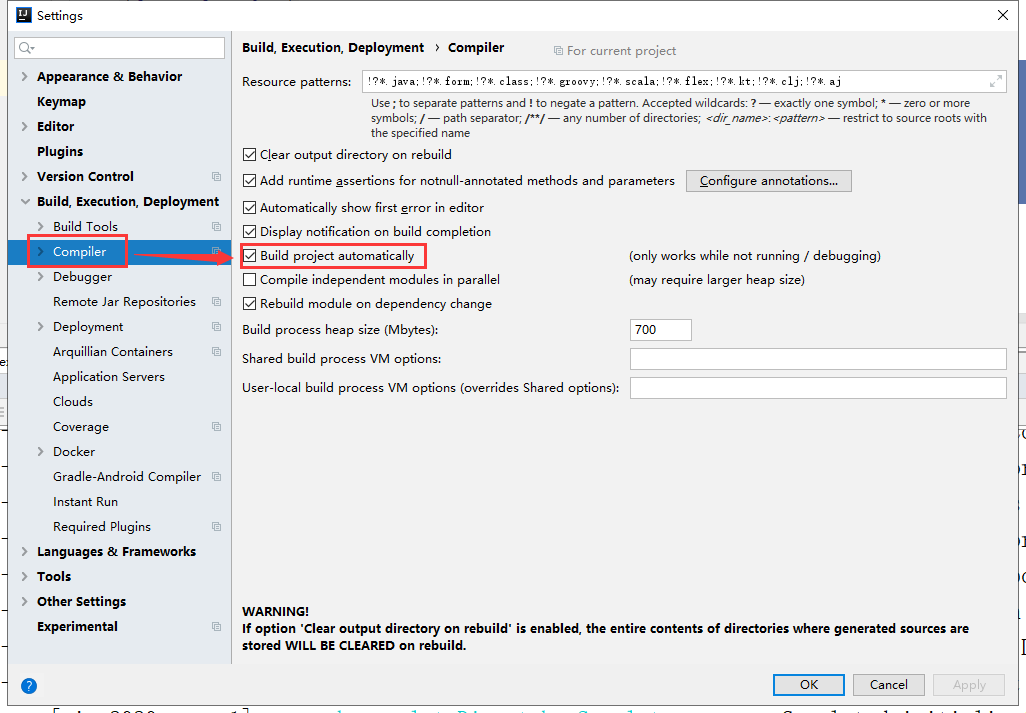
5.4 热加载
5.4.1 导入依赖
<dependency>
    <groupId>org.springframework.boot</groupId>
    <artifactId>spring-boot-devtools</artifactId>
    <optional>true</optional>
</dependency>
5.4.2 settings配置
| 修改settings中的配置 |
|---|
 |
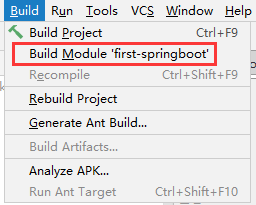
5.4.3 重新构建工程
| build |
|---|
 |
六、SpringBoot整合Mybatis【重点】
6.1 xml方式整合Mybatis
xml方式在编写复杂SQL时,更适合
6.1.1 导入依赖。
<!--        mysql驱动-->
<dependency>
    <groupId>mysql</groupId>
    <artifactId>mysql-connector-java</artifactId>
</dependency>

<!--        druid连接-->
<dependency>
    <groupId>com.alibaba</groupId>
    <artifactId>druid-spring-boot-starter</artifactId>
    <version>1.1.10</version>
</dependency>

<!--        mybatis-->
<dependency>
    <groupId>org.mybatis.spring.boot</groupId>
    <artifactId>mybatis-spring-boot-starter</artifactId>
    <version>1.3.2</version>
</dependency>
6.1.2 编写配置文件
// 准备实体类
@Data
public class Air  implements Serializable {

	private Integer id;

	private Integer districtId;

	private java.util.Date monitorTime;

	private Integer pm10;

	private Integer pm25;

	private String monitoringStation;

	private java.util.Date lastModifyTime;

}
// ================================================
@Data
public class District  implements Serializable {

	private Integer id;

	private String name;

}
6.1.3 准备Mybatis
// 1. 接口
public interface AirMapper {

    List<Air> findAll();

}

// 2. 在启动类中添加直接,扫描Mapper接口所在的包
@MapperScan(basePackages = "com.lq.firstspringboot.mapper")

// 3. 准备映射文件
<?xml version="1.0" encoding="UTF-8" ?>
<!DOCTYPE mapper
        PUBLIC "-//mybatis.org//DTD Mapper 3.0//EN"
        "http://mybatis.org/dtd/mybatis-3-mapper.dtd">
<mapper namespace="com.lq.firstspringboot.mapper.AirMapper">

<!--    List<Air> findAll();-->
    <select id="findAll" resultType="Air">
        select * from air
    </select>
</mapper>
yml配置文件
spring:
  datasource: # 连接数据库的信息
    url: jdbc:mysql://localhost:3306/2001
    driver-class-name: com.mysql.jdbc.Driver
    username: root
    password: root
    type: com.alibaba.druid.pool.DruidDataSource
mybatis: # mybatis配置
  type-aliases-package: com.lq.sboothellowar.entity
  mapper-locations: mapper/*.xml
logging: # 日志配置
  level:
    com.lq.sboothellowar.mapper: debug
6.1.4 测试。
class AirMapperTest extends FirstSpringbootApplicationTests {

    @Autowired
    private AirMapper airMapper;

    @Test
    void findAll() {
        List<Air> list = airMapper.findAll();
        for (Air air : list) {
            System.out.println(air);
        }
    }
}
6.2 注解方式整合Mybatis
注解方式在编写配置简单,简单SQL推荐使用
6.2.1 创建District的Mapper接口
public interface DistrictMapper {

    List<District> findAll();
}
6.2.2 添加Mybatis注解
针对增删改查:@Insert,@Delete,@Update,@Select
还是需要在启动类中添加@MapperScan注解
@Select("select * from district")
List<District> findAll();


@Select("select * from district where id = #{id}")
District findOneById(@Param("id") Integer id);
6.2.3 添加配置
// yml文件
logging:
  level:
    com.lq.firstspringboot.mapper: DEBUG
6.2.4 测试,查看日志
class DistrictMapperTest extends FirstSpringbootApplicationTests {

    @Autowired
    private DistrictMapper mapper;

    @Test
    void findAll() {
        List<District> list = mapper.findAll();
        for (District district : list) {
            System.out.println(district);
        }
    }

    @Test
    void findOneById() {
        District district = mapper.findOneById(5);
        System.out.println(district);
    }
}
6.3 SpringBoot整合MyBatis-Plus
6.3.1 导入依赖
<dependency>
   <groupId>com.baomidou</groupId>
   <artifactId>mybatis-plus-boot-starter</artifactId>
   <version>2.3</version>
</dependency>
6.3.2 yml配置
mybatis-plus:
  type-aliases-package: com.lq.entity
  #  mapper-locations: mapper文件
6.3.3开启dao层扫描
@SpringBootApplication(scanBasePackages = "com.lq")
@MapperScan(basePackages = "com.lq.dao")
public class SbootDemoApplication {
   public static void main(String[] args) {
      SpringApplication.run(SbootDemoApplication.class, args);
   }
}
6.3.4 注解
@Data
@TableName("emp")
public class Emp {

  @TableId(type = IdType.AUTO) // 主键 自动递增
  private long empno;

  @TableField("name") // username对应表中是name
  private String username;

  @TableField(exist = false)
  private List<String> list; // 表中不存在这个属性
6.3.5 开启分页
@Component
public class MybatisPlusConfig {
    @Bean
    public PaginationInterceptor paginationInterceptor() {
        return new PaginationInterceptor();
    }
}
6.3.6 测试
	@Test
	void testPage(){
		Page<Emp> page = new Page<>();
		page.setSize(5);
		page.setCurrent(1);
		List<Emp> emps = empMapper.selectPage(page, null);
		page.setRecords(emps);
		System.out.println(page);
	}
6.3.7事务控制
@EnableTransactionManagement // 用注解来控制事务
@SpringBootApplication
@MapperScan(basePackages = "com.lq.mapper")
@ComponentScan(basePackages = "com.lq")
public class Springboot01Application {
   public static void main(String[] args) {
      SpringApplication.run(Springboot01Application.class, args);
   }
}
七、SpringBoot提供视图支持
Spring Boot支持多种模版引擎包括:
FreeMarker(*.ftm)
Groovy
Thymeleaf(官方推荐)
Mustache
JSP技术Spring Boot官方是不推荐的原因有:
tomcat只支持war的打包方式,不支持可执行的jar。
Jetty 嵌套的容器不支持jsp
当你使用上述模板引擎中的任何一个,它们默认的模板配置路径为:src/main/resources/templates。当然也可以修改这个路径,具体如何修改,可在后续各模板引擎的配置属性中查询并修改
Thymeleaf模板引擎
Thymeleaf是一款用于渲染XML/XHTML/HTML5内容的模板引擎。类似JSP,FreeMaker等,它也可以轻易的与Spring MVC等Web框架进行集成作为Web应用的模板引擎。与其它模板引擎相比,Thymeleaf最大的特点是能够直接在浏览器中打开并正确显示模板页面,而不需要启动整个Web应用。它的功能特性如下:
Spring MVC中@Controller中的方法可以直接返回模板名称
模板中的表达式支持Spring表达式语言(Spring EL)
表单支持,并兼容Spring MVC的数据绑定与验证机制
国际化支持
7.1 JSP视图
7.1.1 需要导入依赖
<!--        JSP核心引擎依赖-->
<dependency>
    <groupId>org.apache.tomcat.embed</groupId>
    <artifactId>tomcat-embed-jasper</artifactId>
</dependency>
<!--        JSTL-->
<dependency>
    <groupId>javax.servlet</groupId>
    <artifactId>jstl</artifactId>
</dependency>
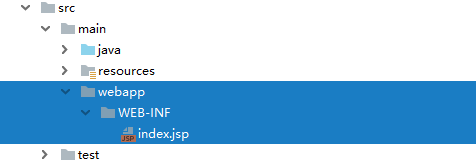
7.1.2 创建JSP页面
| 创建webapp以及WEB-INF去存放JSP页面 |
|---|
 |
7.1.3 创建Contorller
// Controller
@Controller
public class JspController {

    @GetMapping("/index")
    public String index(Model model){
        model.addAttribute("name","张三");
        return "index";
    }
}
7.1.4 配置前缀和后缀
spring:
  mvc:
    # 视图的前缀和后缀
    view:
      prefix: /WEB-INF/
      suffix: .jsp
7.2 Thymeleaf视图
7.2.1 依赖
<!-- thymeleaf 视图模板-->
   <dependency>
      <groupId>org.springframework.boot</groupId>
      <artifactId>spring-boot-starter-thymeleaf</artifactId>
   </dependency>
7.2.2 yml配置
spring:
  thymeleaf:
    cache: fase
7.2.3 使用thymeleaf
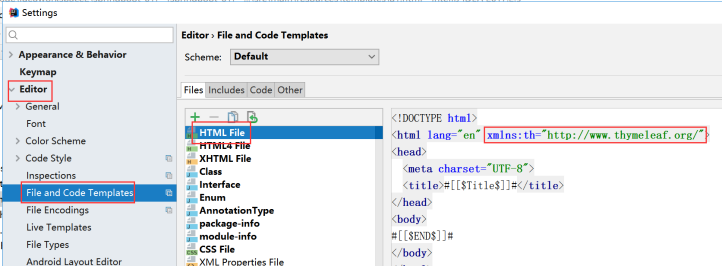
// 1.引入命名空间
<html lang="en" xmlns:th="http://www.thymeleaf.org/">

// 2.从域对象中取值
req:<span th:text="${reqKey}"></span><br>
session:<span th:text="${session.sessionKey}"></span><br>
application:<span th:text="${application.applicationKey}"></span><br>
内置对象:<span th:text="${#request.getAttribute('reqKey')}"></span>

// 3.thymeleaf其他常用操作
<base th:href="${#request.getContextPath()+'/'}">

<td th:text="${#dates.format(user.createTime,'yyyy-MM-dd')}"></td>

<input type="hidden" name="id" th:value="${user.id}" >

th:onclick="|admin_edit('user/getUserById/${user.id}')|"

<p class="miaoshu" th:utext="${goods.ginfo}"></p>

<tr th:each="topic:${page.list}">

<span th:text="${sex ==1?'男':'女'}"></span>

<span th:text="${#numbers.formatDecimal(price,4,3)}"></span>
#numbers.formatDecimal(numbwe,整数位,小数位)。
整数位表示,整数位不足四位,用0补齐

<img th:each="img:${#strings.listSplit(gg.gimage,'|')}" th:src="${img}">

<div th:switch="${age}">
    <p th:case="10">10岁</p>
    <p th:case="20">20岁</p>
    <p th:case="*">大于30岁(默认值)</p>
</div>

<script th:inline="javascript">
    var message = [[${user.username}]];
    var username=[[${#request.getParameter('returnUrl')}]];
    console.log(message);
</script>
7.2.4 修改html模板
7.2.5 thymeleaf其他属性
#开启模板缓存(默认值:true)
spring.thymeleaf.cache=true

#在呈现模板之前,检查模板是否存在
spring.thymeleaf.check-template=true

#检查模板位置是否正确(默认值:true)
spring.thymeleaf.check-template-location=true

#Content-Type的值(默认值:text/html)
spring.thymeleaf.content-type=text/html
#开启MVC Thymeleaf视图解析(默认值:true)
spring.thymeleaf.enabled=true

#模板编码
spring.thymeleaf.encoding=UTF-8

#要被排除在解析之外的视图名称列表,用逗号分隔
spring.thymeleaf.excluded-view-names=

#要运用于模板之上的模板模式。另见StandardTemplate-ModeHandlers(默认值:HTML5)
spring.thymeleaf.mode=HTML5

#在构建URL时添加到视图名称前的前缀(默认值:classpath:/templates/)
spring.thymeleaf.prefix=classpath:/templates/

#在构建URL时添加到视图名称后的后缀(默认值:.html)
spring.thymeleaf.suffix=.html

#Thymeleaf模板解析器在解析器链中的顺序。默认情况下,它排第一位。顺序从1开始,只有在定义了额外的TemplateResolver Bean时才需要设置这个属性。
spring.thymeleaf.template-resolver-order=

#可解析的视图名称列表,用逗号分隔
spring.thymeleaf.view-names=
7.2.6 分页 (page.html)
<!DOCTYPE html>
<html lang="en" xmlns:th="http://www.thymeleaf.org/">
<head>
    <meta charset="UTF-8">
    <title>Title</title>
</head>
<body>
<div th:fragment="pageDiv">
    <link rel="stylesheet" href="lib/layer/ui/css/layui.css" media="all">
    <script src="lib/layer/ui/layui.js"></script>
    <div id="pageDiv"></div>


    <script  th:inline="javascript">
        var total = [[${page.total}]];
        var pageSizse = [[${page.pageSize}]];
        var pageNum =  [[${page.pageNum}]];
        var url =  [[${url}]];
    </script>

    <script>
        layui.use('laypage', function() {
            var laypage = layui.laypage;

            laypage.render({
                elem : 'pageDiv'
                ,count : total
                ,limit : pageSizse
                ,curr:pageNum
                ,layout : [ 'prev', 'page', 'next', 'limit', 'count' ]
                ,limits:[5,10,20]
                ,jump : function(obj, first) {
                    console.log(obj)
                    if (!first) {
                        location.href=url+"?pageNum="+obj.curr+"&pageSize="+obj.limit;
                    }
                }
            });
        });
    </script>
</div>
</body>
</html>
7.2.7 包含
<div th:replace="/common/page::pageDiv"></div> ## 分页路径::模板中的ID
八、SpringBoot静态资源处理
Spring Boot 默认为我们提供了静态资源处理,使用 WebMvcAutoConfiguration 中的配置各种属性。
建议大家使用Spring Boot的默认配置方式,提供的静态资源映射如下:
classpath:/META-INF/resources
classpath:/resources
classpath:/static
classpath:/public
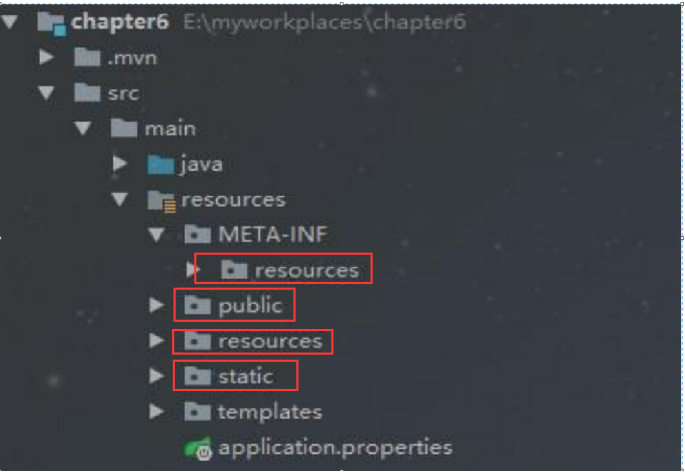
上面这几个都是静态资源的映射路径,优先级顺序为:META-INF/resources > resources > static > public。
可以随机在上面一个路径下面放上index.html,当我们访问应用根目录http://lcoalhost:8080 时,会直接映射到index.html页面。
九、SpringBoot自定义静态资源处理
如果Spring Boot提供的Sping MVC不符合要求,则可以通过一个配置类(注解有@Configuration的类)加上@EnableWebMvc注解来实现完全自己控制的MVC配置。
当然,通常情况下,Spring Boot的自动配置是符合我们大多数需求的。在你既需要保留Spring Boot提供的便利,有需要增加自己的额外的配置的时候,可以定义一个配置类并继承WebMvcConfigurer,无需使用@EnableWebMvc注解。
这里我们提到这个WebMvcConfigurerAdapter这个类,重写这个类中的方法可以让我们增加额外的配置,这里我们就介绍几个常用的。
@Configuration
public class MyWebMvcConfigurerAdapter implements WebMvcConfigurer {

    /**
     * 配置静态资源访问
     * @param registry
     */
    @Override
    public void addResourceHandlers(ResourceHandlerRegistry registry) {
        System.out.println("MyWebMvcConfigurerAdapter.addResourceHandlers");
        registry.addResourceHandler("/a/**").addResourceLocations("classpath:/a/");
    }
}
addResoureHandler指的是对外暴露的访问路径
ddResourceLocations指的是文件放置的目录
十、页面跳转
@Configuration
public class MyWebMvcConfigurerAdapter implements WebMvcConfigurer {

    @Override
    public void addViewControllers(ViewControllerRegistry registry) {
        System.out.println("MyWebMvcConfigurerAdapter.addViewControllers");
        registry.addViewController("toLogin").setViewName("login");
    }
}
十一、.拦截器
写一个拦截器实现HandlerInterceptor接口
@Configuration
public class MyWebMvcConfigurerAdapter implements WebMvcConfigurer {

    @Override
    public void addInterceptors(InterceptorRegistry registry) {
        registry.addInterceptor(new loginInterceprot())
                .addPathPatterns("/**") // 被拦截路径
                .excludePathPatterns("/toLogin"); // 忽略路径
    }
}
十二、SpringBoot全局异常处理
默认情况下,Spring Boot为两种情况提供了不同的响应方式。一种是浏览器客户端请求一个不存在的页面或服务端处理发生异常时,一般情况下浏览器默认发送的请求头中Accept: text/html,所以Spring Boot默认会响应一个html文档内容,称作“Whitelabel Error Page”。另一种是使用Postman等调试工具发送请求一个不存在的url或服务端处理发生异常时,Spring Boot会返回类似如下的Json格式字符串信息
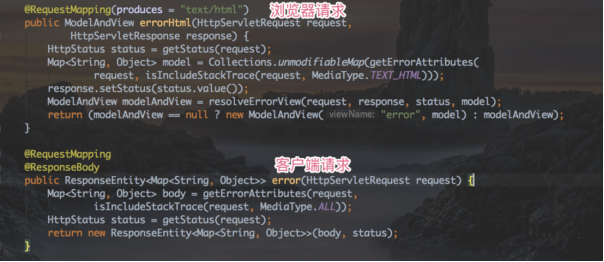
出现异常响应页面
直接在/resources/templates下面创建error.html就可以覆盖默认的Whitelabel Error Page的错误页面
<!DOCTYPE html >
<html lang="en" xmlns:th="http://www.thymeleaf.org/">
<head>
    <meta charset="UTF-8">
    <title>Title</title>
</head>
<body>
错误页面
<p th:text="${error}"></p>
<p th:text="${status}"></p>
<p th:text="${message}"></p>
</body>
</html>
出现异常响应JSON数据
@ControllerAdvice
public class ExceptionHanlder {

   @ExceptionHandler(value = Exception.class)
   @ResponseBody
   public Map<String, String> exceptionToJSON(Exception e) {
      System.out.println("ExceptionHanlder.exceptionToJSON");
      // 1.先封装异常信息提示给用户
      Map<String, String> map = new HashMap<String, String>();
      map.put("code", "500");
      map.put("message", "服务端异常");

      // 2.纪录异常信息
//    log.error("出现异常了", e);
      return map;
   }
}
十三、springMvc的RestTemplate服务器间的请求
使用Restful风格发送数据
发送端
 /**
     * 测试rest风格地址栏传递参数
     */
    @Test
    public void testRest(){
        String result = restTemplate.getForObject("http://localhost:8082/search/getEmpById/200", String.class);
        System.out.println("result:"+result);
    }
接收端
    /**
     * 接收RESTful风格,地址栏传值
     * @return
     */
    @RequestMapping("/getEmpById/{id}")
    public String getEmpById(@PathVariable Integer id){
        System.out.println("id:"+id);
        return "getEmpById";
    }
普通的请求
发送端
/**
     * 只请求,不传值
     */
    @Test
    public void testRestTemplate(){
        //发送一个请求,地址栏传值
        String result = restTemplate.getForObject("http://localhost:8082/search/hello", String.class);
        System.out.println("result"+result);
    }
接收端
@RequestMapping("/hello")
    public String hello(){
        System.out.println("Search.hello");
        return "Search Hello";
    }
使用Json格式数据发送数据
发送端
/**
     * 测试传递Json数据参数请求
     */
    @Test
    public void testJson() throws JsonProcessingException {
        //1.创建一个对象
        Emp emp = new Emp();
        emp.setDeptno(10);
        emp.setEname("admin");
        emp.setHiredate(new Date());

        //2.创建请求头
        HttpHeaders httpHeaders = new HttpHeaders();

        //3.设置请求头的数据类型为application/json
        httpHeaders.setContentType(MediaType.APPLICATION_JSON);

        //4、封装请求数据和请求头
        HttpEntity<Emp> entity = new HttpEntity<>(emp,httpHeaders);//数据将会自动转换为json格式

        //5、发送数据
        String result = restTemplate.postForObject("http://localhost:8082/search/addEmpFromJson", entity, String.class);

        System.out.println("result:"+result);
    }
接收端
 /**
     * 接收Json字符串的参数
     * @param emp
     * @return
     */
    @RequestMapping("/addEmpFromJson")
    public String addEmp(@RequestBody Emp emp){
        System.out.println("emp:"+emp);
        return "addEmpFrom";
    }
使用form表单的方式发送数据
发送端
  /**
     * 表单传递数据
     */
    @Test
    public void testForm(){
        //1、表单数据必须要用MultiValueMap封装
        MultiValueMap<String,Object> map = new LinkedMultiValueMap<>();
        map.add("ename","admin");
        map.add("hiredate","2020-12-12");

        //2、创建请求头
        HttpHeaders httpHeaders = new HttpHeaders();

        //3、设置请求头的数据类型格式为表单类型
        httpHeaders.setContentType(MediaType.APPLICATION_FORM_URLENCODED);

        //4、封装请求头和请求数据
        HttpEntity<MultiValueMap<String,Object>> httpEntity = new HttpEntity<>( map, httpHeaders);

        //5、发送请求
        String result = restTemplate.postForObject("http://localhost:8082/search/addEmpByForm", httpEntity, String.class);

        System.out.println("result:"+result);

    }
接收端
  /**
     *  接收表单类型数据
     * @return
     */
    @RequestMapping("/addEmpByForm")
    public String addEmpByForm(Emp emp){
        System.out.println("emp = [" + emp + "]");
        return "addEmpByForm";
    }
RestTemplate相对于URL的优缺点
1、数据的传递和获取都非常的方便
2、支持RestFul风格