DOM 操作
1. webapi 介绍
(1) api 的概念
API( Application Programming Interface , 应用程序编程接口 )是一些预先定义的函数,目的是提供应用程序与开发人员基于某软件或硬件得以访问一组例程的能力,而又无需访问源码,或理解内部工作机制的细节。例如:alert()、 prompt()、log()、reverse()、getMonths()
任何开发语言都有自己的 API
API 的特征输入和输出( I/O )
API 的使用方法( console.log() )
(2) webapi 的概念
浏览器提供的一套操作浏览器功能和页面元素的 API ( BOM 和 DOM )
我们可以通过 API 去操作 DOM 和 BOM
此处的 web API 特指浏览器提供的 API(一组方法),web API 在后面的课程中有其它含义
(3) JavaScript 的组成
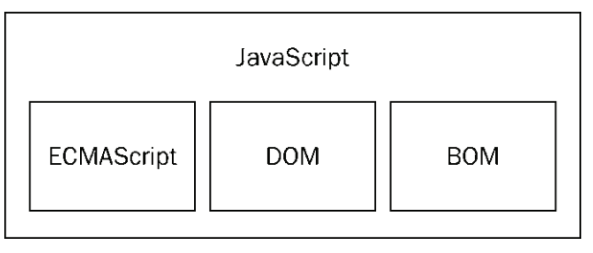
2. DOM 概念
了解
事件基础文档对象模型(Document Object Model,简称 DOM),是 W3C 组织推荐的处理可扩展标志语言的标准编程接口。在网页上,组织页面(或文档)的对象被组织在一个树形结构中,用来表示文档中对象的标准模型就称为 DOM。Document Object Model 的历史可以追溯至 1990 年代后期微软与 Netscape 的“浏览器大战”,双方为了在 JavaScript 与 JScript 一决生死,于是大规模的赋予浏览器强大的功能。微软在网页技术上加入了不少专属事物,既有 VBScript、ActiveX、以及微软自家的 DHTML 格式等,使不少网页使用非微软平台及浏览器无法正常显示。DOM 即是当时蕴酿出来的杰作。
DOM 又称为文档树模型
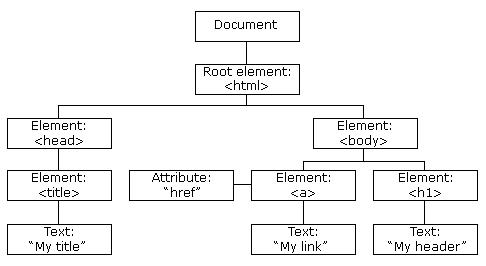
文档:一个网页可以称为文档
节点:网页中的所有内容都是节点(标签、属性、文本、注释等)
元素:网页中的标签
属性:标签(元素)的属性
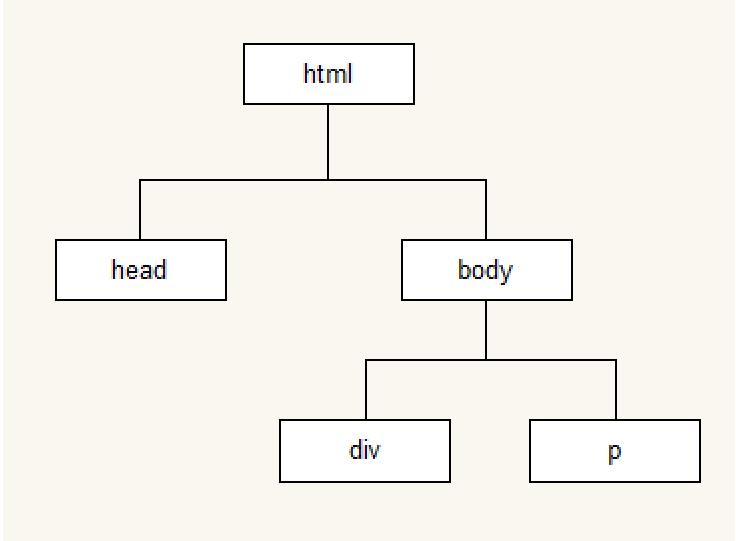
3. 模拟文档树结构
4. 操作 DOM
1. 获取元素的方式
1. 根据 id 获取元素
var div1 = document.getElementById("box1");
2. 通过类名获取元素
var p1 = document.getElementsByClassName("p1");
console.log(Array.isArray(p1)); //false
console.log(p1.length);
console.log(p1[0]);
console.log(p1[1]);
伪数组定义:
1、拥有 length 属性,其它属性(索引)为非负整数(对象中的索引会被当做字符串来处理,这里你可以当做是个非负整数串来理解)
2、不具有数组所具有的方法
伪数组,就是像数组一样有 length 属性,也有 0、1、2、3 等属性的对象,看起来就像数组一样,但不是数组
常见的参数的参数 arguments,DOM 对象列表(比如通过 document.getElementsByTags 得到的列表)
3. 通过标签名获取元素
var tag1 = document.getElementsByTagName("div");
console.log(tag1);
console.log(tag1[0]);
4. 通过 name 名获取元素
var userList = document.getElementsByName("user");
console.log(userList);
for (var i = 0; i < userList.length; i++) {
  console.log(userList[i]);
}
5. 通过选择器的 querySelector 获取元素
querySlector(); // 获取指定选择器的第一个元素,参数就是选择器的名称
var div1 = document.querySelector(".box1");
console.log(div1);
var li1 = document.querySelector("ul>li");
console.log(li1);
var user1 = document.querySelector("#user1");
console.log(user1);
6. 通过选择器的 querySelectorAll 获取元素
querySelectorAll(); // 获取指定选择器的所有的元素,参数就是选择器的名称
var boxList = document.querySelectorAll(".box1");
console.log(boxList);
var listLi = document.querySelectorAll("ul li");
console.log(listLi);
2. 事件初识
事件 : 触发-响应机制
Event 接口表示在 DOM 中发生的任何事件,一些是用户生成的(例如鼠标或键盘事件),而其他由 API 生成。
(1) 事件三要素
事件源 : 触发(被)事件的元素
事件类型 : 事件的触发方式(例如鼠标点击或键盘点击)
事件处理程序 : 事件触发后要执行的代码(函数形式)
(2) 事件的基本使用
var box = document.getElementById("box");
box.onclick = function () {
  console.log("代码会在box被点击后执行");
};
鼠标单击事件:onclick 浏览器加载完成事件:onload
(3) 事件触发的多种写法
HTML 内部书写所有
HTML 行内触发方法
HTML 外部书写
1. 非表单元素的属性操作
href、title、id、src、className、width、height 等等
1. 添加 src 属性值显示图片
imgBox.src = "images/jie.jpg";
2. 改变图片大小
imgBox.width = 750;
imgBox.height = 500;
3. 通过 style 改变宽高
imgBox.style.width = 750 + "px";
imgBox.style.height = 500 + "px";
//通过样式属性设置宽高、位置的属性类型是字符串,需要加上 px
// 凡是 css 中这个属性是多个单词的写法,在 js 代码中 DOM 操作的时候.把-干掉,后面的单词的首字母大写即可
4. 通过类名改变宽度
imgBox.className = "imgCl";
//className  会覆盖之前设置好的类名!
5. 隐藏元素
1. src = "";
2. display = none; // 不占位置的
3. visibility = "hidden"; // 占位置
4. opacity = 0; // 占位置
2. 表单元素属性操作
value 用于大部分表单元素的内容获取( option 除外)
type 可以获取 input 标签的类型(输入框或复选框等)
disabled 禁用属性 checked 复选框选中属性
selected 下拉菜单选中属性
checked
document.querySelector("input").onblur = function () {
  console.log(this.value, this.type);
};
3. this 的指向问题
普通函数中,this 指向 window
构造函数中,this 指向实例化对象
对象函数中,this 指向当前的对象
事件函数中,this 指向事件源
// this 指向
// 1. 普通函数,指向 window
function f1() {
  console.log(this);
}
f1();

// 2. 构造函数,指向实例对象
function Person(name = "lisi") {
  this.name = name;
  console.log(this);
}
var p = new Person("666");

// 3. 对象函数,this
var pp = {
  name: "777",
  func: function () {
    console.log(this);
  },
};
pp.func();

// 4. 事件函数指向事件源
document.getElementsByTagName("button")[0].onclick = function () {
  console.log(this);
};
4. InnerText
能用 switch 语句实现的就一定可以使用 if 实现,但是反之不一定,如果是区间范围就采用 if,如果是等值判断使用 switch
返回被选元素的文本内容
var p1 = document.getElementById("p1");
console.log(p1.innerText);

//设置被选元素的文本内容;
btn1.onclick = function () {
  p1.innerText = "文本改变了哈"; // 设置文本
  console.log(p1.innerText);
};
案例
<script>
  //   window.onload = function () {
  //     document.querySelector("#div").onclick = function () {
  //       alert("666");
  //     };
  //   };
</script>
<body>
  <button id="div" onclick="fun()">IDdiv</button>
  <div class="div">div</div>
  <div class="div"></div>
  <div class="div"></div>
  <div class="div"></div>
  <form action="">
    <input type="text" name="input" id="" />
  </form>
  <button class="submit">按钮</button>
  <img
    src="https://codehhr.coding.net/p/codehhr/d/images/git/raw/master/avatar/tusiji.png"
    alt=""
    width="200"
  />
  <script>
    // 根据 id 获取元素
    console.log(document.getElementById("div"));

    // 通过类名获取元素
    console.log(document.getElementsByClassName("div"));
    console.log(document.getElementsByClassName("div")[0]);
    var divs = document.getElementsByClassName("div");
    for (var i = 0; i < divs.length; i++) {
      console.log(divs[i]);
    }

    // 通过标签名获取元素
    console.log(document.getElementsByTagName("div")[0]);

    // 通过name名获取元素
    console.log(document.getElementsByName("input")[0]);

    // 通过选择器的querySelector获取元素
    console.log(document.querySelector("#div"));

    console.log(document.querySelector(".div"));

    // 通过选择器的querySelectorAll获取元素
    console.log(document.querySelectorAll(".div")[0]);

    document.querySelector(".submit").onclick = function () {
      console.log("666");
    };
    function fun() {
      alert("fun");
    }
    document.querySelectorAll("div")[0].innerText = "div666";

    document.querySelectorAll("div")[1].innerHTML = "<h1>h1</h1>";

    document.querySelector("img").width = 240;
  </script>
  <script src="./script.js"></script>
</body>
作业
// 作业1:利用className属性来完成开关灯效果
var islight = true;
document.querySelector(".toggle").onclick = function () {
  if (islight) {
    document.querySelector("body").className = "dark";
    this.innerText = "开灯";
    islight = !islight;
  } else {
    document.querySelector("body").className = "light";
    this.innerText = "关灯";
    islight = !islight;
  }
};

// 作业2:显示和隐藏元素
var display = true;
document.querySelector(".ctrl").onclick = function () {
  if (display) {
    document.querySelector("div").style.display = "none";
    display = !display;
  } else {
    document.querySelector("div").style.display = "block";
    display = !display;
  }
};

//  作业3:单击按钮利用类名设置元素隔行换色;
document.querySelector(".zebracolor").onclick = function () {
  var lis = document.querySelectorAll("li");
  for (var i = 0; i < lis.length; i++) {
    if (i % 2 == 0) {
      lis[i].className = "dark";
    } else {
      lis[i].className = "light";
    }
  }
};
5. 属性操作与事件
1. 画廊
<style>
  .preview img {
    width: 160px;
  }
  .red {
    background-color: red;
  }
  .blue {
    background-color: blue;
  }
</style>
<body>
  <div class="preview">
    <img
      src="https://codehhr.coding.net/p/codehhr/d/images/git/raw/master/avatar/tusiji.png"
      alt=""
    />
    <img
      src="https://codehhr.coding.net/p/codehhr/d/images/git/raw/master/avatar/tusiji2.jpeg"
      alt=""
    />
  </div>

  <div class="view">
    <img
      width="480"
      src="https://codehhr.coding.net/p/codehhr/d/images/git/raw/master/avatar/tusiji.png"
      alt=""
    />
  </div>
</body>
<script>
  // 画廊
  var imgList = document.querySelectorAll(".preview img");
  var bigImg = document.querySelector(".view img");
  for (var i = 0; i < imgList.length; i++) {
    imgList[i].onclick = function () {
      bigImg.src = this.src;
    };
  }
</script>
2. 阻止 a 链接跳转
三种写法
1. 第一种 ( 缺点: 代码不分离,不符合低耦合,高内聚的规范 )
<a href="https://codehhr.cn" onclick="console.log('666');return false"> HHR </a>
2. 第二种
<a href="https://codehhr.cn" onclick="return func2()">HHR</a>
function func2() {
  return false;
}
3. 第三种
直接 ODM 操作
document.getElementById("link").onclick = function () {
  return false;
};
3. 新事件
(1) 鼠标事件
onmouseover 鼠标移入事件:当鼠标指针在元素上方时触发。
onmouseout 鼠标移出事件:在鼠标指针移出元素后触发
二者搭配使用
var dtList = document.querySelectorAll("dt");
for (var i = 0; i < dtList.length; i++) {
  dtList[i].onmouseover = function () {
    this.style.fontSize = "20px";
  };
  dtList[i].onmouseout = function () {
    this.style.fontSize = "16px";
  };
}
onmouseenter 鼠标进入事件:在鼠标指针进入到元素上时触发。
onmouseleave 鼠标离开事件:在鼠标指针离开元素后触发
onmouseover 会冒泡
onmouseenter 不会冒泡
var dtList = document.querySelectorAll("dt");
for (var i = 0; i < dtList.length; i++) {
  dtList[i].onmouseenter = function () {
    this.style.fontSize = "20px";
  };
  dtList[i].onmouseleave = function () {
    this.style.fontSize = "16px";
  };
}
onfocus 获取焦点事件:在鼠标光标获取输入框焦点时触发
onblur 失去焦点事件:在鼠标光标失去焦点时触发。
//获取焦点事件
user.onfocus = function () {
  this.style.border = "1px solid red";
};
// 失去焦点事件
user.onblur = function () {
  console.log(this.value);
};
onclick 单击事件:在鼠标指针单击时触发
ondblclick 双击事件:在鼠标光标双击时触发。
box.ondblclick = function () {
  this.style.backgroundColor = "blue";
};
(2) 键盘事件
onkeydown : 键盘按下
onkeyup : 键盘抬起
document.getElementById("input2").onkeydown = function () {
  console.log("按下了!!1");
};
document.getElementById("input2").onkeyup = function () {
  console.log(this.value);
  if (this.value.length != 11) {
    console.log("请输入11位");
  }
};
(3) 浏览器事件
onload : 浏览器加载完成执行
onscroll : 滚动浏览器滚动条时触发
// 滚动
window.onscroll = function () {
  console.log("滚动 ing");
};
4. 文本内容属性
(1) innerText 和 textContent
textContent 属性,谷歌,火狐支持,IE8 及以下不支持
设置标签中的文本内容,应该使用 innerText 属性,谷歌,火狐,IE8 都支持
(2) innerText 和 innerHTML 的区别
innerText 设置文本内容
innerHTML 设置富文本
5. 元素的属性操作
(1) 自定义属性
元素除了本身的属性之外可以设置自定义属性
<div id="box1" class="box" name1="div1">盒子</div>
(2) 获取属性
getAttribute("属性") : 不仅可以获取元素本身的属性的属性值,还可以获取元素自定义的属性的属性值
console.log(document.getElementsByTagName("div")[0].getAttribute("name1"));
(3) 设置属性
setAttribute("属性的名字","属性的值") : 元素的属性的设置:不仅可以设置元素本身的属性,还可以设置元素自定义的属性
document.getElementsByTagName("div")[0].setAttribute("name1", "newName");
console.log(document.getElementsByTagName("div")[0].getAttribute("name1"));
当然也可以添加class
document.getElementById("setA").onclick = function () {
  document.getElementsByTagName("h1")[0].setAttribute("class", "blue");
};
(4) 移除属性
removeAttribute("属性") : 不仅可以移除元素本身的属性,还可以移除元素自定义的属性
document.getElementById("remA").onclick = function () {
  document.getElementsByTagName("h1")[0].removeAttribute("class");
};
6. 元素样式设置的几种方式
1.  对象.style
2.  对象.className
3.  对象.setAttribute("style")
4.  对象.setAttribute("class")
5.  对象.style.setProperty("CSS 属性","CSS 属性值")
6.  对象.style.cssText
示例
// setAttribute("style","")
document.getElementsByTagName("h1")[1].setAttribute("style", "color:red");

// style.setProperty()
document.getElementsByTagName("h1")[1].style.setProperty("color", "blue");

// style.cssText=""
document.getElementsByTagName("h1")[1].style.cssText = "color:red";
6. 节点操作
1. 节点类型
通过 noteType 属性可以获取节点的类型
console.log(document.getElementById("nodeDIV").nodeType); // 标签的节点类型为 1

console.log(document.nodeType); // document的节点类型为 9

console.log(document.getElementById("nodeDIV").getAttributeNode("id").nodeType); // 属性的节点类型为 2

console.log(box1.firstChild.nodeType); // 文本的节点类型为 3,元素的第一个子节点就是文本节点
2. 节点名称
通过 nodeName 可以获取元素的节点名称
console.log(document.getElementById("nodeDIV").nodeName); // 标签的节点名称:大写的标签名
console.log(document.nodeName); // document的节点名称:#document
console.log(document.getElementById("nodeDIV").getAttributeNode("id").nodeName); // 属性的节点名称:属性名
console.log(box1.firstChild.nodeName); // 文本的节点名称:#text
3. 节点值
通过 nodeValue 可以获取元素的节点的值
console.log(document.getElementById("nodeDIV").nodeValue); // 标签的节点值:null
console.log(document.nodeValue); // document的节点值:null
console.log(
  document.getElementById("nodeDIV").getAttributeNode("id").nodeValue
); // 属性的节点值:属性值
console.log(document.getElementById("nodeDIV").firstChild.nodeValue); // 文本的节点值:文本的内容
4. 节点之间的关系
// 节点之间的关系
// 父节点
console.log(document.getElementById("d1").parentNode);
// 父元素节点
console.log(document.getElementById("d1").parentElement);
// 子节点--childNode
console.log(document.getElementById("dl").childNodes);
// 子元素节点--children
console.log(document.getElementById("dl").children);
// 第一个子节点--firstChild
console.log(document.getElementById("d1").firstChild);
// firstElementChild
console.log(document.getElementById("dl").firstElementChild);
// lastChild:
console.log(document.getElementById("dl").lastChild);
// lastElementChild
console.log(document.getElementById("dl").lastElementChild);
// 上一个子节点--previousSibling:
console.log(document.getElementById("dl").previousSibling);
// previousElementSibling
console.log(document.getElementById("dl").previousElementSibling);
// 下一个子节点 --nextSibling
console.log(document.getElementById("dl").nextSibling);
// nextElementSibling
console.log(document.getElementById("dl").nextElementSibling);
总结 :
firstChild、lastChild、previousSibling、nextSibling 获取到的都是文本,如果没有就是文本节点名称#text, firstElementChild、lastElementChild、previousElementSibling、nextElementSibling 获取到的都是标签,如果没有就是空
5. 插入节点
insertBefore() 方法可在已有的子节点前插入一个新的子节点
<dl id="dl">
  <dt id="d1">1</dt>
  <dt id="d2">2</dt>
  <dt id="d3">3</dt>
  <dt id="d4">4</dt>
  <dt id="d5">5</dt>
</dl>
// 插入节点
var d3 = document.getElementById("d3");
var d5 = document.getElementById("d5");
console.log(d3);
console.log(d5);
document.getElementById("dl").insertBefore(d3, d5);
6. 创建元素的三种方式
(1) document.write()
document.write("<div>div</div>");
弊端 : 只能往 body 中添加元素
(2) innerHTML
document.querySelector(".box").innerHTML = "<h1>666</h1>";
弊端 : 在同级下只能添加一种元素,多个会覆盖
(3) document.createElement()
document.createElement("h1");
h1.innerHTML = "666";
document.querySelector(".box").appendChild(h1);
示例 : 动态创建列表
<button>按钮</button>
<div class="box"></div>
// 点击创建列表
var list = ["A", "B", "C", "D"];
document.querySelector("button").onclick = function () {
  var ul = document.createElement("ul");
  for (var i = 0; i < list.length; i++) {
    var li = document.createElement("li");
    li.innerHTML = list[i];
    ul.appendChild(li);
    li.onmouseover = function () {
      this.style.background = "red";
    };
    li.onmouseout = function () {
      this.style.background = "none";
    };
    document.getElementsByClassName("box")[0].appendChild(ul);
  }
};
7. 事件进阶
(1) 事件三要素
事件源 : 是指那个元素引发的事件。
事件类型 : 例如,点击,鼠标划过,按下键盘,获得焦点。
事件处理程序
(2) 监听事件
绑定监听事件 对象.addEventListener( "事件的类型" , 事件的处理程序 )
document
  .getElementsByClassName("box")[0]
  .addEventListener("click", function () {
    console.log("666");
  });
(3) 事件对象
任何事件都有内置对象 event,事件对象的兼容性写法为
var event = event || window.event;
示例
document
  .getElementsByClassName("box")[0]
  .addEventListener("click", function () {
    console.log(event);
  });
(4) 事件冒泡
<div>
  <p></p>
</div>
<!-- 这两个元素都绑定了click事件,如果用户点击了p,它在div和p上都触发了click事件 -->
如何阻止冒泡 ( 存在兼容性 )
e.stopPropagation(); // 谷歌和火狐支持;
window.event.cancelBubble = true; // IE特有的, 谷歌支持, 火狐不支持;
8. BOM
(1) BOM 的概念
BOM ( Browser Object Model ) 是指浏览器对象模型
浏览器中的一些操作都可以使用 BOM 的方式进行处理
(2) BOM 的顶级对象
window 是浏览器的顶级对象,当调用 window 下的属性和方法时,可以省略 window
(3) 对话框
alert(); // 消息提示框
prompt(); // 输入框
confirm(); // 确认框
alert("A");
console.log(prompt("请输入"));
console.log(typeof prompt("请输入")); // String
console.log(confirm("Are you sure ?")); // 确认 返回 true;取消 返回 false
(4) 加载事件
onload 事件会在页面或图像加载完成后立即发生
window.onload = function () {
  console.log("666");
};
(5) Location 对象
// 跳转
document.querySelector("btn1").onclick = function () {
  window.location.href = "https://www.baidu.com";
};
//地址栏上#及后面的内容
console.log(window.location.hash);
//主机名及端口号
console.log(window.location.host);
//主机名
console.log(window.location.hostname);
//文件的路径---相对路径
console.log(window.location.pathname);
//端口号
console.log(window.location.port);
//协议
console.log(window.location.protocol);
//搜索的内容
console.log(window.location.search);
(6) History 对象
//前进
document.querySelector("btn2").onclick = function () {
  window.history.forward();
};
//后退
document.querySelector("btn").onclick = function () {
  window.history.back();
};
(7) Navigator 对象
console.log(window.navigator);
console.log(window.navigator.userAgent); // 可以判断用户浏览器的类型;
9. 定时器
(1) setInteval()
setInterval() 方法会不停地调用函数,返回定时器 ID
clearInterval() 方法可取消由 setInterval() 函数设定的定时执行操作。
clearInterval() 方法的参数必须是由 setInterval() 返回的 ID 值。
参数 1 : 函数
参数 2 : 时间为毫秒 , 1000 毫秒 = 1 秒
示例
var i = 1;
var IntervalId = setInterval(function () {
  console.log(i);
  i++;
  if (i == 10) {
    clearInterval(IntervalId);
  }
}, 1000);
(2) setTimeout()
用于在指定一段时间后执行一次动作的方法
参数 1 : 函数
参数 2 : 时间为毫秒 , 1000 毫秒 = 1 秒
示例
var timeOutId = setTimeout(function () {
  console.log("666");
  clearInterval(timeOutId);
}, 5000);
10. 动画
1. 定时器案例
(1) 协议禁止按钮
<textarea name="" id="" cols="30" rows="10">666</textarea>
<button class="agree" disabled>同意该协议 (5)</button>
var time = 5;
window.onload = function () {
  var t = setInterval(function () {
    time--;
    document.querySelector(".agree").innerText = "同意该协议(" + time + ")";
    if (time == 0) {
      clearInterval(t);
      document.querySelector(".agree").removeAttribute("disabled");
      document.querySelector(".agree").innerText = "同意";
    }
  }, 1000);
};
(2) 获取验证码按钮倒计时
<button class="code">点击获取验证码</button>
var time2 = 60;
document.querySelector(".code").addEventListener("click", function () {
  var that = this;
  that.setAttribute("disabled", "true");
  var t2 = setInterval(function () {
    time2--;
    that.innerText = time2;
    if (time2 == 0) {
      that.removeAttribute("disabled");
      that.innerText = "点击获取验证码";
      clearInterval(t2);
    }
  }, 10);
});
2. js 的动画
案例 1: 物体渐变
<button class="opacity">透明度</button>
<div class="opacityBox"></div>
// 改变透明度
var opacity = 1;
document.querySelector(".opacity").addEventListener("click", function () {
  var tt = setInterval(function () {
    opacity -= 0.1;
    document.querySelector(".opacityBox").style.opacity = opacity;
    if (opacity < 0) {
      clearInterval(tt);
    }
  }, 100);
});
案例 2: 按钮控制 div 宽度的变化
var width = 1;
document.querySelector(".changeWidth").addEventListener("click", function () {
  var t3 = setInterval(function () {
    width += 10;
    document.querySelector(".changeWidthBox").style.width = width;
    if ((width = 800)) {
      clearInterval(t3);
    }
  }, 100);
});
案例 3: 物体的移动
// 利用 margin
var margin_left = 100;
document.querySelector(".move").addEventListener("click", function () {
  var t4 = setInterval(function () {
    margin_left += 10;
    document.querySelector(".movableBox").style.marginLeft = margin_left + "px";
    if (margin_left > 800) {
      clearInterval(t4);
    }
  }, 10);
});
// 利用 position
// 父相子绝
var left = 0;
document.querySelector(".toRightButton").addEventListener("click", function () {
  var t5 = setInterval(function () {
    left += 10;
    document.querySelector(".toRight").style.left = left + "px";
    if (left > 800) {
      clearInterval(t5);
    }
  }, 10);
});
3. js 动画的封装
// 封装
function moveToRight(dom, limit) {
  var t6 = setInterval(function () {
    left += 10;
    dom.style.left = left + "px";
    if (left > limit) {
      clearInterval(t6);
    }
  }, 10);
}
4. offset client scroll
(1) offset
offsetLeft: 获取元素距离最左边的距离:
(1) 如果父元素没有定位,就是距离浏览器最左侧的距离
(2) 如果父元素有定位,就是距离父元素最左侧的距离
offsetTop : 获取元素距离最上边的距离:
(1) 如果父元素没有定位,就是距离浏览器最上侧的距离
(2) 如果父元素有定位,就是距离父元素最上侧的距离
offsetWidth : 获取元素的宽度,包括 border 及以内,不包括 margin
offsetHeight : 获取元素的高度,包括 border 及以内,不包括 margin
offsetParent : 获取元素的定位父级元素:
如果元素是 fixed 定位,得到 null
没有 fixed,也没有定位,得到 body
如果父级元素有定位,得到离他最近的有定位的父级元素
(2) scroll 系列
scrollTop 和 scrollLeft : 获得的是内容卷曲的高度和宽度
scrollWidth 和 scrollHeight : 获得元素的实际宽度和高度,在内容没有超出盒子时,获得的是盒子的内部高度和宽度。内容超出盒子时获得的是内容实际应有的高度和宽度。当盒子内部存在滚动条时,获得的高度和宽度不包括滚动条。
(3) client 系列
clientTop 和 clientLeft : 获取上边框和左边框的宽度。
clientWidth 和 clientHeight : 获取可视范围的宽度高度,即边框内部的,不包括 border,包括 padding .当盒子内部存在滚动条时,获得的高度和宽度不包括滚动条。