一.yilia主题的安装
yilia主题的GitHub仓库地址https://github.com/litten/hexo-theme-yilia
1.安装
在根目录输入git clone https://github.com/litten/hexo-theme-yilia.git themes/yilia
2.配置
找到根目录文件_config.yml
修改theme节点,注意有空格
theme: yilia

3.重新生成并启动hexo
hexo clean
hexo g
hexo d
二、将hexo部署到github上面,实现双分支部署
引用master分支中README.md中的有关双分支的部署说明:
yansheng836.github.io
-- master  部署分支:主要存放生成的静态文件,用于部署到github pages
-- blog    写作分支:主要存放hexo环境配置、博客(md)
1. 部署master分支
1.1 指定hexo部署的方式、仓库、分支
修改hexo根目录下的 _config.yml
#部署到github的仓库
#Deployment
#Docs: https://hexo.io/docs/deployment.html
deploy:
  type: git
  repository: https://github.com/zhihaocheng99/zhihaocheng99.github.io.git
  branch: master
1.2 为项目添加说明README.md
你可以把README.md,LICENSE(许可证)等文件放在/source/目录下,该目录的文件可以上传到github根目录;之前提过hexo g是将/source//.md所有文件渲染成html文件(如果没有设置跳过渲染的话),然后放到对应的/public/目录下;而对于其他文件,直接复制到对应文件夹下。
设置跳过渲染README.md,需要修改hexo根目录下的 _config.yml
#hexo g 会默认将所有md文件转换成(渲染成)HTML文件放到public文件夹中;加上这句话的意思就是告诉hexo的解析器,跳过渲染(skip_render)README.md文件
skip_render:
 - 'README.md'
如果不设置该属性,README.md文件会被装换成README.html文件,同理你可以通过该配置跳过渲染你不希望hexo渲染的md文件。
1.3 把master分支部署到github的master分支
如果有修改配置文件,最好都进行重新编译。
hexo clean
hexo g
hexo d
如果出现类似错误:
ERROR Deployer not found: git
需要添加git依赖:
npm install hexo-deployer-git --save
2. 部署blog分支
注意:该分支名可自定义。
2.1 在Hexo根目录打开git命令行,初始化一个仓库
在hexo根目录下新建仓库,用于管理写作分支(之前的部署到github的为部署分支)
git init
git remote add origin https://github.com/zhihaocheng99/zhihaocheng99.github.io.git
2.2 忽略一些不需要备份的文件
修改跟目录下的.gitignore,.gitignore的原内容:
.DS_Store
Thumbs.db
db.json
*.log
node_modules/
public/
.deploy*/
在后面增加以下内容,用来忽略原来的主题文件:
#ignored the useless themes
/themes/landscape/
2.3 删除/themes/yilia/.git文件夹。
为方便将yilia的主题配置进行同步(其实该主题已经很久没更新了……),但是之前我们使用github克隆的yilia,也就是话说:/themes/yilia/里面也有一个仓库,这涉及到git仓库下的子仓库的问题,默认情况下是不将该子仓库介入到外层仓库的,但是我们需要备份yilia主题的配置文件,所以需要删除该子仓库,即删除/themes/yilia/.git文件夹。
2.4 创建blog分支。
创建一个分支存放写作内容,方便同步到同一仓库的不同分支,先提交一次,不然会报
fatal: Not a valid object name: 'master'
添加、提交
git add .
git commit -m "init the blog"
创建分支,并同步到github的blog分支
git branch blog
git checkout blog
git push origin blog
2.5 github上把blog分支设置为默认分支
可设置该分支为默认分支Settings-->branches-->Default branch:master设置为blog-->update,这样以后仓库主页显示就是blog分支,而且拉取(或者克隆)的时候拉取的就是blog分支,而不是原来默认的master分支。
2.6 实现双分支部署
每次写完博客要同时同步到该仓库的不同分支上,以实现真正的同步(备份)。
#Writing
# 同步到master分支
hexo clean
hexo generate
hexo deploy

# 手动同步到blog分支上
git add.
git commit -m "提交信息"
git push origin blog #如果设置了blog为默认分支,可以直接git push
3.发布到github pages
设置master分支为主页,步骤Settings-->options-->GitHub Pages:设置master分支-->update,成功后会刷新,显示则可通过``访问。
如果有购买域名,可设置对应域名,之前要设置域名解析(这个好像有点啰嗦不细讲),或者直接在hexo根目录的/source/文件夹下添加CNAME文件(注意:该文件没有后缀),内容为域名:
www.yansheng.xyz
然后发布到github上
hexo clean
hexo generate
hexo deploy
成功后在setting中会显示可通过域名访问,而不是原来的路径。
三.yilia主题美化
1.hexo设值网站的图标Favicon
效果图
去比特冲网站制作下载,并将图标名称改为favicon.ico
然后把图标放在 hemesyiliasourceimg里
找到hexo hemesyilialayout _partialhead.ejs修改主题配置文件:
<% if (theme.favicon){ %>
    <link rel="icon" href="/img/favicon.ico">
  <% } %>
2.鼠标点击小红心的设置
在hexo/themes/yilia/source文件目录下添加love.js文件,加入以下代码
!function(e,t,a){function r(){for(var e=0;e<s.length;e++)s[e].alpha<=0?(t.body.removeChild(s[e].el),s.splice(e,1)):(s[e].y--,s[e].scale+=.004,s[e].alpha-=.013,s[e].el.style.cssText="left:"+s[e].x+"px;top:"+s[e].y+"px;opacity:"+s[e].alpha+";transform:scale("+s[e].scale+","+s[e].scale+") rotate(45deg);background:"+s[e].color+";z-index:99999");requestAnimationFrame(r)}function n(){var t="function"==typeof e.onclick&&e.onclick;e.onclick=function(e){t&&t(),o(e)}}function o(e){var a=t.createElement("div");a.className="heart",s.push({el:a,x:e.clientX-5,y:e.clientY-5,scale:1,alpha:1,color:c()}),t.body.appendChild(a)}function i(e){var a=t.createElement("style");a.type="text/css";try{a.appendChild(t.createTextNode(e))}catch(t){a.styleSheet.cssText=e}t.getElementsByTagName("head")[0].appendChild(a)}function c(){return"rgb("+~~(255*Math.random())+","+~~(255*Math.random())+","+~~(255*Math.random())+")"}var s=[];e.requestAnimationFrame=e.requestAnimationFrame||e.webkitRequestAnimationFrame||e.mozRequestAnimationFrame||e.oRequestAnimationFrame||e.msRequestAnimationFrame||function(e){setTimeout(e,1e3/60)},i(".heart{ 10px;height: 10px;position: fixed;background: #f00;transform: rotate(45deg);-webkit-transform: rotate(45deg);-moz-transform: rotate(45deg);}.heart:after,.heart:before{content: ''; inherit;height: inherit;background: inherit;border-radius: 50%;-webkit-border-radius: 50%;-moz-border-radius: 50%;position: fixed;}.heart:after{top: -5px;}.heart:before{left: -5px;}"),n(),r()}(window,document);
在hexo/themes/yilia/layout/_partial/footer.ejs文件的最后添加以下代码
<!--页面点击小红心-->
<script type="text/javascript" src="/love.js"></script>
3.头像旋转效果
- 新建
themesyiliasourceavatarrotation.css文件
.left-col #header .profilepic img {
	/* 控制旋转速度时间*/
  -webkit-transition: -webkit-transform 1.0s ease-out;
  -moz-transition: -moz-transform 1.0s ease-out;
  transition: transform 1.0s ease-out;
}
.left-col #header .profilepic img:hover {
	/* 鼠标经过360% */
  -webkit-transform: rotateZ(360deg);
  -moz-transform: rotateZ(360deg);
  transform: rotateZ(360deg);
}
-
修改
themesyilialayout\_partialhead.ejs文件<%- partial('css') %> <!-- 旋转头像效果--> <% if (theme.avatarrotation){ %> <link rel="stylesheet" type="text/css" href="/./avatarrotation.css"> <% } %> <!-- 添加完成 --> <style type="text/css"> <% var defaultCtnBg = 'linear-gradient(200deg,#a0cfe4,#e8c37e)' %> #container.show { background: <%= theme.style && theme.style.slider ? theme.style.slider : defaultCtnBg %>; } </style>themesyilia\_config.yml文件添加
#头像是否旋转(如果不要旋转取false)
avatarrotation: true
4.头像上背景改为图片
修改 themesyilialayout\_partialleft-col.ejs 文件
<div class="overlay" style="background: <%= theme.style && theme.style.header ? theme.style.header : defaultBg %>"></div>
改为
<div class="overlay" style="background: url('https://w.wallhaven.cc/full/k9/wallhaven-k9zqjd.png') no-repeat center bottom;background-size: cover;"></div>
5.添加百度统计
-
去百度统计注册登录,这里我注册的是站长版,然后
网站列表->新增网站,将你的域名输入进去 -
然后获取代码并复制
-
打开
themes/yilia/layout/_partial/baidu-analytics.ejs, -
将复制的代码粘贴在
</script>和<% } %>之间 -
然后打开
themes/yilia/_config.yml -
将里面
baidu_analytics: ''改成baidu_analytics: true -
可能你的站点会出现一个百度的LOGO,你可以
百度统计首页->管理->统计图表设置->页面显示图标,把那个勾去了

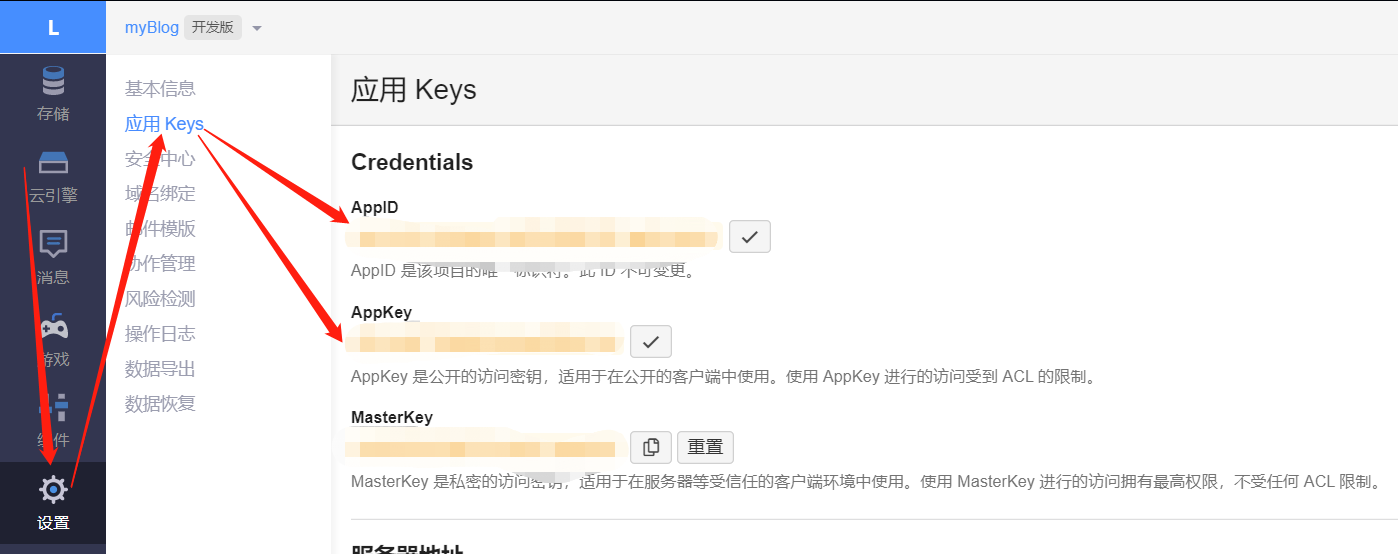
6.添加Valine评论系统
-
leancloud官网:https://leancloud.cn/
注册完成之后
应用->设置->应用Key获取你的appid和appkey , 如图
- 修改
themes/yilia/_config.yml添加valine 评论系统:
#、Valine https://valine.js.org
valine:
 appid: #Leancloud应用的appId
 appkey: #Leancloud应用的appKey
 verify: false #验证码,verify和notify这两个最好就别动了
 notify: false #评论回复提醒
 avatar: mm #评论列表头像样式:''/mm/identicon/monsterid/wavatar/retro/hide
 placeholder: Just go go #评论框占位符
- 打开
themesyilialayout\_partialarticle.ejs文件,末尾添加
<% if (!index){ %>
    <% if (theme.valine && theme.valine.appid && theme.valine.appkey){ %>
        <section id="comments" class="comments">
          <style>
            .comments{margin:30px;padding:10px;background:#fff}
            @media screen and (max-800px){.comments{margin:auto;padding:10px;background:#fff}}
          </style>
          <%- partial('post/valine', {
            key: post.slug,
            title: post.title,
            url: config.url+url_for(post.path)
            }) %>
      </section>
    <% } %>
<% } %>
- 打开
hexo hemesyilialayout_partialpost文件夹,新建valine.ejs文件
<div id="vcomment" class="comment"></div>
<script src="//cdn1.lncld.net/static/js/3.0.4/av-min.js"></script>
<script src='//unpkg.com/valine/dist/Valine.min.js'></script>
<script src="https://cdnjs.loli.net/ajax/libs/jquery/3.2.1/jquery.min.js"></script>
<script>
    var notify = '<%= theme.valine.notify %>' == true ? true : false;
    var verify = '<%= theme.valine.verify %>' == true ? true : false;
    new Valine({
        av: AV,
        el: '#vcomment',
        notify: notify,
        app_id: "<%= theme.valine.appid %>",
        app_key: "<%= theme.valine.appkey %>",
        placeholder: "<%= theme.valine.placeholder %>",
        avatar:"<%= theme.valine.avatar %>",
    });
</script>
7.添加不蒜子和添加统计网站访问量
- 在
themesyilialayout\_partialfooter.ejs最后引入不蒜子和添加统计网站访问量
footer.ejs<footer id="footer">
<div class="outer">
<div id="footer-info">
<div class="footer-left">
© <%= date(new Date(), 'YYYY') %> <%= config.author || config.title %>
</div>
<div class="footer-right">
<a href="http://hexo.io/" target="_blank">Hexo</a> Theme <a href="https://github.com/litten/hexo-theme-yilia" target="_blank">Yilia</a>
</div>
</div>
</div>
<!-- 引入不蒜子-->
<script async src="//busuanzi.ibruce.info/busuanzi/2.3/busuanzi.pure.mini.js"></script>
<!-- 开始添加本站访客数-->
<span id="busuanzi_container_site_pv">
本站总访问量: <span id="busuanzi_value_site_pv"></span>
</span>
<span id="busuanzi_container_site_uv">
本站总访客: <span id="busuanzi_value_site_uv"></span>
</span>
<!-- 添加完成 -->
</footer>
其中
# PV方式,单个用户连续点击 n 篇,记录 n 次记录值
# UV方式,单个用户连续点击 n 篇,记录 1 次记录值
- 打开
themesyilialayout\_partialarticle.ejs文件,添加单篇文章点击量
article.ejs......
    <div class="article-info article-info-index">
      <%if(post.top){%>
        <div class="article-pop-out tagcloud">
          <i class="icon-tuding"></i>
          <a class="article-tag-list-link color3">置顶</a>
        </div>
      <% } %>
      <%- partial('post/tag') %>

<!-- 开始添加阅读量-->
<% if ( !index ){ %>
		<span id="busuanzi_container_page_pv">
  |  阅读量<span id="busuanzi_value_page_pv"></span>次
</span>
<% } %>
<!-- 添加完成 -->

      <%- partial('post/category') %>
      <% if (index && theme.show_all_link){ %>
        <p class="article-more-link">
          <a class="article-more-a" href="<%- url_for(post.path) %>"><%= theme.show_all_link %> >></a>
        </p>
      <% } %>
......