第1章 rsync 软件介绍
1.1 什么是rsync
rsync 是一款开源的、快速的、多功能的、可实现全量及增量的本地或远程数据同步备份的优秀工具。
http://www.samba.org/ftp/rsync/rsync.html
1.1.1 全量及增量
全量:将全部数据,进行传输覆盖
增量:只传输差异部分的数据
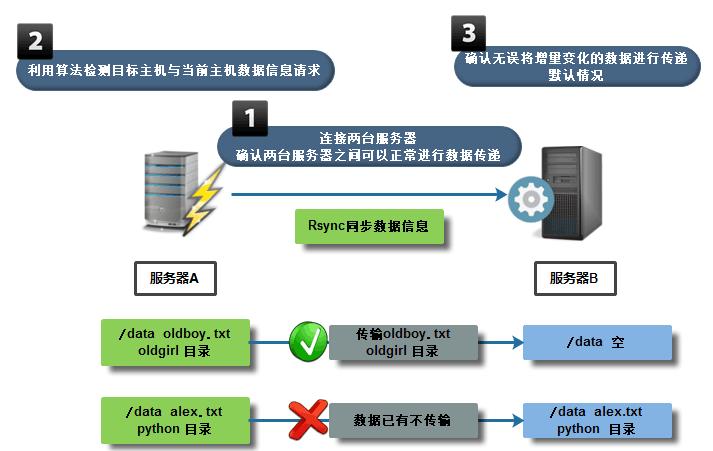
1.2 实现增量复制的原理
Rsync通过其独特的“quick check”算法,实现增量传输数据
[root@backup ~]#man rsync
Rsync  finds  files  that  need  to  be transferred using a “quick check” algorithm (by default)  that  looks  for  files  that  have changed  in  size  or  in  last-modified time.  Any changes in the other preserved attributes (as requested by options) are  made  on the  destination file directly when the quick check indicates that the file’s data does not need to be updated.
在同步备份数据时,默认情况下,Rsync通过其独特的“quick check”算法,它仅同步大小或者最后修改时间发生变化的文件或目录,当然也可根据权限,属主等属性的变化同步,但需要指定相应的参数,甚至可以实现只同步一个文件里有变化的内容部分,所以,可以实现快速的同步备份数据。
centos 5 rsync 2.x 先比对再同步,速度较慢
centos 6 rsync 3.x 一边比对,一边对差异部分进行同步
1.2.1 软件版本
[root@backup ~]# rsync --version
rsync  version 3.0.6  protocol version 30
Copyright (C) 1996-2009 by Andrew Tridgell, Wayne Davison, and others.
Web site: http://rsync.samba.org/
Capabilities:
    64-bit files, 64-bit inums, 64-bit timestamps, 64-bit long ints,
    socketpairs, hardlinks, symlinks, IPv6, batchfiles, inplace,
    append, ACLs, xattrs, iconv, symtimes
rsync comes with ABSOLUTELY NO WARRANTY.  This is free software, and you
are welcome to redistribute it under certain conditions.  See the GNU
General Public Licence for details.
1.3 rsync 软件功能介绍
类似于 cp 命令 -- 实现本地备份传输数据
类似于scp 命令 -- 远程备份传输数据
类似于 rm 命令 -- 实现无差异同步备份
类似于 ls 命令 -- 本地文件信息查看
rsync 命令属于1 v 4 的命令
1.3.1 rsync == cp
[root@backup ~]# cp -a  /etc/hosts /tmp/
[root@backup ~]# ls /tmp/
hosts
[root@backup ~]#
m /tmp/hosts
[root@backup ~]# rsync  /etc/hosts /tmp/
[root@backup ~]# ls /tmp/hosts
/tmp/hosts
1.3.2 rsync == scp
#使用scp实现
#检查对端服务器目标位置上是否有该文件
[root@nfs01 ~]# ls /tmp/hosts
ls: cannot access /tmp/hosts: No such file or directory
#从本地拷贝到远端服务器上
[root@backup ~]# ls /tmp/hosts
/tmp/hosts
[root@backup ~]# scp -rp /etc/hosts 10.0.0.31:/tmp/
The authenticity of host '10.0.0.31 (10.0.0.31)' can't be established.
RSA key fingerprint is d3:41:bb:0d:43:88:da:a3:2c:e8:36:91:11:c9:e4:9c.
Are you sure you want to continue connecting (yes/no)? yes
Warning: Permanently added '10.0.0.31' (RSA) to the list of known hosts.
root@10.0.0.31's password:
hosts                                           100%  357     0.4KB/s   00:00
#检查远端服务器上的结果
[root@nfs01 ~]# ls /tmp/hosts
/tmp/hosts
#使用rsync 实现
[root@backup ~]# rsync -rp /etc/hosts 10.0.0.31:/tmp/
root@10.0.0.31's password:
[root@backup ~]#
[root@nfs01 ~]# ls /tmp/hosts
/tmp/hosts
1.3.3 rsync == rm
1.3.3.1 环境准备
创建出来一次命令 进行操作
 [root@backup tmp]# mkdir /znix
[root@backup znix]# cp /tmp/* .
[root@backup znix]# ll
total 4
-rw-r--r-- 1 root root 357 Oct 11 15:21 hosts
#rm命令操作
[root@backup znix]# rm -rf /znix/hosts
[root@backup znix]# ll /znix/hosts
ls: cannot access /znix/hosts: No such file or directory
查看这文件
[root@backup ~]# l
total 4
-rw-r--r-- 1 root root 357 Oct 11 15:21 hosts
创建一个空目录,使用空目录进行无差异同步
[root@backup ~]# mkdir /null
[root@backup ~]# rsync --delete  /null/ /znix/
rsync: --delete does not work without -r or -d.
rsync error: syntax or usage error (code 1) at main.c(1422) [client=3.0.6]
[root@backup ~]# rsync  -a  --delete  /null/ /znix/
[root@backup ~]# ll /znix/
total 0
1.3.4 rsync == ls -l
使用rsync 可以实现与 ls 类似的功能
[root@backup ~]# ls -l install.log
-rw-r--r--. 1 root root 21736 Sep 25 08:38 install.log
[root@backup ~]# rsync install.log
-rw-r--r--       21736 2017/09/25 08:38:28 install.log
1.4 Rsync的特性总结(7个特性信息说明)
01. 支持拷贝普通文件与特殊文件如链接文件,设备等。
02. 可以有排除指定文件或目录同步的功能,相当于打包命令tar的排除功能。
    #tar zcvf backup_1.tar.gz  /opt/data  -exclude=clsn
    说明:在打包/opt/data时就排除了clsn命名的目录和文件。
03. 可以做到保持原文件或目录的权限、时间、软硬链接、属主、组等所有属性均不改变-p。
04. 可实现增量同步,既只同步发生变化的数据,因此数据传输效率很高(tar -N)。
    # 将备份/home 目录自 2008-01-29 以来修改过的文件
    # tar -N 2008-01-29 -zcvf /backups/inc-backup_$(date +%F).tar.gz /home
    # 将备份 /home 目录昨天以来修改过的文件
    # tar -N $(date -d yesterday "+%F") -zcvf /backups/inc-backup_$(date +%F).tar.gz /home
    # 添加文件到已经打包的文件
    # tar -rf all.tar *.gif
    说明:这条命令是将所有.gif的文件增加到all.tar的包里面去。-r是表示增加文件的意思。
05. 可以使用rcp,rsh,ssh等方式来配合进行隧道加密传输文件(rsync本身不对数据加密)
06. 可以通过socket(进程方式)传输文件和数据(服务端和客户端)*****。重点掌握
07. 支持匿名的或认证(无需系统用户)的进程模式传输,可实现方便安全的进行数据备份及镜像。
1.5 Rsync的企业工作场景说明
01. 两台服务器之间数据同步(定时任务cron+rsync)
同步网站内部人员数据信息(定时任务最小周期为1分钟)
02. 两台服务器之间数据同步(实时任务inotify/sersync/lrsyncd+rsync)
同步网站用户人员数据信息
第2章 rsync使用方式
2.1 rsync软件工作方式
SYNOPSIS
        本地数据同步方式
       Local:  rsync [OPTION...] SRC... [DEST]
        远程数据同步方式
       Access via remote shell:
         Pull: rsync [OPTION...] [USER@]HOST:SRC... [DEST]
         Push: rsync [OPTION...] SRC... [USER@]HOST:DEST
        守护进程方式同步数据
       Access via rsync daemon:
         Pull: rsync [OPTION...] [USER@]HOST::SRC... [DEST]
               rsync [OPTION...] rsync://[USER@]HOST[:PORT]/SRC... [DEST]
         Push: rsync [OPTION...] SRC... [USER@]HOST::DEST
               rsync [OPTION...] SRC... rsync://[USER@]HOST[:PORT]/DEST
2.1.1 本地数据同步方式(类似于cp)
Local: rsync [OPTION...] SRC... [DEST]
|
参数 |
含义 |
|
rsync |
数据同步命令 |
|
[OPTION...] |
rsync命令参数信息 |
|
SRC |
要同不得数据信息(文件或目录) |
|
[DEST] |
将数据传输到什么位置 |
2.1.1.1 实例演示命令:
[root@backup ~]# rsync  /etc/hosts /tmp/
[root@backup ~]# ls /tmp/hosts
/tmp/hosts
2.1.2 远程数据同步方式(类似scp)---又称为隧道传输
Access via remote shell:
  Pull: rsync [OPTION...] [USER@]HOST:SRC... [DEST]
  Push: rsync [OPTION...] SRC... [USER@]HOST:DEST
说明:需要进行交互传输数据。如果想实现免交互传输数据,需要借助ssh+key方式实现
|
pull: 拉: |
|
|
[USER@] : |
以什么用户身份传输数据信息 |
|
HOST: |
远程主机信息(IP地址信息 主机名称信息) |
|
SRC: |
远端要恏过来的数据信息 |
|
[dest] |
恏到本地什么位置 |
|
push:推: |
|
|
SRC: |
本地要怼过去的数据信息 |
|
DEST |
怼到远端什么位置 |
2.1.3 【实践操作】pull 拉
从远端拉文件到当前目录
[root@nfs01 ~]# touch /tmp/1.txt
[root@backup ~]# rsync nfs01:/tmp/1.txt .
root@nfs01's password:
[root@backup ~]# ll
total 44
-rw-r--r--  1 root root     0 Oct 11 16:16 1.txt
2.1.4 【实践操作】push 推 (目录)
将本地的hosts文件推到远端服务器上
[root@backup tmp]# ll
total 4
-rw-r--r-- 1 root root 357 Oct 11 15:12 hosts
使用push的格式 推整个目录(包括目录)
[root@backup tmp]# rsync -r /tmp nfs01:/tmp/
root@nfs01's password:
[root@nfs01 tmp]# ll
total 4
drwxr-xr-x 3 root root 4096 Oct 11 16:20 tmp
推整个目录下的文件(不包括目录本身)
[root@backup tmp]# rsync -r /tmp/ nfs01:/tmp/
root@nfs01's password:
[root@nfs01 tmp]# ll
total 8
-rw-r--r-- 1 root root  357 Oct 11 16:21 hosts
drwxr-xr-x 3 root root 4096 Oct 11 16:20 tmp
说明:
/tmp --表示将tmp目录本身及目录下的内容进行传输
/tmp/ --表示只传输tmp目录下面的内容信息
2.2 守护进程方式同步数据
[root@localhost ~]# uname -a
Linux 2.6.32-696.el6.x86_64 #1 SMP Tue Mar 21 19:29:05 UTC 2017 x86_64 x86_64 x86_64 GNU/Linux
Access via rsync daemon:
Pull: rsync [OPTION...] [USER@]HOST::SRC... [DEST]
      rsync [OPTION...] rsync://[USER@]HOST[:PORT]/SRC... [DEST]
Push: rsync [OPTION...] SRC... [USER@]HOST::DEST
      rsync [OPTION...] SRC... rsync://[USER@]HOST[:PORT]/DEST
2.2.1 配置rsync守护进程方式(需要有服务端与客户端)
规划:
1、backup服务器作为rsync服务端
2、以rysnc客户端作为参照物,将数据推到rsync服务器上
2.2.2 配置rsync服务端(将服务端配置到 backup 服务器上)
第一个里程碑: 软件是否存在
[root@backup ~]# rpm -qa |grep rsync
rsync-3.0.6-12.el6.x86_64
第二个里程碑: 进行软件服务配置
[root@backup ~]# vim /etc/rsyncd.conf
uid = rsync
gid = rsync
use chroot = no
max connections = 200
timeout = 300
pid file = /var/run/rsyncd.pid
lock file = /var/run/rsync.lock
log file = /var/log/rsyncd.log
ignore errors
read only = false
list = false
hosts allow = 172.16.1.0/24
hosts deny = 0.0.0.0/32
auth users = rsync_backup
secrets file = /etc/rsync.password
[backup]
comment = "backup dir by clsn"
path = /backup
第三个里程:创建rsync用户
[root@backup ~]# id rsync
id: rsync: No such user
[root@backup ~]# useradd -s /sbin/nologin -M rsync
第四个里程碑: 创建数据备份储存目录,目录修改属主
[root@backup ~]# mkdir /backup/
[root@backup ~]# chown -R rsync.rsync /backup/
第五个里程碑: 创建认证用户密码文件
echo "rsync_backup:clsn123" >>/etc/rsync.password
chmod 600 /etc/rsync.password
第六个里程碑: 启动rsync服
rsync --daemon
至此服务端配置完成
[root@backup ~]# ps -ef |grep rsync
root       2076      1  0 17:05 ?        00:00:00 rsync --daemon
root       2163   1817  0 17:38 pts/1    00:00:00 grep --color=auto rsync
[root@backup ~]# netstat -lntup |grep rsync
tcp        0      0 0.0.0.0:873                 0.0.0.0:*                   LISTEN      2076/rsync
tcp        0      0 :::873                      :::*                        LISTEN      2076/rsync
2.2.3 配置rsync客户端(其他服务器为客户端)
第一个里程碑: 软件是否存在
[root@nfs01 ~]# rpm -qa |grep rsync
rsync-3.0.6-12.el6.x86_64
第二个里程碑: 创建认证文件
客户端的认证文件只需要有密码即可
echo "clsn123" >>/etc/rsync.password
chmod 600 /etc/rsync.password
第三个里程碑: 实现数据传输
交互式
[root@nfs01 ~]# rsync -avzP /etc/hosts rsync_backup@172.16.1.41::backup
Password:
sending incremental file list
hosts
         357 100%    0.00kB/s    0:00:00 (xfer#1, to-check=0/1)

sent 63 bytes  received 33 bytes  9.14 bytes/sec
total size is 357  speedup is 3.72
免交互式
[root@nfs01 ~]# rsync -avzP /etc/hosts rsync_backup@172.16.1.41::backup --password-file=/etc/rsync.password
sending incremental file list
hosts
         357 100%    0.00kB/s    0:00:00 (xfer#1, to-check=0/1)

sent 199 bytes  received 27 bytes  150.67 bytes/sec
total size is 357  speedup is 1.58
2.3 rsync守护进程传输数据原理
2.4 rsync 命令同步参数选项&特殊参数
|
目录参数 |
参数说明 |
|
-v ,--verbose |
详细模式输出,传输时的信息 |
|
-z,--compress |
传输时进行压缩以提高传输效率 --compress-level=NUM 可按级别压缩 局域网可以不用压缩 |
|
-a,--archive (主要) |
归档模式,表示以递归方式传输文件,并保持文件属性。等于 -rtopgDl |
|
-r,--recursive 归档于-a |
对子目录以递归模式,即目录下的所有目录都同样传输。小写r |
|
-t,--times 归档于-a |
保持文件时间信息 |
|
-o,--owner 归档于-a |
保持文件属主信息 |
|
-p,--perms 归档于-a |
保持文件权限 |
|
-g,--group 归档于-a |
保持文件属组信息 |
|
-P,--progress |
显示同步的过程及传输时的进度等信息(大P) |
|
-D,--devices 归档于-a |
保持设备文件信息 |
|
-l,--links 归档于-a |
保留软连接(小写字母l) |
|
-e,--rsh=COMMAND |
使用的信道协议(remote shell),指定替代rsh的shell程序。 例如 ssh |
|
--exclude=PATTERN |
指定排除不需要传输的文件信息 |
|
--exclude-from=file |
文件名所在目录文件,即可以实现排除多个文件 |
|
--bwlimit=RATE |
限速功能 |
|
--delete |
让目标目录SRC和源目录数据DST一致,即无差异数据同步 |
|
保持同步目录及文件属性: 这里的-avzP相当于 -vzetopdDlP,生产环境常用的参数为 -avzP 在脚本中可以报-vP去掉 --progress可以用-P代替 |
|
|
daemon启动扩展参数 |
|
|
--daemon |
daemon表示以守护进程的方式启动rsync服务。 |
|
--address |
绑定指定IP地址提供服务。 |
|
--config=FILE |
更改配置文件路径,而不是默认的/etc/rsyncd.conf |
|
--port=PORT |
更改其它端口提供服务,而不是缺省的873端口 |
2.4.1 特殊参数实践
指定ip:
[root@backup ~]# rsync --daemon --address=172.16.1.41
[root@backup ~]# netstat -lntup |grep 873
tcp     0   0 172.16.1.41:873     0.0.0.0:*        LISTEN      2583/rsync
参数测试:
[root@nfs01 ~]# rsync -avzP /etc/services rsync_backup@172.16.1.41::backup --password-file=/etc/rsync.password
sending incremental file list
services
      641020 100%   19.34MB/s    0:00:00 (xfer#1, to-check=0/1)

sent 127417 bytes  received 27 bytes  254888.00 bytes/sec
total size is 641020  speedup is 5.03
指定配置文件路径
[root@backup ~]# rsync --daemon --config=/etc/rsyncd.conf
[root@nfs01 ~]# rsync -avzP /etc/services rsync_backup@172.16.1.41::backup --password-file=/etc/rsync.password
sending incremental file list
sent 29 bytes  received 8 bytes  74.00 bytes/sec
total size is 641020  speedup is 17324.86
服务端指定服务端口:
[root@backup ~]# rsync --daemon --port=5222
[root@backup ~]# netstat -lntup|grep rsync
tcp        0      0 0.0.0.0:5222      0.0.0.0:*           LISTEN      2598/rsync
tcp        0      0 :::5222            :::*                 LISTEN      2598/rsync
第3章 rsycn配置文件详解 rsyncd.conf
3.1 部分知识补充
3.1.1 配置文件内容参考资料
man rsyncd.conf
3.1.2 配置文件内容总结
模块之上内容为全局变量信息
模块之下内容为局部变量信息
说明:
无论是全局变量发生变化,还是局部变量发生变化,都建议重启rsync服务使配置生效。
3.2 利用/etc/init.d/启动rsync服务方式
3.2.1 可以实现方式:
a. 编写rsync启动脚本(有一定的shell能力 if case)
b. 利用xinetd服务,管理启动rsync服务
3.2.2 利用 xinetd服务 管理rsync
第一个里程碑: 安装xinetd软件
[root@backup ~]# yum install -y xinetd
[root@backup ~]# rpm -qa |grep xin
xinetd-2.3.14-40.el6.x86_64
第二个里程碑:编辑配置文件
修改disable = yes 改为disable = no
[root@backup ~]# vim /etc/xinetd.d/rsync
# default: off
# description: The rsync server is a good addition to an ftp server, as it
#   allows crc checksumming etc.
service rsync
{
disable   = no
flags     = IPv6
socket_type     = stream
wait            = no
user            = root
server          = /usr/bin/rsync
server_args     = --daemon
log_on_failure  += USERID
}
第三个里程碑:重启xinetd服务
[root@backup ~]# /etc/init.d/xinetd restart
Stopping xinetd:                                           [  OK  ]
Starting xinetd:                                           [  OK  ]
传输测试
[root@nfs01 ~]# rsync -avzP /etc/services rsync_backup@172.16.1.41::backup --password-file=/etc/rsync.password
sending incremental file list
sent 29 bytes  received 8 bytes  74.00 bytes/sec
total size is 641020  speedup is 17324.86
3.3 定义变量信息实现免秘钥交互
3.3.1 通过man手册获得方法
Some  modules  on the remote daemon may require authentication. If so, you will receive a password prompt when you connect.  You  can avoid  the  password  prompt  by  setting the environment variable RSYNC_PASSWORD to the password  you  want  to  use  or  using  the --password-file option. This may be useful when scripting rsync.
WARNING:  On some systems environment variables are visible to all users. On those systems using --password-file is recommended.
在远程进程的一些模块可能需要认证。如果是这样的话,你将得到一个密码提示当您连接。你可以通过设置环境变量rsync_password要使用或使用密码文件选项密码避免密码提示。这可能是有用的脚本文件。
警告:在一些系统环境变量,对所有用户都是可见的。在这些系统中使用的密码文件的建议。
3.3.2 使用 RSYNC_PASSWORD 变量实现免交互
未设置变量之前
[root@nfs01 ~]# rsync -avzP /etc/services rsync_backup@172.16.1.41::backup
Password:
添加上环境变量
[root@nfs01 ~]# export RSYNC_PASSWORD=clsn123
测试
[root@nfs01 ~]# rsync -avzP /etc/services rsync_backup@172.16.1.41::backup
sending incremental file list
sent 29 bytes  received 8 bytes  24.67 bytes/sec
total size is 641020  speedup is 17324.86
3.4 守护进程多模块功能配置
第一个里程碑: 编写配置信息创建多模块
[root@backup ~]# vim /etc/rsyncd.conf
……
[nfsdata]
comment = "nfsdata dir by clsn"
path = /backup/nfsdata
[nfsbackup]
comment = "nfsbackup dir by clsn"
path = /backup/nfsbackup
第二个里程碑: 创建多模块指定的目录
# 创建目录,并修改目录的权限
[root@backup ~]# mkdir /backup/nfs{data,backup} -p
[root@backup ~]# chown rsync.rsync  /backup/nfs{data,backup}
#查看:
[root@backup ~]# ll /backup/nfs{data,backup} -d
drwxr-xr-x 2 rsync rsync 4096 Oct 12 10:05 /backup/nfsbackup
drwxr-xr-x 2 rsync rsync 4096 Oct 12 10:05 /backup/nfsdata
第三里程碑: 利用rsync客户端进行测试
[root@nfs01 ~]# rsync -avz /data/ rsync_backup@172.16.1.41::nfsdata --password-file=/etc/rsync.passsword
sending incremental file list
./
nfs.data
sent 78 bytes  received 30 bytes  216.00 bytes/sec
total size is 0  speedup is 0.00
说明:
rsyncd.conf配置文件中,添加多模块信息,可以不用重启rsync服务,即时生效~
全局变量参数针对所有模块生效;局部变量参数只针对指定模块生效
read only参数默认配置为ture,即为只读模式
全局变量发生变化,不用重启rsync服务;局部变量发生变化,需要重启rsync服务
注意:修改配置文件就重启↓
无论是全局变量发生变化,还是局部变量发生变化,都建议重启rsync服务使配置生效
3.5 守护进程的排除功能实践
3.5.1 排除的方式
a) --exclude=要配置的目录或文件名称
b) --exclude-from=要排除多个目录或文件汇总文件名称
c) 在配置文件中进行修改,指定要排除的信息
3.5.2 排除测试
第一个里程碑: 创建模拟测试环境
[root@nfs01 data]# mkdir {a..d}
[root@nfs01 data]# touch {a..d}/{1..3}.txt
[root@nfs01 data]# tree
.
├── a
│   ├── 1.txt
│   ├── 2.txt
│   └── 3.txt
├── b
│   ├── 1.txt
│   ├── 2.txt
│   └── 3.txt
├── c
│   ├── 1.txt
│   ├── 2.txt
│   └── 3.txt
└── d
    ├── 1.txt
    ├── 2.txt
    └── 3.txt
4 directories, 12 files
第二个里程碑 利用 --exclude参数测试排除功能
# 需求:不要a目录中3.txt 不要b、c目录
[root@nfs01 data]# rsync -avz /data/ --exclude=a/3.txt --exclude=b --exclude=c rsync_backup@172.16.1.41::nfsdata
sending incremental file list
./
a/
a/1.txt
a/2.txt
d/
d/1.txt
d/2.txt
d/3.txt
sent 300 bytes  received 114 bytes  828.00 bytes/sec
total size is 0  speedup is 0.00
精简方式排除
[root@nfs01 data]# rsync -avz /data/ --exclude=a/3.txt --exclude={b,c} rsync_backup@172.16.1.41::nfsdata
sending incremental file list
./
a/
a/1.txt
a/2.txt
d/
d/1.txt
d/2.txt
d/3.txt
sent 300 bytes  received 114 bytes  828.00 bytes/sec
total size is 0  speedup is 0.00
3.5.3 利用--exclude-from 方式进行排除
第一个里程碑: 创建模拟测试环境
[root@nfs01 data]# mkdir {a..d}
[root@nfs01 data]# touch {a..d}/{1..3}.txt
第二个里程碑:利用--exlude-from参数,测试排除功能
[root@nfs01 data]# vim /tmp/paichu.txt
a/3.txt
b
c
第三个里程碑:进行排除
[root@nfs01 data]# rsync -avz /data/ --exclude-from=/tmp/paichu.txt rsync_backup@172.16.1.41::nfsdata
sending incremental file list
./
a/
a/1.txt
a/2.txt
d/
d/1.txt
d/2.txt
d/3.txt
sent 300 bytes  received 114 bytes  828.00 bytes/sec
total size is 0  speedup is 0.00
说明:
01. 排除文件中,需要利用相对路径指定排除信息(不能利用绝对路径)
02. 相对路径指的是相对同步的目录信息而言,是对rsync -avz /data/ 后面的data目录进行相对
3.5.4 在配置文件中修改要排除的文件
第一个里程碑: 编写修改服务端配置文件
vim /etc/rsyncd.conf
[nfsdata]
comment = "nfsdata dir by clsn"
path = /backup/nfsdata
exclude=a/3.txt b c
第二个里程碑:重启rsync服务
killall rsync && sleep 1 && rsync --daemon
第三里程碑: 进行测试
[root@nfs01 data]# rsync -avz /data/  rsync_backup@172.16.1.41::nfsdata
sending incremental file list
./
a/
a/1.txt
a/2.txt
skipping daemon-excluded file "a/3.txt"
skipping daemon-excluded directory "b"
*** Skipping any contents from this failed directory ***
skipping daemon-excluded directory "c"
*** Skipping any contents from this failed directory ***
d/
d/1.txt
d/2.txt
d/3.txt
sent 407 bytes  received 116 bytes  1046.00 bytes/sec
total size is 0  speedup is 0.00
rsync error: some files/attrs were not transferred (see previous errors) (code 23) at main.c(1039) [sender=3.0.6]
3.6 守护进程来创建备份目录
通过客户端命令创建服务端备份目录中子目录
# 推送/etc/services文件到 服务器/backup/sda/目录
[root@nfs01 ~]# rsync -avzP /etc/services rsync_backup@172.16.1.41::backup/dba/
sending incremental file list
created directory dba
services
      641020 100%   19.34MB/s    0:00:00 (xfer#1, to-check=0/1)
# 推送/etc/services文件到 服务器/backup/sa/目录
sent 127417 bytes  received 27 bytes  254888.00 bytes/sec
total size is 641020  speedup is 5.03
[root@nfs01 ~]# rsync -avzP /etc/services rsync_backup@172.16.1.41::backup/sa/
sending incremental file list
created directory sa
services
      641020 100%   19.34MB/s    0:00:00 (xfer#1, to-check=0/1)
# 推送/etc/services文件到 服务器/backup/dev/目录
sent 127417 bytes  received 27 bytes  254888.00 bytes/sec
total size is 641020  speedup is 5.03
[root@nfs01 ~]# rsync -avzP /etc/services rsync_backup@172.16.1.41::backup/dev/
sending incremental file list
created directory dev
services
      641020 100%   18.71MB/s    0:00:00 (xfer#1, to-check=0/1)

sent 127417 bytes  received 27 bytes  254888.00 bytes/sec
total size is 641020  speedup is 5.03
检查结果:
[root@backup backup]# tree
.
├── dba
│   └── services
├── dev
│   └── services
└── sa
    └── services
说明:
a 目标目录名称后要加上 "/", 表示创建目录,否则变为修改传输文件名称了
b 利用客户端创建服务备份子目录时,只能创建一级子目录。
3.7 守护进程的访问控制配置
第一个里程碑:在服务端配置文件,编写白名单策略或黑名单策略(只能取其一)
    vim /etc/rsyncd.conf
    hosts allow = 172.16.1.0/24
    #hosts deny = 0.0.0.0/32
关于访问控制的说明:
01. 白名单和黑名单同时存在时,默认控制策略为不匹配的传输数据信息全部放行
02. 白名单单一存在时,默认控制策略为不匹配的传输数据信息全部禁止
03. 黑名单单一存在时,默认控制策略为不匹配的传输数据信息全部放行
全局变量修改控制策略信息,rsync服务必须重启
第二个里程碑:客户端进行测试
    [root@nfs01 backup]# rsync -avz /etc/services rsync_backup@10.0.0.41::data
    @ERROR: Unknown module 'data'
    rsync error: error starting client-server protocol (code 5) at main.c(1503) [sender=3.0.6]
--------------------------------------------------------------------------------
    [root@nfs01 backup]# rsync -avz /etc/services sync_backup@172.16.1.41::data
    sending incremental file list
    sent 29 bytes  received 8 bytes  74.00 bytes/sec
    total size is 641020  speedup is 17324.86
3.8 守护进程无差异同步配置
3.8.1 什么是无差异:
推模式:我有什么,你就有什么;我没有,你也不能有
拉模式:你有什么,我就有什么;你没有,我也不能有
总结:服务端客户端数据完全一致(一模一样)
3.8.2 实现无差异同步方法
第一个里程碑: 创建实验环境
[root@nfs01 ~]# ll /data/
total 16
drwxr-xr-x 2 root root 4096 Oct 12 10:29 a
drwxr-xr-x 2 root root 4096 Oct 12 10:40 b
drwxr-xr-x 2 root root 4096 Oct 12 10:29 c
drwxr-xr-x 2 root root 4096 Oct 12 10:29 d
第二个里程:进行第一次数据同步
[root@nfs01 ~]# rsync -avz --delete  /data/ rsync_backup@172.16.1.41::backup/
sending incremental file list
./
a/
a/1.txt
a/2.txt
a/3.txt
b/
b/1.txt
b/2.txt
b/3.txt
c/
c/1.txt
c/2.txt
c/3.txt
d/
d/1.txt
d/2.txt
d/3.txt
sent 669 bytes  received 255 bytes  1848.00 bytes/sec
total size is 0  speedup is 0.00
第三个里程:删除指定目录,并添加指定文件,测试无差异功能
# 删除客户端中的 a/ 目录,再进行无差异传输
[root@nfs01 data]# rm a/ -rf
[root@nfs01 data]# rsync -avz --delete  /data/ rsync_backup@172.16.1.41::backup/
sending incremental file list
./
deleting a/3.txt
deleting a/2.txt
deleting a/1.txt
deleting a/
sent 181 bytes  received 14 bytes  390.00 bytes/sec
total size is 0  speedup is 0.00
3.8.3 【注意】无差异同步方法的应用
01. 实现储存数据与备份数据完全一致(慎用)
rsync -avz --delete /data/ rsync_backup@172.16.1.41::backup /
02. 快速删除大文件数据
  1.mkdir /null      --创建出一个空目录。
  2.rsync -avz --delete /null/ /bigdata/
  # 删除效率高于 rm -rf /bigdata
3.9 守护进程的列表功能配置
第一个里程碑: 在服务端配置文件中开启list列表功能
[root@backup ~]# vim /etc/rsyncd.conf
list = true
第二个里程碑:重启rsync服务
[root@backup ~]# killall rsync && sleep 1 && rsync --daemon
第三个里程碑: 客户端查看服务端模块信息
[root@nfs01 data]# rsync rsync_backup@172.16.1.41::
backup         "backup dir by clsn"
nfsdata        "nfsdata dir by clsn"
nfsbackup      "nfsbackup dir by clsn"
说明:
为了提升备份服务器安全性,建议关闭list列表功能
第4章 常见问题
[root@nfs01 tmp]# rsync -avz /etc/hosts  rsync_backup@172.16.1.41::backup
Password:
sending incremental file list
hosts
rsync: mkstemp ".hosts.U5OCyR" (in backup) failed: Permission denied (13)
sent 200 bytes  received 27 bytes  13.76 bytes/sec
total size is 371  speedup is 1.63
rsync error: some files/attrs were not transferred (see previous errors) (code 23) at main.c(1039) [sender=3.0.6]
说明:备份目录权限设置不正确
解决办法:
将服务端的备份存放目录(path值),属主和属组修改为rsync。
[root@backup ~]# chown -R rsync.rsync /backup/