准备工作:
1、一台 window 虚拟机(本机是window也行)
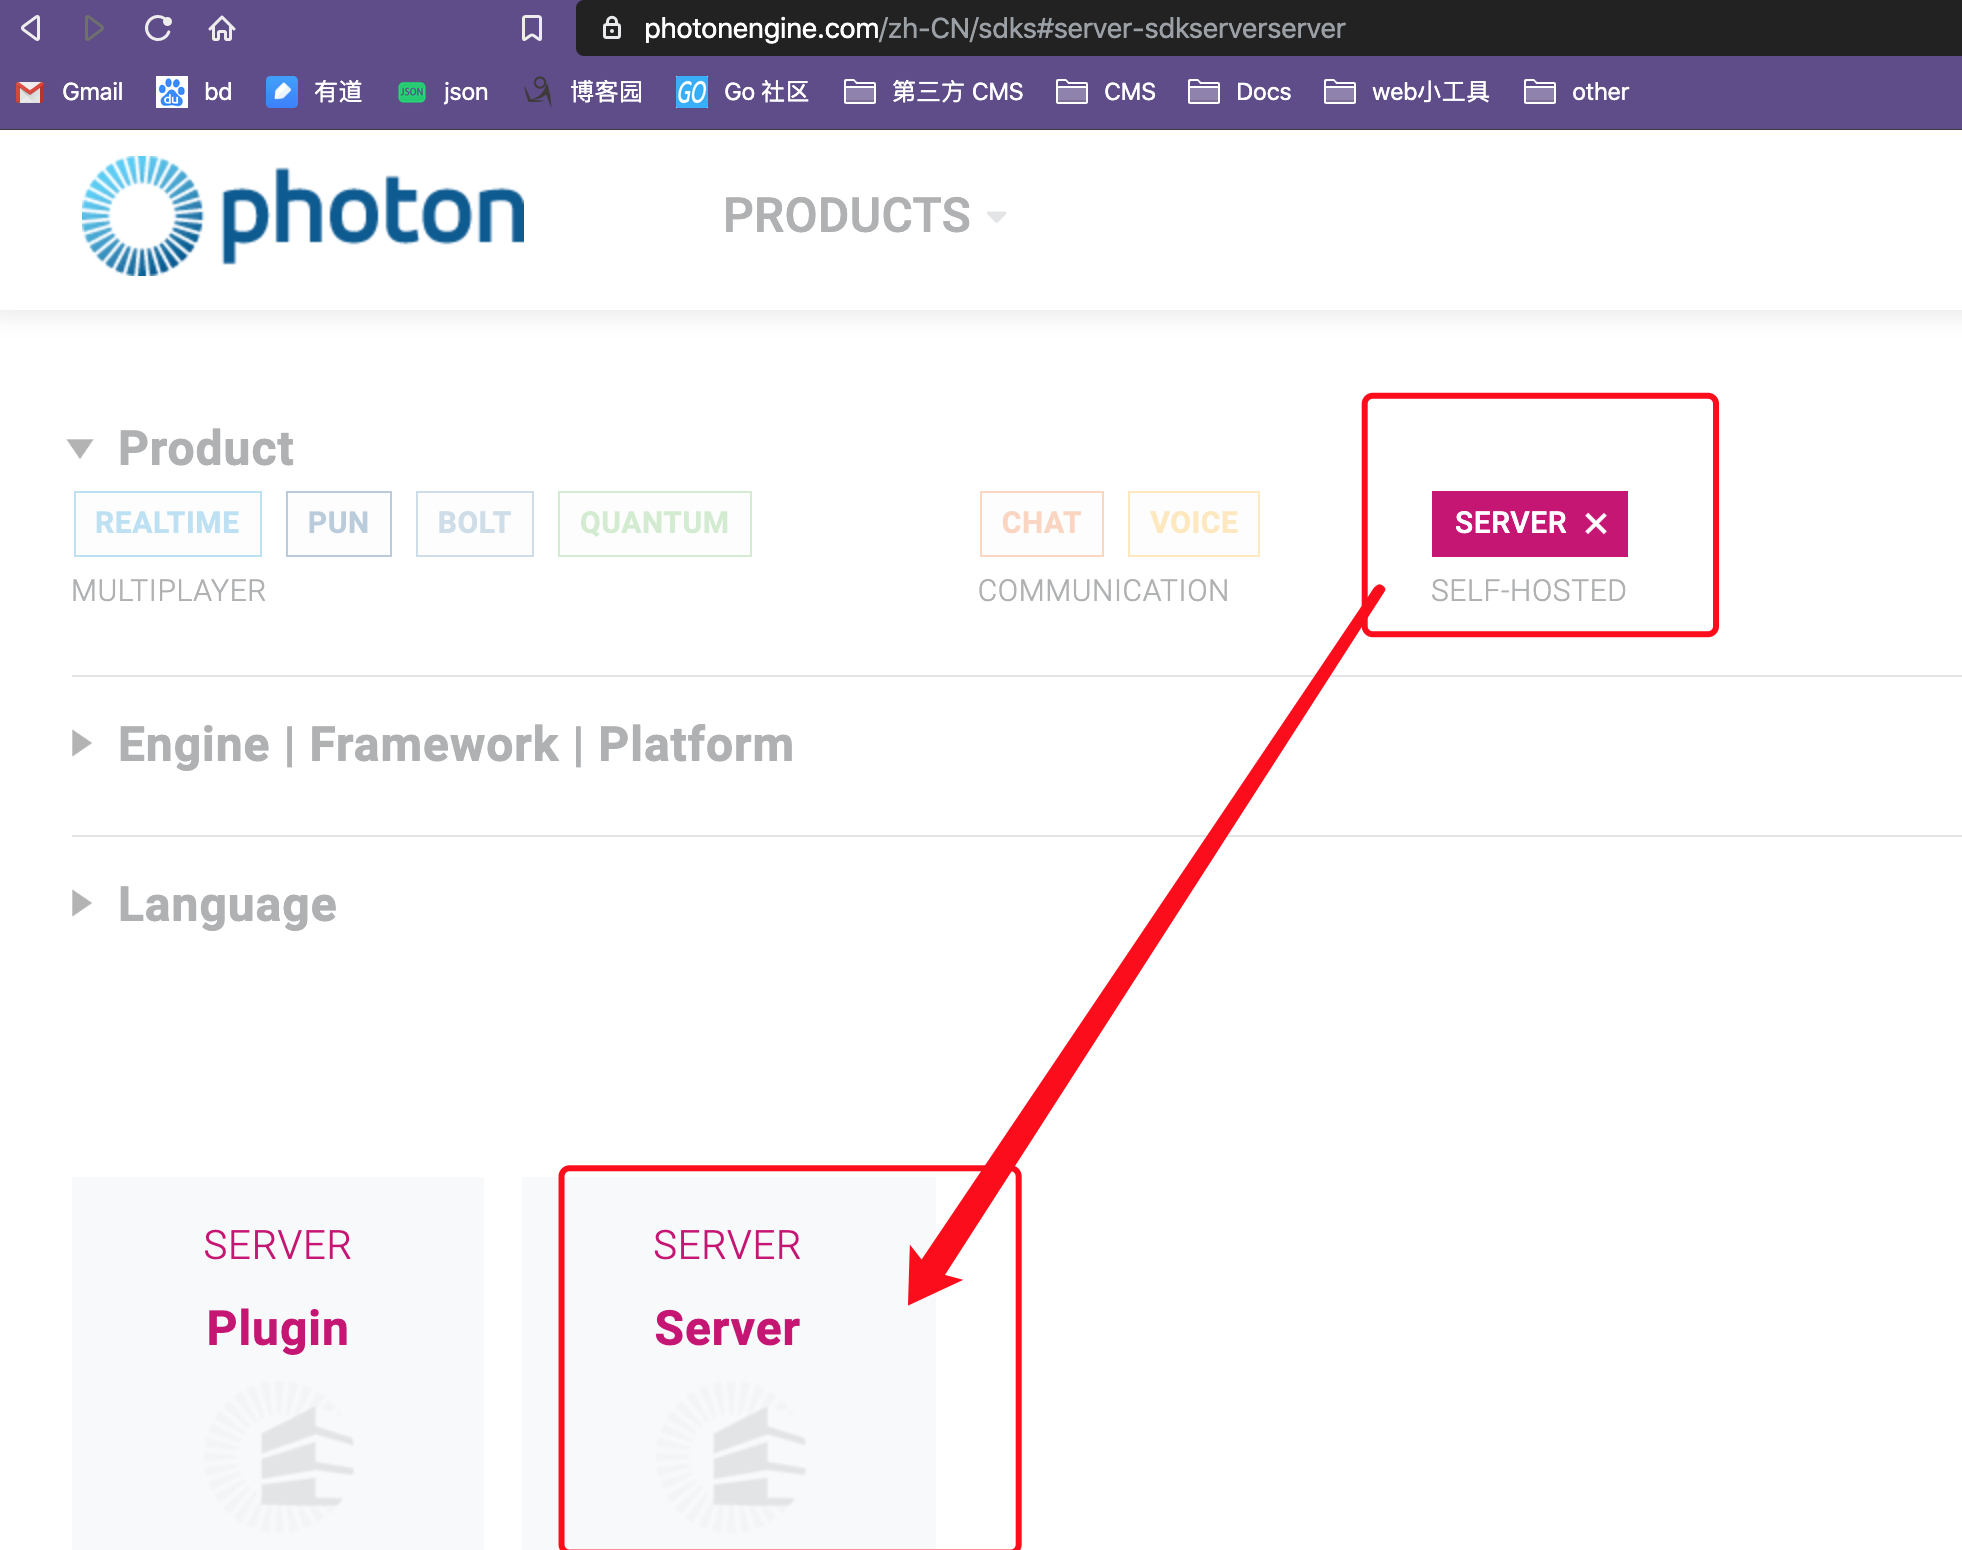
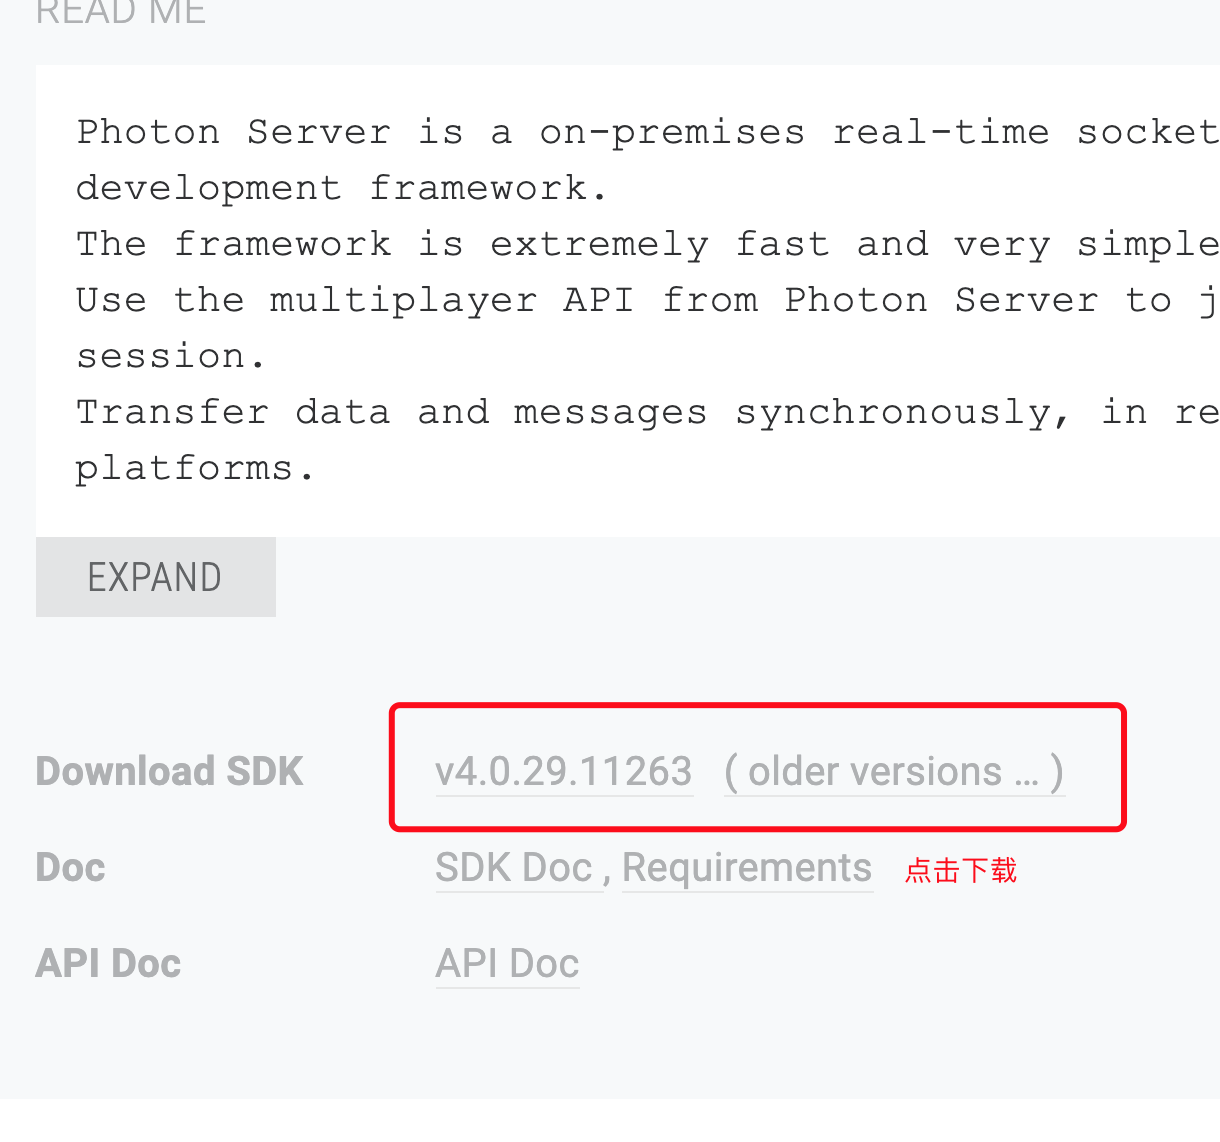
2、下载SDK : https://www.photonengine.com/zh-CN/sdks#server
一:SDK介绍
下载SDK后是一个.exe文件 photon-server-sdk_v4-0-29-11263.exe , 在 window上点击,会生成一个结构目录:
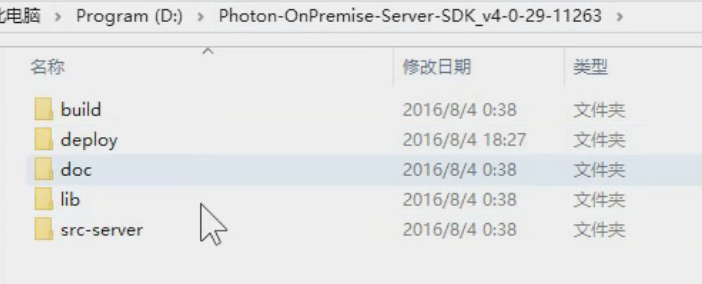
比较重要的就是 deploy 目录,我们的服务部署就是放到这个文件夹下。src-server目录放的是一些官方提供的服务源码。
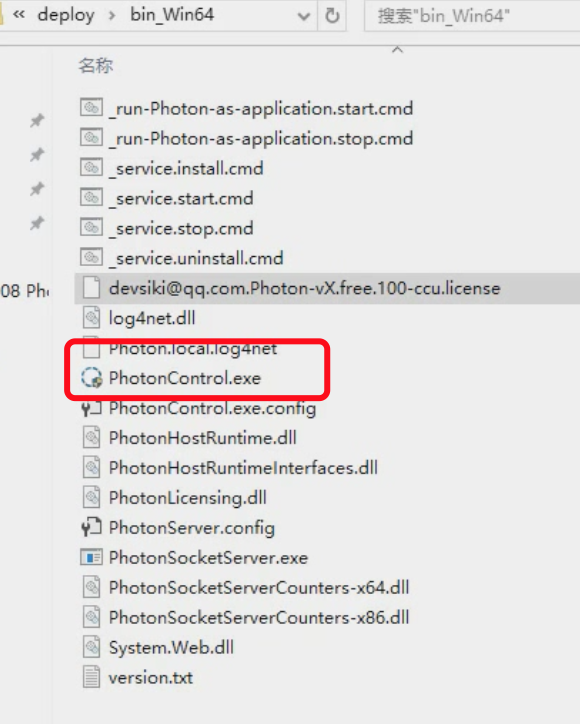
进入deploy-> bin-Win64 -> 中双击 PhotonControl.exe 就算启动服务了。
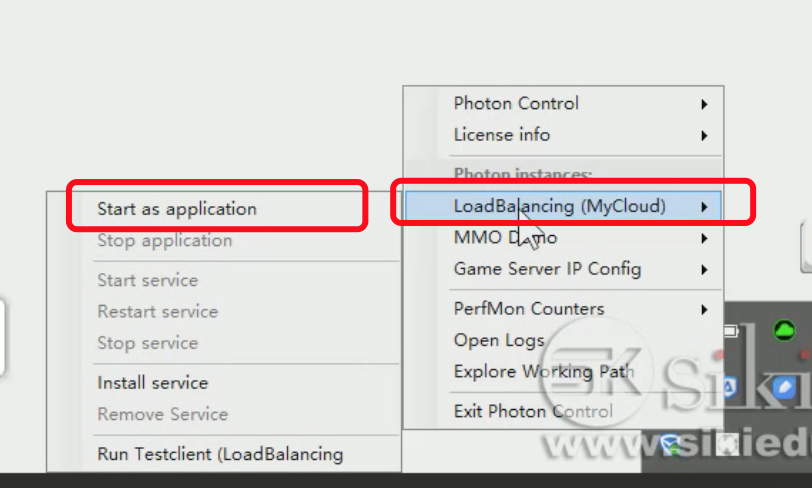
开始我们自己的服务:
二:新建项目,在之前的解决方案下新建项目,注意新建的是类库(不是之前的控制台项目)
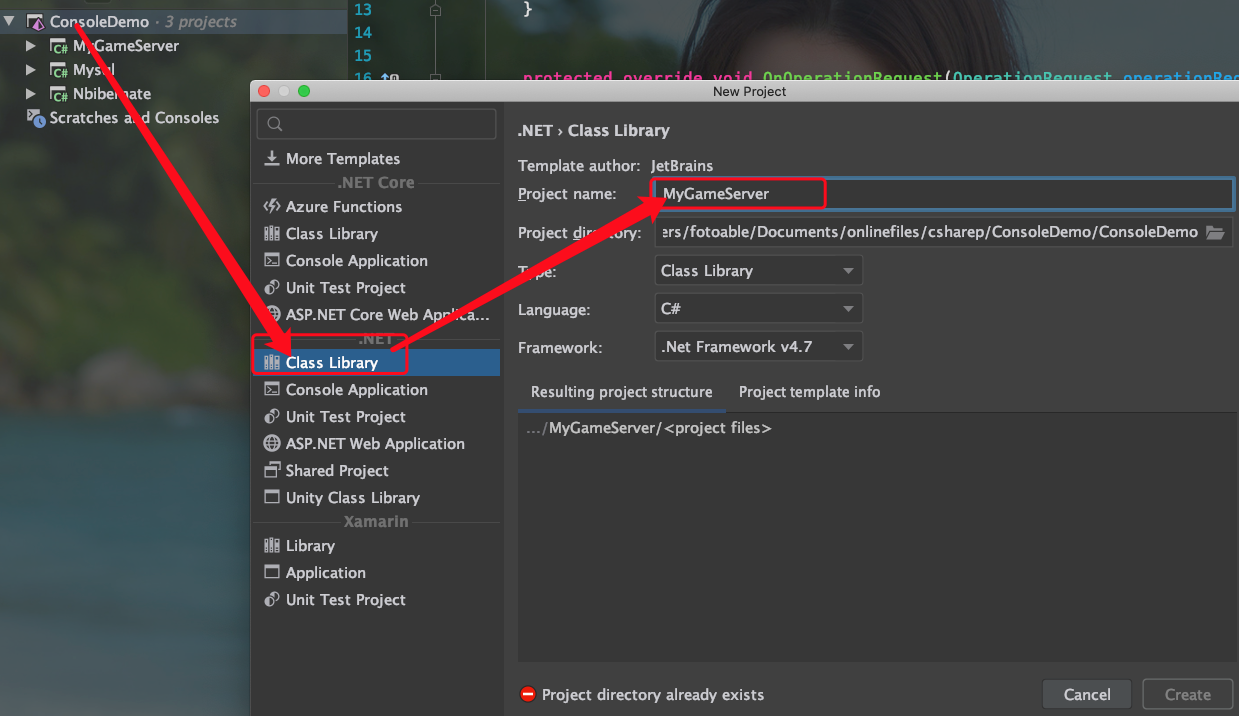
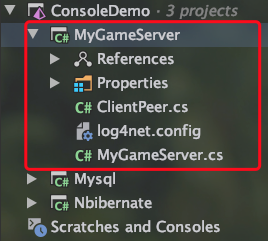
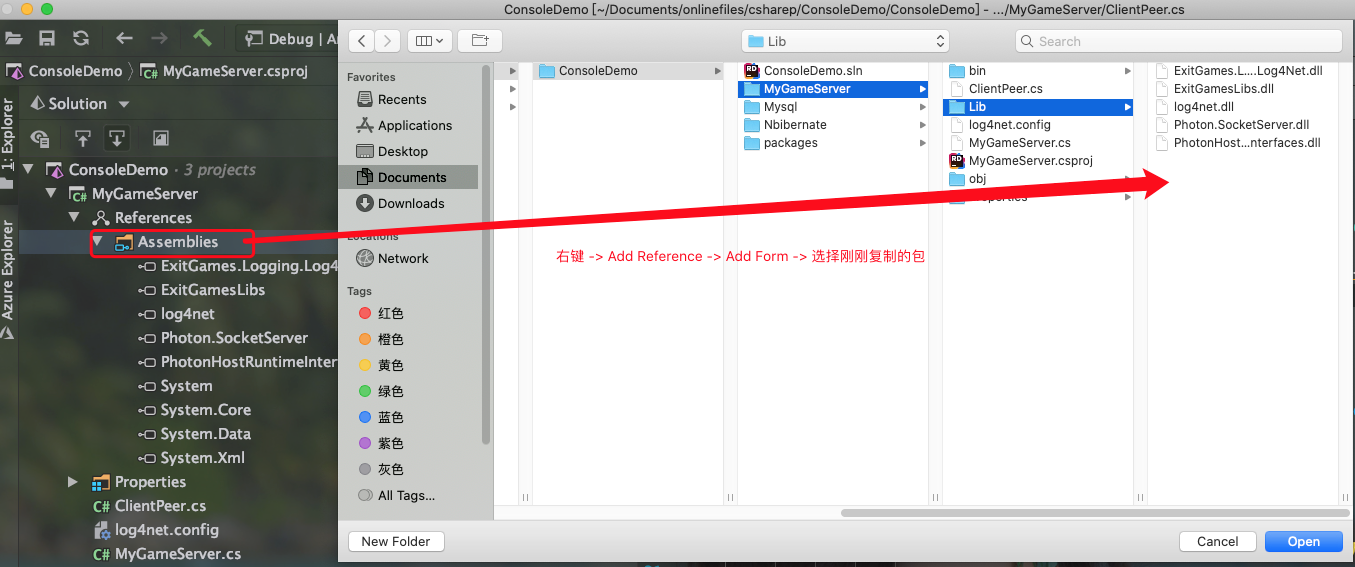
三、引入包。在项目的文件目录中新建 Lib文件夹,将之前下载的SDK中lib目录中的几个dll库复制过来。然后在项目中导入。

四、修改代码。
(1)、去解压的SDK目录 ser-server -> Loadbanlancing -> LoadBalancing 目录下,复制一个文件 log4net.config 到项目的根目录下(用于日志配置)。
(2)、修改Class1.cs 文件重命名为MyGameServer.cs
(3)、新建文件 ClientPeer.cs 文件
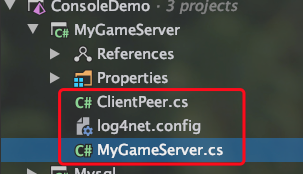
(4)、修改配置 log4net.config

<?xml version="1.0" encoding="utf-8" ?>
<log4net debug="false">

  <appender name="ConsoleAppender" type="log4net.Appender.ConsoleAppender">
    <layout type="log4net.Layout.PatternLayout">
      <param name="ConversionPattern" value="%d{ABSOLUTE} %-5p %-30.30c{2} %m% [%t] [%x]%n" />
    </layout>
  </appender>

    <!-- "normal" log file appender -->
    <appender name="LogFileAppender" type="log4net.Appender.RollingFileAppender">
    <file type="log4net.Util.PatternString" value="%property{Photon:ApplicationLogPath}\MyGameSer.log" />
    <!--param name="File" value="logLite.log" /-->
        <param name="AppendToFile" value="true" />
        <param name="MaxSizeRollBackups" value="1" />
        <param name="MaximumFileSize" value="250MB" />
        <param name="RollingStyle" value="Size" />
    <param name="LockingModel" type="log4net.Appender.FileAppender+MinimalLock" />
        <layout type="log4net.Layout.PatternLayout">
            <param name="ConversionPattern" value="%d [%t] %-5p %c [%x] - %m%n" />
        </layout>
    </appender>

  <!-- logger -->
  <root>
    <level value="INFO" />
    <appender-ref ref="LogFileAppender" />
    <appender-ref ref="ConsoleAppender" />
  </root>


  <!-- operation data logger -->
  <!-- set level to DEBUG to enable operation data logging-->
  <logger name="OperationData">
    <level value="INFO" />
  </logger>

  <!-- override log level for certain classes / namespaces -->
    <logger name="ExitGames">
        <level value="INFO" />
    </logger>

</log4net>
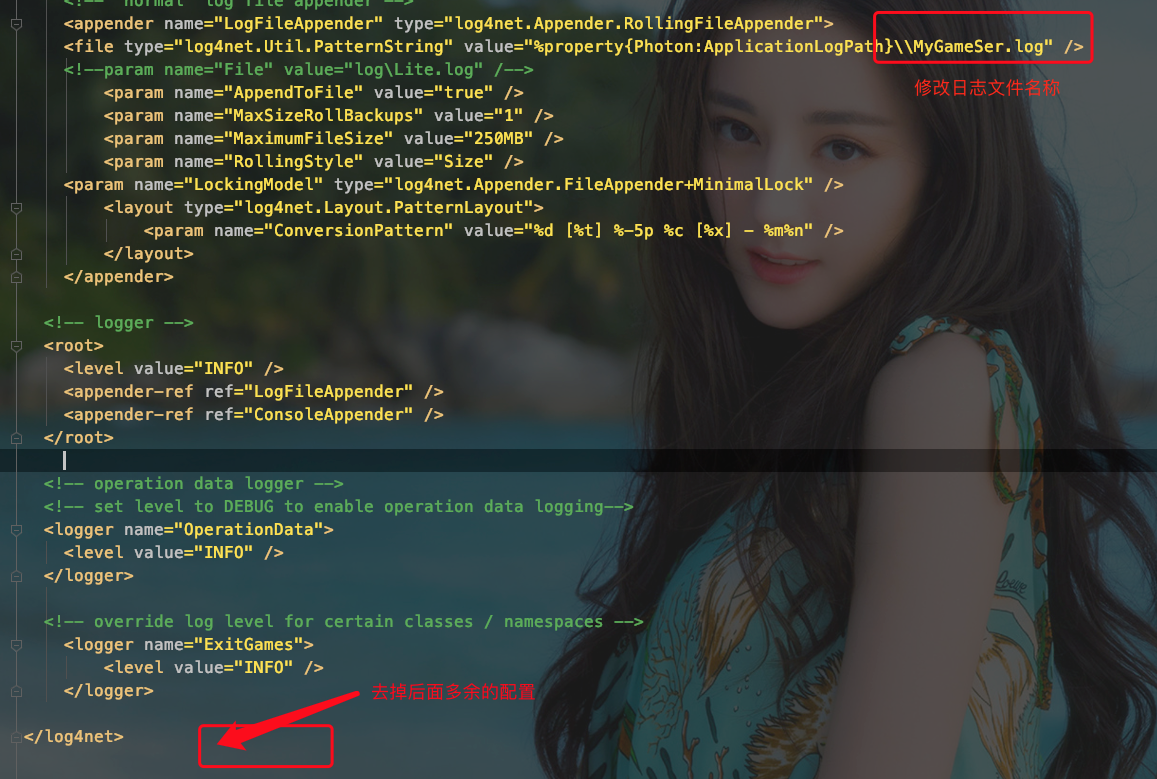
修改文件属性为一直拷贝:

(5)、 修改文件 ClientPeer.cs

using Photon.SocketServer;
using PhotonHostRuntimeInterfaces;

namespace MyGameServer
{
    public class ClientPeer : Photon.SocketServer.ClientPeer
    {
        //创建客户端
        public ClientPeer(InitRequest initRequest) : base(initRequest)
        {
        }


        protected override void OnOperationRequest(OperationRequest operationRequest, SendParameters sendParameters)
        {

        }

        //处理客户端断开连接
        protected override void OnDisconnect(DisconnectReason reasonCode, string reasonDetail)
        {

        }
    }
}
(6) 、修改 MyGameServer.cs 文件

using System.IO;
using ExitGames.Logging;
using ExitGames.Logging.Log4Net;
using log4net;
using log4net.Config;
using Photon.SocketServer;
using LogManager = ExitGames.Logging.LogManager;

namespace MyGameServer
{
    //继承 ApplicationBase
    public class MyGameServer : ApplicationBase
    {
        //日志打印
        public static readonly ILogger log = LogManager.GetCurrentClassLogger();

        //客户端创建链接
        //使用一个peerbase表示一个客户端连接
        protected override PeerBase CreatePeer(InitRequest initRequest)
        {
            log.Info("Client  Connect----------");
            //创建一个客户端返回给引擎,引擎自动管理
            return new ClientPeer(initRequest);
        }

        //服务器启动时调用
        protected override void Setup()
        {
            LogManager.SetLoggerFactory(Log4NetLoggerFactory.Instance);
            GlobalContext.Properties["Photon:ApplicationLogPath"] = Path.Combine(ApplicationRootPath, "log");
            GlobalContext.Properties["LogFileName"] = "MySer_" + ApplicationName;
            XmlConfigurator.ConfigureAndWatch(new FileInfo(Path.Combine(BinaryPath, "log4net.config")));

//            GlobalContext.Properties["Photon:ApplicationLogPath"] = Path.Combine(ApplicationRootPath, "log");
//            FileInfo configFile = new FileInfo(Path.Combine(BinaryPath,"log4net.config"));
//            if (configFile.Exists)
//            {
//                LogManager.SetLoggerFactory(Log4NetLoggerFactory.Instance);
//                XmlConfigurator.ConfigureAndWatch(configFile);
//            }


            log.Info("MyGameServer start----------");
        }

        //服务器停止调用
        protected override void TearDown()
        {
            log.Info("MyGameServer down----------");
        }
    }
}
目前我们的服务只能在服务端打印一些log日志。
五、配置我们的服务。我们的服务要在服务端部署,必须加入到配置文件中。找到SDK解压目录 deploy-> bin-Win64 中拷贝 PhotonServer.config 文件保存一个副本。然后修改该文件,加入我们自己的项目。
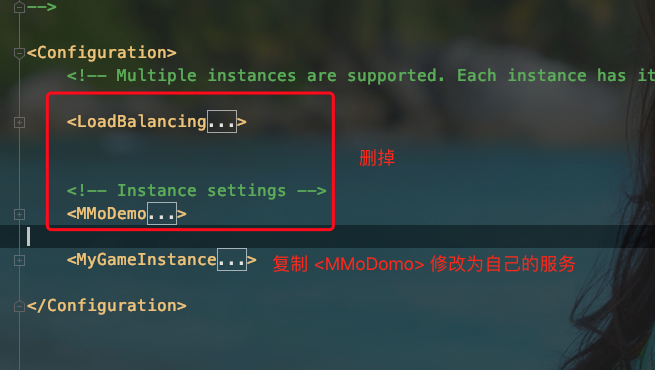
修改的地方:

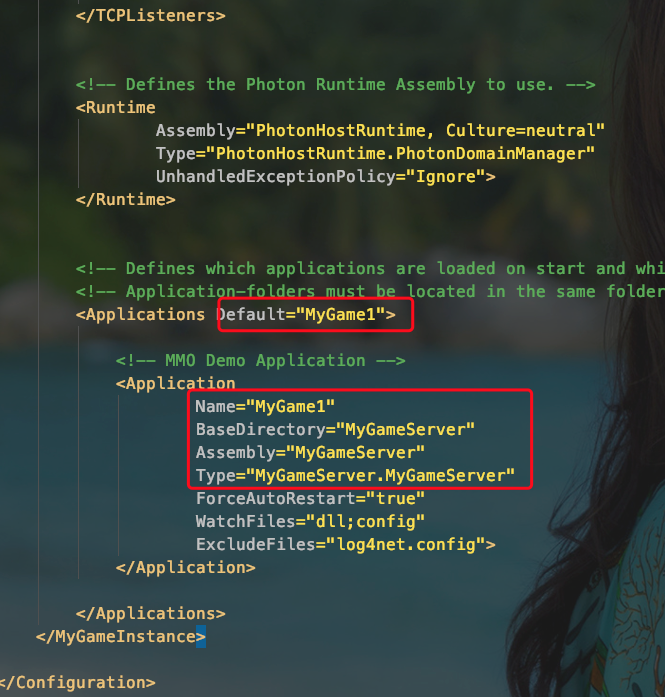
完整配置

<?xml version="1.0" encoding="Windows-1252"?>
<!--
    (c) 2015 by Exit Games GmbH, http://www.exitgames.com
    Photon server configuration file.
    For details see the photon-config.pdf.

    This file contains two configurations:

        "LoadBalancing"
                Loadbalanced setup for local development: A Master-server and a game-server.
                Starts the apps: Game, Master, CounterPublisher
                Listens: udp-port 5055, tcp-port: 4530, 843 and 943

-->

<Configuration>
    <!-- Multiple instances are supported. Each instance has its own node in the config file. -->

    <MyGameInstance
            MaxMessageSize="512000"
            MaxQueuedDataPerPeer="512000"
            PerPeerMaxReliableDataInTransit="51200"
            PerPeerTransmitRateLimitKBSec="256"
            PerPeerTransmitRatePeriodMilliseconds="200"
            MinimumTimeout="5000"
            MaximumTimeout="30000"
            DisplayName="MyGame Demo"
    >

        <!-- 0.0.0.0 opens listeners on all available IPs. Machines with multiple IPs should define the correct one here. -->
        <!-- Port 5055 is Photon's default for UDP connections. -->
        <UDPListeners>
            <UDPListener
                    IPAddress="0.0.0.0"
                    Port="5055"
                    OverrideApplication="MyGame1">
            </UDPListener>
        </UDPListeners>

        <!-- 0.0.0.0 opens listeners on all available IPs. Machines with multiple IPs should define the correct one here. -->
        <!-- Port 4530 is Photon's default for TCP connecttions. -->
        <!-- A Policy application is defined in case that policy requests are sent to this listener (known bug of some some flash clients) -->
        <TCPListeners>
            <TCPListener
                    IPAddress="0.0.0.0"
                    Port="4530"
                    PolicyFile="Policyassetssocket-policy.xml"
                    InactivityTimeout="10000"
                    OverrideApplication="MyGame1"
            >
            </TCPListener>
        </TCPListeners>


        <!-- Defines the Photon Runtime Assembly to use. -->
        <Runtime
                Assembly="PhotonHostRuntime, Culture=neutral"
                Type="PhotonHostRuntime.PhotonDomainManager"
                UnhandledExceptionPolicy="Ignore">
        </Runtime>


        <!-- Defines which applications are loaded on start and which of them is used by default. Make sure the default application is defined. -->
        <!-- Application-folders must be located in the same folder as the bin_win32 folders. The BaseDirectory must include a "bin" folder. -->
        <Applications Default="MyGame1">

            <!-- MMO Demo Application -->
            <Application
                    Name="MyGame1"
                    BaseDirectory="MyGameServer"
                    Assembly="MyGameServer"
                    Type="MyGameServer.MyGameServer"
                    ForceAutoRestart="true"
                    WatchFiles="dll;config"
                    ExcludeFiles="log4net.config">
            </Application>

        </Applications>
    </MyGameInstance>

</Configuration>
六、部署服务。
(1)、复制修改的 PhotonServer.config 到 deploy-> bin-Win64 中覆盖之前的。
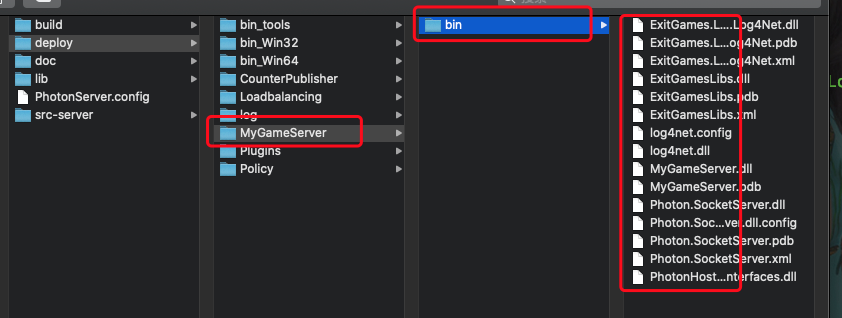
(2)、在目录deploy中新建目前 MyGameServer,进入目录新建文件夹bin.
(3) 、编译项目,将生成的dll复制到第二步新建的文件夹下。

编译后的文件一般在 bin/Debug目录下
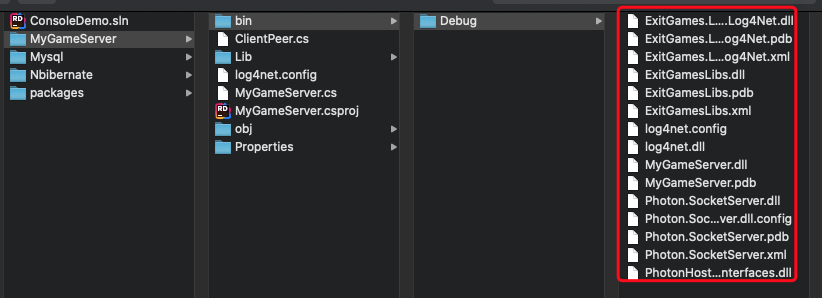
拷贝到新建的文件夹下
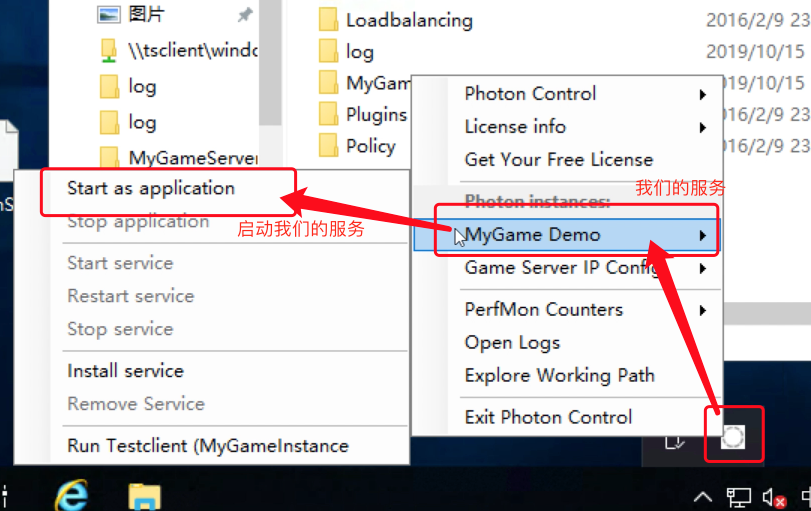
七、启动服务。退出之前的服务,双击 PhotonControl.exe 重新启动。然后启动我们自己的服务,在目录 deploy -> log 目录中就会多一个日志文件 MyGameSer
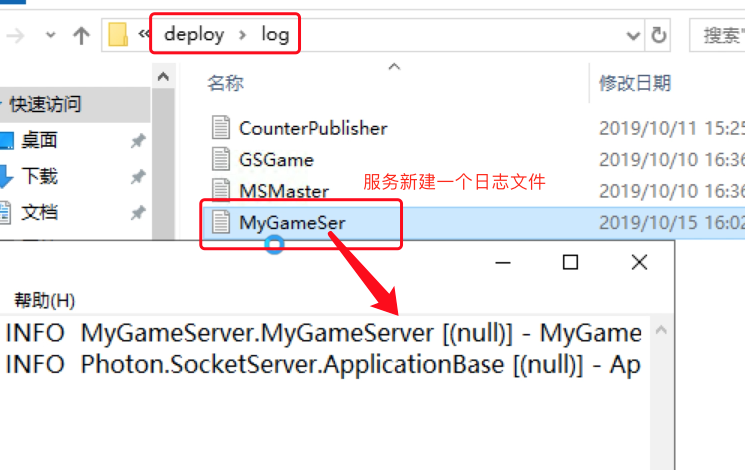
目前为止,我们的服务就正式在Photon下启动了
查看文档:https://blog.csdn.net/TheRootone/article/details/78812670
参考视频:https://www.bilibili.com/video/av27934291/?p=1
