from mininet.topo import Topo
from mininet.net import Mininet
from mininet.util import dumpNodeConnections
from mininet.log import setLogLevel,info
from mininet.node import CPULimitedHost
from mininet.node import RemoteController
from mininet.link import TCLink
from mininet.cli import CLI

class MyTopo( Topo ):

    def __init__( self ):
        "Create custom topo."

         # initilaize topology
        Topo.__init__( self )

        # add hosts and switches
        host1 = self.addHost( 'h1' )
        host2 = self.addHost( 'h2' )
        switch1 = self.addSwitch( 's1' )
        switch2 = self.addSwitch( 's2' )


        # add links
        self.addLink(host1,switch1, bw=100)
        self.addLink(host2,switch2, bw=100)
        self.addLink(switch1,switch2, bw=50)


if __name__=='__main__':
    setLogLevel('info')
    info( '*** Creating network
' )

    topo=MyTopo()
    net=Mininet(topo=topo,controller=None)
    net.addController('c0',controller=RemoteController,ip='192.168.161.1',port=6653)
    net.start()
    CLI(net)
Topo:Mininet基本的拓扑类。
addSwitch():添加一个switch到拓扑中并返回switch名。
addHost():添加一个host到拓扑中并返回host名。
addLink():添加双向链路到拓扑中,在Mininet中链路都是双向的,除非特别注明。
Mininet:主类,用来创建和管理网络。
start():开始运行网络。
setLogLevel( 'info' | 'debug' | 'output' ):Mininet设置的默认输出等级,”info“是推荐的,因为它提供了有用的信息。
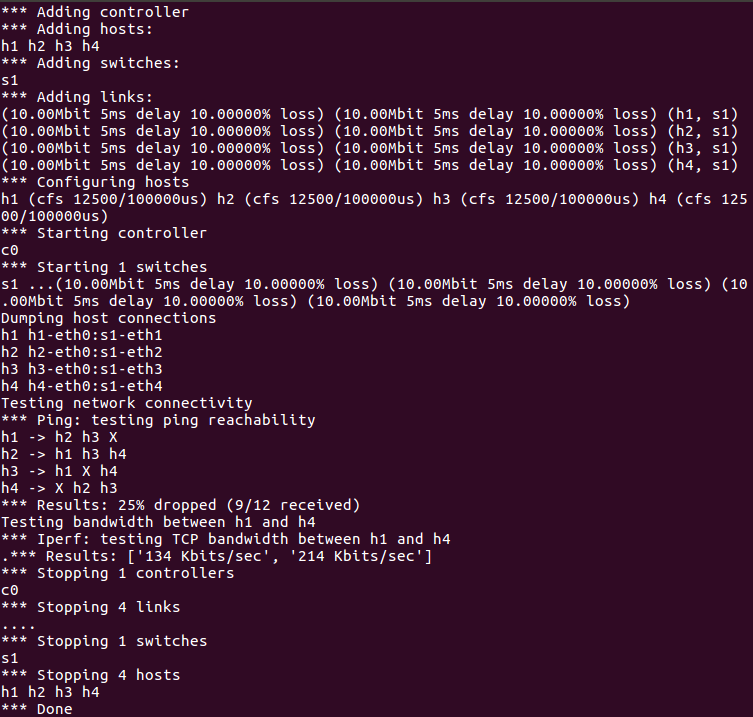
from mininet.topo import Topo
from mininet.net import Mininet
from mininet.node import CPULimitedHost
from mininet.link import TCLink
from mininet.util import dumpNodeConnections
from mininet.log import setLogLevel

class SingleSwitchTopo( Topo ):

    # switch链接到n个host
    def __init__(self, n = 2, **opts):
        Topo.__init__(self, **opts)
        switch = self.addSwitch('s1')
        for h in range(n):
            # 每个host获得系统50%/n的CPU占用
            host = self.addHost('h%s'%(h+1), cpu=.5/n)
            # 10Mbps, 5ms的延迟,100%损失,1000包队列
            self.addLink(host, switch, bw = 10, delay = '5ms', loss = 10, max_queue_size = 1000, use_htb = True)

def perfTest():
        topo = SingleSwitchTopo(n=4)
        net = Mininet(topo = topo, host = CPULimitedHost, link = TCLink)
        net.start()
        print "Dumping host connections"
        dumpNodeConnections(net.hosts)
        print "Testing network connectivity"
        net.pingAll()
        print "Testing bandwidth between h1 and h4"
        h1, h4 = net.get('h1', 'h4')
        net.iperf((h1, h4))
        net.stop()

if __name__=='__main__':
    setLogLevel('info')
    perfTest()
该topo运行结果如下所示:
pingAll():通过各个节点的互相ping来检测网络连通性。
stop():结束网络。
net.hosts:网络中的所有host。
self.addHost(name, cpu = f):指定小部分整个CPU所分配给host的资源。
self.addLink(node1, node2, bw = 10, delay = '5ms', max_queue_size = 1000, loss = 10, use_htb = True):添加双向链路、延迟和损失特性。bw表示带宽的数值;delay表示一串计量字符,例如‘5ms',’1s‘;loss表示丢失百分比(数值在0~100之间);max_queue_size表示数据包。
net.get():检索一个节点(host或switch)对象的名字。
下面详解一下:
import re
from mininet.cli import CLI
from mininet.log import setLogLevel, info,error
from mininet.net import Mininet
from mininet.link import Intf
from mininet.topolib import TreeTopo
from mininet.util import quietRun
from mininet.node import RemoteController, OVSKernelSwitch
re:提供python正则表达式的支持。
CLI:命令行服务的文件。
log:一些日志信息。
net:包含了最重要的类,Mininet类,这是定义一个网络的类。
class Mininet( object ):
"Network emulation with hosts spawned in network    namespaces."

    def __init__( self, topo=None, switch=OVSKernelSwitch, host=Host,
          controller=Controller, link=Link, intf=Intf,
          build=True, xterms=False, cleanup=False, ipBase='10.0.0.0/8',
          inNamespace=False,
          autoSetMacs=False, autoStaticArp=False, autoPinCpus=False,
          listenPort=None ):
以上的参数是基本的参数,也是最重要的参数。除了这些数据成员,Mininet类还有一些重要函数如:
def addHost( self, name, cls=None, **params ):

def addSwitch( self, name, cls=None, **params ):

def addController( self, name='c0', controller=None, **params ):

def ping( self, hosts=None, timeout=None ):

def addLink( self, node1, node2, port1=None, port2=None,
         cls=None, **params ):
link:用于定义一个网络接口。
Tree Topo:支持快速生成一个网络树的函数。
class TreeTopo( Topo ):
    "Topology for a tree network with a given depth and fanout."
    def __init__( self, depth=1, fanout=2 ):
depth 定义的是树的深度,fanout是每一层的分支数。 mininet中便捷使用是, --tree(n,m),可以生成n层的m叉树。
node:RemoteController类定义远程连接的控制器。
class RemoteController( Controller ):
"Controller running outside of Mininet's control."
    def __init__( self, name, ip='127.0.0.1',port=6633, **kwargs):
默认的控制器是本地控制器。ip =127.0.0.1。注意,你可以自己定义你的控制器的名字。
完整topo解说如下:
if __name__ == "__main__":
    setLogLevel("info")
    OVSKernelSwitch.setup() //开启一个网络
    intfName_1 = "eth2"     //将虚拟机eth2赋值给为变量intfName_1
    intfName_3 = "eth3"
    info("****checking****", intfName_1, '
')
    checkIntf(intfName_1)    //检查是否可用
    info("****checking****", intfName_3, '
')
    checkIntf(intfName_3)

    info("****creating network****
")
    net = Mininet(listenPort = 6633)   //创建一个Mininet的实例,端口为6633

    mycontroller = RemoteController("muziController",   ip = "192.168.0.1")//创建远程控制器,ip=192.168.0.1,端口是6633。

    switch_1 = net.addSwitch('s1')   //在net里添加交换机s1,mininet中规则为:如果不填充dpid参数,则dpid参数默认取sn的n.即s1的dpid为1。
    switch_2 = net.addSwitch('s2')
    switch_3 = net.addSwitch('s3')
    switch_4 = net.addSwitch('s4')

    net.controllers = [mycontroller] //将远程控制器添加到网络中


    net.addLink(switch_1, switch_2, 2, 1)# node1,   node2, port1, port2
    net.addLink(switch_2, switch_3, 2, 1)//将s2的2端口跟s3的1端口连接起来。(物理连接)
    net.addLink(switch_1, switch_4, 3, 1)


    //需要注意的是,以上连接的链路是一个环形的链路,在没有解决风暴的情况下,会出问题。
    info("*****Adding hardware interface ",     intfName_1, "to switch:" ,switch_1.name, '
')
    info("*****Adding hardware interface ",     intfName_3, "to switch:" ,switch_3.name, '
')

    _intf_1 = Intf(intfName_1, node = switch_1, port =  1)//将intfName_1和s1的端口1相连,形成一个接口_intf_1
    _intf_3 = Intf(intfName_3, node = switch_3, port =  2)

    net.addLink(switch_4, switch_3, 2, 3)//为什么放在这里呢?因为mininet中允许的端口分配方式是从小到大分配,所以,s3的3端口的配置应该放在s3的2端口之后,虽然难看,但是必须这么做,当然你也可以从新分配端口,只要保证端口是从小到大分配就好了。

    info("Node: you may need to reconfigure the     interfaces for the Mininet hosts:
",   net.hosts, '
')

    net.start()  //启动net
    CLI(net)     //等待键入命令
    net.stop()   //关闭net