异常处理的思路
系统中异常包括两类:预期异常和运行时异常 RuntimeException,前者通过捕获异常从而获取异常信息, 后者主要通过规范代码开发、测试通过手段减少运行时异常的发生。
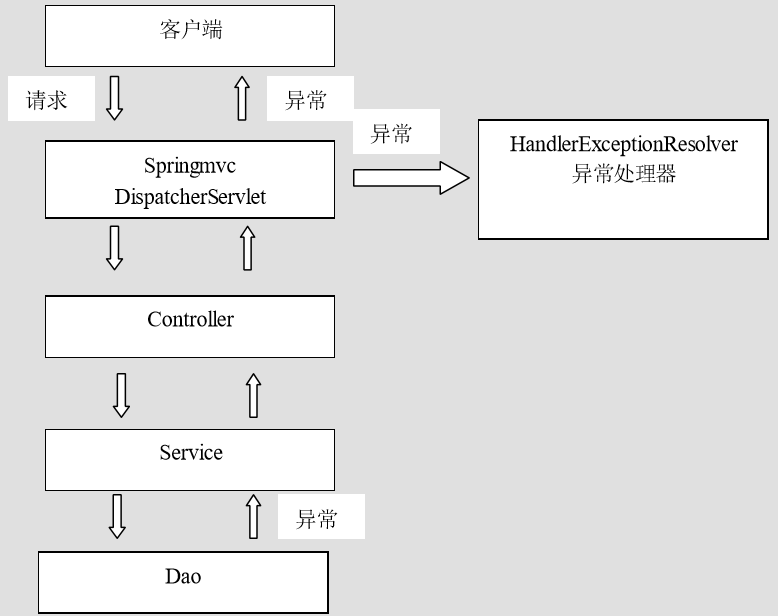
系统的 dao、service、controller 出现都通过 throws Exception 向上抛出,最后由 springmvc 前端 控制器交由异常处理器进行异常处理,如下图:

SpringMVC的异常处理实现步骤

1. 编写index、success、error三个页面
index.jsp

<body>
<h3>异常处理</h3>
<a href="user/testException" >异常处理</a>
</body>

============================

success.jsp

<body>
成功!
</body>

============================

eeror.jsp

<%@ page contentType="text/html;charset=UTF-8" language="java" isELIgnored="false" %>
<html>
<head>
    <title>Title</title>
</head>
<body>
${errorMsg}
</body>
</html>
2. 自定义异常类和自定义异常处理器
/**
 * 自定义异常类
 */
public class SysException  extends Exception{

    //存储提示信息
    private String message;

    public SysException(String message){
        this.message = message;
    }

    public String getMessage() {
        return message;
    }

    public void setMessage(String message) {
        this.message = message;
    }
}

===========================

/**
 * 自定义异常处理器
 */
public class SysExceptionResolver implements HandlerExceptionResolver {
    /**
     * 处理异常业务逻辑
     */
    @Override
    public ModelAndView resolveException(HttpServletRequest request,
                        HttpServletResponse response,Object o, Exception ex) {
        //获取到异常对象
        SysException e = null;
        if (ex instanceof SysException){
            e = (SysException)ex;
        }else{
            e  = new SysException("系统正在维护。。。");
        }
        //创建ModelAndView对象
        ModelAndView mv = new ModelAndView();
        mv.addObject("errorMsg",e.getMessage());
        mv.setViewName("error");
        return mv;
    }
}
3. 在springmvc.xml中配置异常处理器

<?xml version="1.0" encoding="UTF-8"?>
<beans xmlns="http://www.springframework.org/schema/beans"
       xmlns:mvc="http://www.springframework.org/schema/mvc"
       xmlns:context="http://www.springframework.org/schema/context"
       xmlns:xsi="http://www.w3.org/2001/XMLSchema-instance" xmlns:mv="http://www.springframework.org/schema/mvc"
       xsi:schemaLocation="
            http://www.springframework.org/schema/beans
            http://www.springframework.org/schema/beans/spring-beans.xsd
            http://www.springframework.org/schema/mvc
            http://www.springframework.org/schema/mvc/spring-mvc.xsd
            http://www.springframework.org/schema/context
            http://www.springframework.org/schema/context/spring-context.xsd">

    <!--配置spring创建容器时要扫描的包-->
    <context:component-scan base-package="com.churujianghudezai"></context:component-scan>

    <!--配置视图解析器-->
    <bean id="viewResolver"
          class="org.springframework.web.servlet.view.InternalResourceViewResolver">
        <property name="prefix" value="/WEB-INF/pages/"></property>
        <property name="suffix" value=".jsp"></property>
    </bean>

    <!--配置自定义的异常处理器-->
    <bean id="sysExceptionResolver" class="com.churujianghudezai.exception.SysExceptionResolver"/>

    <!--配置spring开启注解mvc的支持-->
    <mvc:annotation-driven ></mvc:annotation-driven>
</beans>
4. 编写控制器
@Controller
@RequestMapping("/user")
public class UserController {
    @RequestMapping("/testException")
    public String testException() throws SysException{
        System.out.println("testException执行了。。。");

        try{
            //模拟异常
            int a = 10/0;
        }catch(Exception e){
            //打印异常信息
            e.printStackTrace();;
            //抛出自定义异常信息
            throw new SysException("查询所有用户出现异常。。。");
        }

        return "success";
    }
}

