Add or Remove Allowed Apps through Windows Firewall in Windows 10
Starting with Windows 10 build 16193, Windows Firewall has been renamed to Windows Defender Firewall.
Windows Firewall can help prevent hackers or malicious software from
gaining access to your PC through the Internet or a network.
Sometimes you may need to allow an app through Windows Firewall. When
you allow an app to communicate though the firewall, it's called adding
an exception or rule.
Usually this will happen automatically. Windows will automatically
create exceptions for its own system services and apps. When you install
a new app that wants to communicate through the firewall, Windows will
prompt you to allow access for it to do so.
You may also want or need to create an exception manually to allow an app to communicate through the firewall.
This tutorial will show you different ways on how to manually remove or add apps to be allowed through Windows Firewall in Windows 10.
You must be signed in as an administrator to remove or add allowed apps through Windows Firewall.
CONTENTS:
- Option One: To Allow App through Windows Defender Firewall in Windows Security Alert
- Option Two: To Allow App through Windows Defender Firewall in Windows Firewall Settings
- Option Three: To Remove Allowed App in Windows Defender Firewall Settings
- Option Four: To Allow App through Windows Defender Firewall in Command Prompt
- Option Five: To Remove Allowed App in Command Prompt
- Option Six: To Allow App through Windows Defender Firewall in PowerShell
- Option Seven: To Remove Allowed App in PowerShell
To Allow App through Windows Defender Firewall in PowerShell
To see more usage options for the New-NetFirewallRule command, see: New-NetFirewallRule - Microsoft Docs
1. Open an elevated PowerShell.
2. Enter the command below into the elevated PowerShell, and press Enter. (see screenshot below)
(Allow app)
 New-NetFirewallRule -DisplayName "app name" -Direction Inbound -Program "Full path of .exe" -Action Allow
OR
(Block app)
 New-NetFirewallRule -DisplayName "app name" -Direction Inbound -Program "Full path of .exe" -Action Block
Substitute Full path of .exe in the command above with the actual full path to the .exe file (ex: "C:Program Files (x86)GoogleChromeApplicationchrome.exe") of the app.
For example:
New-NetFirewallRule -DisplayName "Google Chrome" -Direction Inbound -Program "C:Program Files (x86)GoogleChromeApplicationchrome.exe" -Action Allow

3. When finished, you can close the elevated PowerShell if you like.
To Remove Allowed App in PowerShell
To see more usage options for the Remove-NetFirewallRule command, see: Remove-NetFirewallRule - Microsoft Docs
1. Open an elevated PowerShell.
2. Enter the command below into the elevated PowerShell, and press Enter. (see screenshot below)
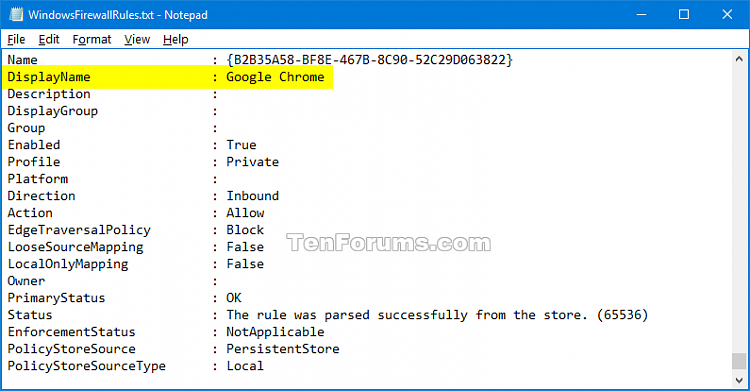
3. You will now have a WindowsFirewallRules.txt file saved to your desktop containing a list of all Windows Firewall rules.
4. Open the WindowsFirewallRules.txt file, and make note of the DisplayName (ex: "Google Chrome") of the app you want to remove all rules for. (see screenshot below)

5. Enter the command below into the elevated PowerShell, and press Enter. (see screenshot below)
 Remove-NetFirewallRule -DisplayName "DisplayName"
For example: Remove-NetFirewallRule -DisplayName "Google Chrome"

6. When finished, you can close the elevated PowerShell if you like.
