CAShapeLayer继承CALayer
CAShapeLayer *square = [[CAShapeLayer alloc] init];
square.frame = CGRectMake(20, 20, 100, 100);
square.backgroundColor = [UIColor blackColor].CGColor;
[self.view.layer addSublayer:square];
显示: ,这个和CALayer一样,没有多大作用。
接下来 将UIBezierPath对象 转化为CGPathRef 对象,赋值给CAShapeLayer的path属性即可,即可画出各种线条和图形。
结合UIBezierPath 与 CAShapeLayer 画图:
-
矩形:

    UIBezierPath *bezierPath = [UIBezierPath bezierPathWithRect:CGRectMake(40, 40, 100, 100)];
    CAShapeLayer *square = [CAShapeLayer layer];
    square.path = bezierPath.CGPath;
    square.fillColor = [UIColor whiteColor].CGColor;    // 内部填充色
    square.strokeColor = [UIColor blackColor].CGColor;   // 线的颜色
    [self.view.layer addSublayer:square];
-
椭圆或圆:
 OR
OR 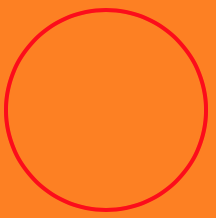
画椭圆或圆的UIBezierPath相关方法:(生成一个矩形的内切椭圆UIBezierPath对象,如果矩形是正方形,就为内切圆)
+ (instancetype)bezierPathWithOvalInRect:(CGRect)rect:
// 矩形的内切椭圆
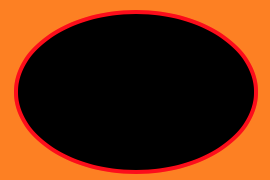
UIBezierPath *ovalPath = [UIBezierPath bezierPathWithOvalInRect:CGRectMake(40, 40, 120, 80)]; CAShapeLayer *layer = [CAShapeLayer layer]; layer.path = ovalPath.CGPath; layer.lineWidth = 2.f; // 边线的宽度 layer.strokeColor = [UIColor redColor].CGColor; // layer.fillColor // 默认为blackColor [self.view.layer addSublayer:layer];
    // 正方形的内切圆
   UIBezierPath *circlePath = [UIBezierPath bezierPathWithOvalInRect:CGRectMake(40, 40, 100, 100)];
    CAShapeLayer *layer = [CAShapeLayer layer];
    layer.path = circlePath.CGPath;
    layer.lineWidth = 2.f;  // 边线的宽度
    layer.strokeColor = [UIColor redColor].CGColor;
    layer.fillColor = [UIColor clearColor].CGColor;
    [self.view.layer addSublayer:layer];
-
折线:

画折线的UIBezierPath相关方法:
+ (instancetype)bezierPath -- 生成一个UIBezierPath对象, 多用于画 不规则曲线 或 多边图形
- (void)moveToPoint:(CGPoint)point -- 添加路径起点
- (void)addLineToPoint:(CGPoint)point -- 添加路径起点外的其他点
    // 线的路径
    UIBezierPath *linePath = [UIBezierPath bezierPath];
    // 起点
    [linePath moveToPoint:CGPointMake(40, 40)];
    // 其它点
    [linePath addLineToPoint:CGPointMake(120, 80)];
    [linePath addLineToPoint:CGPointMake(140, 60)];

    CAShapeLayer *layer = [CAShapeLayer layer];
    layer.path = linePath.CGPath;
    layer.strokeColor = [UIColor redColor].CGColor;
    layer.fillColor = [UIColor clearColor].CGColor;
    [self.view.layer addSublayer:layer];
当 layer.fillColor = [UIColor whiteColor].CGColor; 有填充色后:
证明了:CAShapeLayer依附于一个给定的path,必须给与path,而且,即使path不完整也会自动首尾相接。
-
多边形(三角形):

UIBezierPath相关方法:
- (void)closePath -- 封闭曲线(连接曲线的起点和终点形成封闭曲线
    // 线的路径
    UIBezierPath *trianglePath = [UIBezierPath bezierPath];
    [trianglePath moveToPoint:CGPointMake(40, 60)];
    [trianglePath addLineToPoint:CGPointMake(120, 80)];
    [trianglePath addLineToPoint:CGPointMake(80, 120)];
    // 封闭曲线
    [trianglePath closePath];

    CAShapeLayer *layer = [CAShapeLayer layer];
    layer.path = trianglePath.CGPath;
    layer.strokeColor = [UIColor redColor].CGColor;
    layer.fillColor = [UIColor clearColor].CGColor;
    [self.view.layer addSublayer:layer];
-
圆角矩形:

画圆角矩形的UIBezierPath相关方法:
+ (instancetype)bezierPathWithRoundedRect:(CGRect)rect cornerRadius:(CGFloat)cornerRadius -- 生成一个自定义圆角大小的矩形UIBezierPath对象
当 rect 中 width = height = cornerRadius * 2 , 这不就又是一个圆了;
    UIView *contentView = [[UIView alloc] initWithFrame:CGRectMake(40, 40, 120, 100)];
    contentView.backgroundColor = [UIColor purpleColor];
    [self.view addSubview:contentView];

    UIBezierPath *path = [UIBezierPath bezierPathWithRoundedRect:contentView.bounds cornerRadius:20.f];
    CAShapeLayer *layer = [CAShapeLayer layer];
    layer.path = path.CGPath;
    layer.strokeColor = [UIColor redColor].CGColor;
    contentView.layer.mask = layer; // layer的mask属性,添加蒙版
-
单角的圆角矩形(左上角):
画单角的圆角矩形的UIBezierPath相关方法:
+ (instancetype)bezierPathWithRoundedRect:(CGRect)rect byRoundingCorners:(UIRectCorner)corners cornerRadii:(CGSize)cornerRadii
为矩形的某一个角添加自定义大小的圆角(当自定义的圆角大小超过矩形宽或高的一半是,自动取矩形宽或高的一半作为圆角大小)
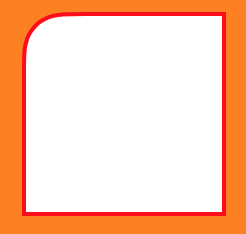
如果想对视图单个角切圆角,和圆切圆角相同只需将UIBezierPath对象添加为mask即可。
    UIBezierPath *path = [UIBezierPath bezierPathWithRoundedRect:CGRectMake(40, 40, 100, 100) byRoundingCorners:UIRectCornerTopLeft cornerRadii:CGSizeMake(20, 0)];
    CAShapeLayer *layer = [CAShapeLayer layer];
    layer.path = path.CGPath;
    layer.lineWidth = 2.f;
    layer.strokeColor = [UIColor redColor].CGColor;
    layer.fillColor = [UIColor whiteColor].CGColor;
    [self.view.layer addSublayer:layer];
如果作做多个圆角的矩形:
UIBezierPath *path = [UIBezierPath bezierPathWithRoundedRect:CGRectMake(40, 40, 100, 100)
                                               byRoundingCorners:UIRectCornerTopLeft | UIRectCornerTopRight
                                                     cornerRadii:CGSizeMake(20, 0)];
-
圆弧:


画圆弧的UIBezierPath相关方法:
+ (instancetype)bezierPathWithArcCenter:(CGPoint)center radius:(CGFloat)radius startAngle:(CGFloat)startAngle endAngle:(CGFloat)endAngle clockwise:(BOOL)clockwise
center:圆弧的中心,相对所在视图; radius:圆弧半径; startAngle:起始点的角度(相对角度坐标系0); endAngle:结束点的角度(相对角度坐标系0); clockwise:是否为顺时针方向。
- (void)addArcWithCenter:(CGPoint)center radius:(CGFloat)radius startAngle:(CGFloat)startAngle endAngle:(CGFloat)endAngle clockwise:(BOOL)clockwise
在原有的线上添加一条弧线 。center:圆弧的中心,相对所在视图; radius:圆弧半径; startAngle:起始点的角度(相对角度坐标系0); endAngle:结束点的角度(相对角度坐标系0); clockwise:是否为顺时针方向。
    // 初始化 画圆弧
    UIBezierPath *path = [UIBezierPath bezierPathWithArcCenter:CGPointMake(200, 200) radius:50.f startAngle:0 endAngle:M_PI_2 clockwise:YES];
    // 添加一条线
    [path addLineToPoint:CGPointMake(100, 250)];
    // 再画 1/4 圆弧
    [path addArcWithCenter:CGPointMake(100, 200) radius:50.f startAngle:M_PI_2 endAngle:M_PI clockwise:YES];

    CAShapeLayer *layer = [CAShapeLayer layer];
    layer.path = path.CGPath;
    layer.lineWidth = 2.f;
    layer.strokeColor = [UIColor redColor].CGColor;
    layer.fillColor = [UIColor clearColor].CGColor;
    [self.view.layer addSublayer:layer];
-
贝塞尔曲线
二次贝塞尔曲线:
二次贝赛尔曲线相关方法:
- (void)addQuadCurveToPoint:(CGPoint)endPoint controlPoint:(CGPoint)controlPoint
贝塞尔二次曲线,起点用 moveToPoint方法给出;endPoint:贝赛尔曲线终点;controlPoint:控制点;曲线是由起点趋向控制点最后到达终点(不会经过控制点)的曲线。控制点决定曲线的起始方向,起点和终点的距离决定曲线趋向控制点的程度。
二次贝塞尔曲线示意图:

三次贝塞尔曲线:
三次贝塞尔曲线相关方法:
- (void)addCurveToPoint:(CGPoint)endPoint controlPoint1:(CGPoint)controlPoint1 controlPoint2:(CGPoint)controlPoint2
三次贝赛尔曲线,起点用 moveToPoint方法给出;endPoint:贝赛尔曲线终点;controlPoint1:控制点1;controlPoint2:控制点2
三次贝塞尔曲线示意图:


    // 一条 二次贝赛尔曲线 -- 参照线(红线)
    UIBezierPath *path1 = [UIBezierPath bezierPath];
    [path1 moveToPoint:CGPointMake(80, 80)];
    [path1 addQuadCurveToPoint:CGPointMake(280, 120) controlPoint:CGPointMake(120, 40)];
    CAShapeLayer *layer1 = [CAShapeLayer layer];
    layer1.path = path1.CGPath;
    layer1.strokeColor = [UIColor redColor].CGColor;
    layer1.fillColor = [UIColor clearColor].CGColor;
    [self.view.layer addSublayer:layer1];

    // 设置相同起点,相同控制点,终点不同时贝赛尔曲线比较(即,起点终点距离不同)-- 对比线(绿线)
    UIBezierPath *path2 = [UIBezierPath bezierPath];
    [path2 moveToPoint:CGPointMake(80, 80)];
    [path2 addQuadCurveToPoint:CGPointMake(180, 120) controlPoint:CGPointMake(120, 40)];
    CAShapeLayer *layer2 = [CAShapeLayer layer];
    layer2.path = path2.CGPath;
    layer2.strokeColor = [UIColor greenColor].CGColor;
    layer2.fillColor = [UIColor clearColor].CGColor;
    [self.view.layer addSublayer:layer2];
    // 总结:起点和终点的距离越小,趋向控制点结束越早,趋向终点开始越早,曲线弧度越大。

    // 起点终点相同,控制点不同 -- 对比线(蓝线)
    UIBezierPath *path3 = [UIBezierPath bezierPath];
    [path3 moveToPoint:CGPointMake(80, 80)];
    [path3 addQuadCurveToPoint:CGPointMake(280, 120) controlPoint:CGPointMake(120, 20)];
    CAShapeLayer *layer3 = [CAShapeLayer layer];
    layer3.path = path3.CGPath;
    layer3.strokeColor = [UIColor blueColor].CGColor;
    layer3.fillColor = [UIColor clearColor].CGColor;
    [self.view.layer addSublayer:layer3];
    // 总结:控制点与起点和终点所在直线偏移距离越大,曲线弧度越大。

    // 三次贝塞尔曲线 -- 紫线
    UIBezierPath *path4 = [UIBezierPath bezierPath];
    [path4 moveToPoint:CGPointMake(40, 200)];
    [path4 addCurveToPoint:CGPointMake(280, 200) controlPoint1:CGPointMake(100, 160) controlPoint2:CGPointMake(200, 260)];
    CAShapeLayer *layer4 = [CAShapeLayer layer];
    layer4.path = path4.CGPath;
    layer4.strokeColor = [UIColor purpleColor].CGColor;
    layer4.fillColor = [UIColor clearColor].CGColor;
    [self.view.layer addSublayer:layer4];