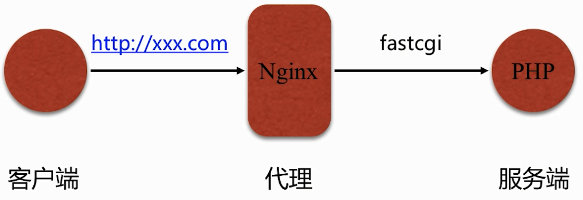
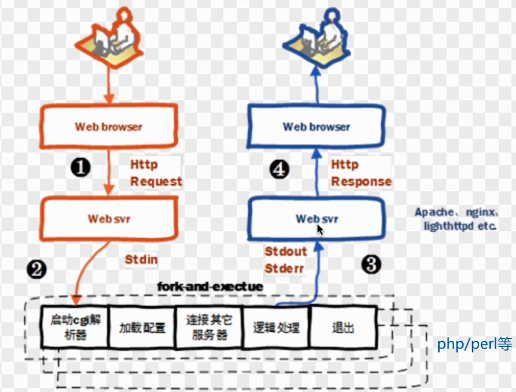
一、fastcgi代理
1、示意图

2、fastcgi 代理配置语法
a、设置PHP服务代理地址
Syntax:    fastcgi_pass address;
Default:    —
Context:    location, if in location
address可以是域名,ip:port ,如:
fastcgi_pass localhost:9000;
或者Linux下的socket
fastcgi_pass unix:/tmp/fastcgi.socket;
Nginx和PHP的进程是在同一台机器上的话,那么也可以选择Linux下的socket,进程间通信的方式。
b、设置主页
Syntax:    fastcgi_index name;
Default:    —
Context:    http, server, location
fastcgi_index 用来设置首页文件,一般要结合 fastcgi_param一起来设置。
设置变量
Syntax:    fastcgi_param parameter value [if_not_empty];
Default:    —
Context:    http, server, location
通过fastcgi_param设置变量,并将设置的变量传递到后端的FastCGI server。
parameter 为参数名
value 为参数值
如果 fastcgi_index 和 fastcgi_param 设置成下面这样
fastcgi_index index.php;
fastcgi_param SCRIPT_FILENAME /home/www/scripts/php$fastcgi_script_name;
如果访问的是首页,那么传递到后端的 SCRIPT_FILENAME = /home/www/scripts/php/index.php
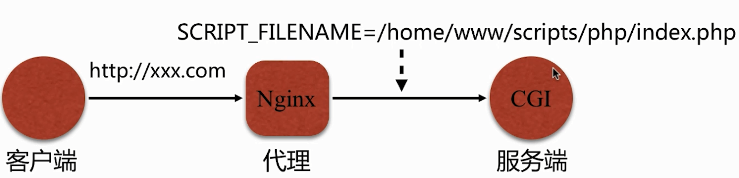
如果访问的不是首页, $fastcgi_script_name 会根据所访问的页面进行变化。

二、对比 http_proxy 代理和 http_fastcgi 代理
| ngx_http_proxy_module | ngx_http_fastcgi_module | 作用 |
| proxy_pass | fastcgi_pass | 代理的是哪一个服务 |
| proxy_busy_buffers_size | fastcgi_busy_buffers_size | 忙时 buffer的最大值 |
| proxy_buffer_size | fastcgi_buffer_size | 临时存储Response头信息的大小 |
http_proxy :通用语 HTTP 协议的代理。
http_fastcgi : 针对于 fastcgi 这种接口模式来进行反向代理。
fastcgi 的配置模式 跟 proxy 的配置模式大同小异,大部分可以通用。
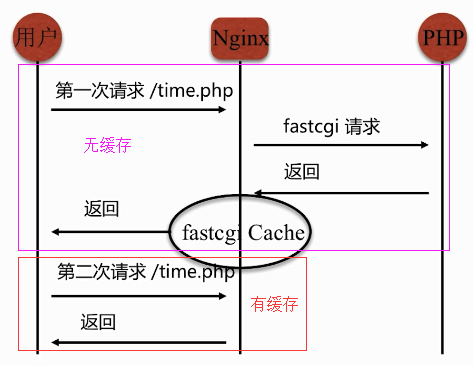
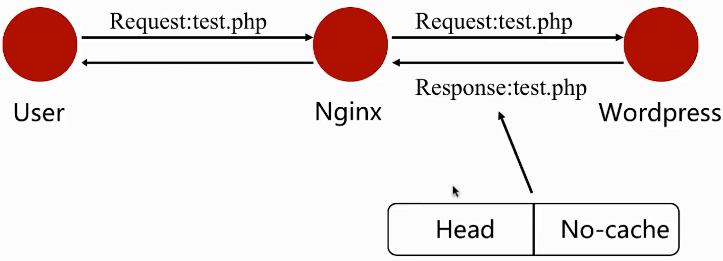
三、fastcgi 缓存
1、示意图
2、配置fastcgi缓存的存储路径,大小等
Syntax:    fastcgi_cache_path path [levels=levels] [use_temp_path=on|off] keys_zone=name:size [inactive=time] [max_size=size] [manager_files=number] [manager_sleep=time] [manager_threshold=time] [loader_files=number] [loader_sleep=time] [loader_threshold=time] [purger=on|off] [purger_files=number] [purger_sleep=time] [purger_threshold=time];
Default:    —
Context:    http
3、配置缓存的维度
Syntax:    fastcgi_cache_key string;
Default:    —
Context:    http, server, location
即缓存什么,几乎所有的http协议 请求头都可以缓存。定义的越细致缓存的维度也会越大,越准确。
4、使用/关闭fastcgi缓存
Syntax:    fastcgi_cache zone | off;
Default:
fastcgi_cache off;
Context:    http, server, location
5、定义不同的状态码的生命周期
Syntax:    fastcgi_cache_valid [code ...] time;
Default:    —
Context:    http, server, location
6、示例:
a、配置Ngnix缓存
//配置缓存的路径,大小等
fastcgi_cache_path /opt/app/cache levels=1:2 keys_zone=chrdai:100m max_size=1g inactive=60m;

server {
    listen       8090;
    server_name  localhost;

    #charset koi8-r;
    #access_log  /var/log/nginx/host.access.log  main;
    root /opt/app/wdcode;
    index index.php index.html index.htm;

    location / {
        index index.php;
        try_files $uri $uri/ /index.php?$args;
        if ( $request_uri ~ "/admin/" ) {
            set $is_nocache yes;
        }
    }
    location ~ .php$ {
        fastcgi_pass 127.0.0.1:9000;
        fastcgi_index index.php;
        include fastcgi_params;
        fastcgi_param SCRIPT_FILENAME $document_root$fastcgi_script_name;

        fastcgi_cache_key $scheme$request_method$host$request_uri$is_args$args;
        fastcgi_cache chrdai;
        fastcgi_cache_valid 200 60m;

      //添加一个响应头,方便前端页面查看是否命中了缓存
        add_header X-Cache-Source $upstream_cache_status;
    }
}
下面的这些都是 Nginx 的内置变量
- $scheme:请求的协议。
- $request_method :请求的方法。
- $host :请求的主机名。
- $request_uri :请求的路径。
- $is_args 和 $args :请求的参数
配置语法几乎和 proxy的配置大同小异,可以先参考我关于proxy的相关博客:https://www.cnblogs.com/chrdai/protected/p/11337238.html
fastcgi_cache_key 缓存维度设置的影响
fastcgi_cache_key 设置的越详细越好,这样子缓存的维度就会更广,例如:
如果将 fastcgi_cache_key 设置为 $scheme$host ,也就是说只缓存协议和主机,其它的请求路径就都不会关系了,当我们访问 http://192.168.0.133:8090/time.php 和 访问 http://192.168.0.133:8090/wp-admin/profile.php 显示的页面是一样的。
b、新建页面文件
在项目目录下(/opt/app/wdcode)下新建一个time.php文件,写入如下内容。
<?php
echo date('Y-m-d H:i:s', time());
c、访问页面,看测试效果。
访问 http://192.168.0.133:8090/time.php , 发现不管怎么刷新,都是显示的第一次的时间,不会发生改变。

发现响应头显示仪有命中缓存。
如果不想使用缓存,就将 fastcgi_cache 关闭就可以啦。
fastcgi_cache off
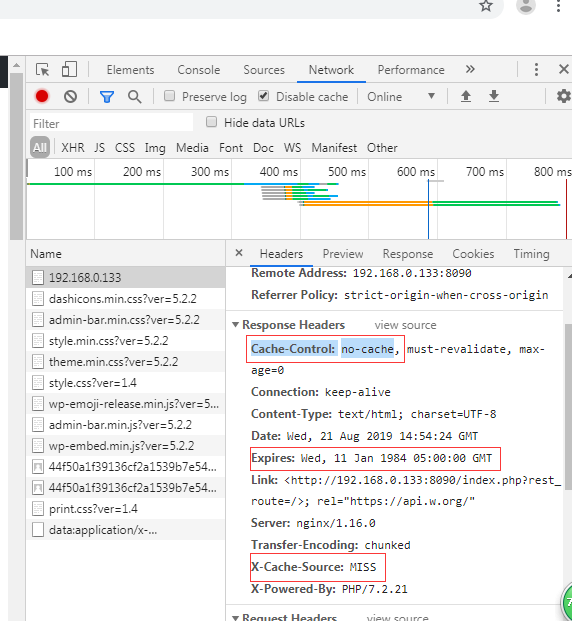
四、后端服务添加no-cache头对于Nginx缓存的影响
当后端服务器设置了 Cache-Control:no-cache 等不需要缓存的头信息时,我们的Nginx会遵从http的请求头要求,不进行缓存,也就是说就算我们设置了fastcgi_cache,也不会缓存这些页面。
示例:
我们访问我们安装好的这个 wordpress 项目,并配置fastcgi缓存,就会发现主页永远不会被缓存。
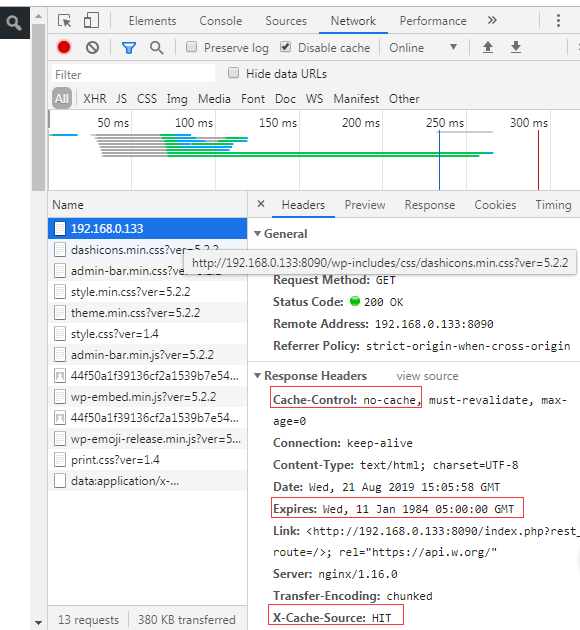
当然我们也可以对Nginx进行配置,来忽略一些头信息,从而安装Nginx的缓存规则来进行。
配置如下:
fastcgi_ignore_headers Cache-Control Expires Set-Cookie;
再次请求相同的页面,发现已经缓存了。
·
本文为袋鼠学习中的总结,如有转载请注明出处:https://www.cnblogs.com/chrdai/protected/p/11374847.html