Flask框架(六)
message
-设置:flash('aaa')
-取值:get_flashed_message()

-假设在a页面操作出错,跳转到b页面,在b页面显示a页面的错误信息
1 如果要用flash就必须设置app.secret_key = 'asdfasdf'
2 特点:存了,你可以在任意一次请求中获取,但是一旦取了一次,就没有了。这里的一次指的是在同一个路径下请求一次
3 我们可以使用  flash('普通信息',category="info"),通过category对信息做分类
4get_flashed_messages(with_categories=True,category_filter=("error",)),设置with_categories以键值对的形式获取
设置category_filter=("error",)进行分类信息的过滤
from flask import Flask,flash,get_flashed_messages
app = Flask(__name__)
app.secret_key = 'asdfasdf'
@app.route('/index1')
def index():
#(category="message", message))
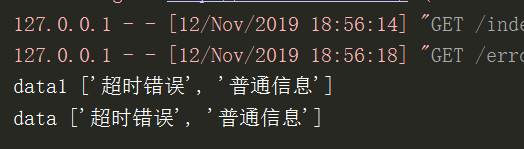
flash('超时错误',category="error") #设置信息,分类为error
flash('普通信息',category="info") #设置信息,分类为info
return "ssdsdsdfsd"
@app.route('/error')
def error():
data = get_flashed_messages(with_categories=True,category_filter=("error","info"))
data1 = get_flashed_messages(with_categories=True, category_filter=("error", "info"))
print("data1",data1)
print("data",data)
return "错误信息"
if __name__ == '__main__':
app.run()
操作流程
请求index1路由,执行flash,设置信息,并且分类请求error路由,执行get_flash_message。with_categories参数可写可不写,写了参数就是(类型,设置信息)格式。category_filter是设置显示的哪个分类信息
设置with_categories=True,结果打印格式

不设置with_categories=True,结果打印格式
请求扩展
1.before_request 在访问正式的视图函数之前做一些事情(比如可以基于它做用户登录)
注意:如果你在一个before中加入return返回值,就会终止代码运行,不会往下走了。
from flask import Flask,request,render_template
app = Flask(__name__)
@app.before_request
def befor1():
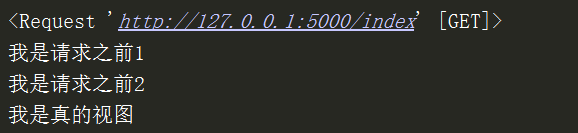
print(request)
print("我是请求之前1")
@app.before_request
def befor2():
print("我是请求之前2")
@app.route('/index')
def index():
print("我是真的视图")
return render_template("index.html")
if __name__ == '__main__':
app.run()
结果是从上往下运行
2.after_request (在每个请求之后绑定一个函数,类似于django中间件中的process_response)
from flask import Flask,request,render_template
app = Flask(__name__)

@app.after_request
def after1(response):
    print("我是请求之后1")
    return response

@app.after_request
def after2(response):
    print("我是请求之后2")
    return response

@app.route('/index')
def index():
    print("我是真的视图")
    return render_template("index.html")


if __name__ == '__main__':
    app.run()
结果是从下往上运行
3.before_first_request (在请求之前运行,如果不重启,只会运行第一次)
from flask import Flask,render_template
app = Flask(__name__)

@app.before_first_request
def before_first():
    print("123")


@app.route('/index')
def index():
    print("我是真的视图")
    return render_template("index.html")


if __name__ == '__main__':
    # app.__call__
    app.run()
4.teardown_request (在正式请求之后绑定一个函数,无论有没有异常都会执行,如果没有异常这个参数e就返回None,有就记录这个异常)
from flask import Flask,render_template
app = Flask(__name__)

@app.teardown_request
def tear(e):
    print('teardown_request')
    print(e)   #返回异常信息

@app.route('/index')
def index():
    print("我是真的视图")
    return render_template("index.html")


if __name__ == '__main__':
    # app.__call__
    app.run()
5.errorhandler (路径不存在时404,服务器内部错误500)
@app.errorhandler(404)
def error_404(arg):
    print(arg)   #返回路径错误信息
    return "404错误了"


@app.errorhandler(500)
def error(arg):
    print(arg)   #返回服务器错误信息
    return "500错误了"
6.template_global (标签)
@app.template_global()
def sb(a1, a2):
    return a1 + a2

@app.route('/index')
def index():
    print("我是真的视图")
    return render_template("index.html")
html
{{sb(1,2)}}
7.template_filter (过滤器)
@app.template_filter()
def db(a1, a2, a3):
    return a1 + a2 + a3

html
#{{ 1|db(2,3)}}
总结:
1 重点掌握before_request和after_request,
2 注意有多个的情况,执行顺序
3 before_request请求拦截后(也就是有return值),response所有都执行
中间件(了解)
from flask import Flask

app = Flask(__name__)

@app.route('/')
def index():
    return 'Hello World!'
# 模拟中间件
class Md(object):
    def __init__(self,old_wsgi_app):
        self.old_wsgi_app = old_wsgi_app

    def __call__(self,  environ, start_response):
        print('开始之前')
        ret = self.old_wsgi_app(environ, start_response)
        print('结束之后')
        return ret

if __name__ == '__main__':
    #1我们发现当执行app.run方法的时候,最终执行run_simple,最后执行app(),也就是在执行app.__call__方法
    #2 在__call__里面,执行的是self.wsgi_app().那我们希望在执行他本身的wsgi之前做点事情。
    #3 所以我们先用Md类中__init__,保存之前的wsgi,然后我们用将app.wsgi转化成Md的对象。
    #4 那执行新的的app.wsgi_app,就是执行Md的__call__方法。
    #把原来的wsgi_app替换为自定义的,

    app.wsgi_app = Md(app.wsgi_app)
    app.run()
请求所有的流程
ctx = self.request_context(environ)
        error = None
        try:
            try:
                ctx.push()
                #根据路径去执行视图函数,视图类
                response = self.full_dispatch_request()
            except Exception as e:
                error = e
                response = self.handle_exception(e)
            except:  # noqa: B001
                error = sys.exc_info()[1]
                raise
            return response(environ, start_response)
        finally:
            #不管出不出异常,都会走这里
            if self.should_ignore_error(error):
                error = None
            ctx.auto_pop(error)