上个专题我们讲到了Membership,了解了Membership可以让我们轻松的实现用户注册、登录、删除用户、用户更改密码等等一系列关于用户的基本操作,但是对于一个面向多用户的web程序,为了满足用户在访问站点时能够根据自己的喜好定制web站点的一些页面布局、皮肤,语言等等一些信息,Membership是不能满足要求的,因此,在CS中引入了Profile,Profile并不是为了实现用户个性化的机制,只是实现了个性化信息存储(在asp.net 2.0 beat2.0中页面的个性化可以用webpart实现的),目前CS的版本中还没有实现这个功能。但是我想,CS实现页面布局的个性化是迟早的事情,如果有可能,我会在CS专题结束后做一些asp.net 2.0 webpart的讲解。
CS中的Profile存储的主要是注册用户的email、timezone(时区)、日期格式、字体大小等等。通过这些信息CS就可以给注册并且登录后的用户个性化他们设置的页面,如:选择的皮肤、语言、字体大小,日期格式。
以显示日期格式为例,我们看看Profile给我们带来的效果:
我们先在CS中设置日期格式如下:

可以看到CS论坛中的日期格式如下:

接下来,设置过另外一个格式:
![]()
在论坛中可以看到格式也改变了:

如果你注销后,日期格式又会发生改变(改变为默认日期格式),也就是说这种设置完全是个人的。
当然,要实现这样的功能需要构建复杂的代码,Profile机制在这里仅仅提供数据的存储服务,这个专题我们只分析Profile机制是如何提供存储服务的。
先看看配置文件:
 <profile enabled="true" > <providers> <add name="CommunityServerSqlProvider" type="CommunityServer.Components.CSProfileProvider, CommunityServer.Components" connectionStringName="SiteSqlServer" applicationName="dev" description="Stores and retrieves profile data from the local Microsoft SQL Server database" /> </providers> <properties> <add name = "commonName" type = "string" /> <add name = "birthdate" type = "DateTime" /> <add name = "gender" type = "int" defaultValue = "0" /> <add name = "dateFormat" type = "string" defaultValue="yyyy-MM-dd" /> <add name = "publicEmail" type = "string" /> <add name = "language" type = "string" /> <add name = "webAddress" type = "string" /> <add name = "webLog" type = "string" /> <add name = "signature" type = "string" /> <add name = "signatureFormatted" type = "string" /> <add name = "location" type = "string" /> <add name = "occupation" type = "string" /> <add name = "interests" type = "string" /> <add name = "msnIM" type = "string" /> <add name = "yahooIM" type = "string" /> <add name = "aolIM" type = "string" /> <add name = "icqIM" type = "string" /> <add name = "qqIM" type = "string" /> <add name = "enablePostPreviewPopup" type = "System.Boolean" defaultValue = "false" /> <add name = "enableEmoticons" type = "System.Boolean" defaultValue = "true" /> <add name = "timezone" type = "System.Double" defaultValue="0" /> <add name = "fontsize" type = "int" defaultValue = "0" /> </properties></profile>
< providers >节点下的内容我就不多说了。<properties>节点是配置的关键,该节点下面的信息就是一个注册用户可以存储的个性化信息。name是存储的名称,type是该名称保存数据的类型(其实还有一些信息可有可无,比如defaultValue等,表示默认值)。
用Reflector打开MemberRole,可以看到相比Membership,profile在类结构方面复杂很多,其实往往数据库设计的越简单,处理数据的类就越复杂。与Membership一样,通过实现 IConfigurationSectionHandler接口来读取在Web.config中配置。先实例化一个ProfileConfig,用来存储Providers节点下的信息和Properties节点下信息。
public class ProfileConfig {
{
 // Methods public ProfileConfig(ProfileConfig parent); // Fields public bool AutomaticSaveEnabled; public bool Enabled; public string Inherits; public ProfilePropertySettingsCollection Properties; public ProfileProvider Provider;
 }
}分别存储在Provider与Properties属性下,看看UML图:
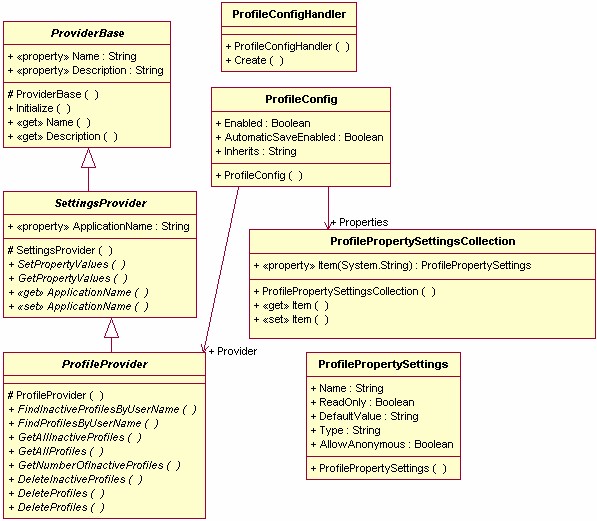
在图中,可以看到Properties是一个ProfilePropertySettingsCollection类的实例,该实例通过一个索引器来保存或者读取多个ProfilePropertySettings类实例,而ProfilePropertySettings实例中保存的就是<properties>节点下的<add>节点信息,如:<add name = "msnIM" type = "string" />。
由于Profile采用的也是Provider数据访问模型,所以可以看到上图中左边的三个类一路继承下来,但都是抽象类,没有具体实现。由于MemberRole中只实现了SQL Server的数据库存储实现,该实现在SqlProfileProvider类中可以看到:
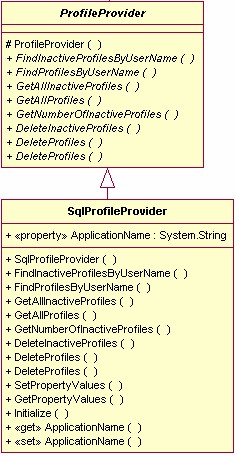
(UML 中用斜体来表示抽象方法或者抽象类)
在Profile中还运用了httpModule,在web.config文件文件中,我们还看到这样一个配置文件:
<httpModules> …… <add name="Profile" type="Microsoft.ScalableHosting.Profile.ProfileModule, MemberRole, Version=1.0.0.0, Culture=neutral, PublicKeyToken=b7c773fb104e7562"/> ……</httpModules>这是一个
httpModule模块的配置,该模块有何用处我们具体看看。以下类省略方法与属性具体内容:
public sealed class ProfileModule : IHttpModule{ // Events public event ProfileMigrateEventHandler MigrateAnonymous; public event ProfileEventHandler Personalize; public event ProfileAutoSaveEventHandler ProfileAutoSaving; // Methods static ProfileModule(); [SecurityPermission(SecurityAction.Demand, UnmanagedCode=true)] public ProfileModule(); public void Dispose(); public void Init(HttpApplication app); private void OnEnter(object source, EventArgs eventArgs); private void OnLeave(object source, EventArgs eventArgs); private void OnPersonalize(ProfileEventArgs e); internal static void ParseDataFromDB(string[] names, string values, byte[] buf, SettingsPropertyValueCollection properties); internal static void PrepareDataForSaving(ref string allNames, ref string allValues, ref byte[] buf, bool binarySupported, SettingsPropertyValueCollection properties, bool userIsAuthenticated); // Fields private ProfileAutoSaveEventHandler _AutoSaveEventHandler; private ProfileEventHandler _eventHandler; private ProfileMigrateEventHandler _MigrateEventHandler; private static object s_Lock;} 如果你对httpModule不了解,请看前面的专题。在Init方法中可以看到
public void Init(HttpApplication app){ app.AcquireRequestState += new EventHandler(this.OnEnter); app.EndRequest += new EventHandler(this.OnLeave);}这里声明了两个事件,这两个事件分别在Http请求状态开始和结束Http请求时自动被激发。很有必要具体看看事件的处理内容:
Http请求状态开始时激发:
private void OnEnter(object source, EventArgs eventArgs){ if (ProfileManager.Enabled) {
{ HttpContext context1 = ((HttpApplication) source).Context; this.OnPersonalize(new ProfileEventArgs(context1)); string text1 = AnonymousIdUtil.GetAnonymousIdInternal(context1); if ((context1.Request.IsAuthenticated && (text1 != null)) && ((text1.Length > 0) && (this._MigrateEventHandler != null))) { AnonymousIdUtil.SetShowAnonymousId(context1, true); ProfileMigrateEventArgs args1 = new ProfileMigrateEventArgs(context1, text1); this._MigrateEventHandler(this, args1); AnonymousIdUtil.SetShowAnonymousId(context1, false);
 } }}
} }}首先得到该次请求的上下文Context,这很重要,因为web请求是无状态的,要保存上下文信息来完成这次请求。接着调用OnPersonalize方法:
private void OnPersonalize(ProfileEventArgs e){ if (this._eventHandler != null) { this._eventHandler(this, e); } if (e.Profile != null) { ProfileUtil.SetProfile(e.Context, e.Profile); } else { ProfileUtil.SetProfileDelayLoad(e.Context, true); }}该方法主要是初始化一个事件—Personalize(用处是在你的运用代码中如果还需要对这个请求开始的时候做一些个性化处理添加自己的方法,那么就可以通过向这个事件指定委托,委托指向的方法就会在这个时候被事件调用。)。之后判断e.Profile是否已经有内容,如果有就保存在context.Items["PRF"]中,如果没有就保存一个context.Items["PRFDL"] = true,这样后面就可以判断Profile的内容是否已经存储在请求的上下文中了。
再回到OnEnter方法中来,处理完OnPersonalize方法的调用后,判断是否是是已经验证过的匿名用户,根据判断后在看是否进行MigrateAnonymous事件的初始化,关于匿名用户的处理,后面会专门的专题讲解,这里就不多说。
看看结束Http请求时激发的方法:
private void OnLeave(object source, EventArgs eventArgs){ if (ProfileManager.Enabled) { HttpApplication application1 = (HttpApplication) source; HttpContext context1 = application1.Context; if (((ProfileUtil.GetProfileInternal(context1) != null) && (ProfileUtil.GetProfileInternal(context1) != ProfileBase.SingletonInstance)) && ProfileManager.AutomaticSaveEnabled) { if (this._AutoSaveEventHandler != null) { ProfileAutoSaveEventArgs args1 = new ProfileAutoSaveEventArgs(context1); this._AutoSaveEventHandler(this, args1); if (!args1.ContinueWithProfileAutoSave) { return; } } ProfileUtil.GetProfileInternal(context1).Save(); } }}其实只要对事件与委托了解,看懂就不成问题,主要就是根据在web.config中的设置判断是否初始化ProfileAutoSaving事件,然后ContinueWithProfileAutoSave的值来决定是否在请求结束的时候自动对Profile信息进行保存,其实这里的Profile信息就是一个ProfileBase实体,在OnPersonalize方法中被保存在context.Items["PRF"]中,当这次请求完成后,上下文context信息将自动被销毁。
在Profile中还有很重要的一部分,那就是数据的序化(串行化),通过一些方法把要存储的信息和信息的名称分别存放在数据库的两个字段中,这些信息是叠加的字符或者二进制串:


PropertyNames保存Profile的名称,PropertyValuesString保存以文本方式Profile的值,PropertyValuesBinary是二进制方式保存的Profile的值。具体分析一下:
PropertyNames内容:
“publicEmail:S:0:13:yahooIM:S:13:0:timezone:S:13:1:msnIM:S:14:13:commonName:B:0:-1:birthdate:S:27:9:gender:S:36:1:fontsize:B:0:-”
PropertyValuesString内容:
“ugoer@msn.com0ugoer@msn.com1982-8-141yyyy年M月d日, dddFalsezh-CN25694432www.ugoer.com无ugoer.cnblogs.comTrue”
“S”表示是用文本方式存储PropertyNames值,如果是“B”就表示用二进制存储。心细一点就会发现PropertyNames的值中包括所有的web.config中配置<properties>节点下的name,只是在这些name后面多了如“:S:13:1:”这样的信息,刚才说过S表示用文本方式存储,其实“13”指的是从第PropertyValuesString字段中存储信息的第13个字符开始后的1个字符长度的内容为timezone的值。这就是奥妙所在,那么PropertyValuesBinary是不是多余呢?有时你可能考虑需要用二进制的方式来保存这些信息,这样在数据库中这些信息就不容易直接看到,因此MemberRole中的Profile提供这样的选择,在asp.net 2.0 beta2中也同样提供这样的选择,毕竟众口难调嘛。
最后看看是如何对properties信息进行序化和反序化的:
数据操作的具体实现是SqlProfileProvider类中,SetPropertyValues方法实现Profile信息的保存,该方法中调用ProfileModule类的PrepareDataForSaving方法来实现数据的序化(其实我搞不明白为什么PrepareDataForSaving这个方法放在ProfileModule类下,这有点不合逻辑,不过方法是静态的,放在哪里都不影响):
internal static void PrepareDataForSaving(ref string allNames, ref string allValues, ref byte[] buf, bool binarySupported, SettingsPropertyValueCollection properties, bool userIsAuthenticated){ StringBuilder builder1 = new StringBuilder(); StringBuilder builder2 = new StringBuilder(); MemoryStream stream1 = binarySupported ? new MemoryStream() : null; try { try { bool flag1 = false; foreach (SettingsPropertyValue value1 in properties) { if (!value1.IsDirty) { continue; } if (userIsAuthenticated || ((bool) value1.Property.Attributes["AllowAnonymous"])) { flag1 = true; break; } } if (!flag1) { return; } foreach (SettingsPropertyValue value2 in properties) { if (!userIsAuthenticated && !((bool) value2.Property.Attributes["AllowAnonymous"])) { continue; } if (value2.IsDirty || !value2.UsingDefaultValue) { int num1 = 0; int num2 = 0; string text1 = null; if (value2.Deserialized && (value2.PropertyValue == null)) { num1 = -1; } else { object obj1 = value2.SerializedValue; if (obj1 == null) { num1 = -1; } else { if (!(obj1 is string) && !binarySupported) { obj1 = Convert.ToBase64String((byte[]) obj1); } if (obj1 is string) { text1 = (string) obj1; num1 = text1.Length; num2 = builder2.Length; } else { byte[] buffer1 = (byte[]) obj1; num2 = (int) stream1.Position; stream1.Write(buffer1, 0, buffer1.Length); stream1.Position = num2 + buffer1.Length; num1 = buffer1.Length; } } } string[] textArray1 = new string[8] { value2.Name, ":", (text1 != null) ? "S" : "B", ":", num2.ToString(CultureInfo.InvariantCulture), ":", num1.ToString(CultureInfo.InvariantCulture), ":" } ; builder1.Append(string.Concat(textArray1)); if (text1 != null) { builder2.Append(text1); } } } if (binarySupported) { buf = stream1.ToArray(); } } finally { if (stream1 != null) { stream1.Close(); } } } catch { throw; } allNames = builder1.ToString(); allValues = builder2.ToString();}方法其实很简单,分析不难得出具体是如何工作的,我就不做具体的讲解,数据的反序化是在ParseDataFromDB方法中进行,该方法也在ProfileModule类下:
internal static void ParseDataFromDB(string[] names, string values, byte[] buf, SettingsPropertyValueCollection properties){ if (((names != null) && (values != null)) && ((buf != null) && (properties != null))) { try { for (int num1 = 0; num1 < (names.Length / 4); num1++) { string text1 = names[num1 * 4]; SettingsPropertyValue value1 = properties[text1]; if (value1 != null) { int num2 = int.Parse(names[(num1 * 4) + 2], CultureInfo.InvariantCulture); int num3 = int.Parse(names[(num1 * 4) + 3], CultureInfo.InvariantCulture); if ((num3 == -1) && !value1.Property.PropertyType.IsValueType) { value1.PropertyValue = null; value1.IsDirty = false; value1.Deserialized = true; } if (((names[(num1 * 4) + 1] == "S") && (num2 >= 0)) && ((num3 > 0) && (values.Length >= (num2 + num3)))) { value1.SerializedValue = values.Substring(num2, num3); } if (((names[(num1 * 4) + 1] == "B") && (num2 >= 0)) && ((num3 > 0) && (buf.Length >= (num2 + num3)))) { byte[] buffer1 = new byte[num3]; Buffer.BlockCopy(buf, num2, buffer1, 0, num3); value1.SerializedValue = buffer1; } } } } catch { } }}其实数据序化和反序化运用很广泛,在一些项目中使用他可以变得很灵活,比如CRM系统中,用这种方式保存一些客户不是太重要的资料,这些资料往往不需要进行查询但是在对不同的客户定制CRM系统时经常需要添加或者修改,这个时候就可以采用。常常有人在埋怨asp.net 2.0 beta2中的membership操作并不简单,反而复杂化,比如:如果添加一个字段,需要对UI做不小的改动。我也有这样的感觉,但是当把membership与webpart结合在一起,那么可以实现一种从数据操作,到业务逻辑,再到UI的全过程实现。也就是说,如果开发一个webpart用来处理profile,当增加profile内容的时候,UI根据增加的信息,自动的在UI上生成内容的现实与设置,那就一劳永逸了。