更多k8s内容,请关注威信公众好:新猿技术生态圈
一、数据持久化
    Pod是由容器组成的,而容器宕机或停止之后,数据就随之丢了,那么这也就意味着我们在做Kubernetes集群的时候就不得不考虑存储的问题,而存储卷就是为了Pod保存数据而生的。存储卷的类型有很多,

  # 一般有四种:emptyDir,hostPath,NFS以及云存储(ceph, glasterfs...)等。
1、emptyDir(不能用来做数据持久化)
# emptyDir:是pod调度到节点上时创建的一个空目录,当pod被删除时,emptydir中数据也随之删除,emptydir常用于容器间分享文件,或者用于创建临时目录。

#实例
# 1、编写配置清单
[root@k8s-m-01 k8s]# vim emptydir.yaml
kind: Deployment
apiVersion: apps/v1
metadata:
  name: emptydir
spec:
  selector:
    matchLabels:
      app: emptydir
  template:
    metadata:
      labels:
        app: emptydir
    spec:
      containers:
        - name: nginx
          image: nginx
          volumeMounts:
            - mountPath: /data/ #nginx挂载目录
              name: emptydir-name
        - name: php
          image: registry.cn-shanghai.aliyuncs.com/aliyun_mm/discuz:php-v1
          volumeMounts:
            - mountPath: /opt/ # php挂载目录
              name: emptydir-name
      volumes:
        - name: emptydir-name
          emptyDir: {}
# 2、查看pod
[root@k8s-m-01 k8s]# kubectl get pod
NAME                        READY   STATUS    RESTARTS   AGE
emptydir-6ffc884879-rqlnw   2/2     Running   0          3m52s
# 验证容器间的数据分享
# 3、进入nginx容器挂载的目录,创建文件
[root@k8s-m-01 k8s]# kubectl exec -it emptydir-6ffc884879-rqlnw -c nginx -- bash
root@emptydir-6ffc884879-rqlnw:/# df
/dev/mapper/centos-root 103754244 5333064  98421180   6% /data
root@emptydir-6ffc884879-rqlnw:/# cd /data/
root@emptydir-6ffc884879-rqlnw:/data# ls
root@emptydir-6ffc884879-rqlnw:/data# echo 111 > 1.tt
root@emptydir-6ffc884879-rqlnw:/data# ls
1.tt
# 4、进入php挂载的目录查看是否也有创建的文件
[root@k8s-m-01 k8s]# kubectl exec -it emptydir-6ffc884879-rqlnw -c php -- bash
[root@emptydir-6ffc884879-rqlnw html]# df
/dev/mapper/centos-root 103754244 5333092  98421152   6% /opt
[root@emptydir-6ffc884879-rqlnw html]# cd /opt/
[root@emptydir-6ffc884879-rqlnw opt]# ls
1.tt
[root@emptydir-6ffc884879-rqlnw opt]# cat 1.tt
111
2、hostpath
hostPath类型则是映射node文件系统中的文件或者目录到pod里。在使用hostPath类型的存储卷时,也可以设置type字段,支持的类型有文件、目录、File、Socket、CharDevice和BlockDevice。
# hostPath类似于docker -v参数,将宿主主机中的文件挂载pod中,但是hostPath比docker -v参数更强大,(Pod调度到哪个节点,则直接挂载到当前节点上)

#实例
# 1、编写配置清单
[root@k8s-m-01 k8s]# vim hostpath.yaml
kind: Deployment
apiVersion: apps/v1
metadata:
  name: hostpath
spec:
  selector:
    matchLabels:
      app: hostpath
  template:
    metadata:
      labels:
        app: hostpath
    spec:
      containers:
        - name: nginx
          image: nginx
          volumeMounts:
            - mountPath: /opt/  # 本地必须存在的目录
              name: hostpath-name
      volumes:
        - name: hostpath-name
          hostPath:
            path: /opt/hostpath # 随机在node节点创建
            type:  DirectoryOrCreate # 类型:没有就创建,有就不创建
 # 2、查看pod
[root@k8s-m-01 k8s]# kubectl get pod -o wide
NAME                        READY   STATUS    RESTARTS   AGE     IP            NODE       NOMINATED NODE   READINESS GATES
hostpath-54859ffd84-cqssj   1/1     Running   0          3m40s   10.244.1.25   k8s-n-01   <none>           <none>
# 3、进入容器创建(在node节点/opt/目录创建一样)
root@k8s-m-01 opt]# kubectl exec -it hostpath-54859ffd84-cqssj -- bash
root@hostpath-54859ffd84-cqssj:/# df
/dev/mapper/centos-root 103754244 5333132  98421112   6% /opt
root@hostpath-54859ffd84-cqssj:/opt# ls
root@hostpath-54859ffd84-cqssj:/opt# echo 111 > 1.tt
root@hostpath-54859ffd84-cqssj:/opt# ls
1.tt
# 4、node节点查看
[root@k8s-n-01 ~]# cd /opt/
[root@k8s-n-01 opt]# ll
drwxr-xr-x 2 root root 18 Aug  9 15:24 hostpath  # 默认权限755
[root@k8s-n-01 opt]# cd hostpath/
[root@k8s-n-01 hostpath]# ll
total 4
-rw-r--r-- 1 root root 4 Aug  9 15:24 1.tt
[root@k8s-n-01 hostpath]# cat 1.tt
111
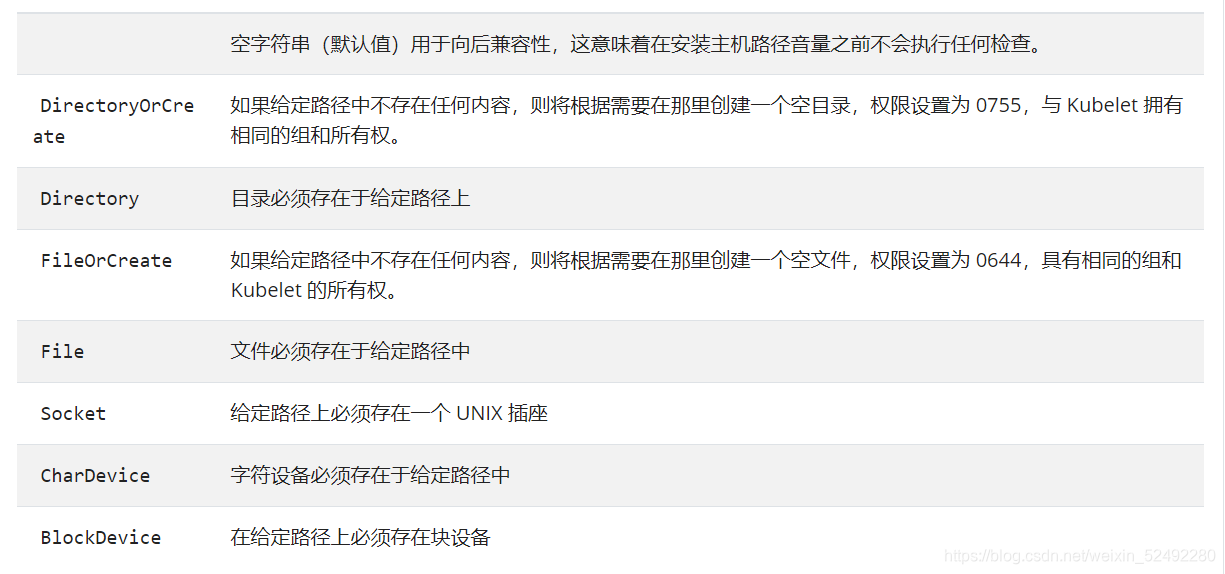
1、hostpath 的type的种类
3、NFS
nfs使得我们可以挂载已经存在的共享搭到我们的pod中
和emptydir不同的是,当pod被删除时,emptydir也会被删除。
nfs不会被删除,仅仅是解除挂在状态而已,这就意味着NFS能够允许我们提前对数据进行处理,而且这些数据可以在pod之间互相传递,并且nfs可以同时被多个pod挂载并进行读写。
# 1、部署NFS(所有节点)
[root@k8s-m-01 k8s]# yum install nfs-utils.x86_64 -y
# 2、配置
[root@k8s-m-01nfs]# mkdir -p /nfs/v{1..10}
[root@k8s-m-01nfs]# cat > /etc/exports <<EOF
/nfs/v1 192.168.15.0/16(rw,sync,all_squash)
/nfs/v2 192.168.15.0/16(rw,sync,all_squash)
/nfs/v3 192.168.15.0/16(rw,sync,all_squash)
/nfs/v4 192.168.15.0/16(rw,sync,all_squash)
/nfs/v5 192.168.15.0/16(rw,sync,all_squash)
EOF

# 3、查看结果
[root@k8s-m-01 k8s]# exportfs -arv
exporting192.168.15.0/16:/nfs/v5
exporting192.168.15.0/16:/nfs/v4
exporting192.168.15.0/16:/nfs/v3
exporting192.168.15.0/16:/nfs/v2
exporting192.168.15.0/16:/nfs/v1
[root@k8s-m-01 k8s]# showmount -e
Export list for k8s-m-01:
/nfs/v5 192.168.15.0/24
/nfs/v4 192.168.15.0/24
/nfs/v3 192.168.15.0/24
/nfs/v2 192.168.15.0/24
/nfs/v1 192.168.15.0/24

# 4、启动nfs(所有节点)
[root@k8s-m-01 k8s]# systemctl enable --now nfs

# 5、测试k8s使用nfs
apiVersion: apps/v1
kind: Deployment
metadata:
  name: nfs
spec:
  selector:
    matchLabels:
      app: nfs

  template:
    metadata:
      labels:
        app: nfs
    spec:
      nodeName: gdx3
      containers:
        - name: mysql
          image: mysql:5.7
          env:
            - name: MYSQL_ROOT_PASSWORD
              value: "123456"
          volumeMounts:
            - mountPath: /var/lib/mysql
              name: nfs
      volumes:
        - name: nfs
          nfs:
            path: /nfs/v1
            server: 192.168.15.111
 # 6、验证nfs挂载
 #进入到nfs数据库
[root@k8s-m-01 k8s]# kubectl get pods
NAME                        READY   STATUS    RESTARTS   AGE
emptydir-5dc7dcd9fd-zrb99   2/2     Running   0          9h
nfs-85dff7bb6b-8pgrp        1/1     Running   0          60m
statefulset-test-0          1/1     Running   0          27h
test-6799fc88d8-t6jn6       1/1     Running   0          142m
test-tag                    1/1     Running   0          3d15h
wordpress-test-0            2/2     Running   0          26h
[root@k8s-master1 v1]# kubectl exec -it nfs-85dff7bb6b-8pgrp -- bash
root@nfs-85dff7bb6b-8pgrp:/# mysql -u root -p123456
mysql: [Warning] Using a password on the command line interface can be insecure.
Welcome to the MySQL monitor.  Commands end with ; or g.
Your MySQL connection id is 2
Server version: 5.7.33 MySQL Community Server (GPL)

Copyright (c) 2000, 2021, Oracle and/or its affiliates.

Oracle is a registered trademark of Oracle Corporation and/or its
affiliates. Other names may be trademarks of their respective
owners.

Type 'help;' or 'h' for help. Type 'c' to clear the current input statement.

mysql> create database discuz;  #创建一个数据库
Query OK, 1 row affected (0.01 sec)

mysql> show databases;
+--------------------+
| Database           |
+--------------------+
| information_schema |
| discuz             |
| mysql              |
| performance_schema |
| sys                |
+--------------------+
5 rows in set (0.00 sec)

#到宿主机的挂载目录下查看
[root@k8s-m-01 k8s]# cd /nfs/v1
[root@k8s-master1 v1]# ll
总用量 188484
-rw-r----- 1 polkitd ssh_keys       56 4月   4 19:06 auto.cnf
-rw------- 1 polkitd ssh_keys     1680 4月   4 19:06 ca-key.pem
-rw-r--r-- 1 polkitd ssh_keys     1112 4月   4 19:06 ca.pem
-rw-r--r-- 1 polkitd ssh_keys     1112 4月   4 19:06 client-cert.pem
-rw------- 1 polkitd ssh_keys     1680 4月   4 19:06 client-key.pem
drwxr-x--- 2 polkitd ssh_keys       20 4月   4 21:07 discuz  #数据库目录已经存在
-rw-r----- 1 polkitd ssh_keys      692 4月   4 20:04 ib_buffer_pool
-rw-r----- 1 polkitd ssh_keys 79691776 4月   4 20:04 ibdata1
-rw-r----- 1 polkitd ssh_keys 50331648 4月   4 20:04 ib_logfile0
-rw-r----- 1 polkitd ssh_keys 50331648 4月   4 19:06 ib_logfile1
-rw-r----- 1 polkitd ssh_keys 12582912 4月   4 20:05 ibtmp1
drwxr-x--- 2 polkitd ssh_keys     4096 4月   4 19:06 mysql
drwxr-x--- 2 polkitd ssh_keys     8192 4月   4 19:06 performance_schema
-rw------- 1 polkitd ssh_keys     1680 4月   4 19:06 private_key.pem
-rw-r--r-- 1 polkitd ssh_keys      452 4月   4 19:06 public_key.pem
-rw-r--r-- 1 polkitd ssh_keys     1112 4月   4 19:06 server-cert.pem
-rw------- 1 polkitd ssh_keys     1680 4月   4 19:06 server-key.pem
drwxr-x--- 2 polkitd ssh_keys     8192 4月   4 19:06 sys

# 7、测试删除pod
[root@k8s-master1 discuz]# kubectl delete pods nfs-85dff7bb6b-8pgrp
pod "nfs-85dff7bb6b-8pgrp" deleted

#在回宿主机挂载目录查看discuz数据库目录仍然是存在的
4.PV/PVC
# 1、PersistentVolume(PV)是集群中已由管理员配置的一段网络存储。
集群中的资源就像一个节点是一个集群资源。 PV是诸如卷之类的卷插件,但是具有独立于使用PV的任何单个pod的生命周期。 该API对象捕获存储的实现细节,即NFS,iSCSI或云提供商特定的存储系统  。
# 2、PersistentVolumeClaim(PVC)是用户存储的请求。
PVC的使用逻辑:在pod中定义一个存储卷(该存储卷类型为PVC),定义的时候直接指定大小,pvc必须与对应的pv建立关系,pvc会根据定义去pv申请,而pv是由存储空间创建出来的。pv和pvc是kubernetes抽象出来的一种存储资源。
1)PV 的访问模式(accessModes)
| 模式 | 解释 |
|---|---|
| ReadWriteOnce(RWO) | 可读可写,但只支持被单个节点挂载。 |
| ReadOnlyMany(ROX) | 只读,可以被多个节点挂载。 |
| ReadWriteMany(RWX) | 多路可读可写。这种存储可以以读写的方式被多个节点共享。不是每一种存储都支持这三种方式,像共享方式,目前支持的还比较少,比较常用的是 NFS。在 PVC 绑定 PV 时通常根据两个条件来绑定,一个是存储的大小,另一个就是访问模式。 |
2)PV的回收策略(persistentVolumeReclaimPolicy)
| 策略 | 解释 |
|---|---|
| Retain | 不清理, 保留 Volume(需要手动清理) |
| Recycle | 删除数据,即 rm -rf /thevolume/*(只有 NFS 和 HostPath 支持) |
| Delete | 删除存储资源,比如删除 AWS EBS 卷(只有 AWS EBS, GCE PD, Azure Disk 和 Cinder 支持) |
3)PV的状态
| 状态 | 解释 |
|---|---|
| Available | 可用 |
| Bound | 已经分配给 PVC。 |
| Released | PVC 解绑但还未执行回收策略。 |
| Failed | 发生错误 |
# 1、创建pv (PV集群级资源)
apiVersion: v1
kind: PersistentVolume
metadata:
  name: pv1
spec:
  nfs:
    path: /nfs/v2
    server: 172.16.1.11
  capacity:
    storage: 20Gi
  persistentVolumeReclaimPolicy: Retain  #指定pv的回收策略:不清理保留volume
  accessModes:  #指定pv的访问模式
    - "ReadWriteOnce"  #可读可写,但只支持单个节点挂载
    - "ReadWriteMany"  #多路可读可写

# 2、查看pv
[root@k8s-m-01 k8s]# kubectl get pv
NAME   CAPACITY   ACCESS MODES   RECLAIM POLICY   STATUS      CLAIM   STORAGECLASS   REASON   AGE
pv1    20Gi       RWO,RWX        Retain           Available                                   53s
4)PVC指定使用的PV (PVC名称空间级资源)
# 1、创建PVC
apiVersion: v1
kind: PersistentVolumeClaim
metadata:
  name: pvc1
spec:
  accessModes:
    - "ReadWriteMany"  #此内容要在pv的访问模式中包含
  resources:
    requests:
      storage: "6Gi"  #此值要包含在pv的大小内

# 2、再查看pv
[root@k8s-m-01 k8s]# kubectl get pv
NAME   CAPACITY   ACCESS MODES   RECLAIM POLICY   STATUS   CLAIM          STORAGECLASS   REASON   AGE
pv1    20Gi       RWO,RWX        Retain           Bound    default/pvc1                           29m
#注:此时pv已是绑定pv1的状态

# 3、查看pvc
[root@k8s-m-01 k8s]# kubectl get pvc
NAME   STATUS   VOLUME   CAPACITY   ACCESS MODES   STORAGECLASS   AGE
pvc1   Bound    pv1      20Gi       RWO,RWX                       2m42s
二、部署discuz(使用pv/pvc管理nfs)
# 1、所有机器安装nfs
# 2、编写nfs配置文件并启动
# 3、上传代码包
# 4、编写mysql的yaml文件
# 5、编写discuz的yaml文件
# 6、生成yaml文件并查看详情
# 7、Ip访问
# 8、故障排查
1、所有机器安装nfs
[root@k8s-m-01 k8s]# yum -y install nfs-utils
2、编写nfs配置文件并启动
# 1、创建目录
[root@k8s-m-01 k8s]# mkdir -p /nfs/v{1..10}
# 2、编写nfs文件
[root@k8s-m-01 k8s]# vim /etc/exports
/nfs/v1  192.168.15.0/24(rw,sync,all_squash)
/nfs/v2  192.168.15.0/24(rw,sync,all_squash)
/nfs/v3  192.168.15.0/24(rw,sync,all_squash)
/nfs/v4  192.168.15.0/24(rw,sync,all_squash)
/nfs/v5  192.168.15.0/24(rw,sync,all_squash)
# 3、启动nfs
[root@k8s-m-01 k8s]# systemctl enable --now nfs
3、上传代码包
# 1、上传代码包
[root@k8s-m-01 k8s]# wget http://www.mmin.xyz:81/package/blog/Discuz_X3.4_SC_UTF8_20210320.zip
# 2、解压
[root@k8s-m-01 k8s]# unzip Discuz_X3.4_SC_UTF8_20210320.zip
# 3、改名
[root@k8s-m-01 k8s]#  mv upload/ discuz
# 4、移动到挂载目录
[root@k8s-m-01 k8s]# mv discuz/* /nfs/v2
[root@k8s-m-01 k8s]# rm -rf discuz
# 5、授权
[root@k8s-m-01 v2]# chmod 777 -R ./
# 6、查看文件
[root@k8s-m-01 v2]# ll
total 68
-rwxrwxrwx  1 root root 2834 Mar 22 19:44 admin.php
drwxrwxrwx  9 root root  135 Mar 22 19:44 api
-rwxrwxrwx  1 root root  727 Mar 22 19:44 api.php
drwxrwxrwx  2 root root   23 Mar 22 19:44 archiver
drwxrwxrwx  2 root root  141 Aug  9 21:28 config
-rwxrwxrwx  1 root root 1040 Mar 22 19:44 connect.php
-rwxrwxrwx  1 root root  106 Mar 22 19:44 crossdomain.xml
drwxrwxrwx 15 root root  285 Aug  9 21:28 data
-rwxrwxrwx  1 root root 5558 Mar 20 10:36 favicon.ico
-rwxrwxrwx  1 root root 2245 Mar 22 19:44 forum.php
-rwxrwxrwx  1 root root  821 Mar 22 19:44 group.php
-rwxrwxrwx  1 root root 1280 Mar 22 19:44 home.php
-rwxrwxrwx  1 root root 6472 Mar 22 19:44 index.php
drwxrwxrwx  5 root root   64 Mar 22 19:44 install
drwxrwxrwx  2 root root   23 Mar 22 19:44 m
-rwxrwxrwx  1 root root 1025 Mar 22 19:44 member.php
-rwxrwxrwx  1 root root 2371 Mar 22 19:44 misc.php
-rwxrwxrwx  1 root root 1788 Mar 22 19:44 plugin.php
-rwxrwxrwx  1 root root  977 Mar 22 19:44 portal.php
-rwxrwxrwx  1 root root  582 Mar 22 19:44 robots.txt
-rwxrwxrwx  1 root root 1155 Mar 22 19:44 search.php
drwxrwxrwx 10 root root  168 Mar 22 19:44 source
drwxrwxrwx  7 root root   86 Mar 22 19:44 static
drwxrwxrwx  3 root root   38 Mar 22 19:44 template
drwxrwxrwx  7 root root  106 Mar 22 19:44 uc_client
drwxrwxrwx 13 root root  241 Mar 22 19:44 uc_server
4、编写mysql的yaml文件
[root@k8s-m-01 ~]# vim mysql.yaml
kind: Namespace
apiVersion: v1
metadata:
  name: mysql
---
kind: Deployment
apiVersion: apps/v1
metadata:
  name: mysql
  namespace: mysql
spec:
  selector:
    matchLabels:
      app: mysql
  template:
    metadata:
      labels:
        app: mysql
    spec:
      containers:
        - name: mysql
          image: mysql:5.7
          env:
            - name: MYSQL_ROOT_PASSWORD
              value: "123"
            - name: MYSQL_DATABASE
              value: discuz
          livenessProbe:
            exec:
              command:
                - "/bin/sh"
                - "-c"
                - "cat /etc/mysql/my.cnf"
            initialDelaySeconds: 0
            periodSeconds: 3
            timeoutSeconds: 1
            successThreshold: 1
            failureThreshold: 3
          readinessProbe:
            tcpSocket:
              port: 3306
            initialDelaySeconds: 30
            periodSeconds: 1
            timeoutSeconds: 1
            successThreshold: 3
            failureThreshold: 1
---
kind: Service
apiVersion: v1
metadata:
  name: mysql
  namespace: mysql
spec:
  ports:
    - port: 3306
      targetPort: 3306
      protocol: TCP
      name: mysql
  selector:
    app: mysql
5、编写discuz的yaml文件
[root@k8s-m-01 ~]# vim  discuz.yaml
kind: Namespace
apiVersion: v1
metadata:
  name: web
---
kind: PersistentVolume
apiVersion: v1
metadata:
  name: discuz
  labels:
    app: discuz
spec:
  nfs:
    path: /nfs/v2/
    server: 192.168.15.111
  accessModes:
    - "ReadWriteMany"
  capacity:
    storage: '10Gi'
---
apiVersion: v1
kind: PersistentVolumeClaim
metadata:
  name: discuz
  namespace: web
spec:
  accessModes:
    - "ReadWriteMany"
  resources:
    requests:
      storage: '5Gi'
---
apiVersion: apps/v1
kind: Deployment
metadata:
  name: discuz
  namespace: web
spec:
  replicas: 1
  selector:
    matchLabels:
      app: discuz
  template:
    metadata:
      labels:
        app: discuz
    spec:
      containers:
        - name: php
          image: registry.cn-hangzhou.aliyuncs.com/k8sos/web:discuz-php-v1

          imagePullPolicy: Always
          volumeMounts:
            - mountPath: /usr/share/nginx/html/
              name: discuz
          livenessProbe:
            exec:
              command:
                - "/bin/sh"
                - "-c"
                - "cat /etc/php-fpm.d/www.conf"
            initialDelaySeconds: 0
            periodSeconds: 3
            timeoutSeconds: 1
            successThreshold: 1
            failureThreshold: 3
          readinessProbe:
            tcpSocket:
              port: 9000
            initialDelaySeconds: 10
            periodSeconds: 1
            timeoutSeconds: 1
            successThreshold: 3
            failureThreshold: 1
        - name: nginx
          image: registry.cn-hangzhou.aliyuncs.com/k8sos/web:discuz-v1
          imagePullPolicy: Always
          volumeMounts:
            - mountPath: /usr/share/nginx/html/
              name: discuz
          livenessProbe:
            exec:
              command:
                - "/bin/sh"
                - "-c"
                - "cat /etc/nginx/nginx.conf"
            initialDelaySeconds: 0
            periodSeconds: 3
            timeoutSeconds: 1
            successThreshold: 1
            failureThreshold: 3
          readinessProbe:
            tcpSocket:
              port: 80
            initialDelaySeconds: 30
            periodSeconds: 1
            timeoutSeconds: 1
            successThreshold: 3
            failureThreshold: 1
      volumes:
        - name: discuz
          persistentVolumeClaim:
            claimName: discuz
---
kind: Service
apiVersion: v1
metadata:
  name: discuz
  namespace: web
spec:
  ports:
    - port: 80
      targetPort: 80
      protocol: TCP
      name: http
  selector:
    app: discuz
  type: NodePort
6、生成yaml文件并查看详情
# 1、生成yaml文件
[root@k8s-m-01 ~]# kubectl apply -f mysql.yaml
[root@k8s-m-01 ~]# kubectl apply -f discuz.yaml
# 2、查看详请
[root@k8s-m-01 ~]# kubectl get pod -n web
NAME                     READY   STATUS    RESTARTS   AGE
discuz-fb75c6498-mvjgv   2/2     Running   0          53s
[root@k8s-m-01 ~]# kubectl get pod -n mysql
NAME                     READY   STATUS    RESTARTS   AGE
mysql-6f9b947c9f-hmdvh   1/1     Running   0          64s
7、Ip访问
# 1、查看svc
[root@k8s-m-01 ~]# kubectl get svc -n web discuz
NAME     TYPE       CLUSTER-IP      EXTERNAL-IP   PORT(S)        AGE
discuz   NodePort   10.106.220.40   <none>        80:31706/TCP   69s
# 2、IP访问
192.168.15.111:31706


8、故障排查

#  1、解决BUG
#  2、只是因为服务端没有安装nfs
[root@k8s-m-01 k8s]# yum -y install nfs-utils

# 1、无法访问页面
# 2、解决
[root@k8s-m-01 ~]# vim discuz.yaml |grep v2
    path: /nfs/v2/  # 在挂载目录中写绝对路径 /nfs/v2/
# 还有一种可能是代码包的问题

# 1、无法连接到数据款
# 2、解决
还有一种可能是代码包的问题,重新上传一个包即可
更多k8s内容,请关注威信公众好:新猿技术生态圈
更多k8s内容,请关注威信公众好:新猿技术生态圈
更多k8s内容,请关注威信公众好:新猿技术生态圈