在学习spring的时候,要整合hibernate,本来是看起来挺简单的,但是遇到的远要比想到了多,而且多很多,
期间几天一个bug实在难调,几度放弃,但终究柳暗花明,抑制不住喜悦就想着分享一下成果吧。
1、实体类 User:
 1 import java.util.Date;
 2
 3 import javax.persistence.Column;
 4 import javax.persistence.Entity;
 5 import javax.persistence.GeneratedValue;
 6 import javax.persistence.GenerationType;
 7 import javax.persistence.Id;
 8 import javax.persistence.Temporal;
 9 import javax.persistence.TemporalType;
10
11 @Entity
12 public class User {
13
14     @Id
15     @Column(name="user_id")
16     @GeneratedValue(strategy=GenerationType.IDENTITY)
17     private Integer id;
18     @Column(name="user_name")
19     private String name;
20     private String pass;
21     @Temporal(TemporalType.DATE)
22     private Date birth;
23
24
25
26     public User() {
27
28     }
29
30
31     public User( String name, String pass, Date birth) {
32         super();
33         this.name = name;
34         this.pass = pass;
35         this.birth = birth;
36     }
37
38     public Integer getId() {
39         return id;
40     }
41
42
43     public void setId(Integer id) {
44         this.id = id;
45     }
46
47
48     public String getName() {
49         return name;
50     }
51     public void setName(String name) {
52         this.name = name;
53     }
54     public String getPass() {
55         return pass;
56     }
57     public void setPass(String pass) {
58         this.pass = pass;
59     }
60
61
62     public Date getBirth() {
63         return birth;
64     }
65
66
67     public void setBirth(Date birth) {
68         this.birth = birth;
69     }
70
71
72 }
2、hibernate配置文件hibernate.cfg.xml:
 1 <?xml version='1.0' encoding='utf-8'?>
 2 <!DOCTYPE hibernate-configuration PUBLIC
 3         "-//Hibernate/Hibernate Configuration DTD 3.0//EN"
 4         "http://www.hibernate.org/dtd/hibernate-configuration-3.0.dtd">
 5
 6 <hibernate-configuration>
 7
 8     <session-factory>
 9         <!-- hibernate 所需的配置信息 -->
10         <property name="show_sql">true</property>
11         <property name="dialect">org.hibernate.dialect.MySQLDialect</property><!--方言-->
12         <property name="format_sql">true</property>
13         <property name="hbm2ddl.auto">update</property>
14
15         <!-- hibernate 指定映射类 -->
16         <mapping class="com.csu.domain.User"/>
17
18     </session-factory>
19
20 </hibernate-configuration>
3、c3p0数据库连接池所需要的数据库配置信息,放置在jdbc.properties文件中,这样也方便日后修改只需要改动属性文件,
而不需要改动配置文件:
user=root
password=7890
driverClass=com.mysql.jdbc.Driver
jdbcUrl=jdbc:mysql://localhost:3306/spring
maxPoolSize=200
minPoolSize=2
initialPoolSize=2
4、spring的配置文件beans.xml:
 1 <?xml version="1.0" encoding="UTF-8"?>
 2
 3 <!-- 整个Spring 文件的根元素就是beans -->
 4 <beans xmlns="http://www.springframework.org/schema/beans"
 5 xmlns:p="http://www.springframework.org/schema/p"
 6 xmlns:util="http://www.springframework.org/schema/util"
 7 xmlns:context="http://www.springframework.org/schema/context"
 8     xmlns:xsi="http://www.w3.org/2001/XMLSchema-instance"
 9     xsi:schemaLocation="http://www.springframework.org/schema/beans
10         http://www.springframework.org/schema/beans/spring-beans.xsd
11
12         http://www.springframework.org/schema/util
13         http://www.springframework.org/schema/util/spring-util.xsd
14
15         http://www.springframework.org/schema/context
16         http://www.springframework.org/schema/context/spring-context.xsd
17         ">
18
19        <!-- *****************配置数据源*********************** -->
20
21        <bean class="org.springframework.beans.factory.config.PropertyPlaceholderConfigurer">
22
23            <property name="locations">
24                <!-- 列出需要读取的属性文件 -->
25                <list>
26                    <value>classpath:jdbc.properties</value>
27                </list>
28            </property>
29
30        </bean>
31
32        <bean id="dataSource" class="com.mchange.v2.c3p0.ComboPooledDataSource"
33            p:user="${user}"
34            p:password="${password}"
35            p:driverClass="${driverClass}"
36            p:jdbcUrl="${jdbcUrl}"
37            p:maxPoolSize="${maxPoolSize}"
38            p:minPoolSize="${minPoolSize}"
39            p:initialPoolSize="${initialPoolSize}"
40        />
41        <!-- *****************配置数据源*********************** -->
42
43     <bean id="sessionFactory" class="org.springframework.orm.hibernate3.LocalSessionFactoryBean"
44     p:dataSource-ref="dataSource"
45     p:configLocation="classpath:hibernate.cfg.xml"
46     />
47     <bean id="hibernateTemplate" class="org.springframework.orm.hibernate3.HibernateTemplate"
48     p:sessionFactory-ref="sessionFactory"
49     />
50
51 </beans>
5、测试主类:
 1 import java.util.Date;
 2
 3 import org.hibernate.FlushMode;
 4 import org.springframework.context.ApplicationContext;
 5 import org.springframework.context.support.ClassPathXmlApplicationContext;
 6 import org.springframework.orm.hibernate3.HibernateTemplate;
 7
 8 import com.csu.domain.User;
 9
10 public class SpHiTest {
11
12     public static void main(String[] args) {
13         ApplicationContext ctx = new ClassPathXmlApplicationContext("beans.xml");
14
15         //直接利用数据库的HibernateTemplate类进行数据库操作,可以极大方便了操作流程
16         HibernateTemplate ht = (HibernateTemplate)ctx.getBean("hibernateTemplate");
17
18         ht.save(new User("chen","123",new Date()));
19
20     }
21
22
23
24 }
6、期间碰到的问题是一直出现这个问题:
Exception in thread "main" org.springframework.dao.InvalidDataAccessApiUsageException: Write operations are not allowed in read-only mode (FlushMode.MANUAL): Turn your Session into FlushMode.COMMIT/AUTO or remove 'readOnly' marker from transaction definition.
    at org.springframework.orm.hibernate4.HibernateTemplate.checkWriteOperationAllowed(HibernateTemplate.java:1128)
    at org.springframework.orm.hibernate4.HibernateTemplate$20.doInHibernate(HibernateTemplate.java:737)
    at org.springframework.orm.hibernate4.HibernateTemplate.doExecute(HibernateTemplate.java:341)
    at org.springframework.orm.hibernate4.HibernateTemplate.executeWithNativeSession(HibernateTemplate.java:309)
    at org.springframework.orm.hibernate4.HibernateTemplate.persist(HibernateTemplate.java:734)
    at com.csu.test.SpHiTest.main(SpHiTest.java:26)
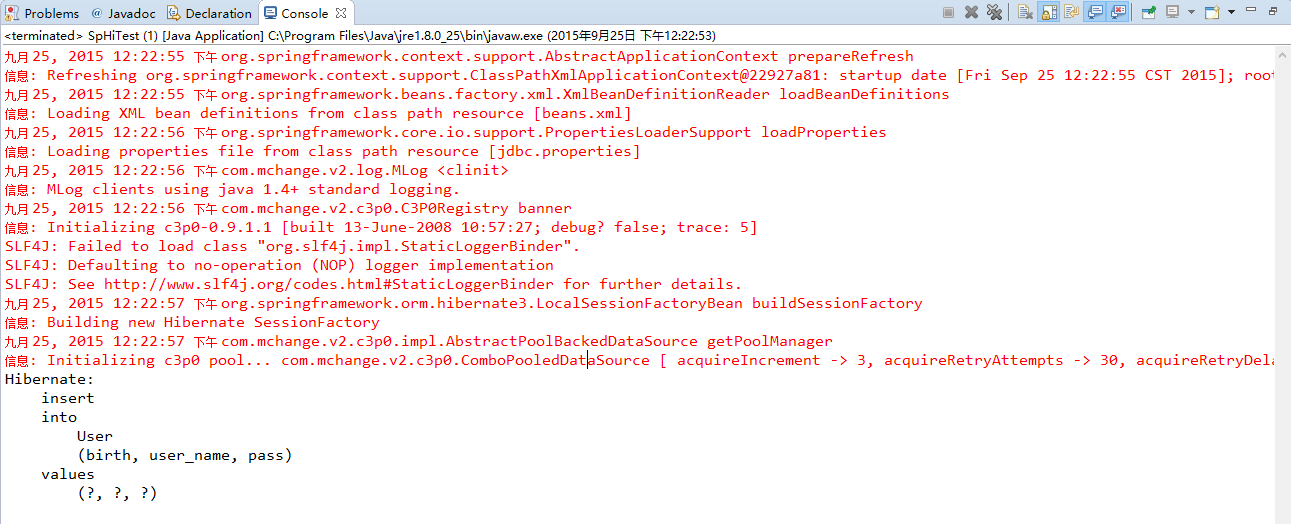
反正无论怎么调都无法正确,最终还是将hibernate4版本换成了hibernate3才得以解决。最后的结果看一下: