代码审核(Code Review)是软件研发质量保障机制中非常重要的一环,但在实际项目执行过程中,却因为种种原因被Delay甚至是忽略。在实践中,给大家推荐一款免费、开放源代码的代码审查软件Gerrit。
一、 Code Review是什么
Code Review最直观的解释即看代码。常规的做法为自己看,有时代码逻辑问题可能自己看不出来,需要找同事一起看,在大家知识体系相对平均的情况下可能需要花钱专门的公司帮助查看。
Code Review需要看哪些?对于刚入职场或者刚接触到Coding的新人来说,代码风格是比较重要的一块。除此之外,编码规范及代码结构写法,框架和工具的选型,具体项目的业务逻辑,安全隐患,性能问题等都可以通过review的方式发现。Code Review从前往后大致分为结对编程,提交代码后,测试之前,发版之前,发版之后等几个阶段,越往后,Code Review的效果越差,修复的成本也越来越高。
为什么一定要做入库前Code Review?
首先,代码审查的最大的功用是纯社会性的。如果你在编程,而且知道将会有同事检查你的代码,你编程态度就完全不一样了。你写出的代码将更加整洁,有更好的注释和程序结构。
其次,偷懒是人的天性,从节约成本的角度考虑,大家一般会选择在测试之前无限制的Delay Code Review。入库前做Code Review便是成本和效果之间最佳平衡点,它能及时发现问题,进行修改后确保代码质量。
最后,代码审查能传播知识。在很多开发团队里,经常每个人负责一个核心模块,每个人都只关注自己的模块。除非是同事的模块影响了自己的程序,他们从不相互交流。这种情况的后果是,每个模块只有一个人熟悉里面的代码。如果这个人休假或辞职了,其他人则束手无策。通过代码审查,至少会有两个人熟悉这些程序——作者,以及审查者。审查者并不能像程序的作者一样对程序十分了解,但至少他会熟悉程序的设计和架构,这是极其重要的。
二、 Gerrit简介
Gerrit是Google为Android系统研发量身定制的一套免费开源的代码审核系统,它在传统的源码管理协作流程中强制性引入代码审核机制,通过人工代码审核和自动化代码验证过程,将不符合要求的代码屏蔽在代码库之外,确保核心代码多人校验、多人互备和自动化构建核验。
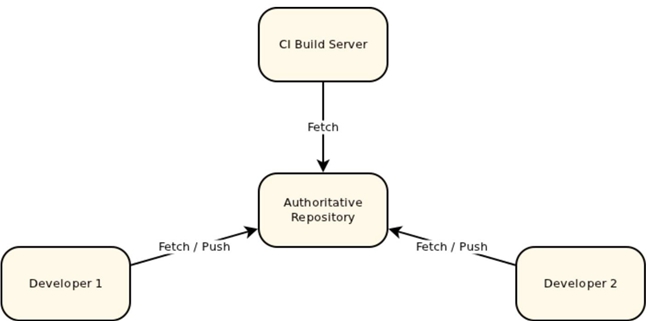
Gerrit之前的系统架构:
Gerrit之后的系统架构:
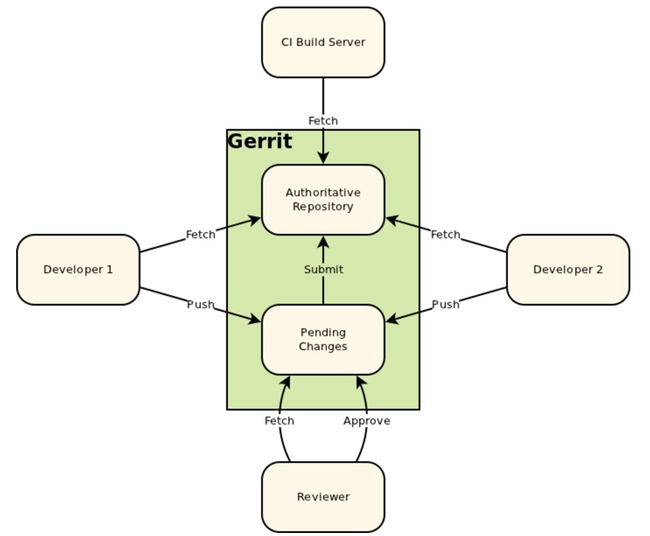
通过Gerrit机制将代码做分隔。
Gerrit适用性
几乎任何需要正式发布的项目都应当使用Gerrit来进行代码审查,如果Team中有新人,必须使用Gerrit确保代码质量。
工作流程
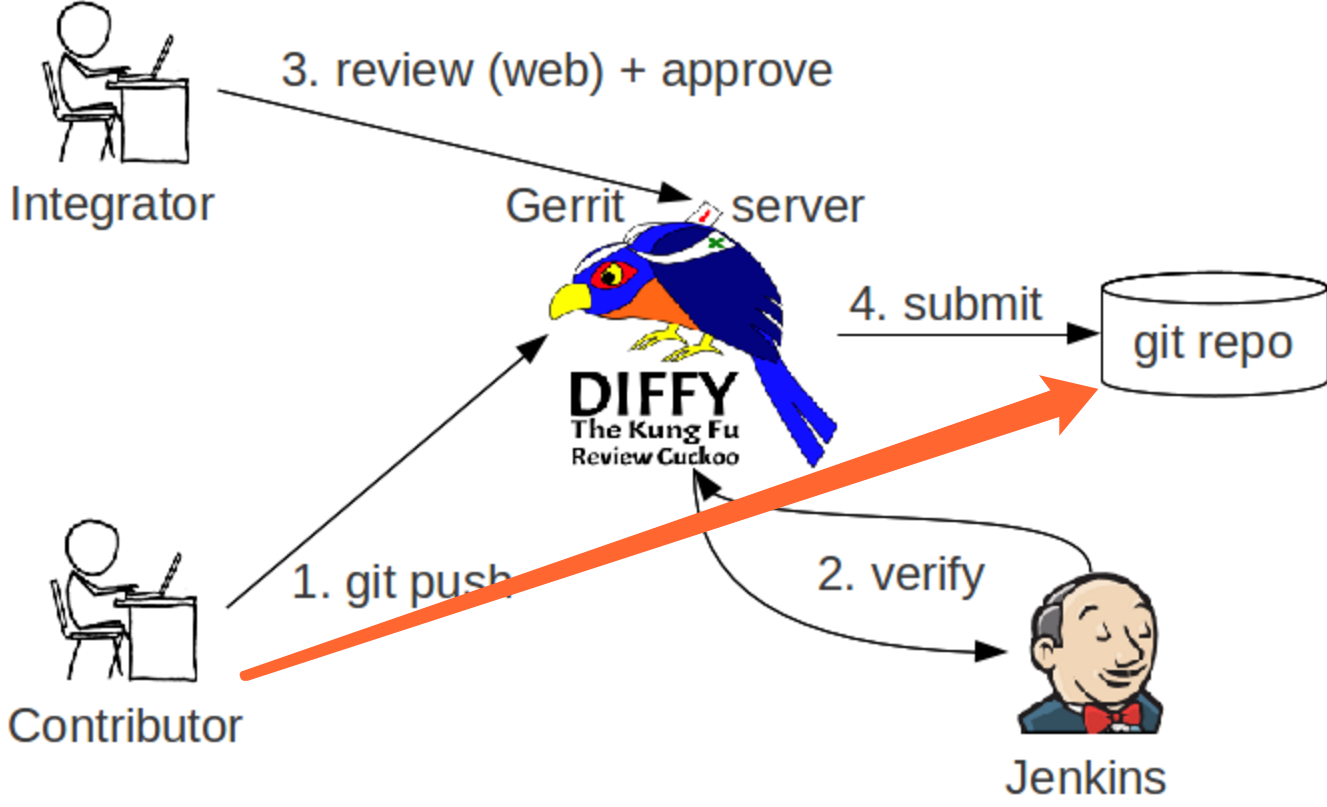
使用过git的同学,都知道,当我们git add --> git commit --> git push 之后,你的代码会被直接提交到repo,也就是代码仓库中,就是图中橘红色箭头指示的那样。
那么gerrit就是上图中的那只鸟,普通成员的代码是被先push到gerrit服务器上,然后由代码审核人员,就是左上角的integrator在web页面进行代码的审核(review),可以单人审核,也可以邀请其他成员一同审核,当代码审核通过(approve)之后,这次代码才会被提交(submit)到代码仓库(repo)中去。
无论有新的代码提交待审核,代码审核通过或被拒绝,代码提交者(Contributor)和所有的相关代码审核人员(Integrator)都会收到邮件提醒。
gerrit还有自动测试的功能,和主线有冲突或者测试不通过的代码,是会被直接拒绝掉的,这个功能似乎就是右下角那个老头(Jenkins)的任务。
整个流程就是这样。 在使用过程中,有两点需要特别注意下:
- 当进行commit时,必须要生成一个Change-Id,否则,push到gerrit服务器时,会收到一个错误提醒。
-
提交者不能直接把代码推到远程的master主线(或者其他远程分支)上去。这样就相当于越过了gerrit了。 gerrit必须依赖于一个
refs/for/*的分支。假如我们远程只有一个master主线,那么只有当你的代码被提交到
refs/for/master分支时,gerrit才会知道,我收到了一个需要审核的代码推送,需要通知审核员来审核代码了。
当审核通过之后,gerrit会自动将这条分支合并到master主线上,然后邮件通知相关成员,master分支有更新,需要的成员再去pull就好了。而且这条refs/for/master分支,是透明的,也就是说普通成员其实是不需要知道这条线的,如果你正确配置了sourceTree,你也应该是看不到这条线的。
这两点很重要!!这两点很重要!!这两点很重要!!
三、Gerrit安装
3.1. 环境准备
-
①. Linux,Gerrit需要Linux环境,ubuntu 或者 centos,这里使用Ubuntu;
-
②. JDK,使用1.7版本就行
-
③. MySQL,其实这个非必须,Gerrit自带的有H2数据库
-
④. nginx/apache,作为认证和反向代理服务器;
-
⑤. Maven, 在安装的过程中会下载一些jar文件;
-
⑥. Git,用来拉取代码
3.2 java环境安装
下载:jdk-7u79-linux-x64.tar.gz http://www.oracle.com/technetwork/java/javase/downloads/jdk7-downloads-1880260.html
安装:sudo tar zxvf ./jdk-7u79-linux-x64.tar.gz -C /opt
配置:vim ~/.bashrc(针对当前用户) or vim /etc/profile(针对所有用户,推荐)
export JAVA_HOME=/opt/jdk1.7.0_79
export JRE_HOME=$JAVA_HOME/jre
export CLASSPATH=$JAVA_HOME/lib:$JRE_HOME/lib:$CLASSPATH
export PATH=$JAVA_HOME/bin:$JRE_HOME/bin:$PATH
验证:
java -version

java version "1.7.0_79"
Java(TM) SE Runtime Environment (build 1.7.0_79-b15)
Java HotSpot(TM) 64-Bit Server VM (build 24.79-b02, mixed mode)
3.3 git环境
gerrit依赖,用来操作git repository
sudo apt-get install git
3.4 下载gerrit
wget https://www.gerritcodereview.com/download/gerrit-2.12.4.war
3.5 apache2安装
sudo apt-get install apache2
验证:
service apache2 start
3.6 gerrit管理帐号
gerrit依赖,用来管理gerrit。
sudo adduser gerrit
sudo passwd gerrit
并将gerrit加入sudo权限
sudo visudo
gerrit ALL=(ALL:ALL) ALL (为了测试方便,开最大权限)
3.7 配置gerrit
默认安装:
java -jar gerrit-2.12.4.war init --batch -d ~/review_site
更新配置文件:sudo vim ~/review_site/etc/gerrit.config
[gerrit]
        basePath = git
        canonicalWebUrl = http://47.120.74.47:8081/
[database]
        type = h2
        database = /home/gerrit/review_site/db/ReviewDB
[index]
        type = LUCENE
[auth]
        type = http
[receive]
        enableSignedPush = false
[sendemail]
        smtpServer = smtp.163.com
        smtpServerPort = 465
        smtpEncryption = ssl
        smtpUser = avcd@163.com
        smtpPass = avcd123123123
        sslVerify = false
        from = code review<avcd@163.com>
[container]
        user = gerrit
        javaHome = /opt/jdk1.7.0_79/jre
[sshd]
        listenAddress = *:29418
[httpd]
        listenUrl = http://*:8081/
[cache]
        directory = cache

[http]
        proxy = http://47.120.74.47:8090
        proxyUsername = gerrit1 #proxy user & password
        proxyPassword = 123456
3.8 配置apache2反向代理
a、如果apache目录结构如下:
apache2.conf conf-enabled magic mods-enabled ports.conf sites-enabled conf-available envvars mods-available sites-available
开启SSL、Proxy、Rewrite等模块:
cd /etc/apache2/mods-enabled
ln -s ../mods-available/proxy.load
ln -s ../mods-available/proxy.conf
ln -s ../mods-available/proxy_http.load
ln -s ../mods-available/proxy_balancer.conf
ln -s ../mods-available/proxy_balancer.load
ln -s ../mods-available/rewrite.load
ln -s ../mods-available/ssl.conf
ln -s ../mods-available/ssl.load
ln -s ../mods-available/socache_shmcb.load #
ln -s ../mods-available/slotmem_shm.load #
更新配置文件:sudo vim /etc/apache2/sites-enabled/gerrit-httpd.conf
ServerName 47.200.74.47
<VirtualHost *:8090>
    ProxyRequests Off
    ProxyVia Off
    ProxyPreserveHost On
    AllowEncodedSlashes On
    RewriteEngine On
    RewriteRule ^/(.*) http://47.200.74.47:8081/$1 [NE,P]

    <Proxy *>
          Order deny,allow
          Allow from all
    </Proxy>

    <Location /login/>
        AuthType Basic
        AuthName "Gerrit Code Review"
        Require valid-user
        AuthBasicProvider file
        AuthUserFile /etc/apache2/passwords
    </Location>

    ProxyPass / http://127.0.0.1:8081/

</VirtualHost>
b、如果apache目录结构如下:
bin build cgi-bin conf error htdocs icons include lib logs man manual modules
开启SSL、Proxy、Rewrite等模块:
# Open LoadModule
LoadModule proxy_module modules/mod_proxy.so
LoadModule proxy_http_module modules/mod_proxy_http.so
LoadModule ssl_module modules/mod_ssl.so
LoadModule rewrite_module modules/mod_rewrite.so
# Gerrit config
Include conf/extra/gerrit-httpd.conf
其中apache2/conf/extra/gerrit-httpd.conf内容同上,apache2/sites-enabled/gerrit-httpd.conf。
3.9 配置gerrit账户密码
touch /etc/apache2/passwords
htpasswd -b /etc/apache2/passwords admin 123456(管理员)
htpasswd -b /etc/apache2/passwords gerrit1 123456(普通用户)
3.10 启动gerrit&启动apache2
sudo ~/review_site/bin/gerrit.sh start
sudo /etc/init.d/apache2 start
四、如何使用gerrit
前提:需要git使用端 / gerrit服务端配合使用。
4.1 添加项目(gerrit 服务端)
ssh -p 29418 gerrit1@47.200.74.47 gerrit create-project --empty-commit --name demo-project
#建议采用管理界面添加
4.2 使用gerrit添加已有项目:(适用于已有项目下移植到gerrit中)
ssh -p 29418 gerrit1@192.168.199.112 gerrit create-project --name exist-project #建议采用管理界面添加
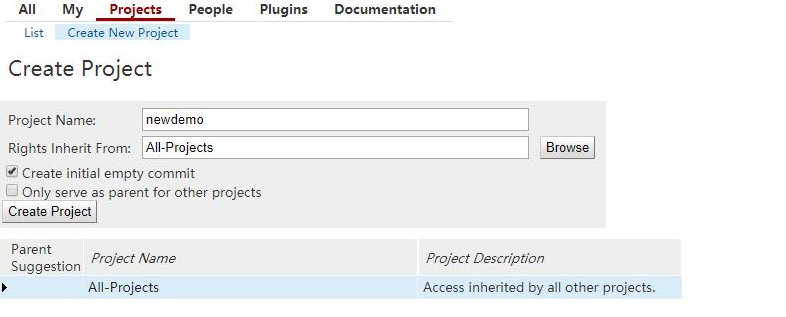
或者使用gerrit管理界面

然后将已有项目与gerrit上建立的exist-project关联,即将已有代码库代码push到gerrit中进行管理。
cd ~/exist-project

git push ssh://gerrit1@47.200.74.47:29418/exist-project *:*
4.3.生成sshkey(git使用端)
在开发账户中生成sshkey,用作与gerrit服务器连接。
ssh-keygen -t rsa #生成sshkey
4.4.添加sshkey到gerrit服务器(gerrit 服务端)
此步骤与git流程类似,即将id_rsa.pub内容上传到git repository,gerrit中帮我们管理git repository.
4.5 拉取代码&配置git hooks(git client端)
验证sshkey是否配置成功:ssh gerrit1@47.200.74.47 -p 29418
  ****    Welcome to Gerrit Code Review    ****

  Hi gerrit1, you have successfully connected over SSH.

  Unfortunately, interactive shells are disabled.
  To clone a hosted Git repository, use:

  git clone ssh://gerrit1@47.200.74.47:29418/REPOSITORY_NAME.git

Connection to 47.200.74.47 closed.
拉取代码:
git clone ssh://gerrit1@47.200.74.47:29418/REPOSITORY_NAME.git
更新githooks:
gitdir=$(git rev-parse --git-dir); scp -p -P 29418 gerrit1@47.200.74.47:hooks/commit-msg ${gitdir}/hooks/
该过程用来在commit-msg中加入change-id,gerrit流程必备。
修改代码并提交,推送时与原有git流程不一致,采用 git push origin HEAD:refs/for/master 。
[root@iZ62j8121e5Z abcd]# git push origin HEAD:refs/for/master
Counting objects: 3, done.
Compressing objects: 100% (2/2), done.
Writing objects: 100% (3/3), 710 bytes | 710.00 KiB/s, done.
Total 3 (delta 0), reused 0 (delta 0)
remote: Processing changes: new: 1, refs: 1, done
remote:
remote: New Changes:
remote:   http://47.200.74.47:8081/5 xxxx
remote:
To ssh://47.200.74.47:29418/abcd
 * [new branch]      HEAD -> refs/for/master
如果不加会提示一下错误:
[root@iZ62j8121e5Z abcd]# git push origin HEAD:refs/for/master
Counting objects: 3, done.
Writing objects: 100% (3/3), 239 bytes | 239.00 KiB/s, done.
Total 3 (delta 0), reused 0 (delta 0)
remote: Processing changes: refs: 1, done
remote: ERROR: missing Change-Id in commit message footer
remote:
remote: Hint: To automatically insert Change-Id, install the hook:
remote:   gitdir=$(git rev-parse --git-dir); scp -p -P 29418 admin@47.200.74.47:hooks/commit-msg ${gitdir}/hooks/
remote: And then amend the commit:
remote:   git commit --amend
remote:
To ssh://47.200.74.47:29418/abcd
 ! [remote rejected] HEAD -> refs/for/master (missing Change-Id in commit message footer)
error: failed to push some refs to 'ssh://admin@47.200.74.47:29418/abcd'
五.使用gerrit website完成code review
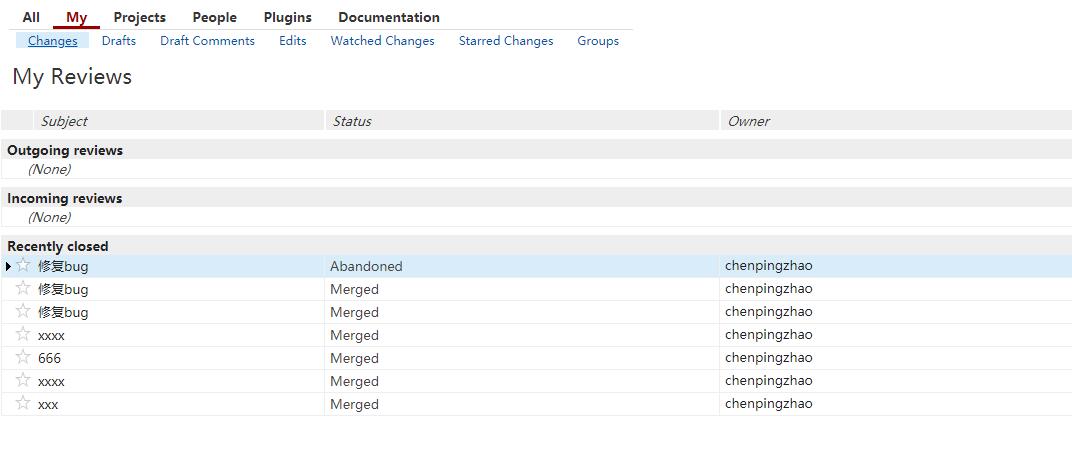
当完成push后,可在gerrit管理界面看到当前提交code review的change。
查看某次提交的详细信息(审核者+2可通过本次提交,提交者可通过Abandon本次提交):
如果审核者+2通过后,可提交该次commit.
六 注意事项
-
需要为每个使用者分配gerrit账号,不要都使用admin账号,因为admin账号可直接push master
-
pull代码后需要配置githooks文件,以便在commit时自动生成change-id,否则无法push
-
push代码时需要使用git push origin HEAD:refs/for/master(branch),gerrit默认关闭非admin账号的push direct权限
-
push代码时需要commit email与gerrit account email一致,否则无法push成功,可选择关闭email notify,并开启forge user权限,或者通过修改gerrit数据库account email信息
-
gerrit数据库与gitlab同步,需要安装replication插件,并开启该功能
参考链接:
Java SDK Download: http://www.oracle.com/technetwork/java/javase/downloads/jdk7-downloads-1880260.html
Gerrit Code Review - Releases Download: https://gerrit-releases.storage.googleapis.com/index.html
Gerrit Code Review - Quick get started guide: https://git.eclipse.org/r/Documentation/install-quick.html
Gerrit代码审核流程 http://www.worldhello.net/gotgit/images/gerrit-workflow.png
Gerrit代码审核原理 http://www.worldhello.net/gotgit/05-git-server/055-gerrit.html
Gerrit代码审核权限管理 https://gerrit-review.googlesource.com/Documentation/access-control.html#category_forge_committer
Gerrit修改数据库email信息 http://www.cnblogs.com/kevingrace/p/5624122.html
Gerrit安装replication插件 https://gerrit-review.googlesource.com/Documentation/cmd-plugin-install.html