Build your own AngularJS
nodejs+npm
build project
- 创建项目目录
$ mkdir myproject

$ cd myproject
- 创建npm配置文件package.json
// 生成默认`package.json`,`npm init`需要手动输入参数
$ npm init -y
**package.json **:
{
  "name": "myproject",
  "version": "1.0.0",
  "description": "",
  "main": "index.js",
  "scripts": {
    "test": "echo "Error: no test specified" && exit 1"
  },
  "keywords": [],
  "author": "",
  "license": "ISC"
}
- grunt安装
// --save-dev 会将安装的添加到`package.json`中
$ npm install grunt --save-dev
- 手动创建grunt配置文件gruntfile.js
module.exports = function(grunt) {

  grunt.initConfig({

     //读取package.json文件
    pkg: grunt.file.readJSON('package.json')

  });

  grunt.loadNpmTasks('');
  grunt.registerTask('default', ['']);

};
- 安装grunt插件
$ npm install [name] --save-dev
-
grunt-contrib-concat:合并文件
-
grunt-contrib-uglify:压缩文件
-
grunt-contrib-jshint:语法检查
-
grunt-contrib-watch:监听文件变化
**package.json **:
{
  "name": "myproject",
  "version": "1.0.0",
  "description": "",
  "main": "index.js",
  "scripts": {
    "test": "echo "Error: no test specified" && exit 1"
  },
  "keywords": [],
  "author": "",
  "license": "ISC",
  "devDependencies": {
    "grunt": "^1.0.3",
    "grunt-contrib-concat": "^1.0.1",
    "grunt-contrib-jshint": "^2.0.0",
    "grunt-contrib-uglify": "^4.0.0",
    "grunt-contrib-watch": "^1.1.0"
  }
}
- 配置gruntfile.js
gruntfile.js:
module.exports = function(grunt) {

  grunt.initConfig({

     //读取package.json文件
    pkg: grunt.file.readJSON('package.json'),

    //concat用来合并js文件
    concat: {
    },
     //uglify用来压缩js文件
    uglify: {
     },
    //jshint用来检查js代码规范
    jshint: {
    },
    //watch用来监听文件,当文件发生变化时会执行tasks中指定的任务
    watch: {
    }
  });

  grunt.loadNpmTasks('grunt-contrib-concat');
  grunt.loadNpmTasks('grunt-contrib-uglify');
  grunt.loadNpmTasks('grunt-contrib-jshint');
  grunt.loadNpmTasks('grunt-contrib-watch');
  grunt.registerTask('test', ['concat','uglify','jshint','watch']);

};
- 安装bower
bower跟npm在某种意义上相似,它是用来管理常用的js库的依赖的,比如jquery、 angularjs、bootstrap等
$ npm install bower -g
- 创建bower配置文件bower.json
$ bower init
bower.json :
{
  "name": "myproject",
  "description": "",
  "main": "",
  "license": "MIT",
  "homepage": "",
  "ignore": [
    "**/.*",
    "node_modules",
    "bower_components",
    "test",
    "tests"
  ]
}
- 创建一个
.bowerrc文件
{
  // 配置下载目标路径
  "directory": "libs"
}
- 安装requirejs、jquery、angularjs、bootstrap
$ bower install [name] --save
bower.json :
{
  "name": "myproject",
  "description": "",
  "main": "",
  "license": "MIT",
  "homepage": "",
  "ignore": [
    "**/.*",
    "node_modules",
    "bower_components",
    "test",
    "tests"
  ],
  "dependencies": {
    "requirejs": "^2.3.6",
    "angular": "angularjs#^1.7.5",
    "jquery": "^3.3.1",
    "bootstrap": "^4.1.3"
  }
}
- 创建requirejs配置文件config.js
config.js :
paths中添加我们要申明的模块,shim用来出来没有遵循requirejs规范的js库
requirejs.config({
  baseUrl: '/lib/public',
  paths: {
    app: 'app',
    jquery: 'lib/jquery/jquery',
    angular: 'lib/angularjs/angular'
  },
  shim: {
  }
});
requirejs(['app'], function(app) {
  app.hello();
});
- 添加app模块对应的app.js
app.js :
define([], function() {
  return {
    hello: function() {
      alert("hello, requirejs");
    }
  }
});
- 添加示例html
**index.html ** :
<html>
<head>
  <script src="libs/requirejs/require.js"
          data-main="config.js"></script>
</head>
<body>
  <div>Hello, world!</div>
</body>
</html>
- 安装
live-server
用于搭建临时的服务,修改文件以后浏览器会自动刷新。
$ npm install -g live-server
- 运行项目
$ live-server
- angularJS demo
angularJS并不是按requirejs的模块方式组织代码的,我们需要在config.js shim配置
shim: {
    angular : { exports : 'angular'}
}
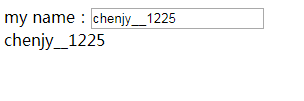
- 使用angularJS,修改index.html和app.js
**index.html ** :
<!DOCTYPE html>
<html ng-app="myApp">
<head>
  <script src="libs/requirejs/require.js"
          data-main="config.js"></script>
</head>
<body ng-controller="myCtrl">
    my name:<input type="text" ng-model="name"/>
	<div>{{name}}</div>
</body>
</html>
**app.js ** :
//定义名为myApp的模块
define("myApp",["angular"],function(angular){
    var myApp = angular.module("myApp",[]);
    return myApp;
});
**config.js ** :
requirejs.config({
  baseUrl: './',
  paths: {
	myApp:'app',
    jquery: 'libs/jquery/jquery',
    angular: 'libs/angular/angular'
  },
  shim: {
	  'angular' : { exports : 'angular'}
  }
});

require(['myApp'], function(myApp) {
  myApp.controller('myCtrl', function ($scope) {
        $scope.name = 'chenjy';
      });
});