场景说明:
由于公司换云平台,必然出口ip也会变,对接的有些合作公司需要添加新的ip白名单,但有些公司申请ip白名单添加流程比较长,所以需要在新云平台的服务器做正向代理以达到通过原来公司的出口ip出去的目的,这样的话在合作公司白名单ip申请期间服务也可以正常使用而不影响业务。
此次采用nginx来作为正向代理,默认nginx没有加载https的代理模块,通过打补丁的方式,然后编译安装就可以。
参考:https://github.com/chobits/ngx_http_proxy_connect_module
nginx版本
nginx-1.14.2
系统版本
centos6.5 , centos7.x也可以,配置步骤基本一样
我这里是nginx代理服务器部署在原来云平台的服务器中,为了出口ip一致
1、下载nginx源码包,https模块
wget http://nginx.org/download/nginx-1.14.2.tar.gz
tar -xf nginx-1.14.2.tar.gz
cd nginx-1.14.2/

yum install -y git
git clone https://github.com/chobits/ngx_http_proxy_connect_module.git
2、打补丁,编译,编译安装
yum install -y patch pcre pcre-devel

patch -p1 < ngx_http_proxy_connect_module/patch/proxy_connect_1.14.patch

./configure --prefix=/usr/local/nginx --with-http_stub_status_module --with-http_ssl_module --add-module=ngx_http_proxy_connect_module

make && make install

ln -s /usr/local/nginx/sbin/nginx /usr/local/bin/nginx
3、正向代理配置
vim /usr/local/nginx/conf/nginx.conf
http {
.....
include /usr/local/nginx/conf/conf.d/*.conf;
.....

}

mkdir /usr/local/nginx/conf/conf.d
cd /usr/local/nginx/conf/conf.d

[root@localhost conf.d]# vim forward.conf
 server {
     listen                         8000;

     # dns resolver used by forward proxying
     resolver                       223.5.5.5;

     # forward proxy for CONNECT request
     proxy_connect;
     proxy_connect_allow            443 563;
     proxy_connect_connect_timeout  10s;
     proxy_connect_read_timeout     10s;
     proxy_connect_send_timeout     10s;

     # forward proxy for non-CONNECT request
     location / {
         proxy_pass http://$host;
         proxy_set_header Host $host;
     }
 }
4、启动正向代理服务
nginx -t
nginx
5、测试是否能代理http,https请求
随便找一台主机,把代理 ip:port 指向配置的搭建的正向代理就可以
[root@sz-d-test-07 ~]#  curl https://github.com/ -v -x 10x.x5.136.51:8000
* About to connect() to proxy 10x.x5.136.51 port 8000 (#0)
*   Trying 10x.x5.136.51...
* Connected to 106.75.136.51 (10x.x5.136.51) port 8000 (#0)
* Establish HTTP proxy tunnel to github.com:443
> CONNECT github.com:443 HTTP/1.1
> Host: github.com:443
> User-Agent: curl/7.29.0
> Proxy-Connection: Keep-Alive
>
< HTTP/1.1 200 Connection Established
< Proxy-agent: nginx
<
* Proxy replied OK to CONNECT request
* Initializing NSS with certpath: sql:/etc/pki/nssdb
*   CAfile: /etc/pki/tls/certs/ca-bundle.crt
  CApath: none
* Server certificate:
* 	subject: CN=github.com,O="GitHub, Inc.",L=San Francisco,ST=California,C=US
* 	start date: May 05 00:00:00 2020 GMT
* 	expire date: May 10 12:00:00 2022 GMT
* 	common name: github.com
* 	issuer: CN=DigiCert SHA2 High Assurance Server CA,OU=www.digicert.com,O=DigiCert Inc,C=US
> GET / HTTP/1.1
> User-Agent: curl/7.29.0
> Host: github.com
> Accept: */*
>
< HTTP/1.1 200 OK
< date: Wed, 08 Jul 2020 02:46:21 GMT
< content-type: text/html; charset=utf-8
< server: GitHub.com
< status: 200 OK
< vary: X-PJAX, Accept-Encoding, Accept, X-Requested-With, Accept-Encoding
< etag: W/"362bc36ce104548787eefc88455faa45"
< cache-control: max-age=0, private, must-revalidate
< strict-transport-security: max-age=31536000; includeSubdomains; preload
< x-frame-options: deny
< x-content-type-options: nosniff
< x-xss-protection: 1; mode=block
< referrer-policy: origin-when-cross-origin, strict-origin-when-cross-origin
..........................
..........................
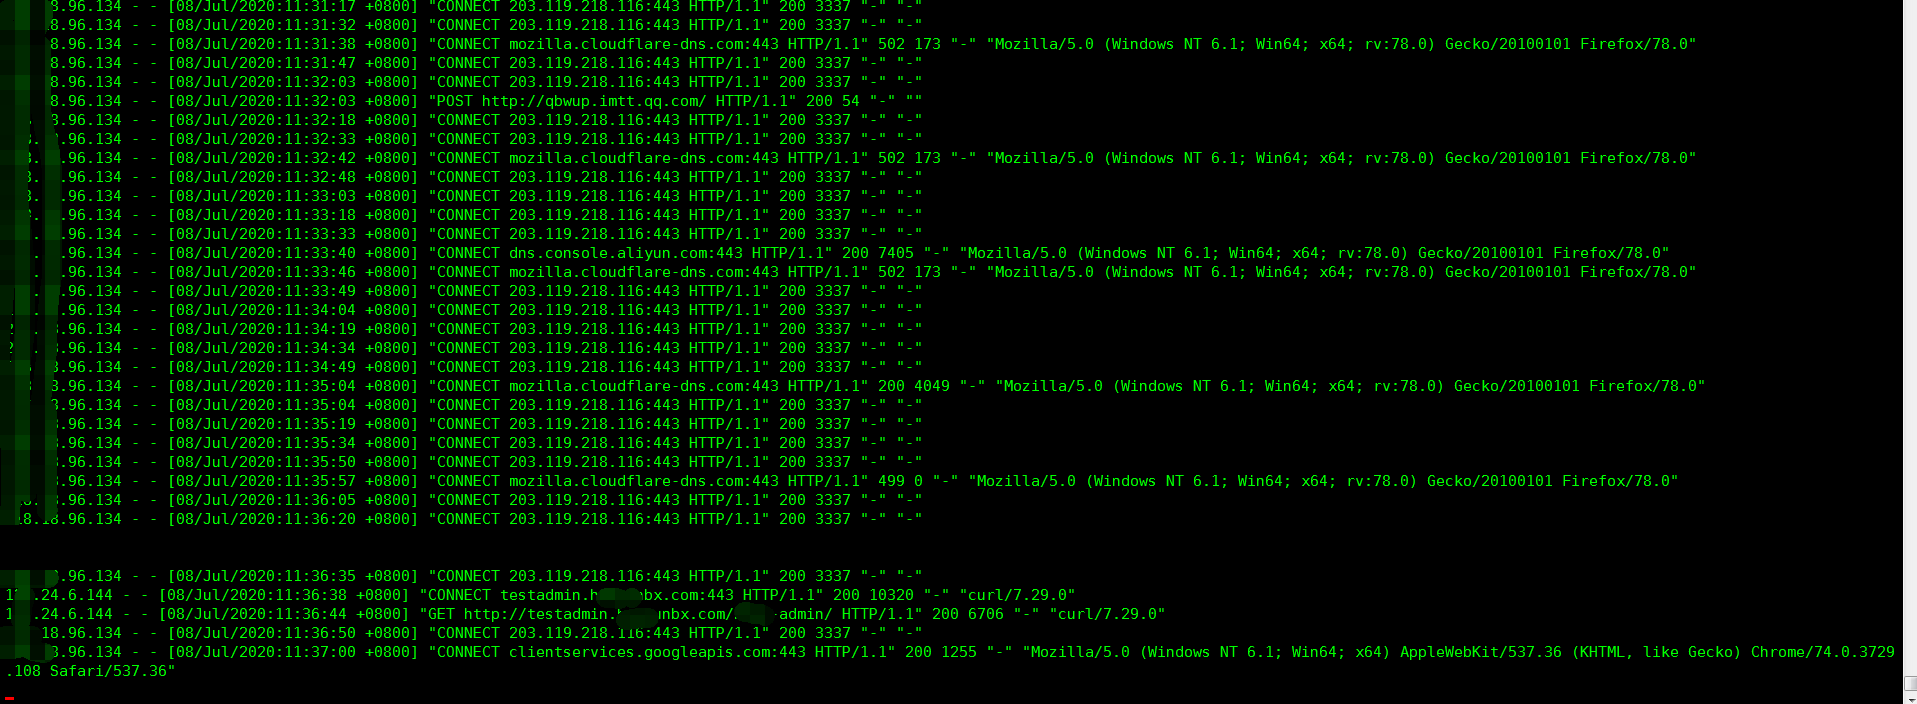
我这里是为了验证在新云平台的服务器中用代理是否成功从原来的云平台出口ip出去,因此找了一台可以看到日志文件的服务,主要是看日志里面的客户端ip是不是原来云服务器的ip来请求的。
在centos里面配置全局代理,任何出去都走代理
如果只是测试下可以用curl -x或--proxy 代理i:port

export http_proxy='10x.x5.136.51:8000'   # http
export https_proxy='10x.x5.136.51:8000'  # https
以上永久生效,需要写在/etc/profile中,或/etc/profile.d/xxx.sh

[root@sz-d-test-07 ~]# echo $http_proxy
10x.x5.136.51:8000
[root@sz-d-test-07 ~]# echo $https_proxy
10x.x5.136.51:8000
[root@sz-d-test-07 ~]#
测试https

[root@sz-d-test-07 ~]# curl https://testadmin.haitxx.com/admin/   # 可以加上-v 查看详细请求过程

............................


tailf  /path/to/access.log

10x.x5.136.51 - - [08/Jul/2020:11:00:43 +0800] "GET /admin/ HTTP/1.1" 200 6706 "-" "curl/7.29.0

这里的ip是正向代理ip就成功


测试http

[root@sz-d-test-07 ~]# curl https://testadmin.haitxx.com/admin/

看到日志文件的ip是正向代理的ip即可
也可以在windows浏览器配置代理地址指向这个正向代理服务器地址,以谷歌浏览器为例
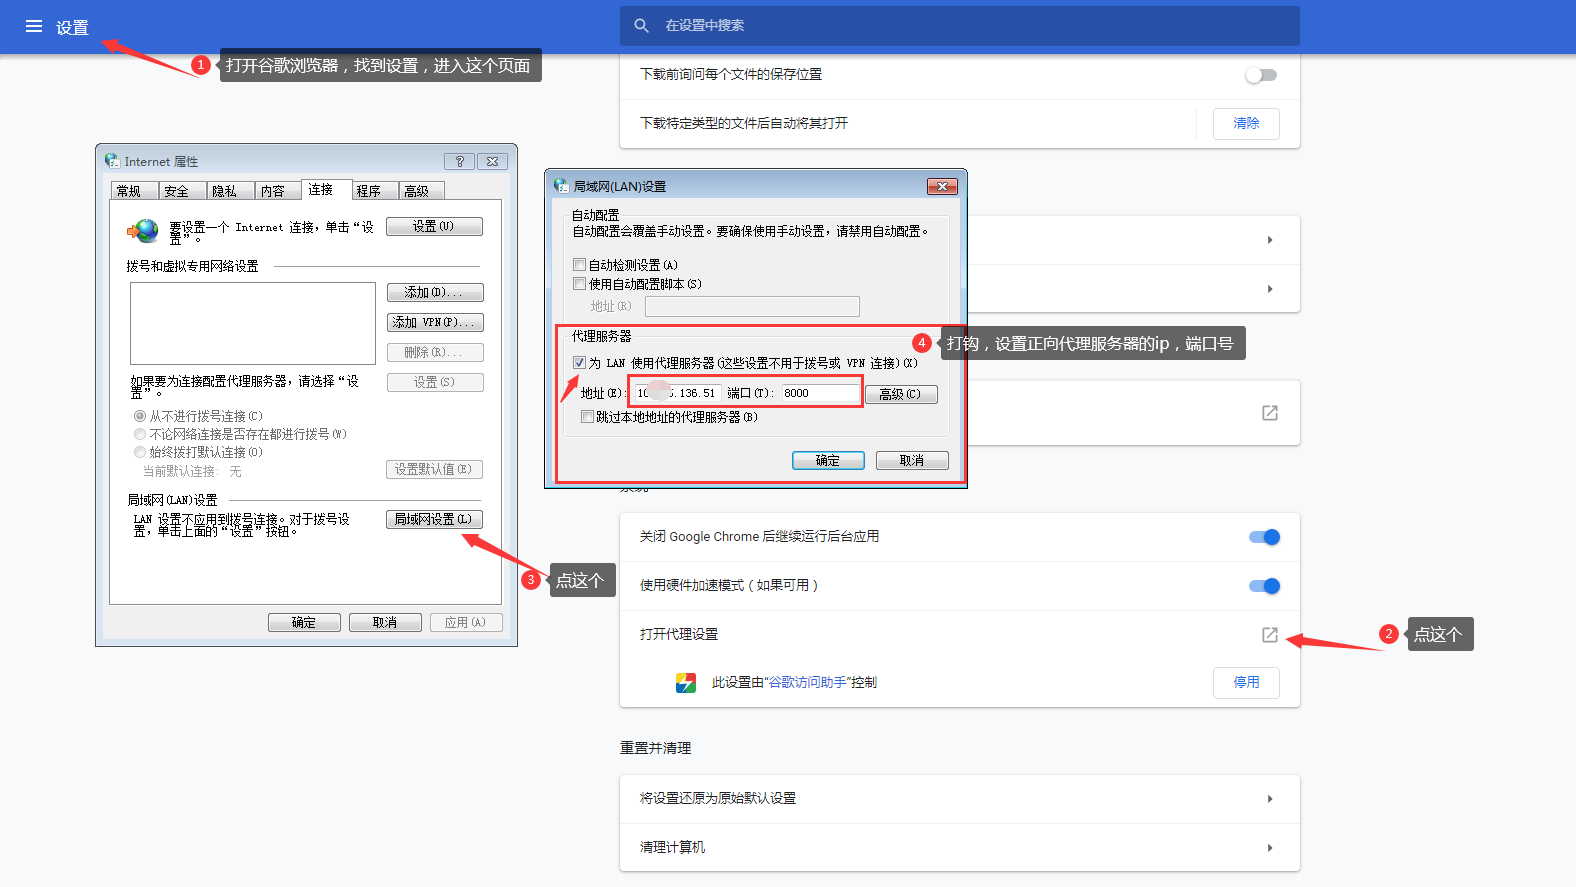
验证是否是通过正向代理服务器出去请求的,在正向代理服务器看代理访问日志,如果请求的ip是你自己的ip就表示成功,如果不知道自己的出口ip,在没设置浏览器代理之前打开百度,输入 ip 就会自动识别出来你的出口ip