一、Vuex是什么
Vuex是专门为Vuejs应用程序设计的状态管理工具。它采用集中式存储管理应用的所有组件的状态,并以相应的规则保证状态以一种可预测的方式发生变化。
1、Vuex的构成
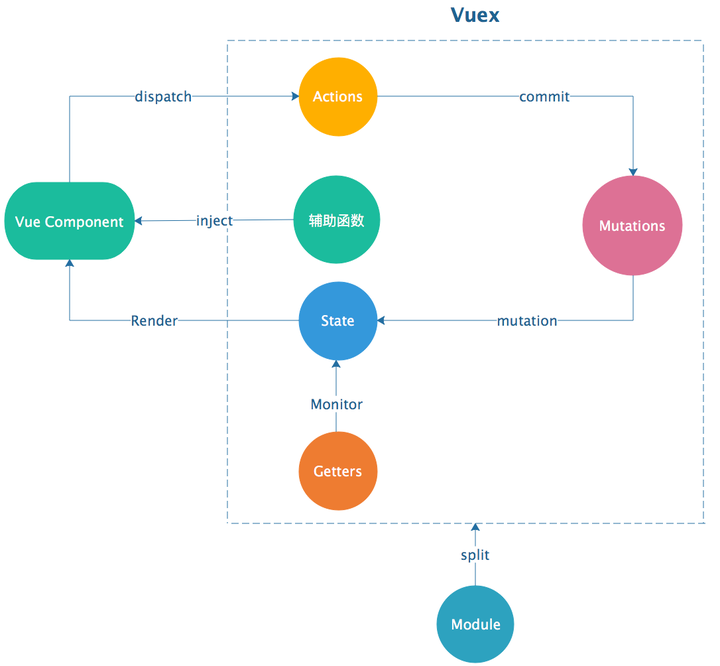
由上图,我们可以看出Vuex有以下几个部分构成:
1)state
state是存储的单一状态,是存储的基本数据。
2)Getters
getters是store的计算属性,对state的加工,是派生出来的数据。就像computed计算属性一样,getter返回的值会根据它的依赖被缓存起来,且只有当它的依赖值发生改变才会被重新计算。
3)Mutations
mutations提交更改数据,使用store.commit方法更改state存储的状态。(mutations同步函数)
4)Actions
actions像一个装饰器,提交mutation,而不是直接变更状态。(actions可以包含任何异步操作)
5)Module
Module是store分割的模块,每个模块拥有自己的state、getters、mutations、actions。
const moduleA = {
  state: { ... },
  mutations: { ... },
  actions: { ... },
  getters: { ... }
}

const moduleB = {
  state: { ... },
  mutations: { ... },
  actions: { ... }
}

const store = new Vuex.Store({
  modules: {
    a: moduleA,
    b: moduleB
  }
})

store.state.a // -> moduleA 的状态
store.state.b // -> moduleB 的状态
6)辅助函数
Vuex提供了mapState、MapGetters、MapActions、mapMutations等辅助函数给开发在vm中处理store。
2、Vuex的使用

import Vuex from 'vuex';
Vue.use(Vuex); // 1. vue的插件机制,安装vuex
let store = new Vuex.Store({ // 2.实例化store,调用install方法
    state,
    getters,
    modules,
    mutations,
    actions,
    plugins
});
new Vue({ // 3.注入store, 挂载vue实例
    store,
    render: h=>h(app)
}).$mount('#app');
二、Vuex的设计思想
Vuex的设计思想,借鉴了Flux、Redux,将数据存放到全局的store,再将store挂载到每个vue实例组件中,利用Vue.js的细粒度数据响应机制来进行高效的状态更新。
看了Vuex设计思想,心里难免会有这样的疑问:
- vuex的store是如何挂载注入到组件中呢?
- vuex的state和getters是如何映射到各个组件实例中响应式更新状态呢?
三、Vuex的原理解析
我们来看下vuex的源码,分析看看上面2个疑惑的问题:
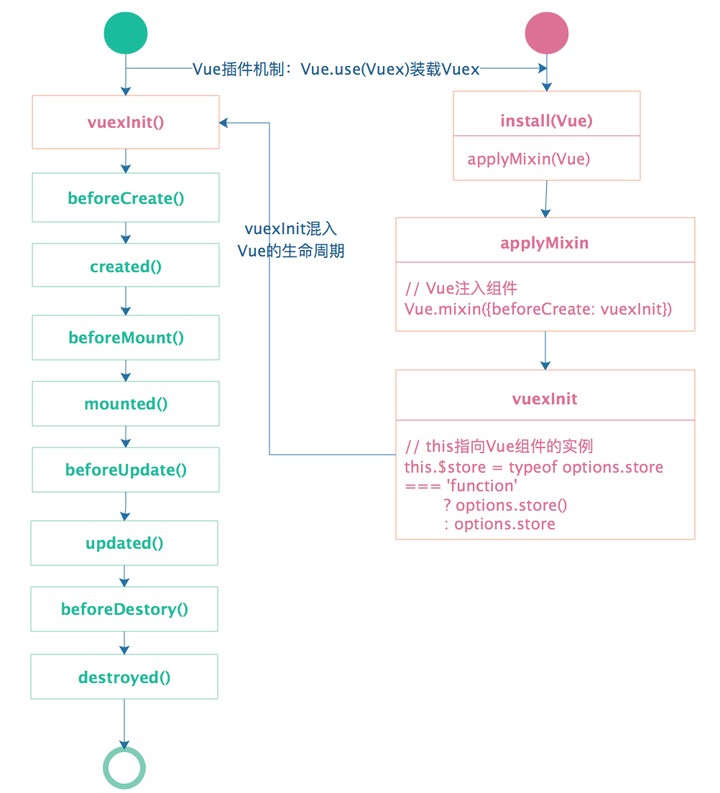
疑问1:vuex的store是如何挂载注入到组件中呢?
1、在vue项目中先安装vuex,核心代码如下:
import Vuex from 'vuex';
Vue.use(vuex);// vue的插件机制2、利用vue的插件机制,使用Vue.use(vuex)时,会调用vuex的install方法,装载vuex,install方法的代码如下:
export function install (_Vue) {
  if (Vue && _Vue === Vue) {
    if (process.env.NODE_ENV !== 'production') {
      console.error(
        '[vuex] already installed. Vue.use(Vuex) should be called only once.'
      )
    }
    return
  }
  Vue = _Vue
  applyMixin(Vue)
}3、applyMixin方法使用vue混入机制,vue的生命周期beforeCreate钩子函数前混入vuexInit方法,核心代码如下:
Vue.mixin({ beforeCreate: vuexInit });

function vuexInit () {
    const options = this.$options
    // store injection
    if (options.store) {
      this.$store = typeof options.store === 'function'
        ? options.store()
        : options.store
    } else if (options.parent && options.parent.$store) {
      this.$store = options.parent.$store
    }
}
分析源码,我们知道了vuex是利用vue的mixin混入机制,在beforeCreate钩子前混入vuexInit方法,vuexInit方法实现了store注入vue组件实例,并注册了vuex store的引用属性$store。store注入过程如下图所示:
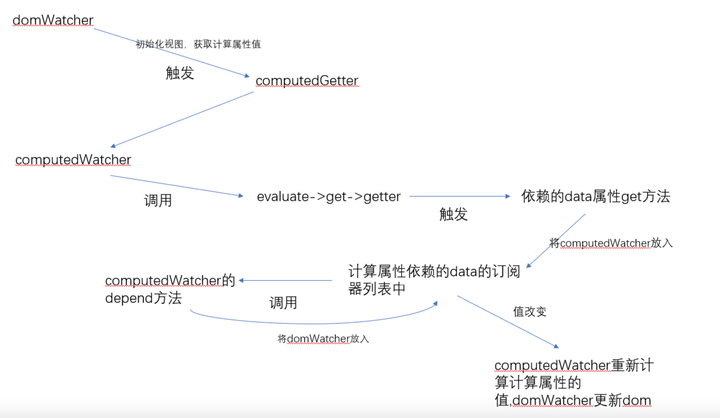
疑问2:vuex的state和getters是如何映射到各个组件实例中响应式更新状态呢?
store实现的源码在src/store.js
1、我们在源码中找到resetStoreVM核心方法:
function resetStoreVM (store, state, hot) {
  const oldVm = store._vm

  // 设置 getters 属性
  store.getters = {}
  const wrappedGetters = store._wrappedGetters
  const computed = {}
  // 遍历 wrappedGetters 属性
  forEachValue(wrappedGetters, (fn, key) => {
    // 给 computed 对象添加属性
    computed[key] = partial(fn, store)
    // 重写 get 方法
    // store.getters.xx 其实是访问了store._vm[xx],其中添加 computed 属性
    Object.defineProperty(store.getters, key, {
      get: () => store._vm[key],
      enumerable: true // for local getters
    })
  })

  const silent = Vue.config.silent
  Vue.config.silent = true
  // 创建Vue实例来保存state,同时让state变成响应式
  // store._vm._data.$$state = store.state
  store._vm = new Vue({
    data: {
      $$state: state
    },
    computed
  })
  Vue.config.silent = silent

  // 只能通过commit方式更改状态
  if (store.strict) {
    enableStrictMode(store)
  }
}
从上面源码,我们可以看出Vuex的state状态是响应式,是借助vue的data是响应式,将state存入vue实例组件的data中;Vuex的getters则是借助vue的计算属性computed实现数据实时监听。
computed计算属性监听data数据变更主要经历以下几个过程:
小结
Vuex是通过全局注入store对象,来实现组件间的状态共享。在大型复杂的项目中(多级组件嵌套),需要实现一个组件更改某个数据,多个组件自动获取更改后的数据进行业务逻辑处理,这时候使用vuex比较合适。假如只是多个组件间传递数据,使用vuex未免有点大材小用,其实只用使用组件间常用的通信方法即可。
Vue组件简单常用的通信方式有以下几种:
1、父子通信:
父向子传值,通过props;子向父传值通过events ($emit);父调用子方法通过ref;provide / inject。
2、兄弟通信:bus
3、跨级嵌套通信:bus;provide / inject等。
如果你在使用 vue.js , 那么我想你可能会对 vue 组件之间的通信感到崩溃 。
我在使用基于 vue.js 2.0 的UI框架 ElementUI 开发网站的时候 , 就遇到了这种问题 : 一个页面有很多表单 , 我试图将表单写成一个单文件组件 , 但是表单 ( 子组件 ) 里的数据和页面 ( 父组件 ) 按钮交互的时候 , 它们之间的通讯很麻烦 :
<!--父组件中引入子组件-->
<template>
  <div>
    <a href="javascript:;" @click="show = true">点击</a>
    <t-dialog :show.sync="show"></t-dialog>
  </div>
</template>

<script>
import dialog from './components/dialog.vue'
export default {
  data(){
    return {
      show:false
    }
  },
  components:{
    "t-dialog":dialog
  }
}
</script>


<!--子组件-->
<template>
  <el-dialog :visible.sync="currentShow"></el-dialog>
</template>

<script>
export default {
  props:['show'],
  computed:{
      currentShow:{
          get(){
              return this.show
          },
          set(val){
              this.$emit("update:show",val)
          }
      }
  }
}
</script>
之所以这么麻烦 , 是因为父组件可以通过 props 给子组件传递参数 , 但子组件内却不能直接修改父组件传过来的参数。
这时候 , 使用 vuex 就可以比较方便的解决这种问题了 :
<!--父组件中引入子组件-->
<template>
  <div>
    <a href="javascript:;" @click="$store.state.show = true">点击</a>
    <t-dialog></t-dialog>
  </div>
</template>

<script>
import dialog from './components/dialog.vue'
export default {
  components:{
    "t-dialog":dialog
  }
}
</script>


<!--子组件-->
<template>
  <el-dialog :visible.sync="$store.state.show"></el-dialog>
</template>

<script>
export default {}
</script>
是不是方便了许多 , 这就是 vuex 最简单的应用 , 不要被网上其他教程吓到 , vuex 原来可以这么简单 !
安装、使用 vuex
首先我们在 vue.js 2.0 开发环境中安装 vuex :
npm install vuex --save
然后 , 在 main.js 中加入 :
import vuex from 'vuex'
Vue.use(vuex);
var store = new vuex.Store({//store对象
    state:{
        show:false
    }
})
再然后 , 在实例化 Vue对象时加入 store 对象 :
new Vue({
  el: '#app',
  router,
  store,//使用store
  template: '<App/>',
  components: { App }
})
完成到这一步 , 上述例子中的 $store.state.show 就可以使用了。
modules
前面为了方便 , 我们把 store 对象写在了 main.js 里面 , 但实际上为了便于日后的维护 , 我们分开写更好 , 我们在 src 目录下 , 新建一个 store 文件夹 , 然后在里面新建一个 index.js :
import Vue from 'vue'
import vuex from 'vuex'
Vue.use(vuex);

export default new vuex.Store({
    state:{
        show:false
    }
})
那么相应的 , 在 main.js 里的代码应该改成 :
//vuex
import store from './store'

new Vue({
  el: '#app',
  router,
  store,//使用store
  template: '<App/>',
  components: { App }
})
这样就把 store 分离出去了 , 那么还有一个问题是 : 这里 $store.state.show 无论哪个组件都可以使用 , 那组件多了之后 , 状态也多了 , 这么多状态都堆在 store 文件夹下的 index.js 不好维护怎么办 ?
我们可以使用 vuex 的 modules , 把 store 文件夹下的 index.js 改成 :
import Vue from 'vue'
import vuex from 'vuex'
Vue.use(vuex);

import dialog_store from '../components/dialog_store.js';//引入某个store对象

export default new vuex.Store({
    modules: {
        dialog: dialog_store
    }
})
这里我们引用了一个 dialog_store.js , 在这个 js 文件里我们就可以单独写 dialog 组件的状态了 :
export default {
    state:{
        show:false
    }
}
做出这样的修改之后 , 我们将之前我们使用的 $store.state.show 统统改为 $store.state.dialog.show 即可。
如果还有其他的组件需要使用 vuex , 就新建一个对应的状态文件 , 然后将他们加入 store 文件夹下的 index.js 文件中的 modules 中。
modules: {
    dialog: dialog_store,
    other: other,//其他组件
}
mutations
前面我们提到的对话框例子 , 我们对vuex 的依赖仅仅只有一个 $store.state.dialog.show 一个状态 , 但是如果我们要进行一个操作 , 需要依赖很多很多个状态 , 那管理起来又麻烦了 !
mutations 登场 , 问题迎刃而解 :
export default {
    state:{//state
        show:false
    },
    mutations:{
        switch_dialog(state){//这里的state对应着上面这个state
            state.show = state.show?false:true;
            //你还可以在这里执行其他的操作改变state
        }
    }
}
使用 mutations 后 , 原先我们的父组件可以改为 :
<template>
  <div id="app">
    <a href="javascript:;" @click="$store.commit('switch_dialog')">点击</a>
    <t-dialog></t-dialog>
  </div>
</template>

<script>
import dialog from './components/dialog.vue'
export default {
  components:{
    "t-dialog":dialog
  }
}
</script>
使用 $store.commit('switch_dialog') 来触发 mutations 中的 switch_dialog 方法。
这里需要注意的是:
mutations中的方法是不分组件的 , 假如你在 dialog_stroe.js 文件中的定义了switch_dialog方法 , 在其他文件中的一个switch_dialog方法 , 那么$store.commit('switch_dialog')会执行所有的switch_dialog方法。mutations里的操作必须是同步的。
你一定好奇 , 如果在 mutations 里执行异步操作会发生什么事情 , 实际上并不会发生什么奇怪的事情 , 只是官方推荐 , 不要在 mutationss 里执行异步操作而已。
actions
多个 state 的操作 , 使用 mutations 会来触发会比较好维护 , 那么需要执行多个 mutations 就需要用 action 了:
export default {
    state:{//state
        show:false
    },
    mutations:{
        switch_dialog(state){//这里的state对应着上面这个state
            state.show = state.show?false:true;
            //你还可以在这里执行其他的操作改变state
        }
    },
    actions:{
        switch_dialog(context){//这里的context和我们使用的$store拥有相同的对象和方法
            context.commit('switch_dialog');
            //你还可以在这里触发其他的mutations方法
        },
    }
}
那么 , 在之前的父组件中 , 我们需要做修改 , 来触发 action 里的 switch_dialog 方法:
<template>
  <div id="app">
    <a href="javascript:;" @click="$store.dispatch('switch_dialog')">点击</a>
    <t-dialog></t-dialog>
  </div>
</template>

<script>
import dialog from './components/dialog.vue'
export default {
  components:{
    "t-dialog":dialog
  }
}
</script>
使用 $store.dispatch('switch_dialog') 来触发 action 中的 switch_dialog 方法。
官方推荐 , 将异步操作放在 action 中。
getters
getters 和 vue 中的 computed 类似 , 都是用来计算 state 然后生成新的数据 ( 状态 ) 的。
还是前面的例子 , 假如我们需要一个与状态 show 刚好相反的状态 , 使用 vue 中的 computed 可以这样算出来 :
computed(){
    not_show(){
        return !this.$store.state.dialog.show;
    }
}
那么 , 如果很多很多个组件中都需要用到这个与 show 刚好相反的状态 , 那么我们需要写很多很多个 not_show , 使用 getters 就可以解决这种问题 :
export default {
    state:{//state
        show:false
    },
    getters:{
        not_show(state){//这里的state对应着上面这个state
            return !state.show;
        }
    },
    mutations:{
        switch_dialog(state){//这里的state对应着上面这个state
            state.show = state.show?false:true;
            //你还可以在这里执行其他的操作改变state
        }
    },
    actions:{
        switch_dialog(context){//这里的context和我们使用的$store拥有相同的对象和方法
            context.commit('switch_dialog');
            //你还可以在这里触发其他的mutations方法
        },
    }
}
我们在组件中使用 $store.state.dialog.show 来获得状态 show , 类似的 , 我们可以使用 $store.getters.not_show来获得状态 not_show 。
注意 : $store.getters.not_show 的值是不能直接修改的 , 需要对应的 state 发生变化才能修改。
mapState、mapGetters、mapActions
很多时候 , $store.state.dialog.show 、$store.dispatch('switch_dialog') 这种写法又长又臭 , 很不方便 , 我们没使用 vuex 的时候 , 获取一个状态只需要 this.show , 执行一个方法只需要 this.switch_dialog 就行了 , 使用 vuex 使写法变复杂了 ?
使用 mapState、mapGetters、mapActions 就不会这么复杂了。
以 mapState 为例 :
<template>
  <el-dialog :visible.sync="show"></el-dialog>
</template>

<script>
import {mapState} from 'vuex';
export default {
  computed:{

    //这里的三点叫做 : 扩展运算符
    ...mapState({
      show:state=>state.dialog.show
    }),
  }
}
</script>
相当于 :
<template>
  <el-dialog :visible.sync="show"></el-dialog>
</template>

<script>
import {mapState} from 'vuex';
export default {
  computed:{
    show(){
        return this.$store.state.dialog.show;
    }
  }
}
</script>
mapGetters、mapActions 和 mapState 类似 , mapGetters 一般也写在 computed 中 , mapActions 一般写在 methods 中。