1.路由
安装
npm i react-router-dom --save
模式 HashRouter BrowserRouter
import {HashRouter,BrowserRouter} from "react-router-dom"

ReactDOM.render(
  <HashRouter>
    <App />
  </HashRouter>
  ,
  document.getElementById('root')
);
规则 Route
import {Route} from "react-router-dom"
 <Route exact strict path="/register" component={Register}></Route>
 <Route path="/index" component={Index}></Route>
Route 的属性 :exact[是否精确匹配] 默认:false。 如果要精确匹配,需要设置exact
strict:严格模式。 需要搭配exact使用。 默认是路径后可以加'/',也可以访问,加上严格模式,有'/'就不行
出口 Switch
import {Switch} from "react-router-dom"
<Switch></Switch>
重定向 Redirect
import {Redirect } from "react-router-dom"
{/* 4.重定向 */}
 <Redirect to="/"></Redirect>
404处理
{/*5. 404第一种方式 */}
<Route path="/404" component={NotFound}></Route>
 <Redirect to="/404"></Redirect>
{/* 404 第2种方式*/}
<Route component={NotFound}></Route>
路由导航 Link NavLink(exact activeClassName activeStyle)
<Link to="/search">搜索</Link>
<NavLink to="/search">搜索</NavLink>
高亮效果:
<footer className="index-footer">
  <NavLink to="/index/home" activeClassName="select">首页</NavLink>
  <NavLink to="/index/cate" activeClassName="select">分类</NavLink>
  <NavLink to="/index/shop" activeClassName="select">购物车</NavLink>
</footer>
<footer className="index-footer">
  <NavLink to="/index/home" activeStyle={{color:"orange"}}>首页</NavLink>
  <NavLink to="/index/cate" activeStyle={{color:"orange"}}>分类</NavLink>
  <NavLink to="/index/shop" activeStyle={{color:"orange"}}>购物车</NavLink>
</footer>
编程式导航:
push(){
  this.props.history.push("/search") //跳转到搜索
}
replace(){
  this.props.history.replace("/search") //跳转到搜索
}
goBack(){
  this.props.history.go(-1)//返回
}
注意:
1.编程式导航 push【添加新的历史记录】 replace【用新的历史记录替换当前历史记录】
2.如果一个组件是路由组件,可以直接使用编程式导航;如果不是路由组件,
    那么
    1.通过withRouter()变成路由组件;
    2.将路由组件的props通过{...this.props}传递过来
withRouter
import React, { Component } from 'react'
//引入withRouter
import {withRouter} from "react-router-dom"
class BackBtn extends Component {
    goBack(){
        console.log(this.props);
        this.props.history.go(-1)
    }
    render() {
        return (
            <button onClick={()=>this.goBack()}>封装的返回</button>
        )
    }
}
//使用
export default withRouter(BackBtn)
路由传参[1. ? ;2.动态路由 ]
1.search传参 【?】
<Link to={`/cateList?id=1&name=222`}>{item.name}</Link>
取参数:
1.原生js
componentDidMount(){
        let str=this.props.location.search;//"?id=2&name=qqq&age=122" --{id:"2",name:"qqq",age:"122"}
        // 1.利用原生js

        let substr=str.slice(1);//"id=2&name=qqq&age=122"
        let arr=substr.split("&");// ['id=2','name=qqq','age=122']
        let result={}
        arr.forEach(item=>{
            let subArr=item.split("=");//["id","2"]
            result[subArr[0]]=subArr[1]
        })
        console.log(result);
    }
2.node questring
import querystring from "querystring"
componentDidMount(){
        let str=this.props.location.search;//"?id=2&name=qqq&age=122" --{id:"2",name:"qqq",age:"122"}

        // 2.node querystring.parse()
        let result=querystring.parse(str.slice(1))
        console.log(result);


    }
3.URLSearchParams
componentDidMount(){
        let str=this.props.location.search;//"?id=2&name=qqq&age=122" --{id:"2",name:"qqq",age:"122"}

        // 3.原生js
        let params=new URLSearchParams(str);
        console.log(params.get("id"));
        console.log(params.get("name"));

    }
2.动态路由传参
<Link to={`/detail/1`}>{item.name}</Link>
<Route path="/detail/:id" component={Detail}></Route>
let id=this.props.match.params.id
路由懒加载
1.通过React.lazy()引入组件
let Login=React.lazy(()=>import("./pages/Login/Login"))
let Index=React.lazy(()=>import("./pages/Index/Index"))
2.需要将规则包裹在React.Suspense 组件中,fallback必填
// 2.React.Suspense  fallback必须的
    <React.Suspense fallback={<div>正在加载。。。</div>}>
      {/* 2.路由出口 */}
      <Switch>

        <Route exact path="/" component={Login}></Route>
        <Route path="/index" component={Index}></Route>

      </Switch>
    </React.Suspense>
登录拦截 :
1.登录成功存个值
login = () => {
      console.log(this.state.user.type);
    //   1.登录成功存登录信息
      sessionStorage.setItem("islogin",1)
  };
2.封装一个组件PrivateRoute,如果要拦截,就使用PrivateRoute书写规则。
import React, { Component } from 'react'
import {Redirect, Route} from "react-router-dom"
export default class PrivateRoute extends Component {
    constructor(){
        super()
        this.state={
            islogin:sessionStorage.getItem("islogin") //'1' null
        }
    }
    render() {
        return (
            <div>
                {this.state.islogin?<Route {...this.props}></Route>:<Redirect to="/"></Redirect>}
            </div>
        )
    }
}
3.使用
<Route exact path="/" component={Login}></Route>
<Route exact strict path="/register" component={Register}></Route>
<PrivateRoute path="/index" component={Index}></PrivateRoute>
<PrivateRoute path="/cateList" component={CateList}></PrivateRoute>
<PrivateRoute path="/detail/:id" component={Detail}></PrivateRoute>
<PrivateRoute path="/search" component={Search}></PrivateRoute>
独享守卫:
{/* 路由独享守卫 */}
  <Route path="/index/shop" render={(props)=>{
      console.log(props);
      let type=sessionStorage.getItem("type")
      if(type==='1'){
        return <Shop {...props}></Shop>
      }else{
        return <div>你没有权限</div>
      }

    }}></Route>
2.UI库
全局引入:
1.安装
npm i yarn -g
yarn add antd
2.引入css [reset.css]
@import '~antd/dist/antd.css';
3.使用组件
import { Button ,Pagination} from 'antd';
<Button type="primary">Button</Button>
<Pagination total={100}></Pagination>
2.按需引入
1.手动引入
import "antd/es/button/style/css"
import "antd/es/pagination/style/css"
import { Button ,Pagination} from 'antd';
2..babel-plugin-import [推荐]
1.安装依赖
npm i babel-plugin-import --save
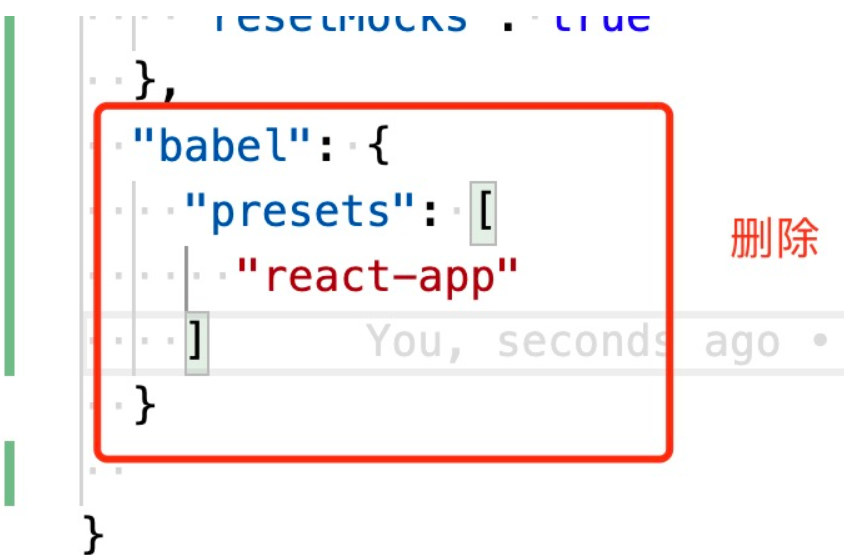
2.在 src 下创建 .babelrc 文件,内容如下:
{
  "presets": [
    "react-app"
  ],
  "plugins": [
    ["import", { "libraryName": "antd", "style": "css" }]
  ]
}
3.通过命令导出 webpack 配置文件 npm run eject
git add .
git commit -m "123"
npm run eject  //y
4.修改config/webpack.config.js
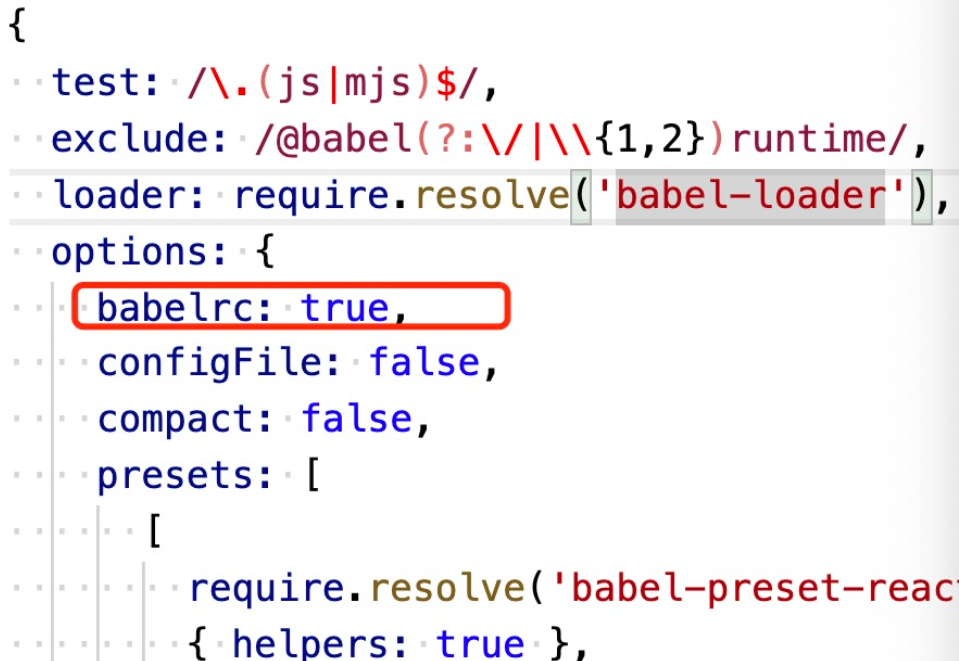
5.修改package.json
6.重启项目
npm start
7.使用
import React, { Component } from "react";
//1.引入Button的样式和组件
import { Button } from "antd";

//1.引入Pagination的样式和组件
import { Pagination } from "antd";

export default class Mine extends Component {
  render() {
    return (
      <div>
        <h1>this is Mine </h1>
        <div style={{ textAlign: "center" }}>
          {/* 2.使用 */}
          <Button type="primary">测试按钮</Button>
          <Pagination></Pagination>
        </div>
      </div>
    );
  }
}
此时不需要引入css,也可以使用。