中间件官网文档解释:中间件是一种装配到应用管道以处理请求和响应的软件 每个中间件:
- 选择是否将请求传递到管道中的下一个组件。
- 可在管道中的下一个组件前后执行工作。
使用 IApplicationBuilder 创建中间件管道
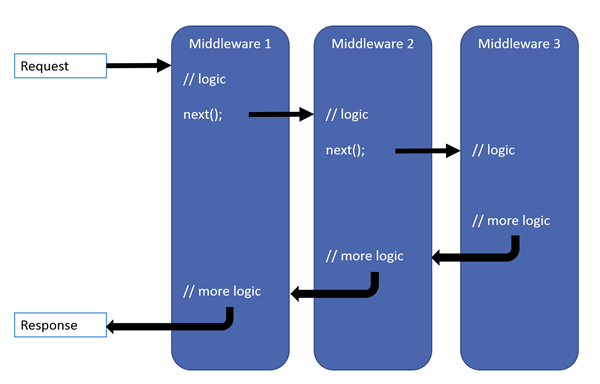
ASP.NET Core 请求管道包含一系列请求委托,依次调用。 下图演示了这一概念。 沿黑色箭头执行。

IApplicationBuilder提供了三个扩展方法配置请求委托
- app.Run 作用添加一个终端中间件,因为不在向下传递请求,常常公开在管道末尾运行。实例代码
  app.Run(async context =>
        {
            await context.Response.WriteAsync("Hello, middleware!");
        });
- app.Use 将多个请求委托链接在一起。next 参数表示管道中的下一个委托。 可通过不 调用 next 参数使管道短路等同于aap.run。 通常可在下一个委托前后执行操作,如以下示例所示:
  app.Use(async (context, next) =>
        {
            // 传递前操作
            await next.Invoke();
            // 传递前操作
        });

        app.Run(async context =>
        {
            await context.Response.WriteAsync("Hello from 2nd delegate.");
        });
    }
- Map 扩展用作约定来创建管道分支。 Map 基于给定请求路径的匹配项来创建请求管道分支。 如果请求路径以给定路径开头,则执行分支。实例代码如下
  private static void HandleMapTest1(IApplicationBuilder app)
    {
        app.Run(async context =>
        {
            await context.Response.WriteAsync("Map Test 1");
        });
    }

    private static void HandleMapTest2(IApplicationBuilder app)
    {
        app.Run(async context =>
        {
            await context.Response.WriteAsync("Map Test 2");
        });
    }

    public void Configure(IApplicationBuilder app)
    {
        app.Map("/map1", HandleMapTest1);

        app.Map("/map2", HandleMapTest2);

        app.Run(async context =>
        {
            await context.Response.WriteAsync("Hello from non-Map delegate. <p>");
        });
    }
自定义中间件
以下演示记录api输入输出参数的中间件。
1.创建一个webapi项目,在默认的WeatherForecastController控制器中添加一个简单的post方法,代码如下
 [HttpPost]
        public string PostWeatherForecast([FromBody]WeatherForecastA weatherForecastA)
        {
            return "添加成功";
        }
public class WeatherForecastA
    {
        public int TemperatureC { get; set; }
    }
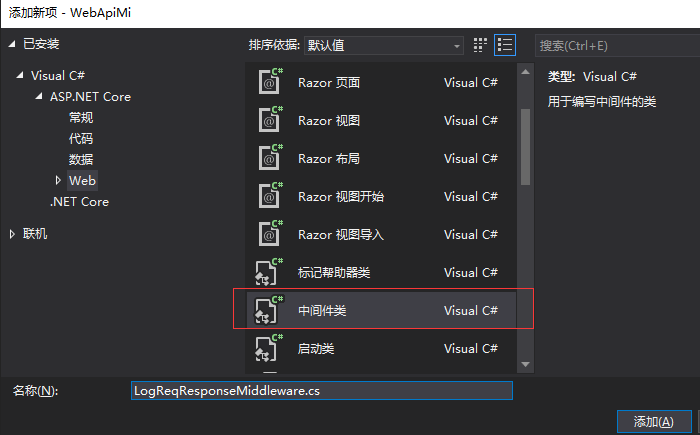
2.新建一个中间件类.CS文件如图

选择之后默认代码如下:
 // You may need to install the Microsoft.AspNetCore.Http.Abstractions package into your project
    public class LogReqResponseMiddleware
    {
        private readonly RequestDelegate _next;

        public LogReqResponseMiddleware(RequestDelegate next)
        {
            _next = next;
        }

        public Task Invoke(HttpContext httpContext)
        {

            return _next(httpContext);
        }
    }

    // Extension method used to add the middleware to the HTTP request pipeline.
    public static class LogReqResponseMiddlewareExtensions
    {
        public static IApplicationBuilder UseLogReqResponseMiddleware(this IApplicationBuilder builder)
        {
            return builder.UseMiddleware<LogReqResponseMiddleware>();
        }
    }
脚手架自动帮我们创建一个 Invoke方法,传递给下一个中间件。一个将自定义的中间件添加到了http请求管道的扩展方法UseLogReqResponseMiddleware。
上面invoke不是异步的,我们自己可以改动,以下代码展示 一个api请求的输入参数和输出信息的日志打印
 // You may need to install the Microsoft.AspNetCore.Http.Abstractions package into your project
    public class LogReqResponseMiddleware
    {
        private readonly RequestDelegate _next;

        public LogReqResponseMiddleware(RequestDelegate next)
        {
            _next = next;
        }

        public async Task Invoke(HttpContext httpContext, ILogger<LogReqResponseMiddleware> logger)
        {
            var request = httpContext.Request;
            request.EnableBuffering();
            //把请求body流转换成字符串
            string bodyAsText = await new StreamReader(request.Body).ReadToEndAsync();//记录请求信息
            var requestStr = $"{request.Scheme} {request.Host}{request.Path} {request.QueryString} {bodyAsText}";
            logger.LogDebug("Request:" + requestStr);
            request.Body.Seek(0, SeekOrigin.Begin);

            var originalBodyStream = httpContext.Response.Body;
            using (var responseBody = new MemoryStream())
            {
                httpContext.Response.Body = responseBody;
                await _next(httpContext);

                var response = httpContext.Response;
                response.Body.Seek(0, SeekOrigin.Begin);
                //转化为字符串
                string text = await new StreamReader(response.Body).ReadToEndAsync();
                //从新设置偏移量0
                response.Body.Seek(0, SeekOrigin.Begin);

                //记录返回值
                var responsestr = $"{response.StatusCode}: {text}";
                logger.LogDebug("Response:" + responsestr);

                await responseBody.CopyToAsync(originalBodyStream);
            }
        }


    }
    // Extension method used to add the middleware to the HTTP request pipeline.
    public static class LogReqResponseMiddlewareExtensions
    {
        public static IApplicationBuilder UseLogReqResponseMiddleware(this IApplicationBuilder builder)
        {
            return builder.UseMiddleware<LogReqResponseMiddleware>();
        }
    }
然后在Startup类的Configure方法中添加下面一行代码,把自定义的中间添加到了HTTP请求的管道中。
app.UseLogReqResponseMiddleware();//记录http请求 输入、输出值;
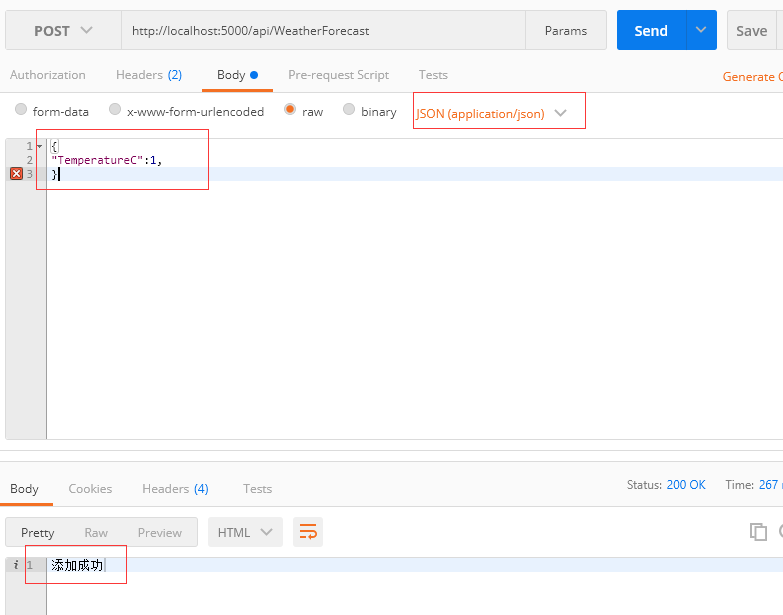
我们在postman中模拟请求

控制台上打印的信息如下:
