上两节我们讲了Spring对AOP的实现,但是在我们的开发中我们不太使用Spring自身的对AOP的实现,而是使用AspectJ,AspectJ是一个面向切面的框架,它扩展了Java语言。AspectJ定义了AOP语法,所以它有一个专门的编译器用来生成遵守Java字节编码规范的Class文件,如果我们要单独的使用Aspect,我们需要安装,并配置环境变量,但是Spring对AspectJ做了很好的整合,我们只需要将相关的jar包导入,就可以在Spring的环境下使用AspectJ。
本节主要讲解Spring环境下Aspect的环境搭建,和在Spring环境下使用AspectJ的AOP,大体的内容摘要如下所示:
- AspectJ环境搭建
- Aspect 注解方式的各种通知实现
- Aspect xml方法的各种通知实现
(一)AspectJ环境搭建
环境搭建分为两步:
①导jar包
我们本节AspectJ的环境搭建是在Spring4.X的基础上实现的,所以首先必须的是SpringAOP环境的搭建,我们这里需要使用到五个Jar包(我们所涂鸦的五个):
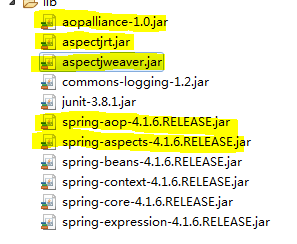
第一个是AOP联盟的jar包,第二个,第三个是AspectJ的jar包,第四个是SpringAOP的jar包,最后一个是Spring整合AspectJ的jar包。
②改变约束文件
我们应该在
spring-framework-4.1.6.RELEASE-dist/spring-framework-4.1.6.RELEASE/docs/spring-framework-reference/html/xsd-config.html
这个目录下找到约束文件: 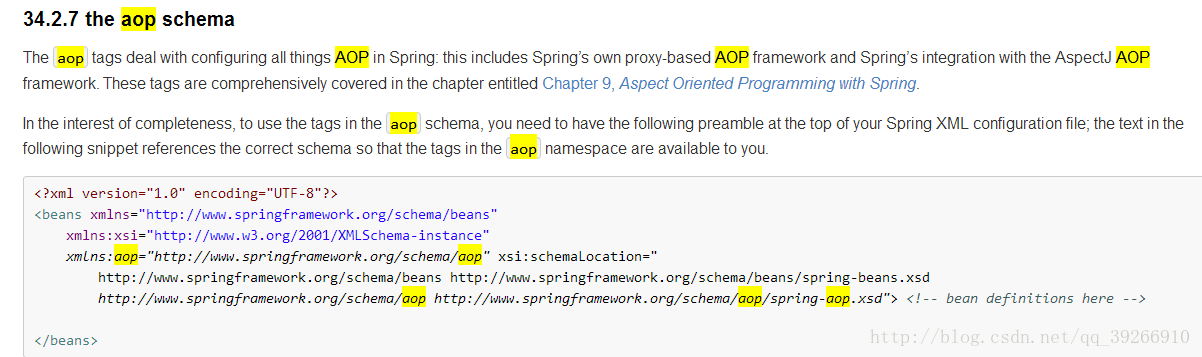
这样我们的环境就搭建好了。
(二)Aspect 注解方式的各种通知实现
好多步骤解释我都写在了注解中,代码就不做详细的介绍了。
首先我们给出我们的基础代码(测试使用):
//一个接口
public interface SomeServices {
    void doFirst();
    String doSecond();
    void doThird();
}
//一个目标类(需要加强方法类)
public class SomeServiceImp implements SomeServices{

    @Override
    public void doFirst() {
        System.out.println("print first");
    }

    @Override
    //这个方法有返回值,供后置通知和环绕通知测试
    public String doSecond() {
        System.out.println("print second");
        return "abc";

    }

    @Override
    public void doThird() {
        //System.out.println("print third");
        //使得程序产生异常,测试异常通知
        System.out.println("print third" + 3/0);
    }
}
<!--AspectJ实现AOP的配置文件-->
<?xml version="1.0" encoding="UTF-8"?>
<beans xmlns="http://www.springframework.org/schema/beans"
    xmlns:xsi="http://www.w3.org/2001/XMLSchema-instance"
    xmlns:aop="http://www.springframework.org/schema/aop" xsi:schemaLocation="
        http://www.springframework.org/schema/beans
        http://www.springframework.org/schema/beans/spring-beans.xsd
        http://www.springframework.org/schema/aop
        http://www.springframework.org/schema/aop/spring-aop.xsd">

    <bean id="service" class="com.test.basedAnnotion.SomeServiceImp"/>

    <bean id="myAspect" class="com.test.basedAnnotion.MyAspect"/>

    <!-- 自动AspectJ代理 -->
    <aop:aspectj-autoproxy/>
</beans>
在这个配置文件中,我们要注册需要加强的目标类bean,和我们的切面bean,还有,因为我们是基于注解的,所以我们需要像IOC注解使用那样开启扫描,开启AspectJ的自动代理,扫描我们的组件,并自动为我们产生代理。
下面我们的主角就要上场了,大家也应该猜到了,就是我们定义的切面类(代码比较庞大,由所有通知组成):
@Aspect
public class MyAspect {
    //前置通知
    @Before("execution(* *..SomeServices.doFirst(..))")
    public void before() {
        System.out.println("前置通知");
    }

    //前置通知
    @Before("execution(* *..SomeServices.doFirst(..))")
    public void before(JoinPoint jp) {//这个参数可以获取切入点路径
        System.out.println("jp:"+jp);
    }

    //后置通知
    @AfterReturning("execution(* *..SomeServices.doSecond(..))")
    public void AfterReturning() {
        System.out.println("后置通知");
    }

    //后置通知,和SpringAOP一样,我们可以获得主业务方法的返回值
    @AfterReturning(value="execution(* *..SomeServices.doSecond(..))",returning="result")
    public void AfterReturning(String result) {
            System.out.println("后置通知");
            System.out.println("result=" + result);
    }

    //环绕通知
    @Around(value="execution(* *..SomeServices.doSecond(..))")
    public Object around(ProceedingJoinPoint pjp) throws Throwable {
        System.out.println("环绕执行前置方法");

        //这里我们可以对主业务方法的返回值进行修改
        String result = ((String)pjp.proceed()).toUpperCase();

        System.out.println("环绕执行后置方法");

        return result;
    }

    //异常通知
    @AfterThrowing("execution(* *..SomeServices.doThird(..))")
    public void afterThrowing() {
        System.out.println("异常通知");
    }

    //异常通知,可以获取异常参数
    @AfterThrowing(value="execution(* *..SomeServices.doThird(..))",throwing="e")
    public void afterThrowing(Exception e) {
        System.out.println("异常通知" + e.getMessage());
    }

    //最终通知
    @After("execution(* *..SomeServices.doThird(..))")
    public void after() {
        System.out.println("最终通知");
    }


    //如果为一个方法定义多个通知,那么我们就需要写很多切入点,所以我们可以写一个通用的切入点,供上面的通知使用
    @Pointcut("execution(* *..SomeServices.doThird(..))")
    public void doThirdPointCut() {}


    //下面我们就来使用这个定义的切入点
    //使用定义切入点的最终通知
    @After("doThirdPointCut()")
    public void after2() {
        System.out.println("定义切入点的最终通知");
    }
}
首先我们看到的是Aspect注解,这个注解表明当前的类是一个切面,就像IOC中的几个注解一样(Component,Service…),表明当前类的作用和地位。
上面的几种通知注解(Before,AfterReturning…)后面跟的参数是切入点表达式,关于切入点的相关介绍本节仅做简单的介绍。
切入点:通俗的讲切入点就是我们切面添加的位置
切入点表达式:它由“*,空格,..相关的方法名,包名”组成,大概的格式为:方法返回值类型+包名+类名+方法名+方法参数。
最后我们来进行测试:
public class test {

    @Test
    public void Test01() {
        String source = "com/test/basedAnnotion/applicationContext.xml";
        ApplicationContext ac = new ClassPathXmlApplicationContext(source);
        SomeServices service = (SomeServices)ac.getBean("service");
        service.doFirst();
        System.out.println("-----------");
        String result = service.doSecond();
        System.out.println(result);
        System.out.println("-----------");
        service.doThird();

    }
}
控制台输出:
jp:execution(void com.test.basedAnnotion.SomeServices.doFirst())
前置通知
print first
-----------
环绕执行前置方法
print second
环绕执行后置方法
后置通知
result=ABC
后置通知
ABC
-----------
最终通知
定义切入点的最终通知
异常通知/ by zero
异常通知
(三)Aspect xml方法的各种通知实现:
基本的代码(一个接口,一个实现类,一个切面类,一个测试类),都和上面的相同,当然切面类中可以将注解删除。
下面就是我们的xml配置文件:
<!-- 注册目标类 -->
    <bean id="service" class="com.test.basedXml.SomeServiceImp"/>
    <!-- 注册切面 -->
    <bean id="myAspect" class="com.test.basedXml.MyAspect"/>
    <!-- AOP配置 -->
    <aop:config>
        <!-- 就像我们注解方式一样,我们也可以定义切入点,能够复用 -->
        <aop:pointcut expression="execution(* *..SomeServices.doFirst(..))" id="doFirst"/>
        <aop:pointcut expression="execution(* *..SomeServices.doSecond(..))" id="doSecond"/>
        <aop:pointcut expression="execution(* *..SomeServices.doThird(..))" id="doThird"/>

        <aop:aspect ref="myAspect">
            <!-- 前置通知 -->
            <!-- 直接指定pointcut -->
            <aop:before method="before" pointcut="execution(* *..SomeServices.doFirst(..))"/>
            <!--ref指定pointcut -->
            <!-- <aop:before method="before" pointcut-ref="doFirst"/> -->
            <!-- 指定带参数的通知方法 -->
            <aop:before method="before(org.aspectj.lang.JoinPoint)" pointcut-ref="doFirst"/>

            <!-- 后置通知 -->
            <aop:after-returning method="AfterReturning" pointcut-ref="doSecond"/>
            <!-- 如果后置通知想要获取返回值,要加上参数returning -->
            <aop:after-returning method="AfterReturning(java.lang.String)" pointcut-ref="doSecond" returning="result"/>

            <!-- 环绕通知 -->
            <aop:around method="around" pointcut-ref="doSecond" />

            <!-- 异常通知 -->
            <aop:after-throwing method="afterThrowing" pointcut-ref="doThird"/>
            <!-- 异常返回值需要加上throwing参数 -->
            <aop:after-throwing method="afterThrowing(java.lang.Exception)" pointcut-ref="doThird" throwing="e"/>

            <!-- 最终通知 -->
            <aop:after method="after" pointcut-ref="doThird"/>
        </aop:aspect>
    </aop:config>
以后我们使用Spring整合的AspectJ都使用这种xml形式的。
版权声明:本文为博主原创文章,如需转载请表明出处。 https://blog.csdn.net/qq_39266910/article/details/78759850