Image源码解读
接着我们来看看放在相同图集中的Sprite是如何合并DrawCall的,从原理上来讲,每个Mesh都需要给顶点设置UV信息,也就是说我们只需要将图集上的某个区域一一抠出来贴到Mesh正确的区域即可。如下代码所示,只要观察GenerateSimpleSprite()方法,UGUI通过Sprites.DataUtility.GetOuterUV(activeSprite)方法将当前待显示的Sprite的UV信息取出来,通过vh.AddVert()和vh.AddTriangle()来填充Mesh信息。
Image.cs(部分代码):
public class Image : MaskableGraphic, ISerializationCallbackReceiver, ILayoutElement, ICanvasRaycastFilter
{
    //...略
    protected override void OnPopulateMesh(VertexHelper toFill)
    {
        if (activeSprite == null)
        {
            base.OnPopulateMesh(toFill);
            return;
        }
        //Image有4种显示模式,正常、九宫、平铺、填充
        //分别生成对应的顶点信息
        switch (type)
        {
            case Type.Simple:
                if (!useSpriteMesh)
                    GenerateSimpleSprite(toFill, m_PreserveAspect);
                else
                    GenerateSprite(toFill, m_PreserveAspect);
                break;
            case Type.Sliced:
                GenerateSlicedSprite(toFill);
                break;
            case Type.Tiled:
                GenerateTiledSprite(toFill);
                break;
            case Type.Filled:
                GenerateFilledSprite(toFill, m_PreserveAspect);
                break;
        }
    }

    void GenerateSimpleSprite(VertexHelper vh, bool lPreserveAspect)
    {
        Vector4 v = GetDrawingDimensions(lPreserveAspect);
        //获取根据Sprite获取正确的UV信息
        var uv = (activeSprite != null) ? Sprites.DataUtility.GetOuterUV(activeSprite) : Vector4.zero;

        var color32 = color;
        vh.Clear();
        //填充顶点、颜色、uv
        vh.AddVert(new Vector3(v.x, v.y), color32, new Vector2(uv.x, uv.y));
        vh.AddVert(new Vector3(v.x, v.w), color32, new Vector2(uv.x, uv.w));
        vh.AddVert(new Vector3(v.z, v.w), color32, new Vector2(uv.z, uv.w));
        vh.AddVert(new Vector3(v.z, v.y), color32, new Vector2(uv.z, uv.y));

        //填充三角形顶点序列
        vh.AddTriangle(0, 1, 2);
        vh.AddTriangle(2, 3, 0);
    }
}
最终,不同的UI使用相同的材质、Shader、贴图,只是它们拥有不同的UV信息,这符合Draw Call合并的规则,所以就能合批。
Text源码解读
UGUI的Text就是位图字体,先通过TTF字体将字体形状生成在位图中,接着就是将正确的UV设置给字体的Mesh,这和前面介绍的Image组件几乎一样了。如下代码所示,首先需要根据文本的区域、字体、填充文字调用GetGenerationSettings()创建文本生成器,顶点、uv信息都会被填充好,由于每个文本都是一个Quad,所以还需要设置它们的位置。
Text.cs(部分代码):
public class Text : MaskableGraphic, ILayoutElement
{
    //...略

    //字体生成器
    public TextGenerator cachedTextGenerator
    {
        get { return m_TextCache ?? (m_TextCache = (m_Text.Length != 0 ? new TextGenerator(m_Text.Length) : new TextGenerator())); }
    }

    readonly UIVertex[] m_TempVerts = new UIVertex[4];
    protected override void OnPopulateMesh(VertexHelper toFill)
    {
        if (font == null)
            return;
        m_DisableFontTextureRebuiltCallback = true;

        Vector2 extents = rectTransform.rect.size;

        //获取字体的生成规则设置
        var settings = GetGenerationSettings(extents);
        //根据待填充字体、生成规则,生成顶点信息
        cachedTextGenerator.PopulateWithErrors(text, settings, gameObject);

        //
        IList<UIVertex> verts = cachedTextGenerator.verts;
        float unitsPerPixel = 1 / pixelsPerUnit;
        int vertCount = verts.Count - 4;
        if (vertCount <= 0)
        {
            toFill.Clear();
            return;
        }

        Vector2 roundingOffset = new Vector2(verts[0].position.x, verts[0].position.y) * unitsPerPixel;
        roundingOffset = PixelAdjustPoint(roundingOffset) - roundingOffset;
        toFill.Clear();
        if (roundingOffset != Vector2.zero)
        {
            for (int i = 0; i < vertCount; ++i)
            {
                int tempVertsIndex = i & 3;
                //填充顶点信息
                m_TempVerts[tempVertsIndex] = verts[i];
                //设置字体偏移
                m_TempVerts[tempVertsIndex].position *= unitsPerPixel;
                m_TempVerts[tempVertsIndex].position.x += roundingOffset.x;
                m_TempVerts[tempVertsIndex].position.y += roundingOffset.y;
                if (tempVertsIndex == 3)
                    toFill.AddUIVertexQuad(m_TempVerts); //填充UI顶点面片
            }
        }
        else
        {
            for (int i = 0; i < vertCount; ++i)
            {
                int tempVertsIndex = i & 3;
                //填充顶点信息
                m_TempVerts[tempVertsIndex] = verts[i];
                //设置字体偏移
                m_TempVerts[tempVertsIndex].position *= unitsPerPixel;
                if (tempVertsIndex == 3)
                    toFill.AddUIVertexQuad(m_TempVerts);//填充UI顶点面片
            }
        }

        m_DisableFontTextureRebuiltCallback = false;
    }

    public TextGenerationSettings GetGenerationSettings(Vector2 extents)
    {
        //字体设置信息
        var settings = new TextGenerationSettings();

        //下面对Text信息进行提取
        settings.generationExtents = extents;
        if (font != null && font.dynamic)
        {
            settings.fontSize = m_FontData.fontSize;
            settings.resizeTextMinSize = m_FontData.minSize;
            settings.resizeTextMaxSize = m_FontData.maxSize;
        }

        settings.textAnchor = m_FontData.alignment;
        settings.alignByGeometry = m_FontData.alignByGeometry;
        settings.scaleFactor = pixelsPerUnit;
        settings.color = color;
        settings.font = font;
        settings.pivot = rectTransform.pivot;
        settings.richText = m_FontData.richText;
        settings.lineSpacing = m_FontData.lineSpacing;
        settings.fontStyle = m_FontData.fontStyle;
        settings.resizeTextForBestFit = m_FontData.bestFit;
        settings.updateBounds = false;
        settings.horizontalOverflow = m_FontData.horizontalOverflow;
        settings.verticalOverflow = m_FontData.verticalOverflow;

        return settings;
    }
}
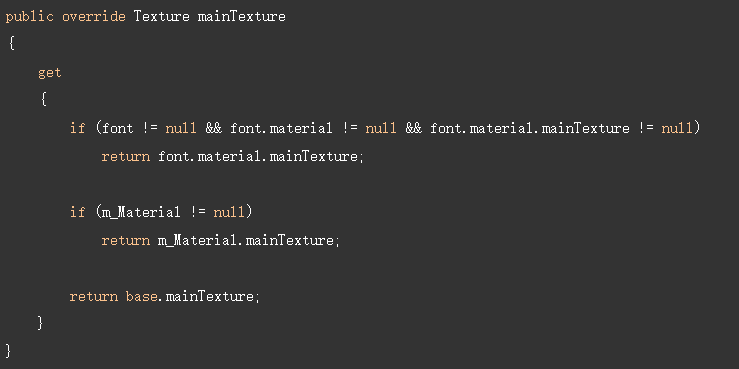
如下代码所示, 字体的贴图保存在Font.material.mainTexture中,Mesh信息准备好后将字体的材质贴上就可以将文字渲染出来了,最终字体和Image绘制完全一样,通过Graphic.UpdateMaterial()将材质贴上。
顶点辅助类VertexHelper
前面我们介绍的Image和Text 合并网格都用到了VertexHelper类,如下代码所示,它只是个普通的类对象,里面只保存了生成Mesh的基本信息并非Mesh对象,最后通过这些基本信息就可以生成Mesh网格了。
VertexHelper.cs(部分代码):
public class VertexHelper : IDisposable
{
    //保存每个顶点的位置、颜色、UV、法线、切线
    private List<Vector3> m_Positions;
    private List<Color32> m_Colors;
    private List<Vector2> m_Uv0S;
    private List<Vector2> m_Uv1S;
    private List<Vector2> m_Uv2S;
    private List<Vector2> m_Uv3S;
    private List<Vector3> m_Normals;
    private List<Vector4> m_Tangents;
    //记录三角形的索引
    private List<int> m_Indices;

    //开始添加顶点的位置、颜色、UV、法线、切线数据
    public void AddVert(Vector3 position, Color32 color, Vector2 uv0, Vector2 uv1, Vector3 normal, Vector4 tangent)
    {
        InitializeListIfRequired();

        m_Positions.Add(position);
        m_Colors.Add(color);
        m_Uv0S.Add(uv0);
        m_Uv1S.Add(uv1);
        m_Uv2S.Add(Vector2.zero);
        m_Uv3S.Add(Vector2.zero);
        m_Normals.Add(normal);
        m_Tangents.Add(tangent);
    }
    //添加三角形的索引
    public void AddTriangle(int idx0, int idx1, int idx2)
    {
        InitializeListIfRequired();

        m_Indices.Add(idx0);
        m_Indices.Add(idx1);
        m_Indices.Add(idx2);
    }
}
Graphic中有个静态对象s_VertexHelper保存每次生成的网格信息,使用完后会立即清理掉等待下个Graphic对象使用。
Graphic.cs(部分代码):
public abstract class Graphic : UIBehaviour, ICanvasElement
{
    //...略
    [NonSerialized] private static readonly VertexHelper s_VertexHelper = new VertexHelper();
    private void DoMeshGeneration()
    {
        //...略
        //s_VertexHelper中的数据信息,调用FillMesh()方法生成真正的网格信息。
        s_VertexHelper.FillMesh(workerMesh);

        //s_VertexHelper.FillMesh内部实现
        //就是Unity自己生成Mesh的API而已
        //public void FillMesh(Mesh mesh)
        //{
        //    InitializeListIfRequired();

        //    mesh.Clear();

        //    if (m_Positions.Count >= 65000)
        //        throw new ArgumentException("Mesh can not have more than 65000 vertices");

        //    mesh.SetVertices(m_Positions);
        //    mesh.SetColors(m_Colors);
        //    mesh.SetUVs(0, m_Uv0S);
        //    mesh.SetUVs(1, m_Uv1S);
        //    mesh.SetUVs(2, m_Uv2S);
        //    mesh.SetUVs(3, m_Uv3S);
        //    mesh.SetNormals(m_Normals);
        //    mesh.SetTangents(m_Tangents);
        //    mesh.SetTriangles(m_Indices, 0);
        //    mesh.RecalculateBounds();
        //}

        //最终提交网格信息,在C++底层中合并网格
        canvasRenderer.SetMesh(workerMesh);
    }
}
Layout源码解读
UGUI的布局功能确实很强大,只要挂在节点下就可以设置HorizontalLayoutGroup(横向)、VerticalLayoutGroup(纵向)、GridLayoutGroup(表格)的布局了。虽然使用方便,但是效率是不高的,这里我们以纵向来举例。无论横向还是纵向排列,首先得计算出每个子对象的区域才行。如下代码所示,在GetChildSizes()方法中拿到每个元素的区域。
HorizontalOrVerticalLayoutGroup.cs(部分代码):
public abstract class HorizontalOrVerticalLayoutGroup : LayoutGroup
{
    //...略
    private void GetChildSizes(RectTransform child, int axis, bool controlSize, bool childForceExpand,
        out float min, out float preferred, out float flexible)
    {
        //获取每个子元素的区域,min最小区域、preferred准确区域、flexible弹性区域
        if (!controlSize)
        {
            min = child.sizeDelta[axis];
            preferred = min;
            flexible = 0;
        }
        else
        {
            min = LayoutUtility.GetMinSize(child, axis);
            preferred = LayoutUtility.GetPreferredSize(child, axis);
            flexible = LayoutUtility.GetFlexibleSize(child, axis);
        }

        if (childForceExpand)
            flexible = Mathf.Max(flexible, 1);
    }
}
如下代码所示,最核心的计算在LayoutUtility. GetLayoutProperty()方法中,把每个实现ILayoutElement接口的对象的信息取出来。
LayoutUtility.cs(部分代码):
public static class LayoutUtility
{
   //...略
    public static float GetMinWidth(RectTransform rect)
    {
        //计算最小宽度
        return GetLayoutProperty(rect, e => e.minWidth, 0);
    }

   public static float GetLayoutProperty(RectTransform rect, System.Func<ILayoutElement, float> property, float defaultValue, out ILayoutElement source)
    {
        source = null;
        if (rect == null)
            return 0;
        float min = defaultValue;
        int maxPriority = System.Int32.MinValue;
        var components = ListPool<Component>.Get();
        rect.GetComponents(typeof(ILayoutElement), components);

        //遍历每一个实现ILayoutElement接口的子对象(Image和Text都实现了ILayoutElement接口)
        //或者绑定了LayoutElement对象的脚本也实现了ILayoutElement接口
        for (int i = 0; i < components.Count; i++)
        {
            //确保layoutComp对象有效
            var layoutComp = components[i] as ILayoutElement;
            if (layoutComp is Behaviour && !((Behaviour)layoutComp).isActiveAndEnabled)
                continue;
            //确保当前优先级小于最大优先级
            int priority = layoutComp.layoutPriority;
            if (priority < maxPriority)
                continue;

            float prop = property(layoutComp);
            if (prop < 0)
                continue;
            //如果有更高的优先级,那么就覆盖最小数值,并且覆盖最大优先级数值
            if (priority > maxPriority)
            {
                min = prop;
                maxPriority = priority;
                source = layoutComp;
            }
            //如果组件有相同的优先级,取较大的值
            else if (prop > min)
            {
                min = prop;
                source = layoutComp;
            }
        }

        ListPool<Component>.Release(components);
        //返回最小值
        return min;
    }
}
如下代码所示,由于Image和Text都实现了ILayoutElement接口,所以LayoutGroup下的Image和Text元素会自动布局,也可以绑定LayoutElement脚本主动设置区域。
public class Image : MaskableGraphic, ISerializationCallbackReceiver, ILayoutElement, ICanvasRaycastFilter
public class Text : MaskableGraphic, ILayoutElement
但是Layout还有Min Wdith和Flexible Width可设置最小宽高和弹性宽高,这都需要进行额外的计算产生额外的开销,如果对效率要求比较高的UI,最好可以考虑自行封装一套布局组件。 如图9-1所示,有时候希望布局以后自动计算RectTransform的区域,那么就不得不再挂上一个Content Size Fitter组件了,它是在LayoutRebuilder中等待Rebuild()时调用,那么势必会再次造成Rebuild()。
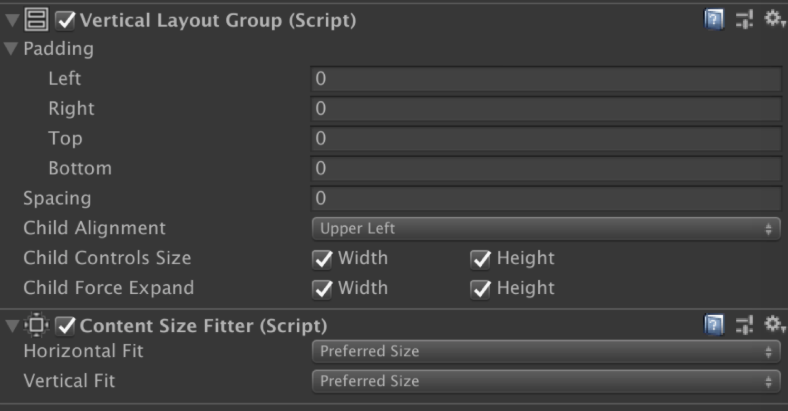
不得不说 Content Size Fitter、VerticalLayoutGroup、HorizontalLayoutGroup、 AspectRatioFitter、GridLayoutGroup组件效率是很低的,它们势必会导致所有元素的Rebuild()执行两次。
1、界面第一次打开需要进行第一次Rebuild()
2、Layout组件要算位置或者大小会强制再执行一次Rebuild()
很有可能有些元素是不需要Rebuild的,但是Layout组件也会强制执行,那么势必造成额外的开销。
遮罩:Mask与Mask2D
UGUI的裁切分为Mask和Mask2D两种,我们先来看Mask。它可以给Mask指定一张裁切图裁切子元素。如图10-1所示,我们给Mask指定了一张圆形图片,那么子节点下的元素都会被裁切在这个圆形区域中。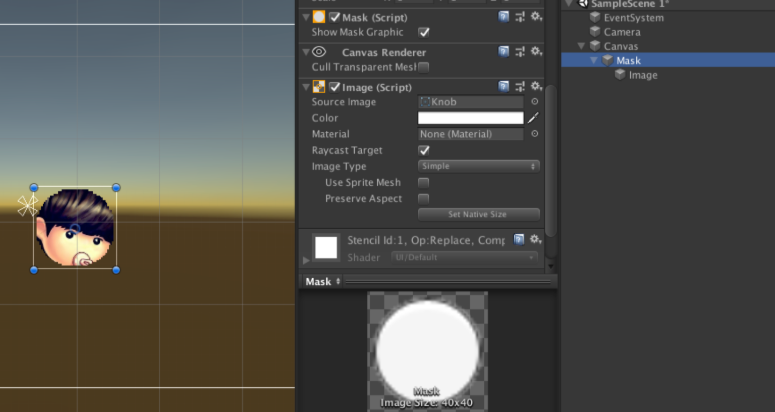
功能确实很强大,我们来看看它的效率如何呢?由于裁切需要同时裁切图片和文本,所以Image和Text都会派生自MaskableGraphic。如果要让Mask节点下的元素裁切,那么它需要占一个DrawCall,因为这些元素需要一个新的Shader参数来渲染。如下代码所示,MaskableGraphic实现了IMaterialModifier接口, 而StencilMaterial.Add()就是设置Shader中的裁切参数。
MaskableGraphic.cs(部分代码):
public abstract class MaskableGraphic : Graphic, IClippable, IMaskable, IMaterialModifier
{
    //...略
    public virtual Material GetModifiedMaterial(Material baseMaterial)
    {
        var toUse = baseMaterial;

        //获取模板缓冲值
        if (m_ShouldRecalculateStencil)
        {
            var rootCanvas = MaskUtilities.FindRootSortOverrideCanvas(transform);
            m_StencilValue = maskable ? MaskUtilities.GetStencilDepth(transform, rootCanvas) : 0;
            m_ShouldRecalculateStencil = false;
        }
        //确保Mask组件有效
        Mask maskComponent = GetComponent<Mask>();
        if (m_StencilValue > 0 && (maskComponent == null || !maskComponent.IsActive()))
        {
            //设置模板缓冲值,并且设置在该区域内的显示,不在的裁切掉
            var maskMat = StencilMaterial.Add(toUse, (1 << m_StencilValue) - 1, StencilOp.Keep, CompareFunction.Equal, ColorWriteMask.All, (1 << m_StencilValue) - 1, 0);
            StencilMaterial.Remove(m_MaskMaterial);
            m_MaskMaterial = maskMat;
            //并且更换新的材质
            toUse = m_MaskMaterial;
        }
        return toUse;
    }
}
如下代码所示,Image对象在进行Rebuild()时,UpdateMaterial()方法中会获取需要渲染的材质,并且判断当前对象的组件是否有继承IMaterialModifier接口,如果有那么它就是绑定了Mask脚本,接着调用上面提到的GetModifiedMaterial方法修改材质上Shader的参数。
Graphic.cs(部分代码):
public abstract class Graphic : UIBehaviour,ICanvasElement
{
    //...略
    public virtual void Rebuild(CanvasUpdate update)
    {
        if (canvasRenderer.cull)
            return;

        switch (update)
        {
            case CanvasUpdate.PreRender:
                if (m_VertsDirty)
                {
                    //开始更新网格
                    UpdateGeometry();
                    m_VertsDirty = false;
                }
                if (m_MaterialDirty)
                {
                    //开始更新材质
                    UpdateMaterial();
                    m_MaterialDirty = false;
                }
                break;
        }
    }

    public virtual Material materialForRendering
    {
        get
        {
            //遍历UI中的每个Mask组件
            var components = ListPool<Component>.Get();
            GetComponents(typeof(IMaterialModifier), components);

            //并且更新每个Mask组件的模板缓冲材质
            var currentMat = material;
            for (var i = 0; i < components.Count; i++)
                currentMat = (components[i] as IMaterialModifier).GetModifiedMaterial(currentMat);
            ListPool<Component>.Release(components);

            //返回新的材质,用于裁切
            return currentMat;
        }
    }

    protected virtual void UpdateMaterial()
    {
        if (!IsActive())
            return;
        //更新刚刚替换的新的模板缓冲的材质
        canvasRenderer.materialCount = 1;
        canvasRenderer.SetMaterial(materialForRendering, 0);
        canvasRenderer.SetTexture(mainTexture);
    }
}
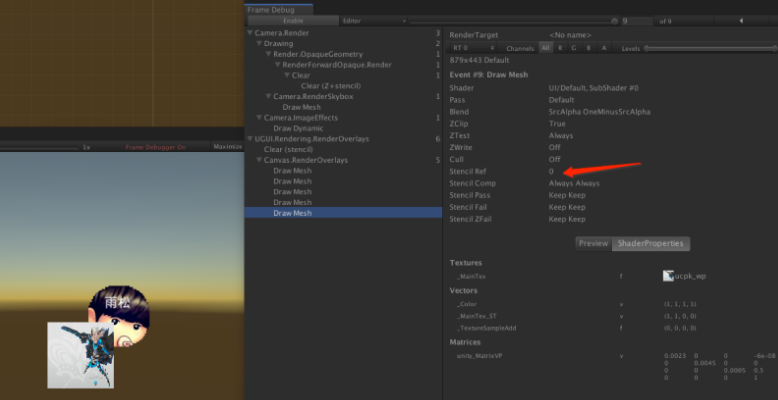
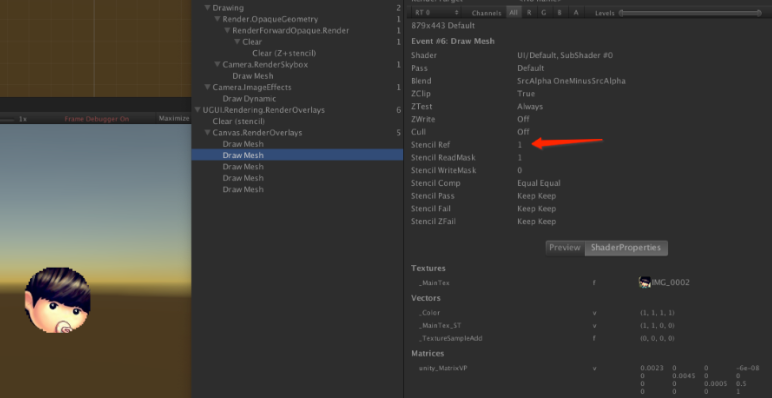
Mask的原理就是利用了StencilBuffer(模板缓冲),它里面记录了一个ID,被裁切元素也有StencilBuffer(模板缓冲)的ID,并且和Mask里的比较,相同才会被渲染。因为模板缓冲可以提供模板的区域,也就是前面设置的圆形图片,所以最终会将元素裁切到这个圆心图片中。 如图10-2所示,在Mask外面放一个普通的图片,默认情况下Stencil Ref的值是0,所以它不会被裁切,永远会显示出来。
如图10-3所示,因为Mask的Stencil Ref 值是1,所需被裁切的元素它的Stencil Ref 值也应该是1就会被裁切。
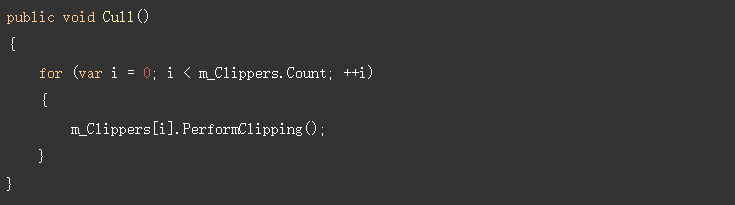
接着我们再来看看Mask2D的原理,在前面介绍Canvas.willRenderCanvases()时在PerformUpdate方法中会调用ClipperRegistry.instance.Cull();来处理界面中所有的Mask2D裁切。

ClipperRegistry.instance.Cull();的原理就是遍历界面中的所有Mask2D组件,并且调用每个组件的PerformClipping();方法。
如下代码所示,Mask2D会在OnEnable()方法中,将当前组件注册ClipperRegistry.Register(this);这样在上面ClipperRegistry.instance.Cull();方法时就可以遍历所有Mask2D组件并且调用它们的PerformClipping()方法了。
PerformClipping()方法,需要找到所有需要裁切的UI元素,因为Image和Text都继承了IClippable接口,最终将调用Cull()进行裁切。
RectMask2D.cs(部分代码):
public class RectMask2D : UIBehaviour, IClipper, ICanvasRaycastFilter
{
    //...略
    protected override void OnEnable()
    {
        //注册当前RectMask2D裁切对象,保证下次Rebuild时可进行裁切。
        base.OnEnable();
        m_ShouldRecalculateClipRects = true;
        ClipperRegistry.Register(this);
        MaskUtilities.Notify2DMaskStateChanged(this);
    }

    public virtual void PerformClipping()
    {
        if (ReferenceEquals(Canvas, null))
        {
            return;
        }

        //重新计算裁切区域
        if (m_ShouldRecalculateClipRects)
        {
            MaskUtilities.GetRectMasksForClip(this, m_Clippers);
            m_ShouldRecalculateClipRects = false;
        }

        //由于裁切可能有多个区域,这里会计算出正确包含重复的一个区域
        bool validRect = true;
        Rect clipRect = Clipping.FindCullAndClipWorldRect(m_Clippers, out validRect);

        RenderMode renderMode = Canvas.rootCanvas.renderMode;
        bool maskIsCulled =
            (renderMode == RenderMode.ScreenSpaceCamera || renderMode == RenderMode.ScreenSpaceOverlay) &&
            !clipRect.Overlaps(rootCanvasRect, true);

        bool clipRectChanged = clipRect != m_LastClipRectCanvasSpace;
        bool forceClip = m_ForceClip;

        // Avoid looping multiple times.
        foreach (IClippable clipTarget in m_ClipTargets)
        {
            if (clipRectChanged || forceClip)
            {
                //准备把裁切区域传到每个UI元素的Shader中
                clipTarget.SetClipRect(clipRect, validRect);
            }
            //确保裁切可用
            var maskable = clipTarget as MaskableGraphic;
            if (maskable != null && !maskable.canvasRenderer.hasMoved && !clipRectChanged)
                continue;
            //准备开始裁切,准备重建裁切的UI
            clipTarget.Cull(
                maskIsCulled ? Rect.zero : clipRect,
                maskIsCulled ? false : validRect);
        }

        m_LastClipRectCanvasSpace = clipRect;
        m_ForceClip = false;
    }
}
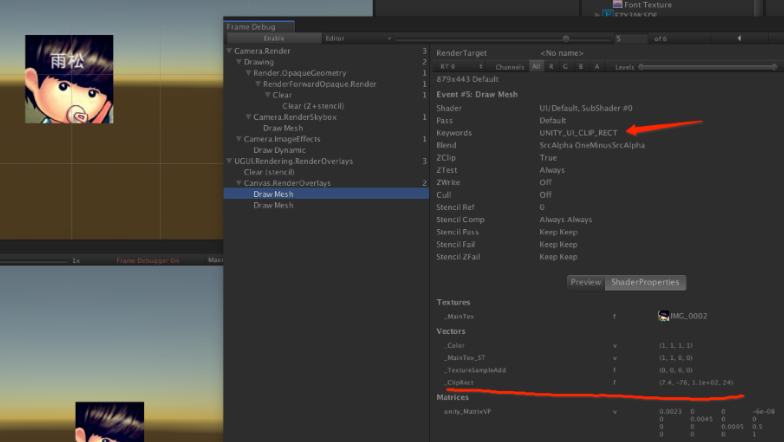
如图10-4所示,RectMask2D会将RectTransform的区域作为_ClipRect传入Shader中,并且激活UNITY_UI_CLIP_RECT的Keywords。Stencil Ref 的值是0 表示它并没有使用模板缓冲比较,如果只是矩形裁切,RectMask2D并且它不需要一个无效的渲染用于模板比较,所以RectMask2D的效率会比Mask要高。
如下代码所示,在Shader的Frag处理像素中,被裁切掉的区域是通过UnityGet2DClipping()将Color.a变成了透明。
RectMask2D.cs(部分代码):
