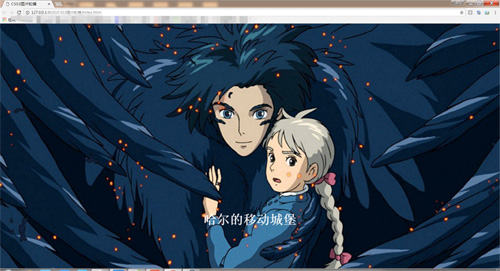
首先来看一下效果:(这些个电影画风好温柔...)

0、先讲一个CSS3的动画用法
animation基本用法是:animation: name keeping-time animate-function delay times iteration final;
- 第一个参数:name (animation-name):
动画的名字,CSS3采用“关键帧 keyframes”来定义动画,如下第4个步骤展示;
1 @keyframes image{
2     0%{opacity: 0;}
3     100%{opacity:1;}
4 }
5 /*或者*/
6 @keyframes image{
7     from{opacity: 0;}
8     to{opacity: 1;}
9 }
- 第二个参数 keeping-time (animation-duration):
动画的持续时间,单位s或者ms(一定要带时间单位);
- 第三个参数 animate-function (animation-timing-function):
(动画方式)的贝赛尔曲线,可取值有:ease、ease-in、ease-out、linear、ease-in-out、cubic-bezier(num1,num2,num3,num4);
- 第四个参数 delay (animation-delay):
动画延迟执行的时间,单位为s或者ms{即使延迟时间为0,也必须加上时间单位,如果写成直接写成0,在Chrome和Safari(webkit)下是没问题的,但是在FF(gecko)下无效};
- 第五个参数 times (animation-iteration-count):
动画循环执行的次数,使用infinite值为无限循环;
- 第六个参数 iteration (animation-direction):
如果动画循环,循环的方式有:alternate(偶数次向前播放,奇数次向后播放)和normal(每次都向前播放);
- 第七个参数 final (animation-fill-mode):
动画达到100%时的状态,取值有:backward(回到初始状态)、forwards(停在最终状态)、none、both。
以上7个参数不定要全部都有,不需要的效果可以不写,如我这里只用到4个参数:
1 animation: image 24s linear infinite;
1、先在<body>里把图片贴进来,每个li下面再给一个标题

 1 <ul class="name">
 2             <li>
 3                 <span><img src="img/img01.jpg" alt="" /></span>
 4                 <div><h3>哈尔的移动城堡</h3></div>
 5             </li>
 6             <li>
 7                 <span><img src="img/img02.jpg" alt="" /></span>
 8                 <div><h3>火隐忍者</h3></div>
 9             </li>
10             <li>
11                 <span><img src="img/img03.jpg" alt="" /></span>
12                 <div><h3>海贼王</h3></div>
13             </li>
14             <li>
15                 <span><img src="img/img04.jpg" alt="" /></span>
16                 <div><h3>红猪</h3></div>
17             </li>
18             <li>
19                 <span><img src="img/img05.jpg" alt="" /></span>
20                 <div><h3>起风了</h3></div>
21             </li>
22             <li>
23                 <span><img src="img/img06.jpg" alt="" /></span>
24                 <div><h3>龙猫</h3></div>
25             </li>
26         </ul>
2、给样式,自己给一个宽度、高度(我这里直接满屏显示,^_^懒...),给图片一个动画名称image;
给标题一个动画名称title。

 1 ody{
 2                 background: #222;
 3                 font-size: 16px;
 4                 color: #999;
 5                 font-weight: 400;
 6                 overflow: hidden;
 7             }
 8             ul{
 9                 list-style: none;
10             }
11             .name{
12                 position: fixed;
13                  100%;
14                 height: 100%;
15                 top: 0;
16                 left: 0;
17             }
18             .name li span{
19                  100%;
20                 height: 100%;
21                 position: absolute;
22                 top: 0;
23                 left: 0;
24                 opacity: 0;
25                 animation: image 24s linear infinite; /*infinite无限循环*/
26                 -webkit-animation: image 24s linear infinite;
27             }
28             .name li span img{
29                  100%;
30                 height: auto;100%
31             }
32             .name li div{
33                 z-index: 10;
34                 position: absolute;
35                 bottom: 100px;
36                  100%;
37                 text-align: center;
38                 opacity: 0;
39                 color: #fff;
40                 animation: title 24s linear infinite;
41                 -webkit-animation: title 24s linear infinite;;
42             }
【注】:
别忘了内外边距置0,*{margin: 0;padding: 0;}
由于每个图片的背景颜色块的值不同,所以我们选择title颜色的时,很难保证不会与背景融合,显示效果会差,我们有很多种方法解决这个问题,不多说,我这里给title一个随机位置效果,top和left值根据自己图片调整,调整时将之前设置的opacity透明度设为1下调整效果,再置为0,也可以解决这个问题:
 1 /*title位置*/
 2             .name li:nth-child(2) div{
 3                 top: 100px;
 4                 left: -500px;
 5             }
 6             .name li:nth-child(3) div{
 7                 top: 320px;
 8                 left: 400px;
 9             }
10             .name li:nth-child(4) div{
11                 top: 400px;
12                 left: -100px;
13             }
14             .name li:nth-child(5) div{
15                 top: 190px;
16                 left: 200px;
17             }
18             .name li:nth-child(6) div{
19                 top: 200px;
20                 left: -100px;
21             }
22             .name li div h3{
23                 font-size: 40px;
24                 line-height: 100px;
25             }
效果显示:

3、设置每张图片和对应title的延时显示时间
 1 /*延时显示*/
 2             .name li:nth-child(1) span,
 3             .name li:nth-child(1) div{
 4                 animation-delay: 0s;
 5                 -webkit-animation-delay: 0s;
 6             }
 7             .name li:nth-child(2) span,
 8             .name li:nth-child(2) div{
 9                 animation-delay: 4s;
10                 -webkit-animation-delay: 4s;
11             }
12             .name li:nth-child(3) span,
13             .name li:nth-child(3) div{
14                 animation-delay: 8s;
15                 -webkit-animation-delay: 8s;
16             }
17             .name li:nth-child(4) span,
18             .name li:nth-child(4) div{
19                 animation-delay: 12s;
20                 -webkit-animation-delay: 12s;
21             }
22             .name li:nth-child(5) span,
23             .name li:nth-child(5) div{
24                 animation-delay: 16s;
25                 -webkit-animation-delay: 16s;
26             }
27             .name li:nth-child(6) span,
28             .name li:nth-child(6) div{
29                 animation-delay: 20s;
30                 -webkit-animation-delay: 20s;
31             }
4、给出关键帧动画
 1 @keyframes image{
 2                 0%{opacity: 0;}
 3                 8%{opacity: 1;}
 4                 16%{opacity: 1;}
 5                 26%{opacity: 0;}
 6                 100%{opacity: 0;}
 7             }
 8             @-webkit-keyframes image{
 9                 0%{opacity: 0;}
10                 8%{opacity: 1;}
11                 16%{opacity: 1;}
12                 26%{opacity: 0;}
13                 100%{opacity: 0;}
14             }
15             @keyframes title{
16                 0%{opacity: 0;}
17                 8%{opacity: 1;}
18                 16%{opacity: 1;}
19                 26%{opacity: 0;}
20                 100%{opacity: 0;}
21             }
22             @-webkit-keyframes title{
23                 0%{opacity: 0;}
24                 8%{opacity: 1;}
25                 16%{opacity: 1;}
26                 26%{opacity: 0;}
27                 100%{opacity: 0;}
28             }
【注】:
之前定义动画名称image和title时给的animation时间为24s,所以平均分给6张图片是每张4秒,刚开始加载的时候可能比较慢,加载完就好了,如果觉得显示太快或者太慢,可以微调整。
自己犯过一个错,调了每个li的时间,但是总时间、image动画时间、title动画时间对不上,因为是循环播放,循环几轮之后就很明显看到,图片和title的显示不一致,切记所有时间要对的上!!
