1、修改
1 修改系统主机名,hosts 文件,系统参数
1.1 关闭防火墙并禁用防火墙
[root@localhost ~]# systemctl stop firewalld
[root@localhost ~]# systemctl disable firewalld
1.2.关闭 seLinux
[root@localhost ~]# vim /etc/sysconfig/selinux
SELINUX=disabled
1.3 重启操作系统
[root@localhost ~]# reboot
1.4 修改主机名
[root@localhost ~]# hostname
localhost.localdomain ##Oracle 数据库的安装在生产中要慎重考虑主机名,避免二次修改。
[root@localhost ~]# hostnamectl set-hostname centos-oracle
[root@localhost ~]# hostname ##验证是否成功
2、安装依赖包
安装依赖包之前,个人建议将yum源修改为aliyun源,下载速度快些,执行如下命令即可:
mv yum.repos.d yum.repos.d.bak
mkdir yum.repos.d
wget -O /etc/yum.repos.d/CentOS-Base.repo http://mirrors.aliyun.com/repo/Centos-7.repo
yum clean all
yum makecache
修改成功后,安装如下依赖包:
yum install binutils -y
yum install compat-libstdc++-33 -y
yum install gcc -y
yum install gcc-c++ -y
yum install glibc -y
yum install glibc-devel -y
yum install ksh -y
yum install libgcc -y
yum install libstdc++ -y
yum install libstdc++-devel -y
yum install libaio -y
yum install libaio-devel -y
yum install libXext -y
yum install libXtst -y
yum install libX11 -y
yum install libXau -y
yum install libxcb -y
yum install libXi -y
yum install make -y
yum install sysstat -y
yum install unixODBC -y
yum install unixODBC-devel -y
yum install zlib-devel -y
yum install elfutils-libelf-devel -y
3、添加oracle用户组和用户
groupadd dba
groupadd asmadmin
groupadd asmdba
useradd -g oinstall -G dba,asmdba oracle -d /home/oracle
添加完成后,查看oracle用户
id oracle初始化oracle用户的密码
echo oracle | passwd --stdin oracle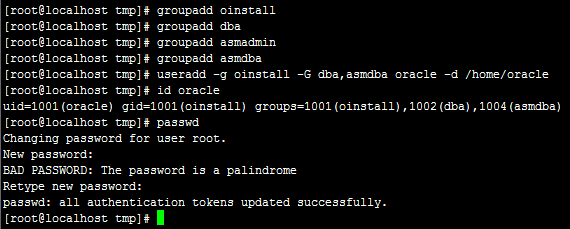
4、配置hostname(本机IP映射)
vim /etc/hosts 192.168.154.154 centos-oracle5、优化OS内核参数
vim /etc/sysctl.conf
fs.aio-max-nr = 1048576
fs.file-max = 6815744
# kernel.shmall 和 kernel.shmmax 的参数值,请按照下面的方式进行配置(RAM:操作系统的物
#理内存)
# kernel.shmall=kernel.shmmax/kernel.shmmni
# kernel.shmmax=RAM*80%*1024*1024*1024
kernel.shmall = 419430
kernel.shmmax = 1717986918
kernel.shmmni = 4096
# semaphores: semmsl, semmns, semopm, semmni
kernel.sem = 250 32000 100 128
net.ipv4.ip_local_port_range = 9000 65500
net.core.rmem_default=262144
net.core.rmem_max=4194304
net.core.wmem_default=262144
net.core.wmem_max=1048586
使参数生效
sysctl -p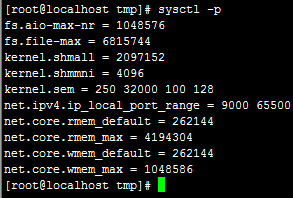
6、限制oracle用户的shell权限
vim /etc/security/limits.conf oracle soft nproc 2047
oracle hard nproc 16384
oracle soft nofile 4096
oracle hard nofile 65536
oracle soft stack 10240
vim /etc/pam.d/loginsession required pam_limits.so
vim /etc/profileif [ $USER = "oracle" ]; then
if [ $SHELL = "/bin/ksh" ]; then
ulimit -p 16384
ulimit -n 65536
else
ulimit -u 16384 -n 65536
fi
fi
7、创建oracle安装目录
mkdir /db/app/oracle/oradata
mkdir /db/app/oracle/inventory
mkdir /db/app/oracle/fast_recovery_area
chown -R oracle:oinstall /db/app/oracle
chmod -R 775 /db/app/oracle
8、配置oracle用户环境变量
vim .bash_profile
export ORACLE_HOSTNAME=centos-oracle
export ORACLE_SID=orcl
export PATH=.:$ORACLE_HOME/bin:$ORACLE_HOME/OPatch:$ORACLE_HOME/jdk/bin:$PATH
export LC_ALL="en_US"
export LANG="en_US"
export NLS_LANG="AMERICAN_AMERICA.ZHS16GBK"
export NLS_DATE_FORMAT="YYYY-MM-DD HH24:MI:SS"
以上配置完成后,个人建议重启下系统
reboot 9、解压oracle压缩文件到 /db
cd /tmp
解压完成后
mkdir /db/etc/
cp /db/database/response/* /db/etc/
vim /db/etc/db_install.rsp #将里面一些字段修改与下面的对应
oracle.install.option=INSTALL_DB_SWONLY
DECLINE_SECURITY_UPDATES=true
UNIX_GROUP_NAME=oinstall
INVENTORY_LOCATION=/db/app/oracle/inventory
SELECTED_LANGUAGES=en,zh_CN
ORACLE_HOSTNAME=centos-oracle
ORACLE_HOME=/db/app/oracle/product/11.2.0
ORACLE_BASE=/db/app/oracle
oracle.install.db.InstallEdition=EE
oracle.install.db.isCustomInstall=true
oracle.install.db.DBA_GROUP=dba
oracle.install.db.OPER_GROUP=dba
开始安装
安装期间可以使用tail命令监看oracle的安装日志
tail -f /db/app/oracle/inventory/logs/installActions2017-07-12_03-48-29PM.log
安装完成,提示Successfully Setup Software.
根据提示完成配置
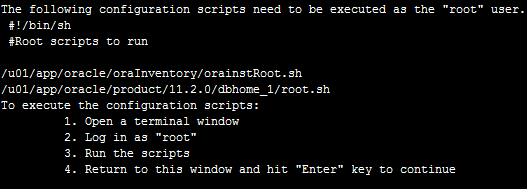
su - root
sh /db/app/oracle/inventory/orainstRoot.sh
sh /db/app/oracle/product/11.2.0/root.sh

11、配置静默监听
su - oracle
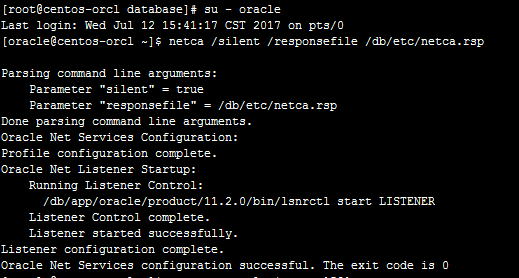
查看监听端口
  netstat -tnulp | grep 1521
  如果提示没有 netstat 命令,请 yum install net-tools -y
12、静默创建数据库
TOTALMEMORY 设置为总内存的80%
vim /db/etc/dbca.rsp #修改字段对应SID = "orcl"
SYSMANPASSWORD = "oracle"
DBSNMPPASSWORD = "oracle"
DATAFILEDESTINATION =/db/app/oracle/oradata
RECOVERYAREADESTINATION=/db/app/oracle/fast_recovery_area
CHARACTERSET = "AL32UTF8"
TOTALMEMORY = "1638"
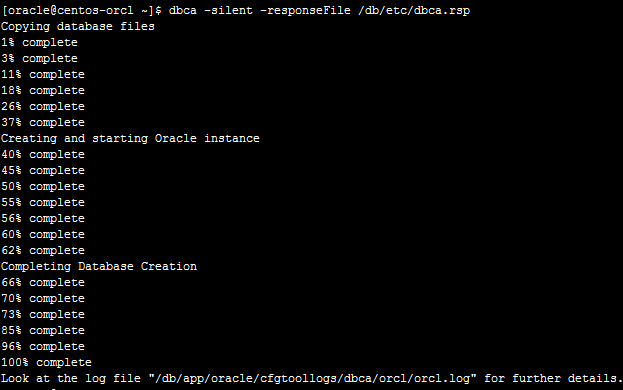
执行静默建库
dbca -silent -responseFile /db/etc/dbca.rsp
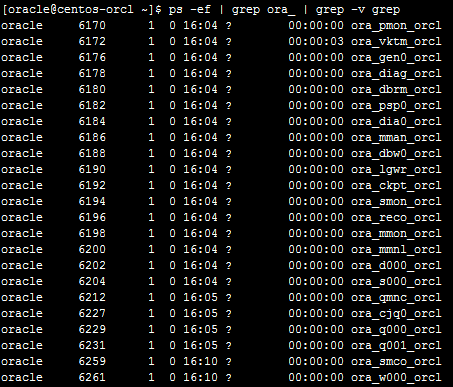
查看oracle实例进程
ps -ef | grep ora_ | grep -v grep
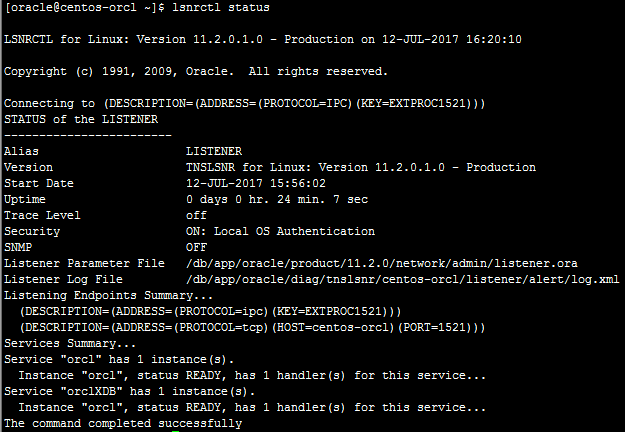
查看监听状态
lsnrctl status
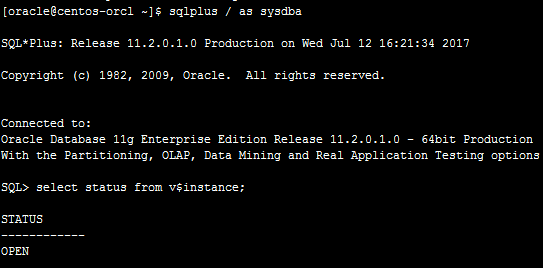
登录sqlplus,查看实例状态
sqlplus / as sysdba
出现以下情况,解决方式如下:输入startup,根据提示信息,将$ORACLE_BASE/admin/数据库名称/pfile目录下的init.ora.xxx形式的文件copy到$ORACLE_HOME/dbs目录下init{sid}.ora(根据startup提示)即可。
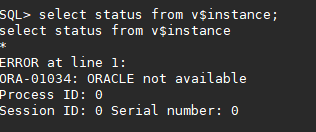
如果报错:ORA-01102: cannot mount database in EXCLUSIVE mode
cause:A database is started in EXCLUSIVE mode by default.Some other instance has the database mounted exclusive or shared.
solution:(我安装的时候是通过第3步解决的)
1. Verify that there is not a "sgadef<sid>.dbf" file in the directory "ORACLE_HOME/dbs".
% ls $ORACLE_HOME/dbs/sgadef<sid>.dbf If this file does exist, remove it.
% rm $ORACLE_HOME/dbs/sgadef<sid>.dbf
2. Verify that there are no background processes owned by "oracle"
% ps -ef | grep ora_ | grep $ORACLE_SID
If background processes exist, remove them by using the Unix
command "kill". For example:
% kill -9 <rocess_ID_Number>
3. Verify that no shared memory segments and semaphores that are owned by "oracle" still exist
% ipcs -b
If there are shared memory segments and semaphores owned by "oracle", remove the shared memory segments
% ipcrm -m <Shared_Memory_ID_Number>
and remove the semaphores
% ipcrm -s <Semaphore_ID_Number>
NOTE: The example shown above assumes that you only have one
database on this machine. If you have more than one
database, you will need to shutdown all other databases
before proceeding with Step 4.
4. Verify that the "$ORACLE_HOME/dbs/lk<sid>" file does not exist
5. Startup the instance
Solution Explanation:
=====================
The "lk<sid>" and "sgadef<sid>.dbf" files are used for locking shared memory. It seems that even though no memory is allocated, Oracle thinks memory is still locked. By removing the "sgadef" and "lk" files you remove any knowledge oracle has of shared memory that is in use. Now the database can start.
查看数据库编码
select userenv('language') from dual;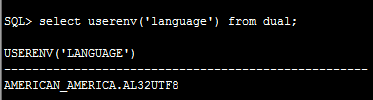
查看数据库版本信息
select * from v$version;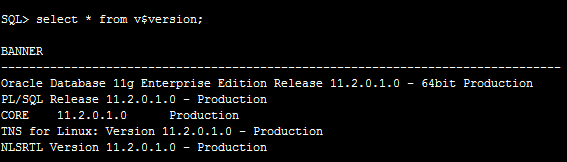
vi /db/app/oracle/product/11.2.0/bin/dbstart
ORACLE_HOME_LISTNER=$ORACLE_HOME
vi /db/app/oracle/product/11.2.0/bin/dbshut
ORACLE_HOME_LISTNER=$ORACLE_HOME
vi /etc/oratab
orcl:/db/app/oracle/product/11.2.0:Y
vi /etc/rc.d/init.d/oracle
开机启动oracle
systemctl enable oracle