OAuth2 客户端的授权模式分为4种:
- 授权码模式(authorization code)
- 简化模式(implicit)
- 密码模式(resource owner password credentials)
- 客户端模式(client credentials)
下面我们就总结一下,如何使用IdentityServer来实现客户端模式.
客户端模式是里面最简单的模式
客户端模式指客户端以自己的名义,而不是以用户的名义,向服务提供商进行认证。
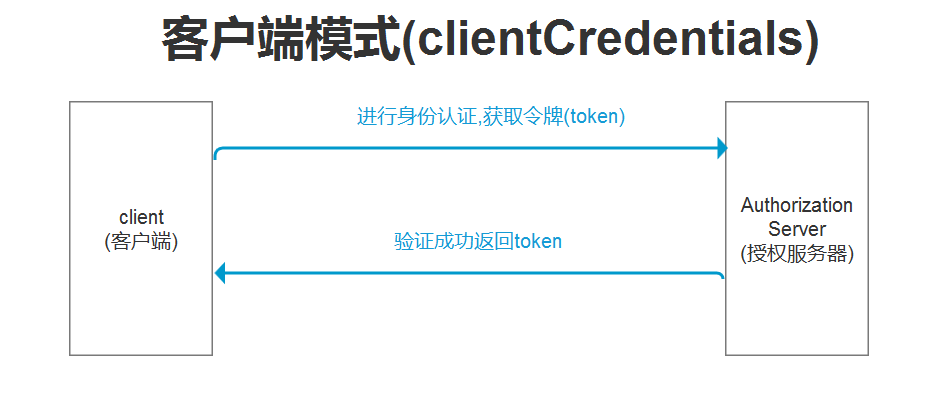
上图表示了客户端请求的流程
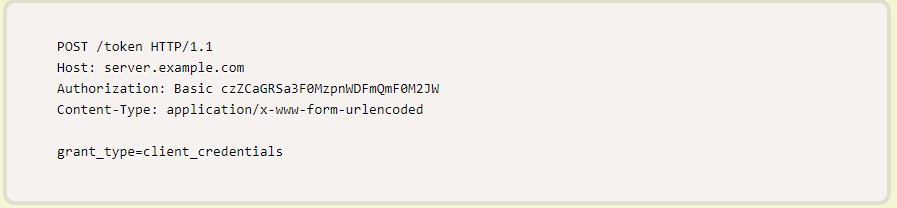
再向授权服务器发送请求的时候,客户端发出的HTTP请求,包含以下参数:
- granttype :表示授权类型,此处的值固定为"clientcredentials",必选项
- scope:表示权限范围,可选项
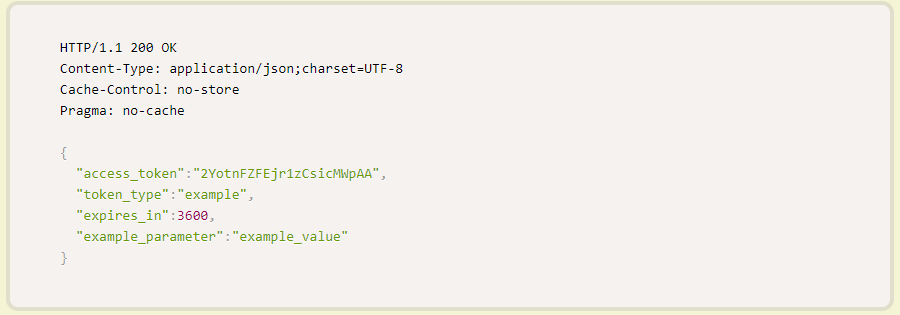
授权服务器必须以某种方式,验证客户端身份
授权服务器向客户端发送访问令牌
下面开始用代码实现IdentityServer ClientCredentials
首先用vs创建一个net core webapi项目,nuget IdentityServer包。
创建一个Config.cs类
public class Config
    {
        public static IEnumerable<ApiResource> GetResources()
        {
            return new List<ApiResource>
            {
                new ApiResource("api1","my api")
            };
        }

        public static IEnumerable<Client> GetClients()
        {
            return new List<Client>
            {
                new Client
                {
                     AllowedGrantTypes=GrantTypes.ClientCredentials, //客户端模式
                    //客户端有权访问的范围
                     AllowedScopes={ "api1" },
                     ClientId="mvc",
                    //用于认证的密码
                     ClientSecrets={ new Secret("secret".Sha256()) },
                }
            };
        }
    }
26
1
public class Config2
{3
public static IEnumerable<ApiResource> GetResources()4
{5
return new List<ApiResource>6
{7
new ApiResource("api1","my api")8
};9
}10
11
public static IEnumerable<Client> GetClients()12
{13
return new List<Client>14
{15
new Client16
{17
AllowedGrantTypes=GrantTypes.ClientCredentials, //客户端模式18
//客户端有权访问的范围19
AllowedScopes={ "api1" },20
ClientId="mvc",21
//用于认证的密码22
ClientSecrets={ new Secret("secret".Sha256()) },23
}24
};25
}26
}在Startup类的ConfigureServices方法中注入IdentityServer和在Configure添加IdentityServer中间件
     public void ConfigureServices(IServiceCollection services)
        {
            // 使用内存存储,密钥,客户端和资源来配置身份服务器。
            services.AddIdentityServer()
                    .AddDeveloperSigningCredential()
                    .AddInMemoryApiResources(Config.GetResources())
                    .AddInMemoryClients(Config.GetClients());
            services.AddMvc();
        }

 public void Configure(IApplicationBuilder app, IHostingEnvironment env)
        {
            if (env.IsDevelopment())
            {
                app.UseDeveloperExceptionPage();
            }
            //添加IdentityServer中间件
            app.UseIdentityServer();
            app.UseMvc();
        }
20
1
public void ConfigureServices(IServiceCollection services)2
{3
// 使用内存存储,密钥,客户端和资源来配置身份服务器。4
services.AddIdentityServer()5
.AddDeveloperSigningCredential()6
.AddInMemoryApiResources(Config.GetResources())7
.AddInMemoryClients(Config.GetClients());8
services.AddMvc();9
}10
11
public void Configure(IApplicationBuilder app, IHostingEnvironment env)12
{13
if (env.IsDevelopment())14
{15
app.UseDeveloperExceptionPage();16
}17
//添加IdentityServer中间件18
app.UseIdentityServer();19
app.UseMvc();20
}完成以后编译运行,在浏览器输入http://localhost:5000/.well-known/openid-configuration
{
    "issuer": "http://localhost:5000",
    "jwks_uri": "http://localhost:5000/.well-known/openid-configuration/jwks",
    "authorization_endpoint": "http://localhost:5000/connect/authorize",
    "token_endpoint": "http://localhost:5000/connect/token",  //获取token的地址
    "userinfo_endpoint": "http://localhost:5000/connect/userinfo",
    "end_session_endpoint": "http://localhost:5000/connect/endsession",
    "check_session_iframe": "http://localhost:5000/connect/checksession",
    "revocation_endpoint": "http://localhost:5000/connect/revocation",
    "introspection_endpoint": "http://localhost:5000/connect/introspect",
    "frontchannel_logout_supported": true,
    "frontchannel_logout_session_supported": true,
    "backchannel_logout_supported": true,
    "backchannel_logout_session_supported": true,
    "scopes_supported": [
        "api1",
        "offline_access"
    ],
    "claims_supported": [],
    "grant_types_supported": [
        "authorization_code",
        "client_credentials",
        "refresh_token",
        "implicit"
    ],
    "response_types_supported": [
        "code",
        "token",
        "id_token",
        "id_token token",
        "code id_token",
        "code token",
        "code id_token token"
    ],
    "response_modes_supported": [
        "form_post",
        "query",
        "fragment"
    ],
    "token_endpoint_auth_methods_supported": [
        "client_secret_basic",
        "client_secret_post"
    ],
    "subject_types_supported": [
        "public"
    ],
    "id_token_signing_alg_values_supported": [
        "RS256"
    ],
    "code_challenge_methods_supported": [
        "plain",
        "S256"
    ]
}
54
1
{2
"issuer": "http://localhost:5000",3
"jwks_uri": "http://localhost:5000/.well-known/openid-configuration/jwks",4
"authorization_endpoint": "http://localhost:5000/connect/authorize",5
"token_endpoint": "http://localhost:5000/connect/token", //获取token的地址6
"userinfo_endpoint": "http://localhost:5000/connect/userinfo",7
"end_session_endpoint": "http://localhost:5000/connect/endsession",8
"check_session_iframe": "http://localhost:5000/connect/checksession",9
"revocation_endpoint": "http://localhost:5000/connect/revocation",10
"introspection_endpoint": "http://localhost:5000/connect/introspect",11
"frontchannel_logout_supported": true,12
"frontchannel_logout_session_supported": true,13
"backchannel_logout_supported": true,14
"backchannel_logout_session_supported": true,15
"scopes_supported": [16
"api1",17
"offline_access"18
],19
"claims_supported": [],20
"grant_types_supported": [21
"authorization_code",22
"client_credentials",23
"refresh_token",24
"implicit"25
],26
"response_types_supported": [27
"code",28
"token",29
"id_token",30
"id_token token",31
"code id_token",32
"code token",33
"code id_token token"34
],35
"response_modes_supported": [36
"form_post",37
"query",38
"fragment"39
],40
"token_endpoint_auth_methods_supported": [41
"client_secret_basic",42
"client_secret_post"43
],44
"subject_types_supported": [45
"public"46
],47
"id_token_signing_alg_values_supported": [48
"RS256"49
],50
"code_challenge_methods_supported": [51
"plain",52
"S256"53
]54
}再创建一个API程序
Nuget IdentityServer4.AccessToken.Validation
需要再Startup.cs里面配置
 public void ConfigureServices(IServiceCollection services)
        {
            services.AddAuthentication("Bearer")
                    .AddIdentityServerAuthentication(options => {
                        options.Authority = "http://localhost:5000"; //授权的服务器
                        options.RequireHttpsMetadata = false;
                        options.ApiName = "api1";
                    });
            services.AddMvc();
        }

 public void Configure(IApplicationBuilder app, IHostingEnvironment env)
        {
            if (env.IsDevelopment())
            {
                app.UseDeveloperExceptionPage();
            }
            //添加中间件
            app.UseAuthentication();
            app.UseMvc();
        }
x
1
public void ConfigureServices(IServiceCollection services)2
{3
services.AddAuthentication("Bearer")4
.AddIdentityServerAuthentication(options => {5
options.Authority = "http://localhost:5000"; //授权的服务器6
options.RequireHttpsMetadata = false;7
options.ApiName = "api1";8
}); 9
services.AddMvc();10
}11
12
public void Configure(IApplicationBuilder app, IHostingEnvironment env)13
{14
if (env.IsDevelopment())15
{16
app.UseDeveloperExceptionPage();17
}18
//添加中间件19
app.UseAuthentication();20
app.UseMvc();21
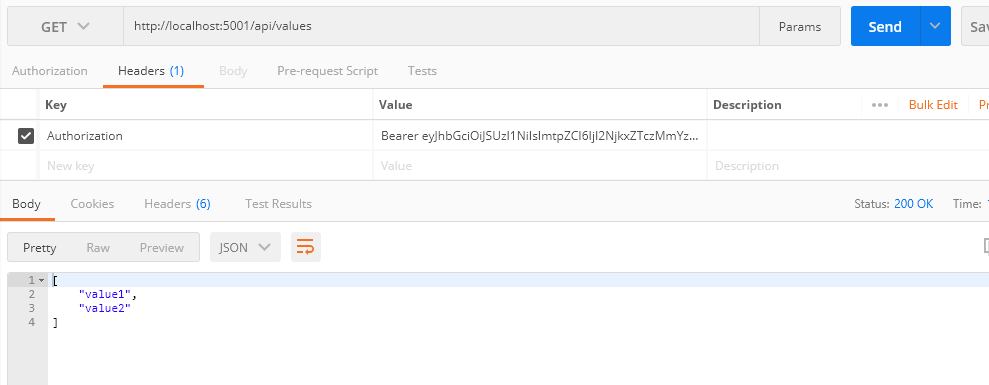
}在要访问的控制器加上Authorize标签
使用PostMan
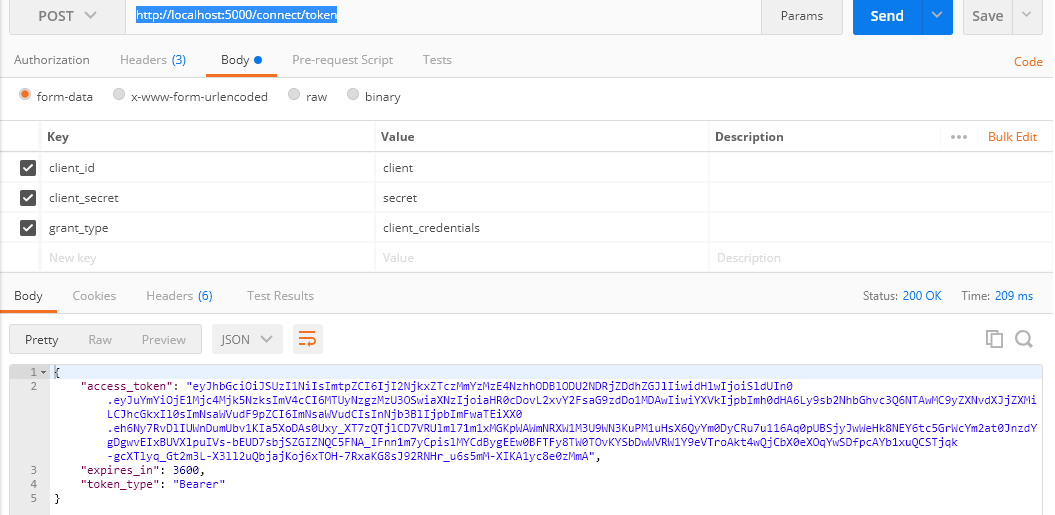
获取AccessToken
再用PostMan去http://localhost:5001/api/values 访问