目标:使用jQuery进行表单验证。
功能:1.必填选项后面添加了红色小星星;
2.选中开始输入时,输入文本框会改变当前背景色,增强用户体验;
3.输入的时候就开始验证,当输入格式正确就会提醒,就是当前还停留在输入框,或者点击提交按钮;
4.设置重置按钮,点击重置,会清除文本框里面的所有内容。
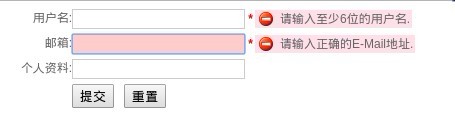
截图:
HTML代码:
 1 <!DOCTYPE html PUBLIC "-//W3C//DTD XHTML 1.0 Transitional//EN" "http://www.w3.org/TR/xhtml1/DTD/xhtml1-transitional.dtd">
 2 <html xmlns="http://www.w3.org/1999/xhtml">
 3 <head>
 4 <meta charset=utf-8" />
 5 <title></title>
 6 </head>
 7 <body>
 8
 9 <form method="post" action="">
10     <div class="int">
11         <label for="username">用户名:</label>
12         <input type="text" id="username" class="required" />
13     </div>
14     <div class="int">
15         <label for="email">邮箱:</label>
16         <input type="text" id="email" class="required" />
17     </div>
18     <div class="int">
19         <label for="personinfo">个人资料:</label>
20         <input type="text" id="personinfo" />
21     </div>
22     <div class="sub">
23         <input type="submit" value="提交" id="send"/><input type="reset" id="res"/>
24     </div>
25 </form>
26
27 </body>
28 </html>
CSS代码:
 1 body { font:12px/19px Arial, Helvetica, sans-serif; color:#666;}
 2 form div { margin:5px 0;}
 3 .int label { float:left; width:100px; text-align:right;}
 4 .int input { padding:1px 1px; border:1px solid #ccc;height:16px;}
 5 .sub { padding-left:100px;}
 6 .sub input { margin-right:10px; }
 7 .formtips{width: 200px;margin:2px;padding:2px;}
 8 .onError{
 9     background:#FFE0E9 url(../img/reg3.gif) no-repeat 0 center;
10     padding-left:25px;
11 }
12 .onSuccess{
13     background:#E9FBEB url(../img/reg4.gif) no-repeat 0 center;
14     padding-left:25px;
15 }
16 .high{
17     color:red;
18 }
19
20 .focus {
21      border: 1px solid #f00;
22      background: #fcc;
23 }
Jquery代码:
 1 <script type="text/javascript">
 3 $(function(){
 4
 5
 6     //2.如果是必填的,则加红星标识.
 7     $("form :input.required").each(function(){
 8         var $required = $("<strong class='high'> *</strong>"); //创建元素
 9         $(this).parent().append($required); //然后将它追加到文档中
10     });
11
12
13          //3.文本框失去焦点后开始验证
14         $('form :input').blur(function(){
15          var $parent = $(this).parent();
16          $parent.find(".formtips").remove();
17
18
19          //3.1验证用户名
20          if( $(this).is('#username') ){
21                 if( this.value=="" || this.value.length < 6 ){
22                 var errorMsg = '请输入至少6位的用户名.';
23                             $parent.append('<span class="formtips onError">'+errorMsg+'</span>');
24                 }else{
25                 var okMsg = '输入正确.';
26                 $parent.append('<span class="formtips onSuccess">'+okMsg+'</span>');
27                 }
28          }
29
30          //3.2验证邮件
31          if( $(this).is('#email') ){
32             if( this.value=="" || ( this.value!="" && !/.+@.+.[a-zA-Z]{2,4}$/.test(this.value) ) ){
33                   var errorMsg = '请输入正确的E-Mail地址.';
34                   $parent.append('<span class="formtips onError">'+errorMsg+'</span>');
35             }else{
36                   var okMsg = '输入正确.';
37                   $parent.append('<span class="formtips onSuccess">'+okMsg+'</span>');
38             }
39          }
40
41          //3.3实现一边输入一边验证
42     }).keyup(function(){
43         $(this).triggerHandler("blur");
44     }).focus(function(){
45           $(this).triggerHandler("blur");
46         });//end blur
47
48
49         //3.4提交,最终验证。
50         $('#send').click(function(){
51             $("form :input.required").trigger('blur');
52             var numError = $('form .onError').length;
53             if(numError){
54                 return false;
55             }
56             alert("注册成功,密码已发到你的邮箱,请查收.");
57         });
58
59         //4.重置
60          $('#res').click(function(){
61             $(".formtips").remove();
62          });
63
64          //1.选中输入的时候输入框变色
65         $(":input").focus(function(){
66             $(this).addClass("focus");
67         }).blur(function(){
68             $(this).removeClass("focus");
69         });
70
71
72 })
73
74 </script>
此案例是基于jQuery1.7,所以需要额外引入jQuery.