首先需要在GitHub上面创建一个项目.
然后创建3个模块:
Cloud-Center 为服务发现中心.
Cloud-Cnofig-Center 为配置中心
Cloud-User 为要分布式配置的模块
首先创建 Cloud-Center , 引入POM依赖:
     <dependency>
            <groupId>org.springframework.cloud</groupId>
            <artifactId>spring-cloud-starter-netflix-eureka-server</artifactId>
        </dependency>
application.yml 文件配置:
eureka:
  client:
    service-url:
      defaultZone: http://${eureka.instance.hostname}:${server.port}/eureka/
    register-with-eureka: false
    fetch-registry: false
  instance:
    hostname: localhost

spring:
  application:
    name: cloud-center
server:
  port: 9001
在启动类加上 @EnableEurekaServer 注解 , 然后启动该模块.
创建第二个模块 Cloud-Config-Center . 引入POM依赖:
     <dependency>
            <groupId>org.springframework.cloud</groupId>
            <artifactId>spring-cloud-config-server</artifactId>
        </dependency>
        <dependency>
            <groupId>org.springframework.cloud</groupId>
            <artifactId>spring-cloud-starter-netflix-eureka-client</artifactId>
        </dependency>

        <dependency>
            <groupId>org.springframework.cloud</groupId>
            <artifactId>spring-cloud-starter-bus-amqp</artifactId>
        </dependency>

        <dependency>
            <groupId>org.springframework.cloud</groupId>
            <artifactId>spring-cloud-config-monitor</artifactId>
        </dependency>
application.yml 文件配置:
spring:
  application:
    name: config-center
  cloud:
    config:
      server:
        git:
          uri: git地址(地址后面是否以".git"结尾都可以)
          username: git账号
          password: git密码
          basedir: e:/cloud-config-git/my-config #默认保存位置.项目启动后会自动同步git到本地的这个位置
eureka:
  client:
    service-url:
      defaultZone: http://${eureka.instance.hostname}:9001/eureka/
  instance:
    hostname: localhost
management:
  endpoints:
    web:
      exposure:
        include: "*" #暴露出所有的url,比如/actuator/bus-refresh 等
server: port: 9050
启动类 加上 @EnableDiscoveryClient 和 @EnableConfigServer 注解,然后启动.
引入POM依赖
     <dependency>
            <groupId>org.springframework.cloud</groupId>
            <artifactId>spring-cloud-starter-netflix-eureka-client</artifactId>
        </dependency>

        <dependency>
            <groupId>org.springframework.cloud</groupId>
            <artifactId>spring-cloud-config-client</artifactId>
        </dependency>
    <dependency>
        <groupId>org.springframework.cloud</groupId>
        <artifactId>spring-cloud-starter-bus-amqp</artifactId>
    </dependency>
此时配置文件不再是 application.yml 了 , 应该改名成 bootstrap.yml , 配置如下:
spring:
  application:
    name: goods-service #
  cloud:
    config:
      discovery:
        enabled: true
        service-id: config-center
      profile: dev
eureka:
  client:
    service-url:
      defaultZone: http://${eureka.instance.hostname}:9001/eureka/
  instance:
    hostname: localhost
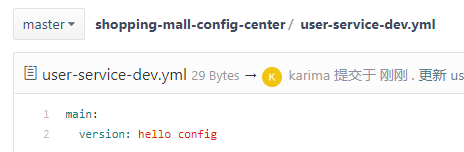
在远端的Git项目创建一个名为 user-service-dev.yml 的文件.然后做测试,如果返回文件内容,说明配置成功
不过此时还只是静态配置(即更改远端Git的配置不会自动刷新其他项目的配置)
编写测试类并打断点查看配置是否生效
从日志也可以看出是否成功获取到配置信息.

现在开始动态配置的实现(Spring Cloud Bus).
只需要在要更新的配置上面加上 @RefreshScope 注解即可.
@Data
@Component
@RefreshScope
@ConfigurationProperties("main")
public class MainValue {
    private String version;
}
或者:
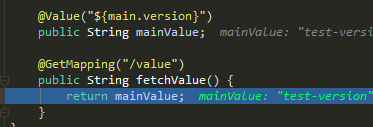
@RestController
@RefreshScope
public class ValueController {
    @Value("${main.version}")
    private String version;

    @GetMapping("/value")
    public String fetchValue() {
        return version;
    }
}
然后使用POST请求 该URL : http://localhost:9050/actuator/bus-refresh
即可半自动刷新配置.
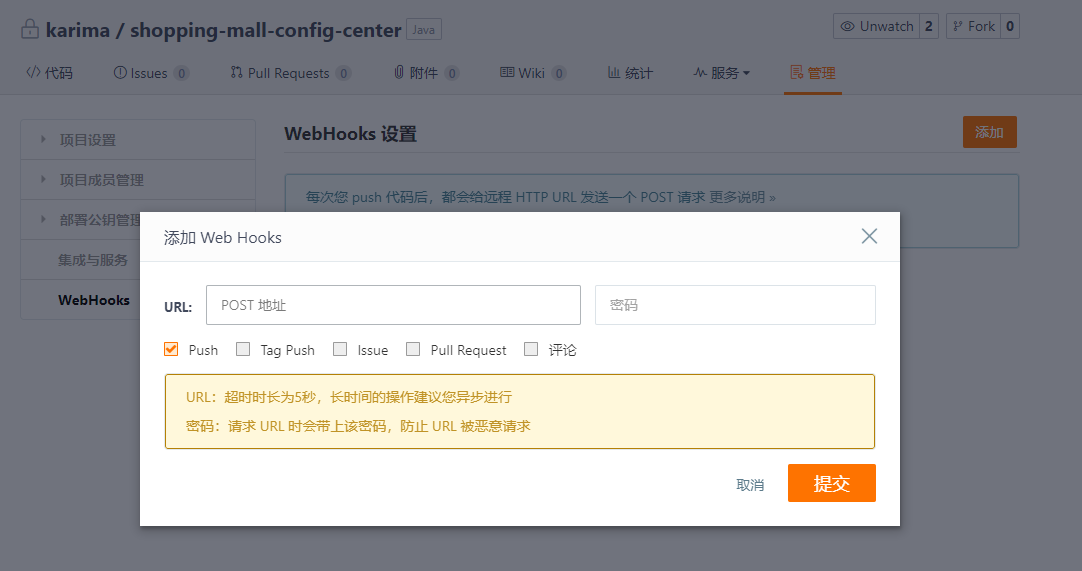
要实现修改完远程git文件自动刷新配置的话,可以在git上面添加一个WebHooks, URL需要把本地的 http://localhost:9050/actuator/bus-refresh 映射成公网IP.可以使用第三方内网穿透实现.