原文链接
https://zhuanlan.zhihu.com/p/259344620
前言
Bigfish 是蚂蚁集团企业级前端研发框架,基于 umi 微内核框架,Bigfish = umi + preset-react + 内部 presets。
前天发布了 Bigfish VSCode 插件,开发过程中遇到了不少问题,除了官方文档外,没有一个很好的指南,索性将 VSCode 插件开发过程记录下,让后面的同学可以更好地开发 VSCode 插件,因为篇幅有限,讲清楚得来个系列。
同时也有一些思考,可不可以用 umi 直接开发 VSCode 插件?
快速开始
让我们从零开始开发一个插件吧,首先我们需要先安装一个 VSCode Insiders(类似 VSCode 开发版),这样可以在相对纯净的插件环境进行研发,同时建议用英文版,这样在看 microsoft/vscode 源码时,更容易定位到具体代码。
初始化
这里直接使用官方的脚手架生成,用 npx 不用全局 -g 安装
➜ npx --ignore-existing -p yo -p generator-code yo code
_-----_ ╭──────────────────────────╮
| | │ Welcome to the Visual │
|--(o)--| │ Studio Code Extension │
`---------´ │ generator! │
( _´U`_ ) ╰──────────────────────────╯
/___A___ /
| ~ |
__'.___.'__
´ ` |° ´ Y `
? What type of extension do you want to create? New Extension (TypeScript)
? What's the name of your extension? hello-world
? What's the identifier of your extension? hello-world
? What's the description of your extension?
? Initialize a git repository? Yes
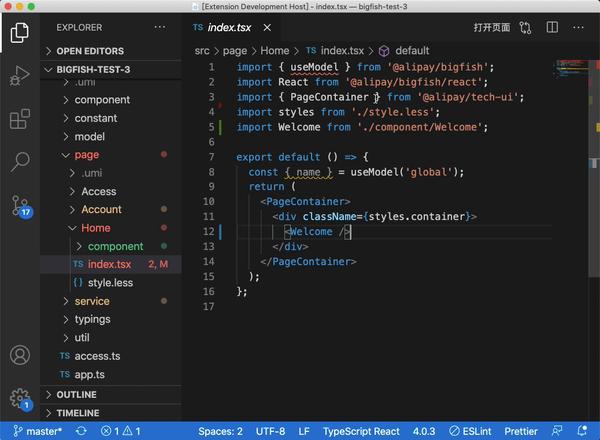
? Which package manager to use? yarn然后用 VSCode Insiders 打开 hello-world 项目,点击 『Run Extension』会启动一个 [Extension Development Host] 窗口,这个窗口会加载我们的插件

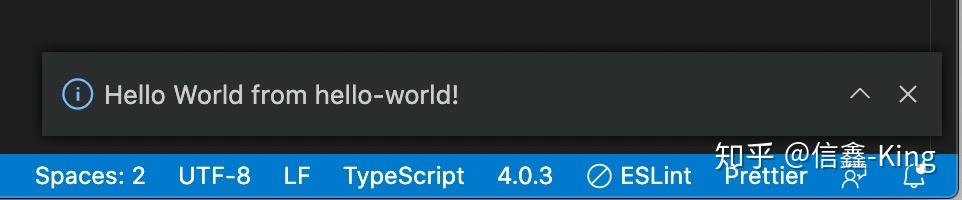
脚手架里插件默认是输入 『Hello World』然后右下角弹窗
至此,一个 VSCode 插件初始化就完成啦 ~
目录结构
首先我们从项目目录结构来了解下插件开发,组织上和我们 npm 库基本一样
.
├── CHANGELOG.md
├── README.md
├── .vscodeignore # 类似 .npmignore,插件包里不包含的文件
├── out # 产物
│   ├── extension.js
│   ├── extension.js.map
│   └── test
│       ├── runTest.js
│       ├── runTest.js.map
│       └── suite
├── package.json # 插件配置信息
├── src
│   ├── extension.ts # 主入口文件
│   └── test # 测试
│       ├── runTest.ts
│       └── suite
├── tsconfig.json
└── vsc-extension-quickstart.md
package.json
{
  "name": "hello-world",
    "displayName": "hello-world",
    "description": "",
    "version": "0.0.1",
    "engines": {
        "vscode": "^1.49.0"
    },
    "categories": [
        "Other"
    ],
    "activationEvents": [
    "onCommand:hello-world.helloWorld"
    ],
    "main": "./out/extension.js",
    "contributes": {
        "commands": [
            {
                "command": "hello-world.helloWorld",
                "title": "Hello World"
            }
        ]
    },
    "scripts": {
        "vscode:prepublish": "yarn run compile",
        "compile": "tsc -p ./",
        "lint": "eslint src --ext ts",
        "watch": "tsc -watch -p ./",
        "pretest": "yarn run compile && yarn run lint",
        "test": "node ./out/test/runTest.js"
    },
    "devDependencies": {}
}
VSCode 开发配置复用了 npm 包特性,详见 Fields,但有几个比较重要的属性:
main就是插件入口,实际上就是src/extension.ts编译出来的产物contributes可以理解成 功能声明清单,插件有关的命令、配置、UI、snippets 等都需要这个字段
插件入口
我们来看一下 src/extension.ts
// src/extension.ts

// vscode 模块不需要安装,由插件运行时注入
import * as vscode from 'vscode';

// 插件加载时执行的 activate 钩子方法
export function activate(context: vscode.ExtensionContext) {

    console.log('Congratulations, your extension "hello-world" is now active!');

  // 注册一个命令,返回 vscode.Disposable 对象,该对象包含 dispose 销毁方法
    let disposable = vscode.commands.registerCommand('hello-world.helloWorld', () => {
        // 弹出一个信息框消息
        vscode.window.showInformationMessage('Hello World from hello-world!');
    });

    // context 订阅注册事件
    context.subscriptions.push(disposable);
}

// 插件被用户卸载时调用的钩子
export function deactivate() {}
我们只需要暴露 activate 和 deactivate 两个生命周期方法,插件就能运行了。
功能
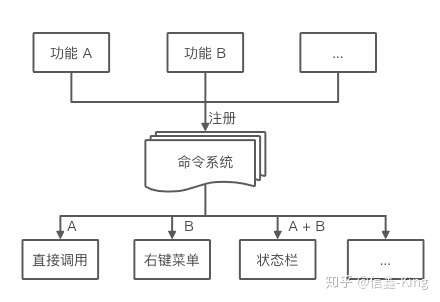
作为插件,提供哪些功能呢?这里整理了一个思维导图,同时也可以对照官方文档来看:

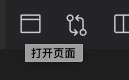
这里我们以一个点击『打开页面』 弹出 webview 的例子,来串一下所用到的 VSCode 功能
插件清单声明
插件清单声明(Contribution Points)是我们需要首先关注的,位于 package.json 的 contributes 属性,这里面可以声明 VSCode 大部分配置、UI 扩展、快捷键、菜单等。
为了找到我们对应配置项,VSCode 编辑器布局图会更直观的感受

根据例子,我们需要在 Editor Groups 里添加一个按钮,同时需要注册一个命令,也就是如下配置:
{
  "contributes": {
      "commands": [
        {
           "command": "hello-world.helloWorld",
           "title": "Hello World"
        },
+       {
+           "command": "hello-webview.helloWorld",
+           "title": "打开页面"
+       }
      ],
+     "menus": {
+       "editor/title": [
+           {
+               "command": "hello-webview.helloWorld",
+               "group": "navigation@0"
+           }
+       ]
+   }
    }
}
其中 命令 和 菜单 的类型如下,可以根据需求增加更多个性化配置,配置类型见 menusExtensionPoint.ts#L451-L485。
注册命令(commands)
一个命令可以理解一个功能点,比如打开 webview 就是一个功能,那么我们使用 vscode.commands.registerCommand 注册 打开 webview 这个功能:
// src/extension.ts

export function activate(context: vscode.ExtensionContext) {
    context.subscriptions.push(
    vscode.commands.registerCommand('hello-webview.helloWorld', () => {

    })
  )
}
我们可以看下registerCommand 方法定义:
/**
 * Registers a command that can be invoked via a keyboard shortcut,
 * a menu item, an action, or directly.
 *
 * Registering a command with an existing command identifier twice
 * will cause an error.
 *
 * @param command A unique identifier for the command.
 * @param callback A command handler function.
 * @param thisArg The `this` context used when invoking the handler function.
 * @return Disposable which unregisters this command on disposal.
 */
export function registerCommand(command: string, callback: (...args: any[]) => any, thisArg?: any): Disposable;
其中 command 要与我们前面 package.json 声明的命令要一致, callback 就是调用后做什么事,返回的是一个 Disposable 类型,这个对象很有意思,可在插件退出时执行销毁 dispose 方法。
打开 webview
这里需要用到 Webview API,因为有 webview,扩展了 VSCode UI 和交互,提供了更多的想象力
const panel = vscode.window.createWebviewPanel('helloWorld', 'Hello World', vscode.ViewColumn.One, {
    enableScripts: true,
});
panel.webview.html = `
    <!DOCTYPE html>
    <html lang="en">
    <head>
        <meta charset="UTF-8">
        <meta name="viewport" content="width=device-width, initial-scale=1.0">
        <title>Hello World</title>
    </head>
    <body>
        <iframe width="100%" height="500px" src="https://www.yunfengdie.com/"></iframe>
    </body>
    </html>
`;
panel.onDidDispose(async () => {
    await vscode.window.showInformationMessage('关闭了 webview');
}, null, context.subscriptions);
这里要注意的点是,html 中的本地 url 地址需要转一道,不然无法运行,例如
- <script src="/bar.js"></script>
+ <script src="${panel.webview.asWebviewUri(vscode.Uri.file(path.join(__dirname, 'bar.js')))}"></script>
✈️ 进阶
上面提到的功能只是 VSCode 功能的冰山一角,更多的功能遇到时查文档就会用了,这里有几点进阶的部分。
命令系统
VSCode 的命令系统是一个很好的设计,优势在于:中心化注册一次,多地扁平化消费
我个人觉得更重要的一点在于:
- 先功能后交互:VSCode 提供的 UI 和交互有限,我们可以先不用纠结交互,先把功能用命令注册,再看交互怎么更好
- 灵活性:比如 VSCode 增加了一种新交互形式,只需要一行配置就可以接入功能,非常方便
另外官网也内置了一些命令,可直接通过 vscode.commands.executeCommand 使用。
when 上下文
如果希望在满足特定条件,才开启插件某个功能/命令/界面按钮,这时候可以借助插件清单里的 when 上下文来处理,例如检测到是 Bigfish 应用( hello.isBigfish )时开启:
"activationEvents": [
  "*"
],
"contributes": {
  "commands": [
    {
      "command": "hello-world.helloWorld",
      "title": "Hello World",
    },
    {
      "command": "hello-webview.helloWorld",
      "title": "打开页面",
    }
  ],
  "menus": {
    "editor/title": [
      {
        "command": "hello-webview.helloWorld",
        "group": "navigation@0",
+       "when": "hello.isBigfish"
      }
    ]
  }
},
如果直接这样写,启动插件时,会看到之前的『打开页面』按钮消失,这个值的设置我们用 VSCode 内置的 setContext 命令:
vscode.commands.executeCommand('setContext', 'hello.isBigfish', true);
这时候我们打开就有按钮了,关于状态什么时候设置,不同插件有自己的业务逻辑,这里不再赘述。
这里的 when 可以有简单的表达式组合,但是有个坑点是不能用 () ,例如:
- "when": "bigfish.isBigfish && (editorLangId == typescriptreact || editorLangId == typescriptreact)"
+ "when": "bigfish.isBigfish && editorLangId =~ /^typescriptreact$|^javascriptreact$/"
结合 umi
webview 的部分,如果单写 HTML 明显回到了 jQuery 时代,能不能将 umi 联系起来呢?实际上是可以的,只是我们需要改一些配置。
首先对 umi,
devServer.writeToDist:需要在 dev 时写文件到输出目录,这样保证开发阶段有 js/css 文件history.type:使用内存路由 MemoryRouter,webview 里是没有 url 的,这时候浏览器路由基本是挂的。
import { defineConfig } from 'umi';

export default defineConfig({
  publicPath: './',
  outputPath: '../dist',
  runtimePublicPath: true,
  history: {
    type: 'memory',
  },
  devServer: {
    writeToDisk: filePath => ['umi.js', 'umi.css'].some(name => filePath.endsWith(name)),
  },
});
加载 webview,这时候就是把 umi.css 和 umi.js 转下路径:
this.panel.webview.html = `
    <!DOCTYPE html>
    <html>
      <head>
        <meta charset="utf-8" />
        <meta name="viewport" content="width=device-width, initial-scale=1, maximum-scale=1, minimum-scale=1, user-scalable=no" />
        <link rel="stylesheet" href="${this.panel.webview.asWebviewUri(
          vscode.Uri.file(path.join(distPath, 'umi.css')),
        )}" />
        <script>window.routerBase = "/";</script>
        <script>//! umi version: 3.2.14</script>
      </head>
      <body>
        <div id="root"></div>
        <script src="${this.panel.webview.asWebviewUri(vscode.Uri.file(path.join(distPath, 'umi.js')))}"></script>
      </body>
    </html>`;
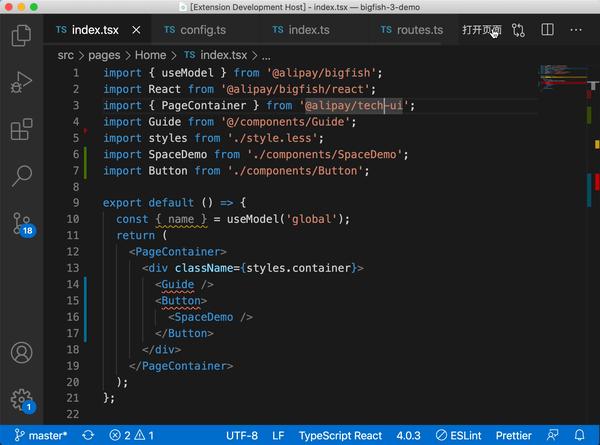
然后就可以用我们的 umi 开发 webview 了
调试
这里的调试分两个:插件调试、webview 调试。
插件调试直接用 VSCode 内置的断点,非常方便

webview 的调试我们通过 command + shift + p 调用 Open Webview Developer Tools 来调试 webview

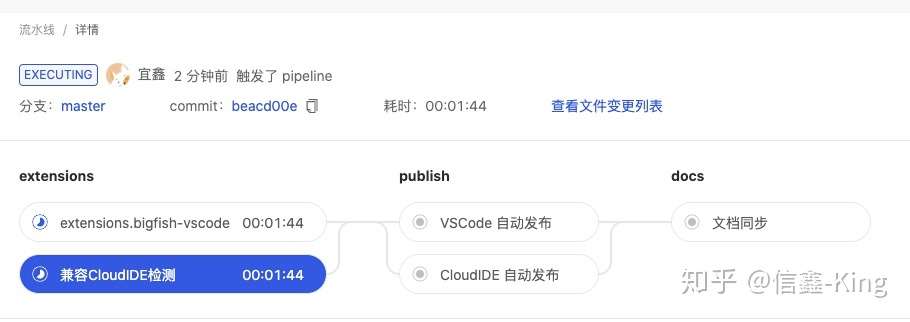
支持 CloudIDE
CloudIDE 兼容 VSCode API,但也有一些不兼容的 API(如 vscode.ExtensionMode ),为了保证同时兼容,用到了 CloudIDE 团队写的 @ali/ide-extension-check,可直接扫当前是否兼容 CloudIDE,这里把它做成一个 CI 流程,自动化发布、文档同步
Icon 图标
为了更好的体验,可以使用官网内置的图标集,例如:
只需要使用 $(iconIdentifier) 格式来表示具体 icon
{
  "contributes": {
        "commands": [
            {
                "command": "hello-world.helloWorld",
                "title": "Hello World"
            },
           {
            "command": "hello-webview.helloWorld",
            "title": "打开页面",
+           "icon": "$(browser)",
           }
        ],
    }
}
但是在 CloudIDE 中,内置的不是 VSCode icon,而是 antd Icon。为了同时兼容 CloudIDE 和 VSCode,直接下载 vscode-icons,以本地资源形式展现。
{
  "contributes": {
        "commands": [
            {
                "command": "hello-world.helloWorld",
                "title": "Hello World"
            },
        {
            "command": "hello-webview.helloWorld",
            "title": "打开页面",
+           "icon": {
+             "dark": "static/dark/symbol-variable.svg",
+             "light": "static/light/symbol-variable.svg"
+           },
        }
        ],
    }
}
打包、发布
部署上线前需要注册 Azure 账号,具体步骤可以按官方文档操作。
包体积优化
脚手架默认的是 tsc 只做编译不做打包,这样从源文件发布到插件市场包含的文件就有:
- out
- extension.js
- a.js
- b.js
- ...
- dist
- umi.js
- umi.css
- index.html
- node_modules # 这里的 node_modules,vsce package --yarn 只提取 dependencies 相关包
- ...
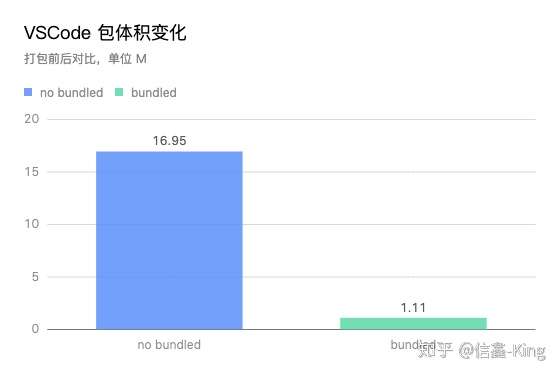
- package.json那边 Bigfish 插件第一次打包是多大呢? 11709 files, 16.95MB
为了绕过这个 node_modules ,思路是通过 webpack 将不进行 postinstall 编译的依赖全打进 extension.js 里,webpack 配置如下:
'use strict';

const path = require('path');

const tsConfigPath = path.join(__dirname, 'tsconfig.json');
/** @type {import("webpack").Configuration} */
const config = {
  target: 'node',
  devtool: process.env.NODE_ENV === 'production' ? false : 'source-map',
  mode: process.env.NODE_ENV === 'production' ? 'production' : 'development',
  entry: './src/extension.ts',
  externals: {
    vscode: 'commonjs vscode',
  },
  module: {
    rules: [
      {
        test: /.ts$/,
        exclude: /node_modules/,
        loader: 'ts-loader',
        options: {
          transpileOnly: true,
          configFile: tsConfigPath,
        },
      },
    ],
  },
  output: {
    devtoolModuleFilenameTemplate: '../[resource-path]',
    filename: 'extension.js',
    libraryTarget: 'commonjs2',
    path: path.resolve(__dirname, 'out'),
  },
  resolve: {
    alias: {
      '@': path.join(__dirname, 'src'),
    },
    extensions: ['.ts', '.js'],
  },
  optimization: {
    usedExports: true
  }
};

module.exports = config;
.vscodeignore 里加上 node_modules ,不发到市场,这样包结构就变成了
- out
  - extension.js
- dist
    - umi.js
    - umi.css
    - index.html
- package.json
最后的包大小为: 24 files, 1.11MB ,从 16.95M 到 1.11M ,直接秒级安装。
 Made by ChartCube
预编译依赖 & 安全性
之前一直想着把 Bigfish core 包(@umijs/core)打到 插件包里,基本没成功过,原因在于 core 依赖了 fsevents,这个包要根据不同 OS 安装时做编译,所以没办法打到包里:
- [fail] cjs (./src/extension.ts -> out/extension.js)Error: Build failed with 2 errors:
node_modules/fsevents/fsevents.js:13:23: error: File extension not supported:
node_modules/fsevents/fsevents.node
node_modules/@alipay/bigfish-vscode/node_modules/prettier/third-party.js:9871:10:
error: Transforming for-await loops to the configured target environment is not
supported yet
同时像一些内部的 sdk 包(@alipay/oneapi-bigfish-sdk)如果打进包,会有一定的安全风险,毕竟包是发到外部插件市场。
解决这两个问题,采用了动态引用依赖,直接引用户项目已有的依赖(Bigfish 项目内置 oneapi sdk 包),这样一是包体积小,二是包安全性高。
import resolvePkg from 'resolve-pkg';

// origin require module
// https://github.com/webpack/webpack/issues/4175#issuecomment-342931035
export const cRequire = typeof __webpack_require__ === "function" ? __non_webpack_require__ : require;

// 这样引用是为了避免内部包泄露到 外部插件市场
const OneAPISDKPath = resolvePkg('@alipay/oneapi-bigfish-sdk', {
  cwd: this.ctx.cwd,
});
this.OneAPISDK = cRequire(OneAPISDKPath);
发布
直接用官方的 vsce 工具:
vsce publish patch:发 patch 版本vsce package:输出插件包文件.vsix
没有打包依赖的插件:
vsce publish patch --yarn:发 patch 版本,包含生产依赖的 node_modulesvsce package --yarn:输出插件包文件.vsix,包含生产依赖的 node_modules
❓ 思考
几乎每个 VSCode 插件的开发方式都不一样,缺少最佳实践(commands、provider 注册、services 的消费、webview 的开发等)
细思下来,能不能借鉴按 SSR 方案,其实仅用一个 umi 是可以编译打包 VSCode 插件 + webview 的(名子想了下,可能是 vsue),觉得比较好的目录结构是:
- snippets
- src
  - commands # 命令,根据文件名自动注册
    - hello-world.ts
    - services # 功能建模,挂载到 ctx 上,通过 ctx.services 调用
    - A.ts
    - B.ts
  - providers # Provider 类,扩展 VSCode 默认交互、UI
    - TreeDataProvider.ts
  - utils # 工具类,ctx.utils.abc 调用
  - constants.ts
    - extension.ts
- static
    - dark
    - a.png
  - light
- webview # webview 应用
    - mock
    - src
    - pages
- test
- .umirc.ts # 同时跑 前端 和 插件 编译和打包
- package.json
umi 配置文件可能就是:
export default defineConfig(
 {
  entry: './webview',
  publicPath: './',
  outputPath: './dist',
  history: {
    type: 'memory',
  },
  devServer: {
    writeToDisk: filePath => ['umi.js', 'umi.css'].some(name => filePath.endsWith(name)),
  },
  // VSCode 插件打包相关配置
  vscode: {
    entry: './src',
    // 插件依赖这个包,没有则提示安装(更多功能扩展)
    globalDeps: ['@alipay/bigfish'],
    // 全量打包
    // bundled: true,
  }
 }
)
最终插件包结构为:
- dist
  - umi.js
  - umi.css
  - index.html
- out
  - extension.js
- package.json
开发过程只需要 umi dev 可将插件端 + webview(如果有)同时编译,直接 VSCode 调试即可,支持热更新(待验证)
有兴趣的同学可以勾搭一起讨论,欢迎联系 chaolin.jcl@antgroup.com ~