RabbitMQ是一个在AMQP基础上完整的,可复用的企业消息系统。他遵循Mozilla Public License开源协议。
MQ全称为Message Queue, 消息队列(MQ)是一种应用程序对应用程序的通信方法。应用程序通过读写出入队列的消息(针对应用程序的数据)来通信,而无需专用连接来链接它们。消 息传递指的是程序之间通过在消息中发送数据进行通信,而不是通过直接调用彼此来通信,直接调用通常是用于诸如远程过程调用的技术。排队指的是应用程序通过队列来通信。队列的使用除去了接收和发送应用程序同时执行的要求。
RabbitMQ安装
epel源安装
现在服务器安装epel源,为什么选择epel源呢?强烈推荐大家使用epel源,epel是社区强烈打造的免费开源发行软件包版本库,系统包含大概有1万多个软件包,163和sohu的镜像是没有这么多软件了.
首选确认你的版本号,然后才能选择相应的epel,命令如下
[root@cobbler ~]# cat /etc/issue
CentOS release 6.5 (Final)
Centos6*源安装:
rpm -ivh http://dl.fedoraproject.org/pub/epel/6/x86_64/epel-release-6-8.noarch.rpm
验证是否安装成功,执行如下命令:
[root@cobbler ~]# yum repolist
Loaded plugins: fastestmirror, refresh-packagekit, security
Loading mirror speeds from cached hostfile
 * base: mirrors.yun-idc.com
 * epel: ftp.riken.jp
 * extras: mirrors.yun-idc.com
 * updates: mirrors.yun-idc.com
repo id                                        repo name                                                                              status
base                                           CentOS-6 - Base                                                                         6,696
epel                                           Extra Packages for Enterprise Linux 6 - x86_64                                         12,155
extras                                         CentOS-6 - Extras                                                                          62
updates                                        CentOS-6 - Updates                                                                        263
repolist: 19,176
看到epel,说明安装成功了,可以看到epel有1万2千155个包.有了他你不在需要tar、configure、make等等繁琐的动作了。使用yum即可搞定一切.
还有一个好处,如果你用自动化运维,使用saltstack puppet ansilble 等等统一配置管理时,都一个重要的要求是统一标准化,我们用epel源,直接一条命令就能安装了,不是很爽么?
安装RabbitMQ
安装erlang
   $ yum -y install erlang

安装RabbitMQ
   $ yum -y install rabbitmq-server
Python中安装API
pip install pika
or
easy_install pika
Python操作RabbitMQ
基本用法
发布者端:
import pika

connection=pika.BlockingConnection(pika.ConnectionParameters(host='192.168.4.193'))
channel=connection.channel()
channel.queue_declare(queue='cc')   #如果有cc的队列,略过;如果没有,创建cc的队列

channel.basic_publish(exchange='',routing_key='cc',body='hello!world!!!')
print("[x] sent 'hello,world!'")
connection.close()
接收端:
import pika

#创建一个连接对象,对象中绑定了rabbitmq的IP
connection=pika.BlockingConnection(pika.ConnectionParameters(host='192.168.4.193'))
#创建一个频道对象
channel=connection.channel()
#频道中声明指定queue,如果MQ中没有指定queue就创建,如果有,则略过
channel.queue_declare(queue='cc')
#定义回调函数
def callback(ch,method,properties,body):
    print('[x] Recieved %r'%body)
    # channel.close()
#no_ack=Fales:表示消费完以后不主动把状态通知rabbitmq,callback:回调函数,queue:指定队列
channel.basic_consume(callback,queue='cc',no_ack=True)
# channel.basic_consume(callback,queue='cc')

print('[*] Waiting for msg')

channel.start_consuming()
acknowledgment 消息不丢失
no-ack = False,如果消费者遇到情况(its channel is closed, connection is closed, or TCP connection is lost)挂掉了,那么,RabbitMQ会重新将该任务添加到队列中。
- 回调函数中的
ch.basic_ack(delivery_tag=method.delivery_tag) - basic_comsume中的
no_ack=False
消息接收端应该这么写:
import pika

connection = pika.BlockingConnection(pika.ConnectionParameters(host='192.168.4.193'))
channel = connection.channel()
channel.queue_declare(queue='cc')

# 定义回调函数
def callback(ch, method, properties, body):
    print('[x] Recieved %r' % body)
    # channel.close()
    ch.basic_ack(delivery_tag=method.delivery_tag)


# no_ack=Fales:表示消费完以后不主动把状态通知rabbitmq

channel.basic_consume(callback, queue='cc',
                      no_ack=False)

print('[*] Waiting for msg')

channel.start_consuming()
durable 消息不丢失
消息生产者端发送消息时挂掉了,消费者接消息时挂掉了,以下方法会让RabbitMQ重新将该消息添加到队列中:
- 回调函数中的
ch.basic_ack(delivery_tag=method.delivery_tag),消费端需要做的 - basic_comsume中的
no_ack=False,消费端需要做的 - 发布消息端的basic_publish添加参数
properties=pika.BasicProperties(delivery_mode=2),生产者端需要做的
消息生产者端:
import pika

connection = pika.BlockingConnection(pika.ConnectionParameters(host='192.168.4.193'))
channel = connection.channel()
channel.queue_declare(queue='cc')  # 如果有cc的队列,略过;如果没有,创建cc的队列

channel.basic_publish(exchange='',
                      routing_key='cc',
                      body='hello!world!!!',
                      properties=pika.BasicProperties(delivery_mode=2)) #消息持久化
print("[x] sent 'hello,world!'")
connection.close()
消息消费者端:
import pika

connection = pika.BlockingConnection(pika.ConnectionParameters(host='192.168.4.193'))
channel = connection.channel()
channel.queue_declare(queue='cc')

# 定义回调函数
def callback(ch, method, properties, body):
    print('[x] Recieved %r' % body)
    # channel.close()
    ch.basic_ack(delivery_tag=method.delivery_tag)


# no_ack=Fales:表示消费完以后不主动把状态通知rabbitmq

channel.basic_consume(callback, queue='cc',
                      no_ack=True)

print('[*] Waiting for msg')

channel.start_consuming()
消息获取顺序
默认消息队列里的数据是按照顺序被消费者拿走,例如:消费者1去队列中获取 奇数 序列的任务,消费者2去队列中获取 偶数 序列的任务。但有大部分情况下,消息队列后端的消费者服务器的处理能力是不相同的,这就会出现有的服务器闲置时间较长,资源浪费的情况,那么,我们就需要改变默认的消息队列获取顺序!
channel.basic_qos(prefetch_count=1) 表示谁来谁取,不再按照奇偶数排列,这是消费者端需要做的
消费者端如下:
import pika

connection = pika.BlockingConnection(pika.ConnectionParameters(host='192.168.4.193'))
channel = connection.channel()
channel.queue_declare(queue='cc')

# 定义回调函数
def callback(ch, method, properties, body):
    print('[x] Recieved %r' % body)
    # channel.close()
    ch.basic_ack(delivery_tag=method.delivery_tag)


channel.basic_qos(prefetch_count=1)     #改变默认获取顺序,谁来谁取

# no_ack=Fales:表示消费完以后不主动把状态通知rabbitmq
channel.basic_consume(callback, queue='cc',
                      no_ack=True)

print('[*] Waiting for msg')

channel.start_consuming()
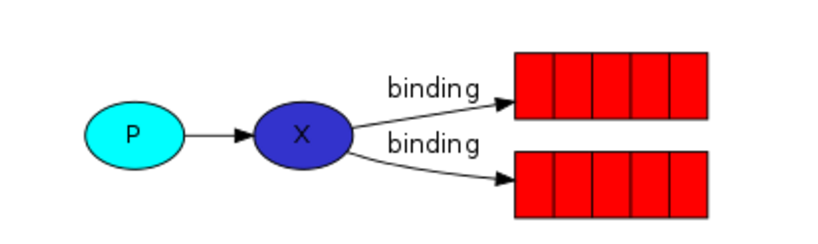
发布和订阅
发布订阅和简单的消息队列区别在于,发布订阅会将消息发送给所有的订阅者,而消息队列中的数据被消费一次便消失。所以,RabbitMQ实现发布和订阅时,会为每一个订阅者创建一个队列,而发布者发布消息时,会将消息放置在所有相关队列中。
关键字:exchange type = fanout
消息生产者:
import pika

connection=pika.BlockingConnection(pika.ConnectionParameters(host='192.168.11.131'))
channel = connection.channel()
channel.exchange_declare(exchange='logs_fanout',type='fanout')

msg='456'
channel.basic_publish(exchange='logs_fanout',routing_key='',body=msg)

print('开始发送:%s'%msg)
connection.close()
消息消费者:
import pika

connection=pika.BlockingConnection(pika.ConnectionParameters(host='192.168.11.131'))
channel = connection.channel()
channel.exchange_declare(exchange='logs_fanout',type='fanout')

#随机创建队列
result=channel.queue_declare(exclusive=True)
queue_name=result.method.queue

#绑定相关队列名称
channel.queue_bind(exchange='logs_fanout',queue=queue_name)

def callback(ch,method,properties,body):
    print('[x] %r'%body)

channel.basic_consume(callback,queue=queue_name,no_ack=True)
channel.start_consuming()
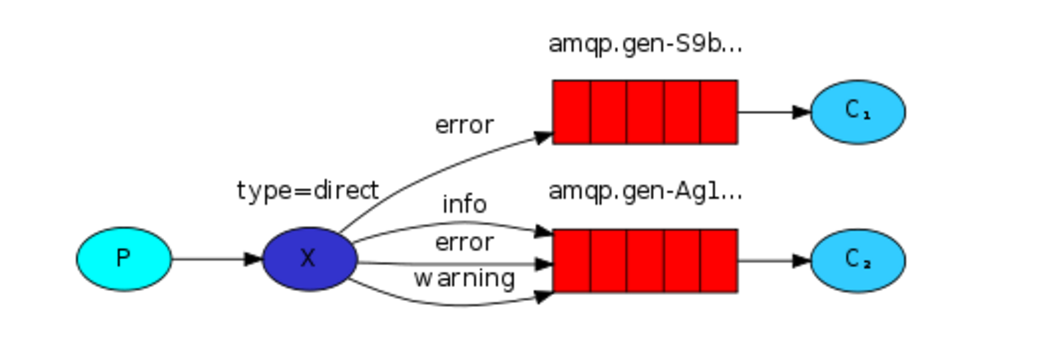
关键字发送
之前事例,发送消息时明确指定某个队列并向其中发送消息,RabbitMQ还支持根据关键字发送,即:队列绑定关键字,发送者将数据根据关键字发送到消息exchange,exchange根据 关键字 判定应该将数据发送至指定队列。
关键字:exchange type = direct,默认模式也为此模式.
消息生产者端:
import pika

connection=pika.BlockingConnection(pika.ConnectionParameters(host='192.168.11.131'))
channel = connection.channel()
channel.exchange_declare(exchange='logs_direct_test1',type='direct')


serverity='error'
msg='123'

channel.basic_publish(exchange='logs_direct_test1',routing_key=serverity,body=msg)

print('开始发送:%r:%r'%(serverity,msg))
connection.close()
消息消费者1:
import pika

connection=pika.BlockingConnection(pika.ConnectionParameters(host='192.168.11.131'))
channel = connection.channel()
channel.exchange_declare(exchange='logs_direct_test1',type='direct')

#随机创建队列
result=channel.queue_declare(exclusive=True)
queue_name=result.method.queue

serverities=['error','info','warning',]
for serverity in serverities:
    channel.queue_bind(exchange='logs_direct_test1',queue=queue_name,routing_key=serverity)

print('[***] 开始接受消息!')

def callback(ch,method,properties,body):
    print('[x] %r:%r'%(method.routing_key,body))

channel.basic_consume(callback,queue=queue_name,no_ack=True)
channel.start_consuming()
消息消费者2:
import pika

connection=pika.BlockingConnection(pika.ConnectionParameters(host='192.168.11.131'))
channel = connection.channel()
channel.exchange_declare(exchange='logs_direct_test1',type='direct')

#随机创建队列
result=channel.queue_declare(exclusive=True)
queue_name=result.method.queue

serverities=['error',]
for serverity in serverities:
    channel.queue_bind(exchange='logs_direct_test1',queue=queue_name,routing_key=serverity)

print('[***] 开始接受消息!')

def callback(ch,method,properties,body):
    print('[x] %r:%r'%(method.routing_key,body))

channel.basic_consume(callback,queue=queue_name,no_ack=True)
channel.start_consuming()
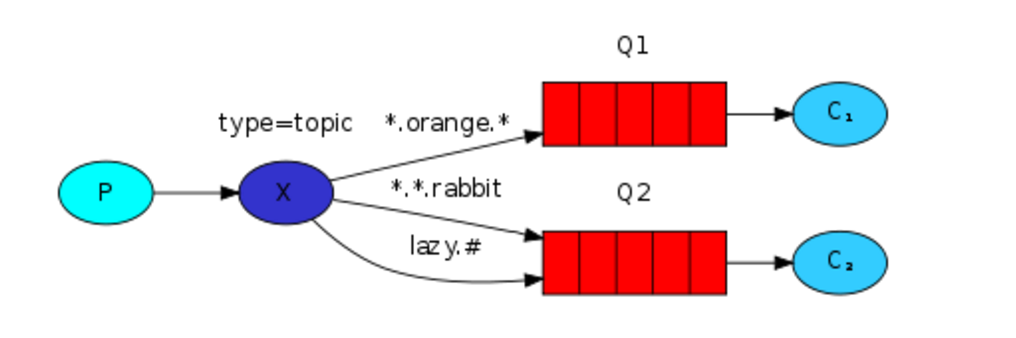
模糊匹配
在topic类型下,可以让队列绑定几个模糊的关键字,之后发送者将数据发送到exchange,exchange将传入”路由值“和 ”关键字“进行匹配,匹配成功,则将数据发送到指定队列。
关键字:exchange type = topic
-
- 表示只能匹配 一个 单词
- # 表示可以匹配0个或多个单词
发送者路由值              队列中
old.boy.python          old.*  -- 不匹配
old.boy.python          old.#  -- 匹配
消息生产者:
#!/usr/bin/env python
import pika
import sys

connection = pika.BlockingConnection(pika.ConnectionParameters(
        host='localhost'))
channel = connection.channel()

channel.exchange_declare(exchange='topic_logs',
                         type='topic')

routing_key = sys.argv[1] if len(sys.argv) > 1 else 'anonymous.info'
message = ' '.join(sys.argv[2:]) or 'Hello World!'
channel.basic_publish(exchange='topic_logs',
                      routing_key=routing_key,
                      body=message)
print(" [x] Sent %r:%r" % (routing_key, message))
connection.close()
消息消费者:
#!/usr/bin/env python
import pika
import sys

connection = pika.BlockingConnection(pika.ConnectionParameters(
        host='localhost'))
channel = connection.channel()

channel.exchange_declare(exchange='topic_logs',
                         type='topic')

result = channel.queue_declare(exclusive=True)
queue_name = result.method.queue

binding_keys = sys.argv[1:]
if not binding_keys:
    sys.stderr.write("Usage: %s [binding_key]...
" % sys.argv[0])
    sys.exit(1)

for binding_key in binding_keys:
    channel.queue_bind(exchange='topic_logs',
                       queue=queue_name,
                       routing_key=binding_key)

print(' [*] Waiting for logs. To exit press CTRL+C')

def callback(ch, method, properties, body):
    print(" [x] %r:%r" % (method.routing_key, body))

channel.basic_consume(callback,
                      queue=queue_name,
                      no_ack=True)

channel.start_consuming()