https://solarianprogrammer.com/2016/11/19/swift-opengl-linux-macos-glfw/
Swift 3 and OpenGL on Linux and macOS with GLFW
Posted on November 19, 2016 by Sol
This is a short article about how to get started with Swift 3 and OpenGL on Linux and macOS. In order to keep the code portable on both operating systems, we’ll use GLFW to create a window with an OpenGL context. Keep in mind that, at time of this writing, Swift can call directly any C library. However, if you need to use a C++ library you will need to write a C wrapper around it, because Swift 3 is not interoperable with C++.
As a practical example, we’ll use OpenGL to draw a yellow rectangle on a red background. In order to keep the code short and as simple as possible, we’ll use the fixed OpenGL functionality. If you want to use modern OpenGL, please check my other OpenGL articles. Replacing the fixed OpenGL functionality from the article example is left as an exercise for the reader. Basically, once you know how to call OpenGL functions from Swift and compile the code, it is just a question of writing supporting code for dealing with shaders, buffers and so on.
macOS prerequisites:
On macOS, first you need to install Xcode from the App Store. Start Xcodeand agree with the license.
Next, install Apple’s Command Line Tools with:
1 xcode-select --install
Once the above is installed, install the Homebrew package manager:
1 /usr/bin/ruby -e "$(curl -fsSL https://raw.githubusercontent.com/Homebrew/install/master/install)"
Next, we’ll use Homebrew to install GLFW:
1 brew install homebrew/versions/glfw3
Ubuntu Linux prerequisites:
If you don’t have latest versions of Swift and Clang installed on your system, check my Getting started with Swift 3 on Linux article.
Next step is to install GLFW:
1 sudo apt install libglfw3-dev libglfw3
Swift OpenGL example
At this point, I assume that you can build and run a Swift code from your Terminal. Assuming that you have a simple Swift program saved as test.swift, this is how you can compile and run the code:
1 swiftc test.swift
2 ./test
In order to use a C function from Swift, we need to let the compiler know the function definition. This can be done using an Objective-C header file. For example, if we want to use GLFW from Swift, we will add the next line in a file ending in .h:
1 #include <GLFW/glfw3.h>
I’ll assume the above line was saved in a file named opengl_includes.h.
Next, we can write our Swift code that uses GLFW and OpenGL functions:
 1 import Foundation
 2
 3 #if os(OSX)
 4 	import OpenGL
 5 #endif
 6
 7 // Initialize GLFW
 8 if(glfwInit() == 0) {
 9 	print("Failed to initialize GLFW! I'm out!")
10 	exit(-1)
11 }
12
13
14 // Open a window and attach an OpenGL context to the window surface
15 guard let window = glfwCreateWindow(600, 600, "OpenGL test - Swift", nil, nil)
16 else {
17 	print("Failed to open a window! I'm out!")
18 	glfwTerminate()
19 	exit(-1)
20 }
21
22 // Set the window context current
23 glfwMakeContextCurrent(window)
24
25 // Print the OpenGL version currently enabled on your machine
26 let version = String(cString: glGetString(UInt32(GL_VERSION)))
27 print(version)
28
29 // Use red to clear the screen
30 glClearColor(1, 0, 0, 1)
31
32 while (glfwWindowShouldClose(window) == 0) {
33 	// Clear the screen (window background)
34 	glClear(UInt32(GL_COLOR_BUFFER_BIT))
35
36 	// Draw a square using the (deprecated) fixed pipeline functionality
37 	glColor3f(1.0, 1.0, 0.0)
38 	glBegin(UInt32(GL_QUADS))
39 	glVertex2f(-0.5, -0.5)
40 	glVertex2f(0.5, -0.5)
41 	glVertex2f(0.5, 0.5)
42 	glVertex2f(-0.5, 0.5)
43 	glEnd()
44
45 	// Swap front and back buffers for the current window
46 	glfwSwapBuffers(window)
47
48 	// Poll for events
49 	glfwPollEvents()
50 }
51
52 // Destroy the window and its context
53 glfwDestroyWindow(window)
54
55 // Terminate GLFW
56 glfwTerminate()
Save the above code as main.swift.
macOS compilation:
At this point, you should have two files opengl_includes.h and main.swift in your current directory. Use the next command to create an executable:
1 xcrun -sdk macosx swiftc main.swift -I /usr/local/include -import-objc-header opengl_includes.h -L /usr/local/lib -lglfw3
2 ./main
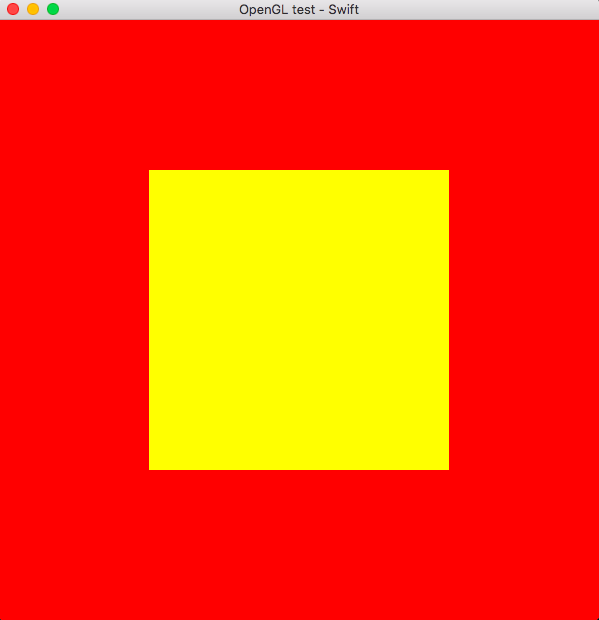
This is what you should see:
Ubuntu Linux compilation
At this point, you should have two files opengl_includes.h and main.swift in your current directory. Use the next command to create an executable:
1 swiftc main.swift -import-objc-header opengl_includes.h -lglfw -lGL
2 ./main
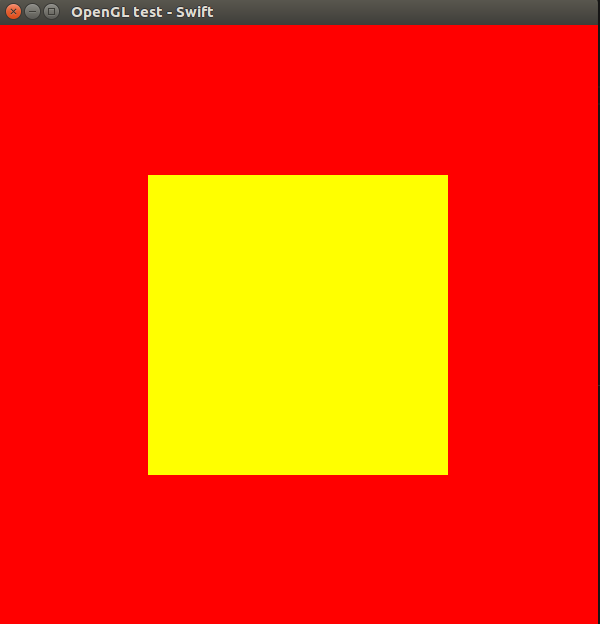
This is what you should see:
If you are interested to learn more about the Swift 3 syntax, I would recommend reading Swift Programming: The Big Nerd Ranch Guide (2nd Edition) by M Mathias, J Gallagher:
If you are interested to learn more about OpenGL, I would recommend reading OpenGL SuperBible by Graham Sellers, Richard S. Wright Jr., Nicholas Haemel:
大概步骤
在终端完成
1.安装
/usr/bin/ruby -e "$(curl -fsSL https://raw.githubusercontent.com/Homebrew/install/master/install)"
2.brew install homebrew/versions/glfw3
3.在任何路径下新建文件 opengl_includes.h main.swift
4.在当前路径下执行
①.xcrun -sdk macosx swiftc main.swift -I /usr/local/include -import-objc-header opengl_includes.h -L /usr/local/lib -lglfw3
②./main