使用koa:
koa2是一个类,所以引入koa后,要创建实例化“对象”,才能使用koa内部封装的方法。

设置监听端口:

处理http请求:
1、http请求处理链
A、通过app.use()注册async异步函数
B、每收到一个http请求,koa就会调用通过app.use()注册的async异步函数,并传入ctx和next参数。
2、koa使用异步方法处理请求
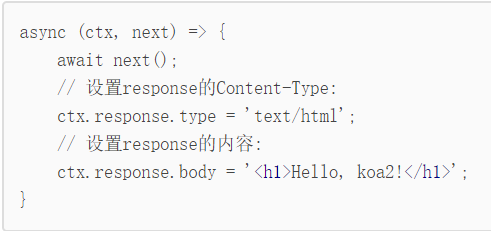
async:异步函数
ctx:是由koa传入的封装了request和response的变量
3、next()
用await next()来调用下一个async函数
4、middleware
我们把每个async函数称为middleware
针对不同的url申请调用不同的异步函数:
底层的处理方式,是通过if判断请求的地址来进行区分的

使用if判断非常麻烦,使用koa-router省略这一个步骤
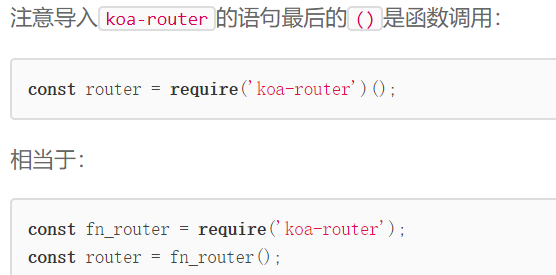
koa-router只能省略掉if判断的部分,最后要使用app.use()去调用koa-router这个异步函数
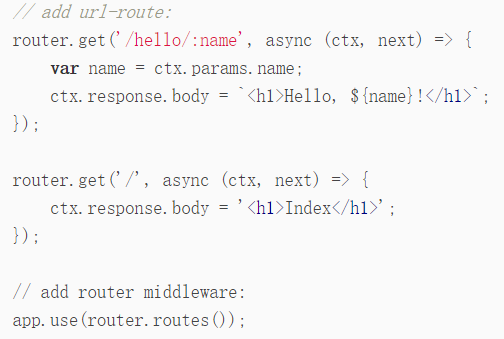
同理可以处理post请求
用post请求时,会遇到一个问题:post请求通常会发送一个表单,或者JSON,它作为request的body发送
但无论是Node.js提供的原始request对象,还是koa提供的request对象,都不提供解析request的body的功能!
引入另一个middleware ——koa-bodyparser解析request的body
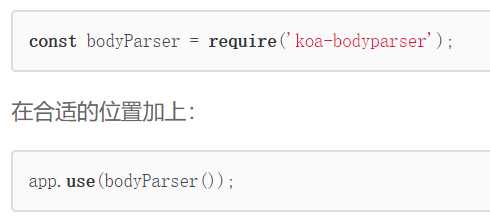
用var name = ctx.request.body.name || ''拿到表单的name字段,如果该字段不存在,默认值设置为''
随着需要处理的url越来越多,app.js会显得特别的臃肿
在controller文件中集中描写url:
app.js不再放置url的异步函数处理方式
app.js只用于将所有controller文件夹中的url异步函数,引入,并使用app.use为其注册
引入+注册:就两个函数封装这一些功能
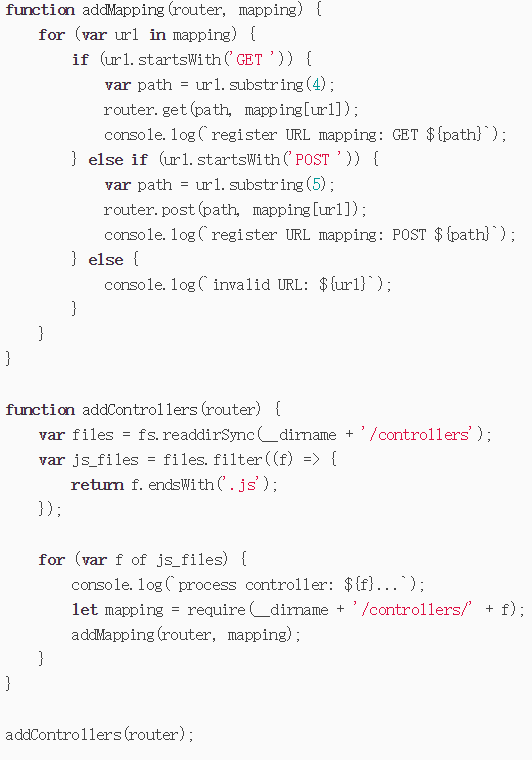
进一步简化app.js
将处理引入与注册url异步函数的方法,作为一个
Controller Middleware
进一步封装到controller.js中,去处理controller文件夹中的url异步函数
const fs = require('fs');

// add url-route in /controllers:

function addMapping(router, mapping) {
    for (var url in mapping) {
        if (url.startsWith('GET ')) {
            var path = url.substring(4);
            router.get(path, mapping[url]);
            console.log(`register URL mapping: GET ${path}`);
        } else if (url.startsWith('POST ')) {
            var path = url.substring(5);
            router.post(path, mapping[url]);
            console.log(`register URL mapping: POST ${path}`);
        } else if (url.startsWith('PUT ')) {
            var path = url.substring(4);
            router.put(path, mapping[url]);
            console.log(`register URL mapping: PUT ${path}`);
        } else if (url.startsWith('DELETE ')) {
            var path = url.substring(7);
            router.del(path, mapping[url]);
            console.log(`register URL mapping: DELETE ${path}`);
        } else {
            console.log(`invalid URL: ${url}`);
        }
    }
}

function addControllers(router, dir) {
    fs.readdirSync(__dirname + '/' + dir).filter((f) => {
        return f.endsWith('.js');
    }).forEach((f) => {
        console.log(`process controller: ${f}...`);
        let mapping = require(__dirname + '/' + dir + '/' + f);
        addMapping(router, mapping);
    });
}

module.exports = function (dir) {
    let
        controllers_dir = dir || 'controllers',
        router = require('koa-router')();
    addControllers(router, controllers_dir);
    return router.routes();
};
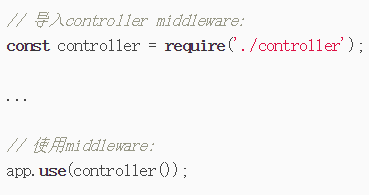
这样app.js中只需要引入这个middleware,再调用就可以完成url的处理
操作数据库:
ORM技术:Object-Relational Mapping,把关系数据库的表结构映射到js对象上。
ORM框架:Sequelize
数据库配置信息,在使用Sequelize操作MySQL需要放在参数里,告诉函数应该如何做
将其保存在config.js中
var config = {
    database: 'test', // 使用哪个数据库
    username: 'www', // 用户名
    password: 'www', // 口令
    host: 'localhost', // 主机名
    port: 3306 // 端口号,MySQL默认3306
};

module.exports = config;
1、创建Sequelize对象实例
//引入
const Sequelize = require('sequelize');
const config = require('./config');
//对象实例化
var sequelize = new Sequelize(config.database, config.username, config.password, {
    host: config.host,
    dialect: 'mysql',
    pool: {
        max: 5,
        min: 0,
        idle: 30000
    }
});
new Sequelize(database, [username=null], [password=null], [options={}])
//option可选填


2、定义数据模型model让数据库可以创建表
//第一个参数传入名称Pet,默认的表名是Pets
//第二个参数指定列名和数据类型,如果是主键,需要更详细地指定。
//第三个参数是额外的配置,我们传入timestamps: false是为了关闭Sequelize的自动添加timestamp的功能
var Pet = sequelize.define('pet', {
    id: {
        type: Sequelize.STRING(50),
        primaryKey: true
    },
    name: Sequelize.STRING(100),
    gender: Sequelize.BOOLEAN,
    birth: Sequelize.STRING(10),
    createdAt: Sequelize.BIGINT,
    updatedAt: Sequelize.BIGINT,
    version: Sequelize.BIGINT
}, {
        timestamps: false
    });
3、插入数据
promise方式
var now = Date.now();

Pet.create({
    id: 'g-' + now,
    name: 'Gaffey',
    gender: false,
    birth: '2007-07-07',
    createdAt: now,
    updatedAt: now,
    version: 0
}).then(function (p) {
    console.log('created.' + JSON.stringify(p));
}).catch(function (err) {
    console.log('failed: ' + err);
});
await方式
(async () => {
    var dog = await Pet.create({
        id: 'd-' + now,
        name: 'Odie',
        gender: false,
        birth: '2008-08-08',
        createdAt: now,
        updatedAt: now,
        version: 0
    });
    console.log('created: ' + JSON.stringify(dog));
})();
4、查询数据
(async () => {
    var pets = await Pet.findAll({
        where: {
            name: 'Gaffey'
        }
    });
    console.log(`find ${pets.length} pets:`);
    for (let p of pets) {
        console.log(JSON.stringify(p));
    }
})();
5、更新数据
如果要更新数据,可以对查询到的实例调用save()方法:

(async () => {
    var p = await queryFromSomewhere();
    p.gender = true;
    p.updatedAt = Date.now();
    p.version ++;
    await p.save();
})();
6、删除数据
(async () => {
    var p = await queryFromSomewhere();
    await p.destroy();
})();
直接使用Sequelize虽然可以创建model,但是存在一些问题
混乱,不方便管理,不规范,无法复用
制定一个规范
A、model统一存放在models文件夹中
B、其次,每一个Model必须遵守一套规范:
- 统一主键,名称必须是
id,类型必须是STRING(50); - 主键可以自己指定,也可以由框架自动生成(如果为null或undefined);
- 所有字段默认为
NOT NULL,除非显式指定; - 统一timestamp机制,每个Model必须有
createdAt、updatedAt和version,分别记录创建时间、修改时间和版本号。其中,createdAt和updatedAt以BIGINT存储时间戳,最大的好处是无需处理时区,排序方便。version每次修改时自增。
这一套规范,不需要去记忆,而是通过一个db.js统一Model的定义:
const Sequelize = require('sequelize');

console.log('init sequelize...');

var sequelize = new Sequelize('dbname', 'username', 'password', {
    host: 'localhost',
    dialect: 'mysql',
    pool: {
        max: 5,
        min: 0,
        idle: 10000
    }
});

const ID_TYPE = Sequelize.STRING(50);

function defineModel(name, attributes) {
    var attrs = {};
    for (let key in attributes) {
        let value = attributes[key];
        if (typeof value === 'object' && value['type']) {
            value.allowNull = value.allowNull || false;
            attrs[key] = value;
        } else {
            attrs[key] = {
                type: value,
                allowNull: false
            };
        }
    }
    attrs.id = {
        type: ID_TYPE,
        primaryKey: true
    };
    attrs.createdAt = {
        type: Sequelize.BIGINT,
        allowNull: false
    };
    attrs.updatedAt = {
        type: Sequelize.BIGINT,
        allowNull: false
    };
    attrs.version = {
        type: Sequelize.BIGINT,
        allowNull: false
    };
    return sequelize.define(name, attrs, {
        tableName: name,
        timestamps: false,
        hooks: {
            beforeValidate: function (obj) {
                let now = Date.now();
                if (obj.isNewRecord) {
                    if (!obj.id) {
                        obj.id = generateId();
                    }
                    obj.createdAt = now;
                    obj.updatedAt = now;
                    obj.version = 0;
                } else {
                    obj.updatedAt = Date.now();
                    obj.version++;
                }
            }
        }
    });
}
怎么调用呢db.js创建model?举个例子!
//引入db.js
const db = require('../db');
//调用db.js中的defineModel,定义并暴露model
module.exports = db.defineModel('users', {
    email: {
        type: db.STRING(100),
        unique: true
    },
    passwd: db.STRING(100),
    name: db.STRING(100),
    gender: db.BOOLEAN
});
在使用model进行数据库操作时候,每一次都要导入model,如果同时使用多个model,还要写多条语句去导入,显得特别麻烦
创建一个model.js自动化导入所有的model
const fs = require('fs');
const db = require('./db');

let files = fs.readdirSync(__dirname + '/models');

let js_files = files.filter((f)=>{
    return f.endsWith('.js');
}, files);

module.exports = {};

for (let f of js_files) {
    console.log(`import model from file ${f}...`);
    let name = f.substring(0, f.length - 3);
    module.exports[name] = require(__dirname + '/models/' + f);
}

module.exports.sync = () => {
    db.sync();
};
使用model.js
//引入model.js
const model = require('./model');
//掉用导入
let
    Pet = model.Pet,
    User = model.User;

var pet = await Pet.create({ ... });