Ubuntu系统---以virtualenv方式安装Tensorflow-CPU
一、安装环境
环境:Ubuntu18.04+CPU+python2.7
本文介绍:如何在ubuntu上以virtualenv方式安装tensorflow。
采用virtualenv方式安装的原因?系统中的多个python混用会导致$PYTHONPATH混乱,或者各个工程对于package的版本要求不同等等情况。有一个简单的解决方案就是用virtualenv来隔离多个python,其本质只是实现隔离不同python中$PYTHONPATH的路径,当然也可以衍生到隔离多个$PATH。
二、安装步骤
2.1 准备
如果你有两个项目,一个需要python2.7开发,一个需要python3.5开发,那么virtualenv是一个很好的选择。如果你想创建一个python2.7和python3.5的虚拟环境的话。首先你的电脑上得装有python2.7和python3.5,而且需要装好pip和pip3。
2.2 安装pip和virtualenv
# Ubuntu/Linux 64-bit
$ sudo apt-get install python-pip python-dev python-virtualenv

# Mac OS X
$ sudo easy_install pip
$ sudo pip install --upgrade virtualenv
2.3 创建 Virtualenv 虚拟环境
进入你想安装tensorflow的父目录下,然后执行下面命令建立虚拟环境:
$ cd TF-virtualenv
$ virtualenv --system-site-packages tensorflow
2.4 激活虚拟环境并安装tensorflow
对于python2.7,则执行如下命令:
$ source ./tensorflow/bin/activate # If using bash$ source ./tensorflow/bin/activate.csh # If using csh(tensorflow)$ # Your prompt should change# Ubuntu/Linux 64-bit, CPU only:$ pip install --upgrade https://storage.googleapis.com/tensorflow/linux/cpu/tensorflow-0.6.0-cp27-none-linux_x86_64.whl# Ubuntu/Linux 64-bit, GPU enabled:$ pip install --upgrade https://storage.googleapis.com/tensorflow/linux/gpu/tensorflow-0.6.0-cp27-none-linux_x86_64.whl# Mac OS X, CPU only:$ pip install --upgrade https://storage.googleapis.com/tensorflow/mac/tensorflow-0.6.0-py2-none-any.whl$ source ./tensorflow/bin/activate # If using bash$ source ./tensorflow/bin/activate.csh # If using csh(tensorflow)$ # Your prompt should change# Ubuntu/Linux 64-bit, CPU only:$ pip3 install --upgrade https://storage.googleapis.com/tensorflow/linux/cpu/tensorflow-0.6.0-cp34-none-linux_x86_64.whl# Ubuntu/Linux 64-bit, GPU enabled:$ pip3 install --upgrade https://storage.googleapis.com/tensorflow/linux/gpu/tensorflow-0.6.0-cp34-none-linux_x86_64.whl# Mac OS X, CPU only:$ pip3 install --upgrade https://storage.googleapis.com/tensorflow/mac/tensorflow-0.6.0-py3-none-any.whl2.4 验证Tensorflow CPU版本
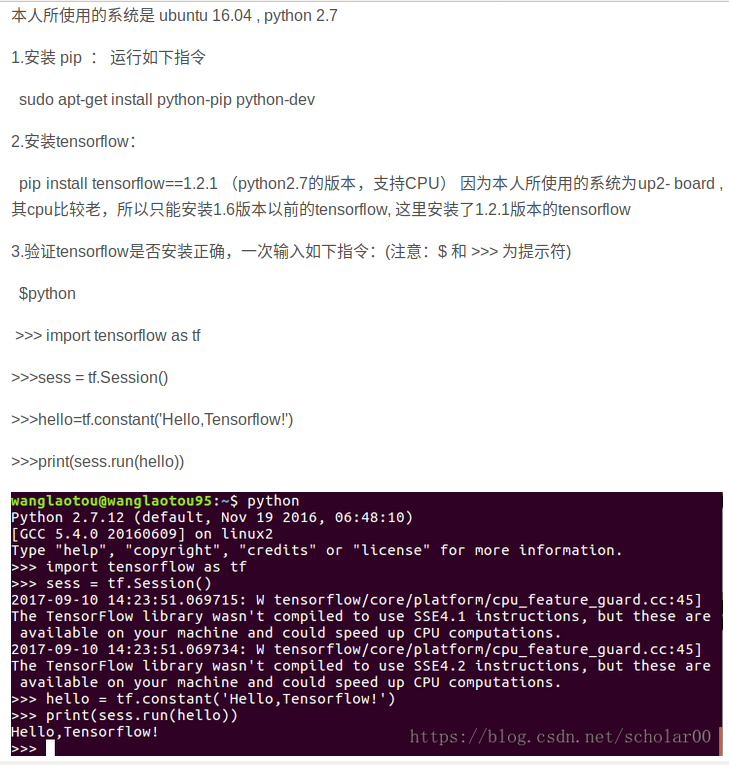
在终端执行如下命令进入python shell环境:cd tensorflowpython
>>> import tensorflow as tf>>> hello = tf.constant('Hello, TensorFlow!')>>> sess = tf.Session()>>> print(sess.run(hello))Hello, TensorFlow!>>> a = tf.constant(10)>>> b = tf.constant(32)>>> print(sess.run(a + b))$ source ~/tensorflow/bin/activate(tensorflow)$python# Python
import tensorflow as tf
hello = tf.constant('Hello, TensorFlow!')
sess = tf.Session()
print(sess.run(hello))>>> print(sess.run(hello)) b'Hello, TensorFlow!' >>>也可以, 使用类似命令运行 TensorFlow 程序:
退出Python环境
>>> exit()
(tensorflow)$ cd tensorflow/models/image/mnist
(tensorflow)$ python convolutional.py

 2.4.3 停用virtualenv
# 当使用完 TensorFlow
(tensorflow)$ deactivate  # 停用 virtualenv
$  # 你的命令提示符会恢复原样

附,可以参考官网: http://www.tensorfly.cn/tfdoc/get_started/os_setup.html

再说明,
ubuntu下python import tensorflow显示非法指令(核心已转储)
1、版本
ubuntu版本为18.04
python为2.7
tensorflow为pip安装的1.10.0版本
2、解决
删除原先的tensorflow:sudo pip uninstall tensorflow
虚拟机Vitualenv下不用sudo
下载低版本的tensorflow版本安装就可以解决问题了。
===========================================
从Tensorflow1.2开始,不再支持GPU在Mac OS X上的安装。
tensorFlow安装命令
$ pip install tensorflow      # Python 2.7; CPU support
$ pip3 install tensorflow     # Python 3.n; CPU support
如果上面的安装出错,可以通过以下命令安装最新的TensorFlow:
$ sudo pip  install --upgrade tfBinaryURL   # Python 2.7
$ sudo pip3 install --upgrade tfBinaryURL   # Python 3.n
where tfBinaryURL identifies the URL of the TensorFlow Python package. The appropriate value of tfBinaryURL depends on the operating system and Python version. Find the appropriate value for tfBinaryURL here. For example, if you are installing TensorFlow for Mac OS and Python 2.7 issue the following command:
$ sudo pip3 install --upgrade
 https://storage.googleapis.com/tensorflow/mac/cpu/tensorflow-1.3.0-py2-none-any.whl
上面以安装TensorFlow 1.3.0为例,若输入的是pip,则为python2安装TensorFlow 1.3.0
更新TensorFlow
(tensorflow)$ pip install --upgrade tensorflow      # for Python 2.7
(tensorflow)$ pip3 install --upgrade tensorflow     # for Python 3.n

=====================================================================================
ubuntu下virtualenvwrapper的安装与卸载
1. virtualenvwrapper的安装
$ sudo pip install virtualenvwrapper2. virtualenvwrapper的卸载
$ sudo pip uninstall virtualenvwrapper