一、ByteBuf工作原理
1. ByteBuf是ByteBuffer的升级版:
jdk中常用的是ByteBuffer,从功能角度上,ByteBuffer可以完全满足需要,但是有以下缺点:
- ByteBuffer一旦分配完成,长度固定,不能动态扩展和收缩,当需要编码的POJO对象大于分配容量时发生索引越界异常
- ByteBuffer只要一个标识位置的指针postion,读写切换比较麻烦,flip rewind等操作
- 功能有限
ByteBuf依然是Byte数组缓冲区,拥有ByteBuffer的一切功能:
- 7种Java基础类型、byte数组、ByteBuffer(ByteBuf)等读写;
- 缓冲区自身的copy和slice等;
- 设置网络字节序;
- 构造缓冲区实例;
- 操作位置指针方法;
2. ByteBuf的工作原理:
ByteBuf使用2个位置指针来协助缓冲区的读写操作,读操作使用readerIndex,写操作使用writerIndex。
(1) 一开始readerIndex和writerIndex都是0
(2) 随着写入writerIndex增加,随着读取readerIndex增加,但是不会超过writerIndex。
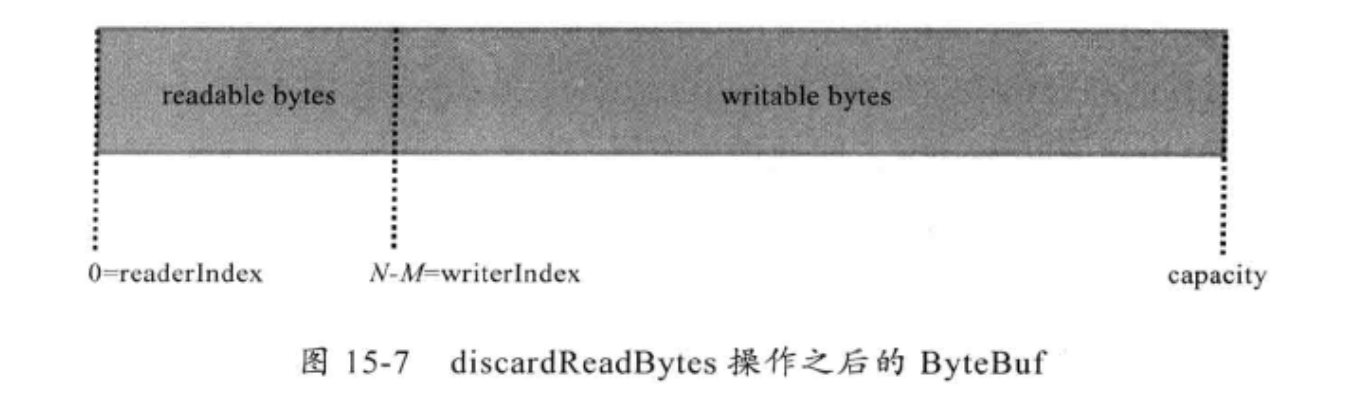
(3) 读取之后,0~readerIndex这部分视为discard,调用discardReadBytes方法,可以释放这部分空间
(4) readerIndex到writerIndex之间的数据是可以读取的,等价于ByteBuffer中position-limit之间的数据
(5) writerIndex和capacity之间的空间是可写的,等价于ByteBuffer limit和capacity之间的可用空间。
3. 用图演示上述过程:
初始分配的ByteBuf:

写入了N个字节之后:

读取了M(<N)个字节之后的ByteBuf如图所示:

调用了discardReadBytes操作之后的ByteBuf如图所示:
调用了clear之后的ByteBuf如图所示:

4. 动态扩展
跟大多数的自动扩容数组一样,在进行put操作的时候,如果空间不足,就创建新的ByteBuffer实现自动扩容,并将之前的ByteBuffer复制到新的ByteBuffer中,最后释放老的ByteBuffer。
    public ByteBuf writeBytes(ByteBuffer src) {
        ensureAccessible();
        int length = src.remaining();
        ensureWritable(length);
        setBytes(writerIndex, src);
        writerIndex += length;
        return this;
    }
注意到读写都是使用ByteBuffer,在容量不足的时候会自动扩容:
    private void ensureWritable0(int minWritableBytes) {
        if (minWritableBytes <= writableBytes()) {
            return;
        }

        if (minWritableBytes > maxCapacity - writerIndex) {
            throw new IndexOutOfBoundsException(String.format(
                    "writerIndex(%d) + minWritableBytes(%d) exceeds maxCapacity(%d): %s",
                    writerIndex, minWritableBytes, maxCapacity, this));
        }

        // Normalize the current capacity to the power of 2.
        int newCapacity = alloc().calculateNewCapacity(writerIndex + minWritableBytes, maxCapacity);

        // Adjust to the new capacity.
        capacity(newCapacity);
    }
二、ByteBuf功能介绍
1. 顺序读操作
详见api,类似于ByteBuffer的get
2. 顺序写操作
详见api,类似于ByteBuffer的put
3. readerIndex和writerIndex
读索引和写索引,将ByteBuf分割为3个区域:

可读区域和可写区域,以及已经读取过的区域,可以调用discardReadBytes操作来重用这部分的空间,以节省内存,防止ByteBuf的动态扩张。这在私有协议栈解码的时候非常有用,因为TCP层可能会粘包,几百个整包消息被TCP作为一个整包发送。这样,使用discardReadBytes操作可以重用之前的已经解码过的缓冲区,从而防止接收缓冲区因为容量不足扩张。
但是,discardReadBytes是把双刃剑,不能滥用。
4. Discardable bytes
动态扩张比较耗时,因此为了提高性能,往往需要最大努力提升缓冲区的重用率。
discardbytes操作则可以重用已经读过的空间,减少扩容的次数。
但是,discardbytes操作本身也是自己数组的内存复制,所以频繁调用也会导致性能下降,因此调用之前,请确认,你想要时间换取空间,而不是扩容。
    @Override
    public ByteBuf discardReadBytes() {
        ensureAccessible();
        if (readerIndex == 0) {
            return this;
        }

        if (readerIndex != writerIndex) {
            setBytes(0, this, readerIndex, writerIndex - readerIndex);
            writerIndex -= readerIndex;
            adjustMarkers(readerIndex);
            readerIndex = 0;
        } else {
            adjustMarkers(readerIndex);
            writerIndex = readerIndex = 0;
        }
        return this;
    }
5. Readable bytes和Writable bytes
- 可读区域中是数据实际存储的区域,以read或者skip开头的任何操作都将会从readerIndex开始读取或者跳过指定的数据。如果读的字节数>可读字节数,throw IndexOutOfBoundsException。
- 可写区域是尚可填充的空间,任何以write开头的操作都会从writeIndex开始向空闲空间开始写入字节,如果写入字节数>可写字节数,也会抛出IndexOutOfBoundsException。
6. Clear操作
ByteBuffer的clear操作不会操作内容本身,而是修改指针位置。ByteBuf也一样,clear之后0=readerIndex=writerIndex。
7. Mark和Reset
某些情况需要能够回滚,Netty提供了类似的方法。
- markReaderIndex:将当前的readerIndex备份到markedReaderIndex中;
- resetReaderIndex:将当前的readerIndex设置为mardedReaderIndex;
- markWriterIndex:将当前的readerIndex备份到markedWriterIndex中;
- resetWriterIndex:将当前的readerIndex设置为mardedWriterIndex;
8. 查找操作
ByteBuf提供了查找方法用于满足不同的应用场景,详细分类如下.
(1) indexOf(int fromIndex, int toIndex, byte value):从from到to查找value的值
(2) bytesBefore(byte value): readerIndex到writerIndex中查找value的值
(3) bytesBefore(int length, byte value):从readerIndex到readerIndex+length
(4) bytesBefore(int index, int length, byte value): 从index到Index+length
(5) forEachByte(ByteBufProcessor processor): 遍历可读字节数组,与ByteBufProcessor 设置的条件进行对比
(6) forEachByte(int index, int length, ByteBufProcessor processor): 类似上面
(7) forEachByteDesc(ByteBufProcessor processor): 同上,采用逆序
(8) forEachByteDesc(int index, int length, ByteBufProcessor processor):逆序
对于被查询的字节,Netty在ByteBufProcessor中做好了抽象,定义如下:
- FIND_NUL: NUL(0x00)
- FIND_CR
- FIND_LF
- FIND_CRLF
- FIND_LINER_WHITESPACE
9. Derived buffers
类似于数据库的视图。以下方法用于创建视图或者恢复ByteBuf。
(1) duplicate: 返回当前ByteBuf的复制对象,二者共享缓冲区内容,但是读写索引独立,即修改内容内容会变,索引变化不影响原ByteBuf。
(2) copy: 复制一个对象,不共享,内容和索引都是独立的;
(3) copy(int index, int length)
(4) slice: 返回当前ByteBuf的可读子缓冲区,即从readerIndex到writerIndex的部分,共享内容,索引独立。
(5) slice(int index, int length):共享内容,索引独立。
10. 转换为ByteBuffer
(1) ByteBuffer nioBuffer(): 当前可读缓冲区转换为ByteBuffer,共享内容,索引独立,且无法感知动态扩容;
(2) ByteBuffer nioBuffer(int index, int length)
11. 随机读写 (set和get)
随机读api:

随机写api,同样方式可以查看。
无论是get还是set,都会对其索引进行合法性校验。
但是,set不支持动态扩展。
三、源码分析
3.1 主要类继承关系
除了这些类之外,还有非常多的类:

1. 从内存分配的角度有2类:
(1) 堆内存:优点是内存的分配和回收速度快,可以被自动回收,缺点是如果进行SocketIO的读写,需要额外一次的内存复制,将堆内存对应的缓冲区复制到内核Channel中,性能有一定程度损失。
(2) 直接内存:在堆外进行分配,相对分配和回收速度会慢一些,但是将它写入或者从Socket Channel读取时,少了一次内存复制,速度更快。
经验表明:ByteBuf的最佳实践是在I/O通信线程读写缓冲区使用DirectByteBuf,后端业务消息的编解码模块使用HeapByteBuf,这样组合可以达到性能最优。
2. 从内存回收角度上:
(1) 基于对象池的ByteBuf:内存池,可以循环创建ByteBuf,提升内存的利用率,降低高负载导致的频繁GC。
(2) 普通ByteBuf。
测试表明高负载使用内存池会更加的平稳。
尽管推荐使用基于内存池的ByteBuf,但是内存池的管理和维护更加复杂,也需要更加谨慎。
3.2 AbstactByteBuf
骨架类
1. 主要成员变量
    private static final boolean checkAccessible;

    static {
        checkAccessible = SystemPropertyUtil.getBoolean(PROP_MODE, true);
        if (logger.isDebugEnabled()) {
            logger.debug("-D{}: {}", PROP_MODE, checkAccessible);
        }
    }

    static final ResourceLeakDetector<ByteBuf> leakDetector =
            ResourceLeakDetectorFactory.instance().newResourceLeakDetector(ByteBuf.class);

    //读索引
    int readerIndex;
    //写索引
    int writerIndex;
    private int markedReaderIndex;
    private int markedWriterIndex;
    private int maxCapacity;
一些公共属性的定义,这里关注下leakDetector:用于检测对象是否有泄露。
2. 读操作系列
这里没有定义缓冲区的实现,因为不知道是直接内存还是堆内存,但是无论是基于何种内存实现读操作,一些基本的操作都在骨架类中已经实现,实现代码复用,这也是抽象和继承的价值所在。
这里以方法readBytes为例:
    @Override
    public ByteBuf readBytes(byte[] dst, int dstIndex, int length) {
       //1. 检测缓冲区可读长度
        checkReadableBytes(length);
       //2. 抽象获取,由子类实现
        getBytes(readerIndex, dst, dstIndex, length);
       //3. 读索引增加
        readerIndex += length;
        return this;
    }
检测长度方法非常简单,检测可读长度是否有length,这里略过。
3. 写操作系列
与读类似
    @Override
    public ByteBuf writeBytes(byte[] src, int srcIndex, int length) {
        ensureAccessible();
        //1 .检测写长度合法
        ensureWritable(length);
        //2. 抽象方法,由子类实现
        setBytes(writerIndex, src, srcIndex, length);
        //3. 写索引增加
        writerIndex += length;
        return this;
    }
为什么需要动态扩展?
很多时候都是依据经验来判断Pojo对象的大小,如果这个估计值偏大则造成内存浪费,如果偏小直接抛出异常,这种做法对用户非常不友好。
而Netty的ByteBuf支持动态扩展,为了保证安全,可以指定最大容量。
如何进行计算?
参数是writerIndex+minWriableBytes,即满足要求的最小容量。
设置阀门值是4MB,如果新增的内存空间大于这个值,不采用倍增,而采用每次步进4MB的方式,每次增加后和maxCapacity比较,选择其小者。
如果扩容之后的新容量小于阀值,则以64进行倍增。
这样做的原因无非是综合2点因素:不希望一次增加容量太小,导致需要频繁的扩容,不希望一次增加太多,造成空间上的浪费。
因此,在内存比较小的时候(<4MB)的时候,倍增64->128->256字节,这种方式大多数应用可以接收
当内存达到阀值时,再倍增就会带来额外的内存浪费,例如10MB->20MB,因此使用步增的方式进行扩张。
代码如下:
    @Override
    public int calculateNewCapacity(int minNewCapacity, int maxCapacity) {
        if (minNewCapacity < 0) {
            throw new IllegalArgumentException("minNewCapacity: " + minNewCapacity + " (expectd: 0+)");
        }
        if (minNewCapacity > maxCapacity) {
            throw new IllegalArgumentException(String.format(
                    "minNewCapacity: %d (expected: not greater than maxCapacity(%d)",
                    minNewCapacity, maxCapacity));
        }
        final int threshold = 1048576 * 4; // 4 MiB page

        if (minNewCapacity == threshold) {
            return threshold;
        }

        // If over threshold, do not double but just increase by threshold.
        if (minNewCapacity > threshold) {
            int newCapacity = minNewCapacity / threshold * threshold;
            if (newCapacity > maxCapacity - threshold) {
                newCapacity = maxCapacity;
            } else {
                newCapacity += threshold;
            }
            return newCapacity;
        }

        // Not over threshold. Double up to 4 MiB, starting from 64.
        int newCapacity = 64;
        while (newCapacity < minNewCapacity) {
            newCapacity <<= 1;
        }

        return Math.min(newCapacity, maxCapacity);
    }
计算完长度,再创建新的缓冲区,由于内存申请方式不同子类不同,依旧设置为一个抽象方法:
public abstract ByteBuf capacity(int newCapacity);
4. 操作索引
与索引相关的操作主要是读写索引 mark reset等等。这部分代码相当简单。
5. 重用缓冲区
0->readerIndex这部分的空间可以重用。
    public ByteBuf discardReadBytes() {
        ensureAccessible();
        if (readerIndex == 0) {
            return this;
        }

        if (readerIndex != writerIndex) {
            //1. 字节组进行复制
            setBytes(0, this, readerIndex, writerIndex - readerIndex);
       //2. 重新设置索引
            writerIndex -= readerIndex;
            adjustMarkers(readerIndex);
            readerIndex = 0;
        } else {
            adjustMarkers(readerIndex);
            writerIndex = readerIndex = 0;
        }
        return this;
    }
注意到还要重新调整markedReaderIndex和markedWriterIndex。
6. skipBytes
在解码的时候,有时候需要丢弃非法的数据报文。非常简单,修改readerIndex即可,
    @Override
    public ByteBuf skipBytes(int length) {
        checkReadableBytes(length);
        readerIndex += length;
        return this;
    }
3.3 AbstractReferenceCountedByteBuf源码分析
从类的名字可以看出,该类的功能主要是引用计数,类似于JVM内存回收的对象引用计数器,用于跟踪对象的分配和销毁,用于自动的内存回收。
1. 成员变量
    private static final AtomicIntegerFieldUpdater<AbstractReferenceCountedByteBuf> refCntUpdater;

    static {
        AtomicIntegerFieldUpdater<AbstractReferenceCountedByteBuf> updater =
                PlatformDependent.newAtomicIntegerFieldUpdater(AbstractReferenceCountedByteBuf.class, "refCnt");
        if (updater == null) {
            updater = AtomicIntegerFieldUpdater.newUpdater(AbstractReferenceCountedByteBuf.class, "refCnt");
        }
        refCntUpdater = updater;
    }

    private volatile int refCnt = 1;
refCntUpdater是一个CAS类型变量,通过原子操作对成员变量进行更新。
refCnt是一个volatile修饰的字段,用于跟踪对象的引用次数。
2. 对象引用计数器
CAS算法,每调用一次retain方法,引用计数器就会+1.
    @Override
    public ByteBuf retain() {
        for (;;) {
            int refCnt = this.refCnt;
            final int nextCnt = refCnt + 1;

            // Ensure we not resurrect (which means the refCnt was 0) and also that we encountered an overflow.
            if (nextCnt <= 1) {
                throw new IllegalReferenceCountException(refCnt, 1);
            }
            if (refCntUpdater.compareAndSet(this, refCnt, nextCnt)) {
                break;
            }
        }
        return this;
    }
下面看释放引用计数器的代码,也是使用CAS在一个自旋循环里进行判断和更新的。需要注意的是:当refCnt==1的时候意味着申请和释放相等,说明对象引用已经不可达,该对象需要被垃圾回收掉,因此调用deallocate方法来释放ByteBuf对象,代码如下:
    @Override
    public boolean release() {
        for (;;) {
            int refCnt = this.refCnt;
            if (refCnt == 0) {
                throw new IllegalReferenceCountException(0, -1);
            }

            if (refCntUpdater.compareAndSet(this, refCnt, refCnt - 1)) {
                if (refCnt == 1) {
                    deallocate();
                    return true;
                }
                return false;
            }
        }
    }
3.4 UnpooledHeapByteBuf
基于堆内存,没有对象池,意味着每次I/O的读写都会创建一个新的UnpooledHeapByteBuf,频繁进行大块内存的分配和回收可能会对性能有一定的影响,但是相比于堆外内存的申请和释放,成本还是要低一些。
相比于PooledHeapByteBuf,其原理更加的简单,也不容易出现内存管理方面的问题,因此在满足性能的情况下,推荐使用UnpooledHeapByteBuf。
1. 成员变量
  //1. 用于内存分配
   private final ByteBufAllocator alloc;
  //2. 数组缓冲区
    byte[] array;
   //3.
    private ByteBuffer tmpNioBuf;
2. 动态扩展缓冲区
    public ByteBuf capacity(int newCapacity) {
        ensureAccessible();
        if (newCapacity < 0 || newCapacity > maxCapacity()) {
            throw new IllegalArgumentException("newCapacity: " + newCapacity);
        }

        int oldCapacity = array.length;
      //1. 如果新的容量值大于当前的缓冲区容量,需要动态扩展
        if (newCapacity > oldCapacity) {
            byte[] newArray = new byte[newCapacity];
        //进行数组复制
            System.arraycopy(array, 0, newArray, 0, array.length);
        // 替换旧的数组
            setArray(newArray);
        } else if (newCapacity < oldCapacity) {
       //此时,需要截取当前缓冲区创建一个新的子缓冲区
            byte[] newArray = new byte[newCapacity];
            int readerIndex = readerIndex();
        //如果读索引<新的容量值
            if (readerIndex < newCapacity) {
                int writerIndex = writerIndex();
                if (writerIndex > newCapacity) {
                    writerIndex(writerIndex = newCapacity);
                }
          //拷贝内容
                System.arraycopy(array, readerIndex, newArray, readerIndex, writerIndex - readerIndex);
            } else {
          //如果此时读索引更大,无须拷贝数据
                setIndex(newCapacity, newCapacity);
            }
            setArray(newArray);
        }
        return this;
    }
3. 字节数组复制
    @Override
    public ByteBuf setBytes(int index, byte[] src, int srcIndex, int length) {
        checkSrcIndex(index, length, srcIndex, src.length);
        System.arraycopy(src, srcIndex, array, index, length);
        return this;
    }
此时不会修改readerIndex和writerIndex,只是修改内容.
4. 转换为ByteBuf
    public ByteBuffer nioBuffer(int index, int length) {
        ensureAccessible();
        return ByteBuffer.wrap(array, index, length).slice();
    }
5. 子类相关方法
isDirect: 由于是基于heap,所以返回false
hasArray: 返回true
array: 返回array
    @Override
    public boolean hasArray() {
        return true;
    }

    @Override
    public byte[] array() {
        ensureAccessible();
        return array;
    }

    @Override
    public int arrayOffset() {
        return 0;
    }

    @Override
    public boolean hasMemoryAddress() {
        return false;
    }

    @Override
    public long memoryAddress() {
        throw new UnsupportedOperationException();
    }
其它:
由于UnpooledDirectByteBuf原理和UnpooledHeapByteBuf相同,不同之处在于使用内部缓冲区DirectByteBuffer实现,这里不再描述。
setByteBuffer(ByteBuffer.allocateDirect(initialCapacity));
3.5 PooledByteBuf内存池原理分析
细节非常复杂,这里仅仅从设计角度上讲解。
1. PoolArena
Arena本身是一块区域,在内存管理中,Memory Arena是指内存中的一大块连续的区域,PoolArena就是Netty的内存池实现类。
为了集中管理内存的分配和释放,同时提高分配和释放内存时候的性能,很多框架和应用都会通过预先申请一大块内存,然后通过提供相应的分配和释放接口来使用内存。
这样,对内存的管理就会被集中到几个类或者函数中,由于不再频繁使用系统调用来申请和释放内存,应用或者系统的性能也会大大提高。这种设计思路中,预先申请的那一大块内存就会被称为Memeory Arena。
不同的框架中,Memory Arena的实现不同,Netty的PoolArena是由多个Chunk组成的大块内存区域,而每个Chunk则由一个或者多个Page组成。
代码片段如下:
abstract class PoolArena<T> implements PoolArenaMetric {
    static final boolean HAS_UNSAFE = PlatformDependent.hasUnsafe();

    enum SizeClass {
        Tiny,
        Small,
        Normal
    }

    static final int numTinySubpagePools = 512 >>> 4;

    final PooledByteBufAllocator parent;

    private final int maxOrder;
    final int pageSize;
    final int pageShifts;
    final int chunkSize;
    final int subpageOverflowMask;
    final int numSmallSubpagePools;
    private final PoolSubpage<T>[] tinySubpagePools;
    private final PoolSubpage<T>[] smallSubpagePools;

    private final PoolChunkList<T> q050;
    private final PoolChunkList<T> q025;
    private final PoolChunkList<T> q000;
    private final PoolChunkList<T> qInit;
    private final PoolChunkList<T> q075;
    private final PoolChunkList<T> q100;

    private final List<PoolChunkListMetric> chunkListMetrics;
2. PoolChunk
Chunk中Page被构建为一棵二叉树。假设一个Chunk由16个Page组成,那么这些Page会被按照下图方式组织起来。
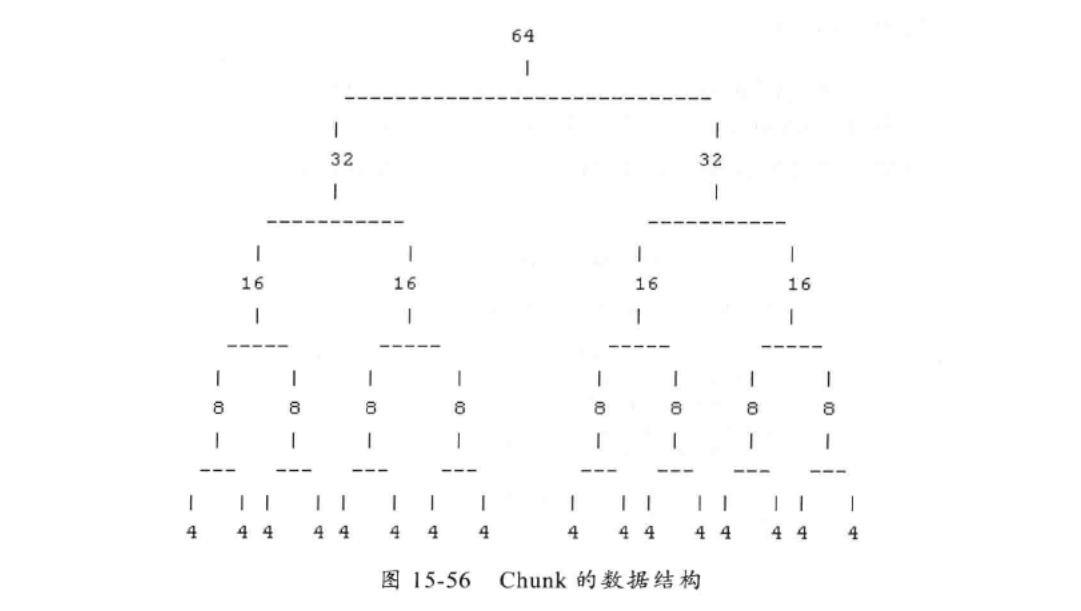
Page的大小是4个byte,而Chunk的大小是64即4*16。树有5层,叶子节点所在层用来分配所有的Page内存,而上一层用来分配2个Page,以此类推...
每个节点都记录了自己在整个Memory Arena中的偏移地址,当一个节点代表的内存区域被分配出去之后,这个节点就被标记为已分配,自这个节点以下的所有节点在后面的内存请求都会被忽略。例如,需要16个byte的时候,就会在第三层寻找,然后标记已经分配,再分配只能寻找其他的三个节点了。
对树的遍历算法采用的是深度优先的算法,但是在选择哪个子节点继续遍历的时候是随机的。
3. PoolSubpage
对于小于一个Page的内存,Netty在Page中完成分配。每个Page会被切分为大小相同的多个存储块,存储块的大小由第一次申请内存的块大小决定。
假设一个Page是8个字节,第一次申请的块大小是4个字节,那么这个Page就包含了2个存储块;如果第一次申请的是8个字节,那么这个Page就被分成一个存储块。同时,之后能分配的也是和第一次一样的字节,如果不一样,需要在一个新的Page中进行分配。
Page中存储区域的使用状态通过一个long数组来维护,数组中每个long的每一位表示一个块存储区域的占用情况:0表示未占用,1表示已占用。对于个4bytes的Page来说,如果这个Page用来分配1个字节的存储区域,那么long数组只用一个元素的低4位就可以描述,如果对于一个128bytes的Page,如果也是1byte分配就有128个,就需要2个long元素来代表区域占用情况。
final class PoolSubpage<T> implements PoolSubpageMetric {

    final PoolChunk<T> chunk;
    private final int memoryMapIdx;
    private final int runOffset;
    private final int pageSize;
    private final long[] bitmap;

    PoolSubpage<T> prev;
    PoolSubpage<T> next;

    boolean doNotDestroy;
    int elemSize;
    private int maxNumElems;
    private int bitmapLength;
    private int nextAvail;
    private int numAvail;
4. 内存回收策略
无论是Chunk还是Page,都使用状态位(bitmap)来标识内存是否可用,不同之处在于Chunk通过在二叉树上对节点进行标识,Page则是通过维护块的状态标识来实现。
3.6 PooledDirectByteBuf
基于内存池实现,基于直接缓冲,与UnPooledDirectByteBuf唯一的不同就是内存分配和销毁策略不同,其他都是相同的。
1. 创建字节缓冲区实例
通过静态工厂创建:
    static PooledDirectByteBuf newInstance(int maxCapacity) {
        PooledDirectByteBuf buf = RECYCLER.get();
        buf.reuse(maxCapacity);
        return buf;
    }
设置引用计数器为1,设置缓冲区最大容量后返回。
    /**
     * Method must be called before reuse this {@link PooledByteBufAllocator}
     */
    final void reuse(int maxCapacity) {
        maxCapacity(maxCapacity);
        setRefCnt(1);
        setIndex0(0, 0);
        discardMarks();
    }
2. 复制新的字节缓冲区实例
如果使用者确实需要复制一个新的实例,与原来的PooledDirectByteBuf独立,则调用它的copy(int index, int length) 可以达到上述目标,代码:
    @Override
    public ByteBuf copy(int index, int length) {
        checkIndex(index, length);
        ByteBuf copy = alloc().directBuffer(length, maxCapacity());
        copy.writeBytes(this, index, length);
        return copy;
    }
上述代码中,首先对index和length进行合法性校验,通过之后调用PooledByteBufAllocator分配一个新的ByteBuf,最终调用的是AbstractByteAllocator的directBuffer方法。
    @Override
    public ByteBuf directBuffer(int initialCapacity, int maxCapacity) {
        if (initialCapacity == 0 && maxCapacity == 0) {
            return emptyBuf;
        }
        validate(initialCapacity, maxCapacity);
        return newDirectBuffer(initialCapacity, maxCapacity);
    }
newDirectBuffer方法根据子类实现不同策略,此处是Pooled,从池中获取而不是创建一个新的对象。
    @Override
    protected ByteBuf newDirectBuffer(int initialCapacity, int maxCapacity) {
        PoolThreadCache cache = threadCache.get();
        PoolArena<ByteBuffer> directArena = cache.directArena;

        ByteBuf buf;
        if (directArena != null) {
            buf = directArena.allocate(cache, initialCapacity, maxCapacity);
        } else {
            if (PlatformDependent.hasUnsafe()) {
                buf = UnsafeByteBufUtil.newUnsafeDirectByteBuf(this, initialCapacity, maxCapacity);
            } else {
                buf = new UnpooledDirectByteBuf(this, initialCapacity, maxCapacity);
            }
        }

        return toLeakAwareBuffer(buf);
    }
3. 其它相关功能
    @Override
    public boolean hasArray() {
        return false;
    }

    @Override
    public byte[] array() {
        throw new UnsupportedOperationException("direct buffer");
    }

    @Override
    public int arrayOffset() {
        throw new UnsupportedOperationException("direct buffer");
    }

    @Override
    public boolean hasMemoryAddress() {
        return false;
    }

    @Override
    public long memoryAddress() {
        throw new UnsupportedOperationException();
    }
四、ByteBuf相关辅助类介绍
4.1 ByteBufHolder
ByteBufHolder是ByteBuf相关的容器,在Netty中非常有用。
例如HTTP协议的请求消息和应答消息都可以携带消息体,这个消息体在NIO ByteBuffer中就是ByteBuffer对象,在Netty中就是ByteBuf对象。而不同的协议消息体中可以含有不同的协议字段和功能,因此需要对ByteBuf进行包装和抽象。
为了满足这些定制化的需求,Netty抽象出了ByteBufHolder对象,它包含了一个ByteBuf,另外还提供了一些其他实用的方法,使用者继承ByteBufHolder接口可以按需封装自己的实现。
下面是其类图,非常丰富。

4.2 ByteBufAllocator
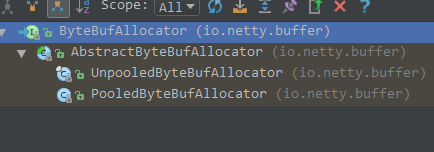
ByteBufAllocator是字节缓冲区分配器,按照Netty的缓冲区实现不同,共有2种不同的分配器,基于内存池的字节缓冲分配器和普通的字节缓冲区分配器。
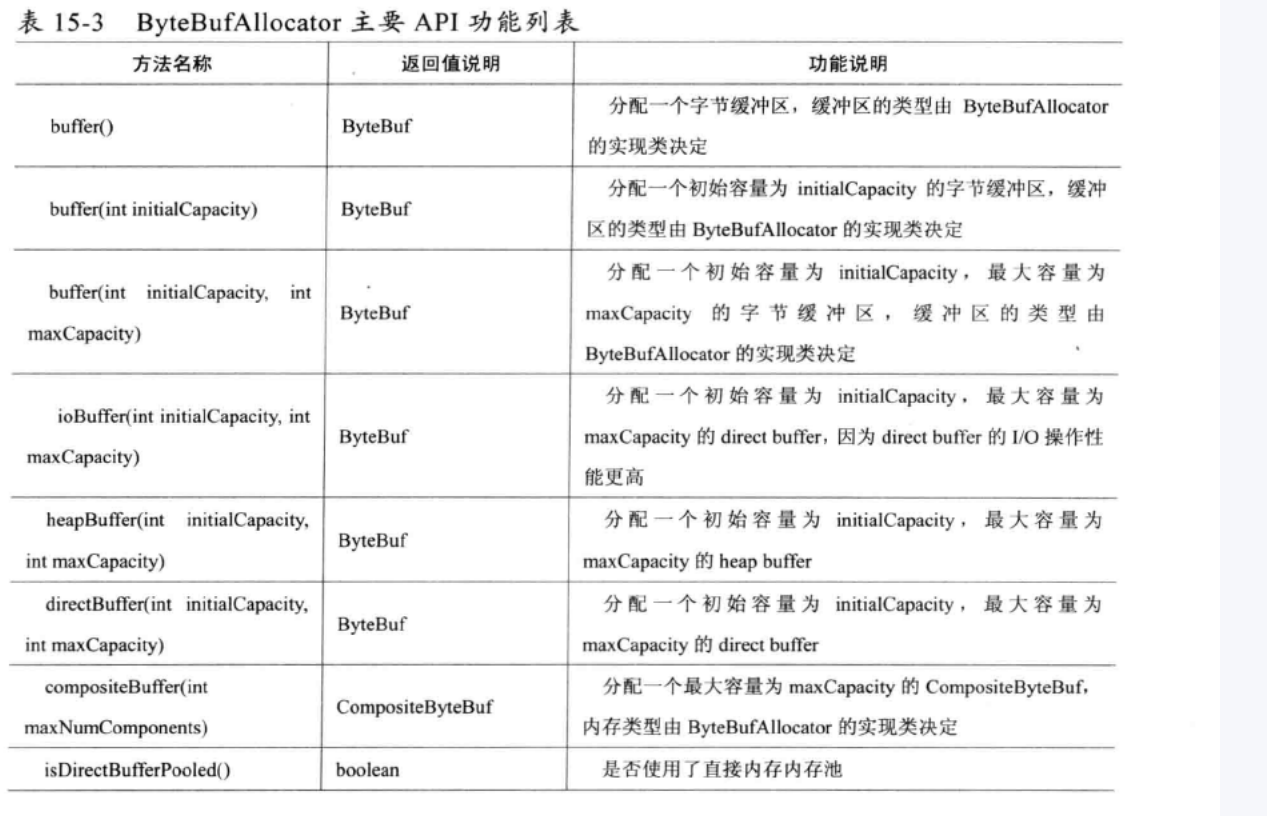
下图是主要API列表:
4.3 CompositeByteBuf
CompositeByteBuf允许将多个ByteBuf的实例组装到一起,形成一个统一的视图。
某些场景下非常有用,例如某个协议POJO对象包含2部分:消息头和消息体,它们都是ByteBuf对象。当需要对消息进行编码的时候需要进行整合,如果使用JDK的话,有以下2种思路:
(1) 将某个ByteBuffer复制到另一个ByteBuffer中,或者创建一个新的ByteBuffer
(2) 通过List等容器,统一维护和处理
Netty的做法则是使用组合模式进行优化。
public class CompositeByteBuf extends AbstractReferenceCountedByteBuf implements Iterable<ByteBuf> {

    private static final ByteBuffer EMPTY_NIO_BUFFER = Unpooled.EMPTY_BUFFER.nioBuffer();
    private static final Iterator<ByteBuf> EMPTY_ITERATOR = Collections.<ByteBuf>emptyList().iterator();

    private final ByteBufAllocator alloc;
    private final boolean direct;
    private final List<Component> components;
    private final int maxNumComponents;

    private boolean freed;
它定义了一个Component的集合,Component就是ByteBuf的包装类:
    private static final class Component {
        final ByteBuf buf;
        final int length;
        int offset;
        int endOffset;

        Component(ByteBuf buf) {
            this.buf = buf;
            length = buf.readableBytes();
        }

        void freeIfNecessary() {
            buf.release(); // We should not get a NPE here. If so, it must be a bug.
        }
    }
增加和删除的代码:
    public CompositeByteBuf addComponent(boolean increaseWriterIndex, ByteBuf buffer) {
        checkNotNull(buffer, "buffer");
        addComponent0(increaseWriterIndex, components.size(), buffer);
        consolidateIfNeeded();
        return this;
    }
    /**
     * Remove the {@link ByteBuf} from the given index.
     *
     * @param cIndex the index on from which the {@link ByteBuf} will be remove
     */
    public CompositeByteBuf removeComponent(int cIndex) {
        checkComponentIndex(cIndex);
        Component comp = components.remove(cIndex);
        comp.freeIfNecessary();
        if (comp.length > 0) {
            // Only need to call updateComponentOffsets if the length was > 0
            updateComponentOffsets(cIndex);
        }
        return this;
    }
4.4 ByteBufUtil
工具类,提供静态方法用于操作ByteBuf对象。

最有用的是对字符串进行编码和解码:
public static ByteBuf encodeString(ByteBufAllocator alloc, CharBuffer src, Charset charset): 对字符串进行编码,使用指定的ByteBufAllocator生成一个新的ByteBuf。
还有方法是hexDump,将ByteBuf内容以16进制的字符串打印出来。