我们从两个例子看起:
例子一
package classLoader;

class Singleton{

    private static Singleton singleton = new Singleton();
    public static int counter1;
    public static int counter2=4;

    private Singleton(){
        Singleton.counter1++;
        Singleton.counter2++;
    }

    public static Singleton getInstance(){
        return singleton;
    }
}

public class SingletonTest{
    public static void main(String[] args){
        Singleton singleton = Singleton.getInstance();
        System.out.println("counter1:"+singleton.counter1);
        System.out.println("counter2:"+singleton.counter2);
    }
}
输出结果:

例子二:
package classLoader;

class Singleton{

    public static int counter1;
    public static int counter2=4;
    private static Singleton singleton = new Singleton();

    private Singleton(){
        Singleton.counter1++;
        Singleton.counter2++;
    }

    public static Singleton getInstance(){
        return singleton;
    }
}

public class SingletonTest{
    public static void main(String[] args){
        Singleton singleton = Singleton.getInstance();
        System.out.println("counter1:"+singleton.counter1);
        System.out.println("counter2:"+singleton.counter2);
    }
}
这两个例子只有一处不同,只是调整了 public static int counter1; public static int counter2=4; private static Singleton singleton = new Singleton();这三个静态变量的顺序,我们再看看结果:

这是为什么呢?原因就在于加载类时各个成员的加载顺序不同。
我们看一下类的各个成员加载顺序,直接看例子:
package classLoader;

public class Demo {

        public static void main(String[] args) {
            subs1 = new Sub();
        }
    }

    class Super {

        static int a = getA();

        static {
            System.out.println("加载Super的静态块");
        }

        int b = getB();

        {
            System.out.println("加载Super的普通块");
        }

        Super() {
            System.out.println("加载Super的构造器");
        }

        static int getA() {
            System.out.println("加载Super的静态变量");
            return 1;
        }

        static int getB() {
            System.out.println("加载Super的实例变量");
            return 2;
        }

    }

    class Sub extends Super {

        static int c = getC();

        static {
            System.out.println("加载Sub的静态块");
        }

        int d = getD();

        {
            System.out.println("加载Sub的普通块");
        }

        Sub() {
            System.out.println("加载Sub的构造器");
        }

        static int getC() {
            System.out.println("加载Sub的静态变量");
            return 3;
        }

        static int getD() {
            System.out.println("加载Sub的实例变量");
            return 4;
        }
    }
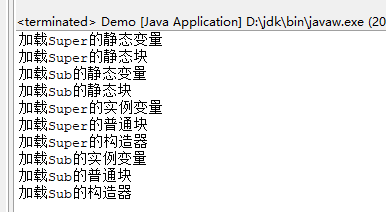
结果:

从结果来看,可以看到静态成员加载顺序大于普通成员加载顺序,父类大于子类,而对于某个类的成员加载顺序依次为:静态变量 > 静态块 > 普通(实例)变量 > 普通快 > 构造器。对于相同性质的成员,从上到下依次加载。

再回头看开头的两个例子:
例子一,先加载private static Singleton singleton = new Singleton();然后调用构造函数,由于此时counter1和counter2还未加载,此时默认先赋值默认初始值0,经过构造函数counter1++和counter2++,分别变成1,1。然后加载 public static int counter1; public static int counter2=4;此时只有counter2重新赋值,所以最终的结果为counter1=1;counter2=4。
例子二,先加载 public static int counter1; public static int counter2=4;此时的counter1=0;counter2=4;然后加载private static Singleton singleton = new Singleton();,调用构造方法,构造方法体为counter1++和counter2++,所以最终counter1=1;counter2=5。