前言
先来了解RabbitMQ一个重要的概念:Exchange交换机
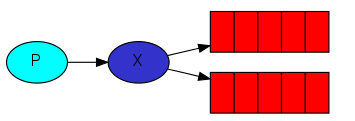
1. Exchange概念
-
Exchange:接收消息,并根据路由键转发消息所绑定的队列。

蓝色框:客户端发送消息至交换机,通过路由键路由至指定的队列。
黄色框:交换机和队列通过路由键有一个绑定的关系。
绿色框:消费端通过监听队列来接收消息。
2. 交换机属性
Name:交换机名称 Type:交换机类型——direct、topic、fanout、headers、sharding(此篇不讲) Durability:是否需要持久化,true为持久化 Auto Delete:当最后一个绑定到Exchange上的队列删除后,自动删除该Exchange Internal:当前Exchange是否用于RabbitMQ内部使用,默认为false Arguments:扩展参数,用于扩展AMQP协议自定制化使用
一、简单模式(Hello Word)

P代表生产者,C代表消费者,红色代码消息队列。P将消息发送到消息队列,C对消息进行处理。
生产者:
@Controller
public class ProducerDemo {

    @Autowired
    private AmqpTemplate rabbitTemplate;

    @RequestMapping("/send")
    @ResponseBody
    public String send() {
        String context = "hello==========" + new Date();
        log.info("Sender : " + context);
        //生产者,正在往hello这个路由规则中发送,由于没有交换机,所以路由规则就是队列名称
        this.rabbitTemplate.convertAndSend("hello", context);
        return "success";
    }
}
消费者:
@Component
//监听hello这个队列
@RabbitListener(queues = "hello")
public class ConsumerDemo {

    @RabbitHandler
    public void process(String hello) {
        System.out.println("Receiver  ===================: " + hello);
    }
}
二、工作模式

一个队列有两个消费者。一个队列中一条消息,只能被一个消费者消费。
在上面的基础中,添加一个消费者就OK了。
消费者:
//第1个消费者
@Component
@RabbitListener(queues = "hello")//监听hello这个队列
public class ConsumerDemo1{

    @RabbitHandler
    public void process(String hello) {
        System.out.println("Receiver  ===================: " + hello);
    }
}

//第2个消费者
@Component
@RabbitListener(queues = "hello")//监听hello这个队列
public class ConsumerDemo2{

    @RabbitHandler
    public void process(String hello) {
        System.out.println("Receiver  ===================: " + hello);
    }
}
当两个消费者同时监听一个队列时,他们并不能同时消费一条消息,而是随机消费消息。1,2,3,4,5,6消息来了,consumer1消费了1,3,5;consumer2消费了2,4,6。
这个数据是随机的哦,别理解为奇偶数。可以自己测试一下。
三、订阅与发布模式(Fanout)
-
不处理路由键,只需要简单的将队里绑定到交换机上
-
生产者将消息不是直接发送到队列,而是发送到X交换机,发送到交换机的消息都会被转发到与该交换机绑定的所有队列上
-
Fanout交换机转发消息是最快的
定义一个订阅模式的交换机:FanoutExchange交换机。然后创建2个队列helloA,helloB,然后将这两个队列绑定到交换机上面。
@Configuration
public class RabbitMQConfig {

     @Bean
    public Queue queueA() {
        return new Queue("helloA", true);
    }

    @Bean
    public Queue queueB() {
        return new Queue("helloB", true);
    }

    //创建一个fanoutExchange交换机
    @Bean
    FanoutExchange fanoutExchange() {
        return new FanoutExchange("fanoutExchange");
    }

    //将queueA队列绑定到fanoutExchange交换机上面
    @Bean
    Binding bindingExchangeMessageFanoutA(Queue queueA, FanoutExchange fanoutExchange) {
        return BindingBuilder.bind(queueA).to(fanoutExchange);
    }

    //将queueB队列绑定到fanoutExchange交换机上面
    @Bean
    Binding bindingExchangeMessageFanoutB(Queue queueB, FanoutExchange fanoutExchange) {
        return BindingBuilder.bind(queueB).to(fanoutExchange);
    }

}
注意一个细节:bindingExchangeMessageFanoutA这种参数中的queueA与创建队列的方法queueA()名字要相同哦。这样才知道queueA绑定了该交换机哦。
交换机的名称也同样。fanoutExchange参数的名字和fanoutExchange()名字要一样哦。
生产者:
this.rabbitTemplate.convertAndSend("fanoutExchange","", context);
消费者:
//第1个消费者
@Component
@RabbitListener(queues = "hello")//监听hello这个队列
public class ConsumerDemo1{

    @RabbitHandler
    public void process(String hello) {
        System.out.println("Receiver  ===================: " + hello);
    }
}

//第2个消费者
@Component
@RabbitListener(queues = "hello")//监听hello这个队列
public class ConsumerDemo2{

    @RabbitHandler
    public void process(String hello) {
        System.out.println("Receiver  ===================: " + hello);
    }
}
现在生产者发送了一条消息,会发现consumer1,2都会收到。之前不是说过一个队列里面的一条消息,只能被一个消费者消费吗?怎么现在一条消息被两个消费者消费了。
要知道这里对于生产者来说是只生产了一条消息,但是它发送给了交换机,交换机会根据绑定的队列来发送。
现在绑定了queueA,queueB队列,所以两个队列里面都有消息了。而消费者关注的也是两个队列,就看到了一条消息被两个消费者消费的情况了。
四、路由模式(Direct)
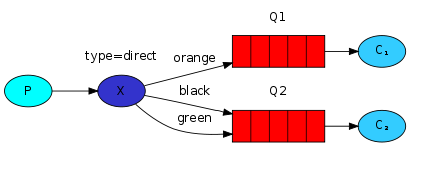
- 所有发送到Direct Exchange的消息被转发到RouteKey中指定的Queue。
- 消息传递时,RouteKey必须完全匹配才会被队列接收,否则该消息会被抛弃。
@Configuration
public class RabbitMQConfig {
    public static final String DIRECT_EXCHANGE = "directExchange";
    public static final String QUEUE_DIRECT_A = "direct.A";
    public static final String QUEUE_DIRECT_B = "direct.B";

    //创建一个direct交换机
    @Bean
    DirectExchange directExchange() {
        return new DirectExchange(DIRECT_EXCHANGE);
    }

    //创建队列A
    @Bean
    Queue queueDirectNameA() {
        return new Queue(QUEUE_DIRECT_A);
    }

    //创建队列B
    @Bean
    Queue queueDirectNameB() {
        return new Queue(QUEUE_DIRECT_B);
    }

    //将direct.A队列绑定到directExchange交换机中,使用direct.a.key作为路由规则
    @Bean
    Binding bindingExchangeMessageDirectA(Queue queueDirectNameA, DirectExchange directExchange) {
        return BindingBuilder.bind(queueDirectNameA).to(directExchange).with("direct.a.key");
    }

    //将direct.B队列绑定到directExchange交换机中,使用direct.b.key作为路由规则
    @Bean
    Binding bindingExchangeMessageDirectB(Queue queueDirectNameB, DirectExchange directExchange) {
        return BindingBuilder.bind(queueDirectNameB).to(directExchange).with("direct.b.key");
    }
}
消费者:
@Component
public class ConsumerDemo {

    @RabbitListener(queues = "direct.A")
    @RabbitHandler
    public void processtopicA(String hello) {
        System.out.println("Receiver Exchanges direct.A  ===================: " + hello);
    }

    @RabbitListener(queues = "direct.B")
    @RabbitHandler
    public void processtopicB(String hello) {
        System.out.println("Receiver Exchanges direct.B  ===================: " + hello);
    }
}
生产者:
// 往directExchange交换机中发送消息,使用direct.a.key作为路由规则。
rabbitTemplate.convertAndSend(RabbitMQConfig.DIRECT_EXCHANGE, "direct.a.key", context);
direct.A,direct.B 两个队列都绑定了交换机directExchange,但他们的路由规则不同,a队列用了direct.a.key,b队列用了direct.b.key,
这种情况下,生产者使用direct.a.key作为路由规则,就只有a队列能收到消息,b队列则收不到消息。
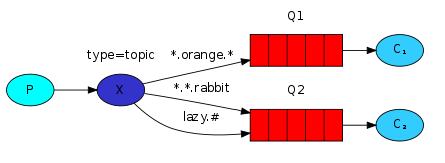
五、主题模式(Topic)
-
所有发送到Topic Exchange的消息被转发到所有管线RouteKey中指定Topic的Queue上
-
Exchange将RouteKey和某Topic进行模糊匹配,此时队列需要绑定一个Topic
@Configuration
public class RabbitMQConfig {

  public static final String TOPIC_EXCHANGE = "topicExchange";

    public static final String TOPIC_KEY_A = "topic.#";

    public static final String TOPIC_KEY_B = "topic.b.key";

    public static final String QUEUE_TOPIC_A = "topic.A";

    public static final String QUEUE_TOPIC_B = "topic.B";


    //创建一个topic交换机
    @Bean
    TopicExchange topicExchange() {
        return new TopicExchange(TOPIC_EXCHANGE);
    }

    //创建队列A
    @Bean
    Queue queueTopicNameA() {
        return new Queue(QUEUE_TOPIC_A);
    }

    //创建队列B
    @Bean
    Queue queueTopicNameB() {
        return new Queue(QUEUE_TOPIC_B);
    }

    //队列topic.A绑定交换机并且关联了topic.#正则路由规则。就是说只要topic.开头的,topic.A队列都将收到消息
    @Bean
    Binding bindingExchangeMessageTopicA(Queue queueTopicNameA, TopicExchange topicExchange) {
        return BindingBuilder.bind(queueTopicNameA).to(topicExchange).with(TOPIC_KEY_A);
    }

    //队列topic.B绑定交换机并且关联了topic.b.key正则路由规则。就是说必须是topic.b.key,topic.B队列才能收到消息,和directExchange类型一样了。
    @Bean
    Binding bindingExchangeMessageTopicB(Queue queueTopicNameB, TopicExchange topicExchange) {
        return BindingBuilder.bind(queueTopicNameB).to(topicExchange).with(TOPIC_KEY_B);
    }

}
消费者:
@Component
public class ConsumerDemo {

    @RabbitListener(queues = "topic.A")
    @RabbitHandler
    public void processtopicA(String hello) {
        System.out.println("Receiver Exchanges topic.A  ===================: " + hello);
    }

    @RabbitListener(queues = "topic.B")
    @RabbitHandler
    public void processtopicB(String hello) {
        System.out.println("Receiver Exchanges topic.B  ===================: " + hello);
    }
}
生产者:
@RequestMapping("/topic/send")
@ResponseBody
public String sendTopicExchange() {
    String context = "Exchange==topic-->a====== " + new Date();
   // 往topicExchange交换机中发送消息,使用topic.b.key作为路由规则。
   this.rabbitTemplate.convertAndSend(RabbitMQConfig.TOPIC_EXCHANGE, "topic.b.key", context);
    return "success";
}
这里发送消息时,往topicExchange这个交换机中发送,并且路由规则为topic.b.key。由于b队列绑定了交换机和路由规则就是它,所以队列b能收到消息。
但是由于A队列的过滤规则为topic.#,就是说只要topic开头的就的路由规则,交换机就会往这个队列里面发送消息。所以a队列也能收到消息,topic.b.key是topic开头的。
对于a队列来说,路由规则为topic.adsf,topic.b.key,topic.a等等,a队列都将收到消息,因为它的路由规则就是topic开头就可以。
六、关系转换
订阅模式,路由模式,主题模式,他们三种都非常类似。而且主题模式可以随时变成两外两种模式。
在主题模式下:
- 当路由规则不为正则表达式的时候,他就和路由模式一样。
- 当路由规则不为正则表达式,且路由规则一样时,就变成了订阅模式。
在路由模式下:
- 当路由规则一样时,就变成了订阅模式。
简单总结五种模式:
- 简单模式:生产者,一个消费者,一个队列
- 工作模式:生产者,多个消费者,一个队列
- 订阅与发布模式(fanout):生产者,一个交换机(fanoutExchange),没有路由规则,多个消费者,多个队列
- 路由模式(direct):生产者,一个交换机(directExchange),路由规则,多个消费者,多个队列
- 主题模式(topic):生产者,一个交换机(topicExchange),模糊匹配路由规则,多个消费者,多个队列
七、总结
- 一个队列,一条消息只会被一个消费者消费(有多个消费者的情况也是一样的)。
- 订阅模式,路由模式,主题模式,他们的相同点就是都使用了交换机,只不过在发送消息给队列时,添加了不同的路由规则。订阅模式没有路由规则,路由模式为完全匹配规则,主题模式有正则表达式,完全匹配规则。
- 在订阅模式中可以看到一条消息被多个消费者消费了,不违背第一条总结,因为一条消息被发送到了多个队列中去了。
- 在交换机模式下:队列和路由规则有很大关系
- 在有交换机的模式下:3,4,5模式下,生产者只用关心交换机与路由规则即可,无需关心队列
- 消费者不管在什么模式下:永远不用关心交换机和路由规则,消费者永远只关心队列,消费者直接和队列交互