搭建nginx-http-flv-module升级代替rtmp模块,详情:https://github.com/winshining/nginx-http-flv-module/blob/master/README.CN.md
centos7+nginx+rtmp+ffmpeg搭建流媒体服务器
1.安装前需要的工具
#net-tool 查本地IP
#wget 下载安装包
#unzip 解压zip包
#gcc gcc-c++ perl 编译软件包用
yum install -y net-tools wget unzip gcc gcc-c++ perl
2. 将将Centos的yum源更换为国内的阿里云源
#备份yum源
mv /etc/yum.repos.d/CentOS-Base.repo /etc/yum.repos.d/CentOS-Base.repo.backup
#下载阿里源
wget -O /etc/yum.repos.d/CentOS-Base.repo http://mirrors.aliyun.com/repo/Centos-7.repo
#清空缓存
yum makecache
3. 安装nginx及rtmp
将当前目录切换的
/home下#切换的homme目录 cd /home
1. 下载并解压pcre
#下载pcre包
wget ftp://ftp.csx.cam.ac.uk/pub/software/programming/pcre/pcre-8.41.tar.gz
#解压pcre包
tar -zxvf pcre-8.41.tar.gz
2. 下载并解压zlib
#下载zlib包
wget http://www.zlib.net/zlib-1.2.11.tar.gz
#解压zlib包
tar -zxvf zlib-1.2.11.tar.gz
3.下载并安装openssl
#下载openssl包
wget https://www.openssl.org/source/old/1.0.1/openssl-1.0.1i.tar.gz
#解压openssl包
tar -zxvf openssl-1.0.1i.tar.gz
#切换到openssl里
cd openssl-1.0.1i
#生成配置文件 默认配置
./configure
#编译程序
make
#安装程序
make install
4. 下载并解压nginx-rtmp-model
#下载rtmp包
wget https://github.com/arut/nginx-rtmp-module/archive/master.zip
#解压下载包
unzip -o master.zip
#修改文件夹名
mv master nginx-rtmp-module
5.安装nginx
#下载nginx
wget http://nginx.org/download/nginx-1.12.2.tar.gz
#解压nignx
tar -zxvf nginx-1.12.2.tar.gz
#切换到nginx中
cd nginx-1.12.2
#生成配置文件,将上述下载的文件配置到configure中
./configure --prefix=/usr/local/nginx --with-pcre=/home/pcre-8.41 --with-zlib=/home/zlib-1.2.11 --with-openssl=/home/openssl-1.0.1i --add-module=/home/nginx-rtmp-module
#编译程序
make
#安装程序
make install
#查看nginx模块
nginx -V
4. 安装ffmpeg
#安装epel包
yum install -y epel-release
#导入签名
rpm --import /etc/pki/rpm-gpg/RPM-GPG-KEY-EPEL-7
#导入签名
rpm --import http://li.nux.ro/download/nux/RPM-GPG-KEY-nux.ro
#升级软件包
rpm -Uvh http://li.nux.ro/download/nux/dextop/el7/x86_64/nux-dextop-release-0-1.el7.nux.noarch.rpm
#更新软件包
yum update -y
#安装ffmpeg
yum install -y ffmpeg
#检查版本
ffmpeg -version
5. 修改配置运行服务
1.修改nginx配置
vi /usr/local/nginx/conf/nginx.conf
修改之后的配置
#工作进程
worker_processes  1;
#事件配置
events {
    worker_connections  1024;
}
#RTMP配置
rtmp {
    server {
        #监听端口
        listen 1935;
        #
        application myapp {
            live on;
        }
        #hls配置
        application hls {
            live on;
            hls on;
            hls_path /tmp/hls;
        }
    }
}

http {
    include       mime.types;
    default_type  application/octet-stream;
    sendfile        on;
    keepalive_timeout  65;
    gzip  on;

    server {
        listen       80;
        server_name  localhost;

        location / {
            root   html;
            index  index.html index.htm;
        }
        #配置hls
        location /hls {
            types {
                application/vnd.apple.mpegurl m3u8;
                video/mp2t ts;
            }
            root /tmp;
            add_header Cache-Control no-cache;
        }
        error_page   500 502 503 504  /50x.html;
        location = /50x.html {
            root   html;
        }
    }
}
2.执行nginx
/usr/local/nginx/sbin/nginx
3. 打开防火墙
/sbin/iptables -I INPUT -p tcp --dport 80 -j ACCEPT
4.测试功能
#查看IP
ifconfig
#在home下上传一个test.mp4视频
#推送rtmp流 下载一个VLC测试
ffmpeg -re -i "/home/test.mp4" -vcodec libx264 -vprofile baseline -acodec aac  -ar 44100 -strict -2 -ac 1 -f flv -s 1280x720 -q 10 rtmp://{IP}:1935/myapp/test1
#推送hls流 写个HTML测试
ffmpeg -re -i "/home/test.mp4" -vcodec libx264 -vprofile baseline -acodec aac -ar 44100 -strict -2 -ac 1 -f flv -s 1280x720 -q 10 rtmp://{IP}:1935/hls/test2
<script src="https://cdn.jsdelivr.net/hls.js/latest/hls.min.js"></script>
<video id="video"></video>
<script>
  if(Hls.isSupported()) {
    var video = document.getElementById('video');
    var hls = new Hls();
    hls.loadSource('http://{IP}/hls/test2.m3u8');
    hls.attachMedia(video);
    hls.on(Hls.Events.MANIFEST_PARSED,function() {
      video.play();
  });
 }
</script>
四、然后就开始推流啦
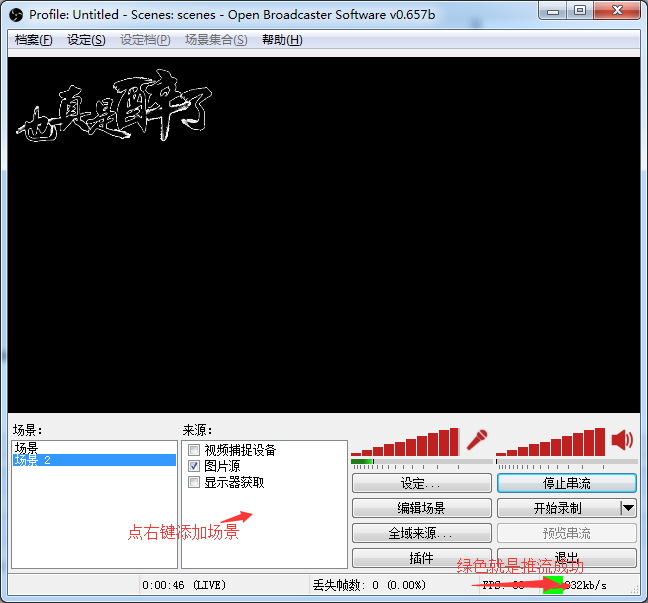
配好后就用推流软件啦,我用的是OBS,按照OBS操作就可以 啦!
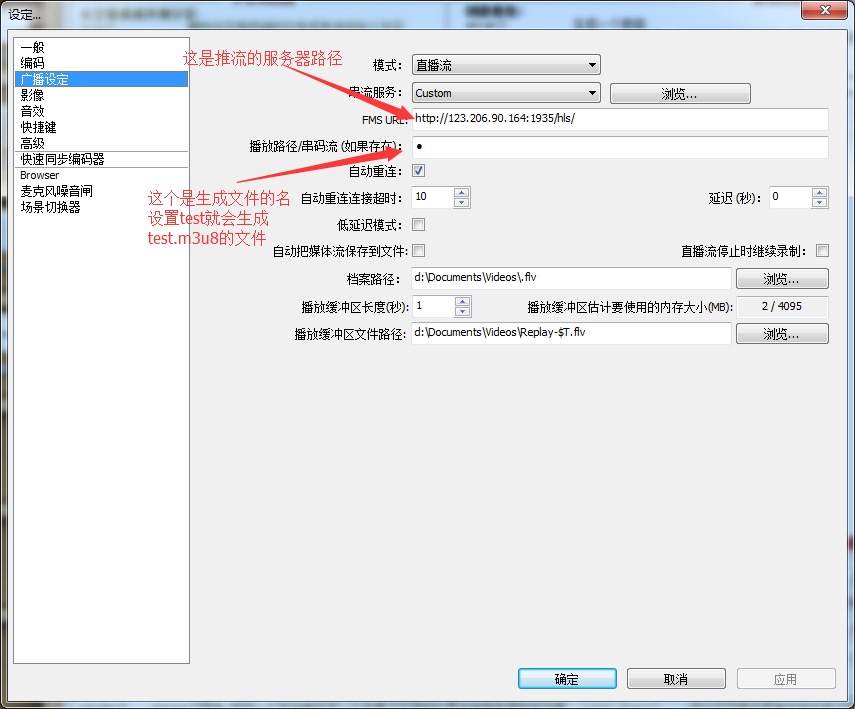
在设置->串流 中填写信息:URL为 rtmp://xxx:1935/hls,xxx为你的服务器的IP地址,hls是用来存放流媒体的。
秘钥可以随便填写一个,用来播放的时候识别播放哪个流媒体的,例如填写test等。
填写完毕后,点击开始串流,就说明我们的流媒体服务器搭建成功了。
五、看直播
如果是mac直接浏览器可以访问http://xxx:81/hls/test.m3u8来观看直播,其中xxx为你的服务器IP地址,
手机端直接访问文件也可以看!
然后其他的H5的vadio需要下载支持m3u8格式的播放啦,我是在https://github.com/huangyaoxin/hLive这下的,挺好用的!找了好多不行,这个可以!
六、看直播肯定会很卡
如果降低延迟也不是没有方法,可以设置切片生成的大小以及访问的速度,但是这样大大增加了服务器的压力。
当然,我们也可以用rtmp拉流工具(VLC等)来看该直播,延迟大概在2-5S左右,拉流地址与推流地址一致。