SpringSecurity实现安全管理主要通过滤器(filter)、验证器(AuthenticationManager)、用户数据提供器(ProviderManager)、授权器(accessDecisionManager)、投票器(AccessDecisionVoter)这几个基本模块协作完成的。大概分为两个部分 用户验证 和授权 这个两个部分。这个部分主要在AuthenticationProcessingFilter和AbstractSecurityInterceptor中完成。
使用过SpringSecurity的用户应该知道,首先应该知道web.xml中申明如下配置
<filter>
<filter-name>springSecurityFilterChain</filter-name>
<filter-class>org.springframework.web.filter.DelegatingFilterProxy</filter-class>
</filter>
<filter-mapping>
<filter-name>springSecurityFilterChain</filter-name>
<url-pattern>/*</url-pattern>
</filter-mapping>
大家不要误认为DelegatingFilterProxy是springsecurity的入口,其实DelegatingFilterProxy其实这个类位于spring-web-3.0.5.RELEASE.jar就说明 这个类本身与springsecurity
无关。其实这个类的作用就是就是拦截请求,把这个请求过滤给springSecurityFilterChain的对应的类(FilterChainProxy)来处理。我们通过断点可以发现,当发送请求时首先进入这个DelegatingFilterProxy这个doFilter进行请求拦截,相关的源码如下:
public void doFilter(ServletRequest request, ServletResponse response, FilterChain filterChain)
throws ServletException, IOException {
// Lazily initialize the delegate if necessary.
Filter delegateToUse = this.delegate;
if (delegateToUse == null) {
synchronized (this.delegateMonitor) {
if (this.delegate == null) {
WebApplicationContext wac = findWebApplicationContext();
if (wac == null) {
throw new IllegalStateException("No WebApplicationContext found: no ContextLoaderListener registered?");
}
this.delegate = initDelegate(wac);
}
delegateToUse = this.delegate;
}
}
// Let the delegate perform the actual doFilter operation.
invokeDelegate(delegateToUse, request, response, filterChain);
}
这里的核心代码就是invokeDelegate(delegateToUse, request, response, filterChain);这个方法,查看的invokeDelegate方法的源码:
protected void invokeDelegate(
Filter delegate, ServletRequest request, ServletResponse response, FilterChain filterChain)
throws ServletException, IOException {
delegate.doFilter(request, response, filterChain);
}
可以看出就是把这个请求委托给FilterChainProxy来处理,delegate通过断点可以看出就是FilterChainProxy,这个过滤器链默认的顺序为
ChannelProcessingFilter
SecurityContextPersistenceFilter
ConcurrentSessionFilter
LogoutFilter
UsernamePasswordAuthenticationFilter/CasAuthenticationFilter/BasicAuthenticationFilter
SecurityContextHolderAwareRequestFilter
JaasApiIntegrationFilter
RememberMeAuthenticationFilter
AnonymousAuthenticationFilter
ExceptionTranslationFilter
FilterSecurityInterceptor
其中加粗的为重点,UsernamePasswordAuthenticationFilter等(进行登陆验证),FilterSecurityInterceptor(进行授权管理),这两个过滤器一般要自定义。
进入到FilterChainProxy 的 doFilter 相关源码如下:
public void doFilter(ServletRequest request, ServletResponse response,
FilterChain chain) throws IOException, ServletException {
//判断是否进行过滤申请了
boolean clearContext = request.getAttribute(FILTER_APPLIED) == null;
if (clearContext) {
try {
//给FILTER_APPLIED 给设置为true,做一个申请的标志
request.setAttribute(FILTER_APPLIED, Boolean.TRUE);
//这个方法是重点 相关的源码如下:
doFilterInternal(request, response, chain);
}
finally {
SecurityContextHolder.clearContext();
request.removeAttribute(FILTER_APPLIED);
}
}
else {
doFilterInternal(request, response, chain);
}
}
doFilterInternal 的的源码解析:
private void doFilterInternal(ServletRequest request, ServletResponse response,
FilterChain chain) throws IOException, ServletException {
FirewalledRequest fwRequest = firewall
.getFirewalledRequest((HttpServletRequest) request);
HttpServletResponse fwResponse = firewall
.getFirewalledResponse((HttpServletResponse) response);
//依据请求路径获取相应的过滤器链 放到一个集合过滤器依次执行
List<Filter> filters = getFilters(fwRequest);//对这个代码进行相应的源码解析
if (filters == null || filters.size() == 0) {
if (logger.isDebugEnabled()) {
logger.debug(UrlUtils.buildRequestUrl(fwRequest)
+ (filters == null ? " has no matching filters"
: " has an empty filter list"));
}
fwRequest.reset();
chain.doFilter(fwRequest, fwResponse);
return;
}
VirtualFilterChain vfc = new VirtualFilterChain(fwRequest, chain, filters);
vfc.doFilter(fwRequest, fwResponse);
}
private List<Filter> getFilters(HttpServletRequest request) {
//filterChains多个过滤器链 这个属性是 注入的<http pattern="" security="" />注入的,当然springsecurity会自动会加入一个过滤器链如上代码所示。
//一般把特殊的权限控制 <http>标签放到默认过滤器前面,不然的话 会被覆盖
for (SecurityFilterChain chain : filterChains) {
//根据请求的路径 获取相应的过滤器链
if (chain.matches(request)) {
//返回第一个匹配的过滤器链的 过滤器集合 并在上面的代码中依次执行(FilterChainProxy的静态内部类中VirtualFilterChain.doFiler()依次执行)
return chain.getFilters();
}
}
return null;
}
下面我们重点讲一下在默认过滤器链中UsernamePasswordAuthenticationFilter(登陆验证过滤器),和FilterSecurityInterceptor(权限管理拦截器).
的
usernamepasswordAuthenticationFilter的过滤器源码解析:过滤器的入口的doFilter,调用的是其父类的AbstractAuthenticationProcessingFilter的dofiler也就是usernamepasswordAuthenticationFiler没有重写父类的代码,dofilter代码如下:
public void doFilter(ServletRequest req, ServletResponse res, FilterChain chain)
throws IOException, ServletException {
HttpServletRequest request = (HttpServletRequest) req;
HttpServletResponse response = (HttpServletResponse) res;
//requiresAuthentication 方法匹配请求的路径,如果不是usernamepasswordAuthenticationFiler的默认的路径或者自己配置的路径直接跳过。
//默认的请求的url为j_spring_security_check,当然这个路径可以自己设置.
public UsernamePasswordAuthenticationFilter() {
super("/j_spring_security_check");
}
if (!requiresAuthentication(request, response)) {
chain.doFilter(request, response);
return;
}
if (logger.isDebugEnabled()) {
logger.debug("Request is to process authentication");
}
Authentication authResult;
try {
//当请求的url匹配上了之后调用attemptAuthentication 方法,attemptAuthentication 是AbstractAuthenticationProcessingFilter的核心方法,在这个方法类进行
//登陆验证。这个方法在AbstractAuthenticationProcessingFilter 中是一个抽象方法,调用的是usernamepasswordAuthenticationFiler对其进行的实现attemptAuthentication下面看一看具体的登陆配置
authResult = attemptAuthentication(request, response);
if (authResult == null) {
// return immediately as subclass has indicated that it hasn't completed authentication
return;
}
sessionStrategy.onAuthentication(authResult, request, response);
} catch(InternalAuthenticationServiceException failed) {
logger.error("An internal error occurred while trying to authenticate the user.", failed);
unsuccessfulAuthentication(request, response, failed);
return;
}
catch (AuthenticationException failed) {
// Authentication failed
//校验失败后调用 验证失败处理器(一般要自己实现)
unsuccessfulAuthentication(request, response, failed);
return;
}
// Authentication success
if (continueChainBeforeSuccessfulAuthentication) {
chain.doFilter(request, response);
}
//校验成功后 调用验证成功处理器(一般要自己实现)
successfulAuthentication(request, response, chain, authResult);
}
usernamepasswordAuthenticationFiler 中的attemptAuthentication的源码实现:
public Authentication attemptAuthentication(HttpServletRequest request, HttpServletResponse response) throws AuthenticationException {
//默认是 是支持post请求可以设置属性postOnly,这一行的代码postOnly && !request.getMethod().equals("POST") 很经典,大家自己体会(充分利用&&操作符的执行过程)
if (postOnly && !request.getMethod().equals("POST")) {
throw new AuthenticationServiceException("Authentication method not supported: " + request.getMethod());
}
//获取用户名 默认参数为(j_username)
// 源码public static final String SPRING_SECURITY_FORM_USERNAME_KEY = "j_username";
String username = obtainUsername(request);
//获取用户密码默认参数为(j_password)
// public static final String SPRING_SECURITY_FORM_PASSWORD_KEY = "j_password";
//这里的注意的是 用户的登陆的密码是没有加密的密码,数据库中或其他服务器中的密码肯定是加密密码 (防止数据泄露)
//所以肯定要将客户端密码 加密之后再进行比对
String password = obtainPassword(request);
if (username == null) {
username = "";
}
if (password == null) {
password = "";
}
username = username.trim();
//这里用一个UsernamePasswordAuthenticationToken 对象存放登陆对象的信息注:UsernamePasswordAuthenticationToken实现了Authenticationj接口:
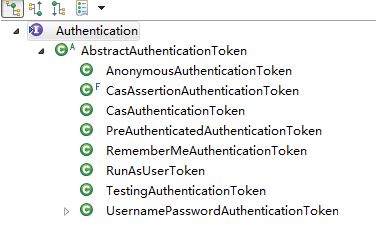
UsernamePasswordAuthenticationToken authRequest = new UsernamePasswordAuthenticationToken(username, password);
setDetails(request, authRequest);
// Allow subclasses to set the "details" property
//设置一些请求的细节 如当前的sessionId和请求的地址信息 保存到 UsernamePasswordAuthenticationToken.details属性中:其实 保存的是一个WebAuthenticationDetails对象.
return this.getAuthenticationManager().authenticate(authRequest);
// getAuthenticationManager() 获得验证管理器 AuthenticationManager,获得的是这个实现类,默认的实现是ProviderManager类,调用的这个类authenticate()这个方法是整个验证就是在个这个方法中实现.
下面是这个类ProviderManager.authenticate()的源码:
public Authentication authenticate(Authentication authentication) throws AuthenticationException {
Class<? extends Authentication> toTest = authentication.getClass();
AuthenticationException lastException = null;
Authentication result = null;
boolean debug = logger.isDebugEnabled();
for (AuthenticationProvider provider : getProviders()) {
//遍历数据提供器 从配置中注入:
if (!provider.supports(toTest)) {
continue;
}
if (debug) {
logger.debug("Authentication attempt using " + provider.getClass().getName());
}
try {
// 从数据提供器中 校验数据 待会详细介绍 daoAuthenticationProvider(从数据库中获取验证校验信息,并进行比对)
result = provider.authenticate(authentication);
if (result != null) {
copyDetails(authentication, result);
break;
}
} catch (AccountStatusException e) {
prepareException(e, authentication);
// SEC-546: Avoid polling additional providers if auth failure is due to invalid account status
throw e;
} catch (InternalAuthenticationServiceException e) {
prepareException(e, authentication);
throw e;
} catch (AuthenticationException e) {
lastException = e;
}
}
if (result == null && parent != null) {
// Allow the parent to try.
try {
result = parent.authenticate(authentication);
} catch (ProviderNotFoundException e) {
// ignore as we will throw below if no other exception occurred prior to calling parent and the parent
// may throw ProviderNotFound even though a provider in the child already handled the request
} catch (AuthenticationException e) {
lastException = e;
}
}
if (result != null) {
if (eraseCredentialsAfterAuthentication && (result instanceof CredentialsContainer)) {
// Authentication is complete. Remove credentials and other secret data from authentication
((CredentialsContainer)result).eraseCredentials();
}
eventPublisher.publishAuthenticationSuccess(result);
return result;
}
// Parent was null, or didn't authenticate (or throw an exception).
if (lastException == null) {
lastException = new ProviderNotFoundException(messages.getMessage("ProviderManager.providerNotFound",
new Object[] {toTest.getName()}, "No AuthenticationProvider found for {0}"));
}
prepareException(lastException, authentication);
throw lastException;
}
}
DaoAuthenticationProvider.authenticate()走的是其父类AbstractUserDetailsAuthenticationProvider.authenticate()的方法
public Authentication authenticate(Authentication authentication) throws AuthenticationException {
Assert.isInstanceOf(UsernamePasswordAuthenticationToken.class, authentication,
messages.getMessage("AbstractUserDetailsAuthenticationProvider.onlySupports",
"Only UsernamePasswordAuthenticationToken is supported"));
// Determine username
String username = (authentication.getPrincipal() == null) ? "NONE_PROVIDED" : authentication.getName();
boolean cacheWasUsed = true;
UserDetails user = this.userCache.getUserFromCache(username);
//从缓存中加载数据,如果没有调用retrieveUser从数据库中获得这个数据,
if (user == null) {
cacheWasUsed = false;
try {
//从数据库总获取信息
user = retrieveUser(username, (UsernamePasswordAuthenticationToken) authentication);
} catch (UsernameNotFoundException notFound) {
logger.debug("User '" + username + "' not found");
if (hideUserNotFoundExceptions) {
throw new BadCredentialsException(messages.getMessage(
"AbstractUserDetailsAuthenticationProvider.badCredentials", "Bad credentials"));
} else {
throw notFound;
}
}
Assert.notNull(user, "retrieveUser returned null - a violation of the interface contract");
}
try {
preAuthenticationChecks.check(user);
//校验一些细节,账号是否有效 账号是否被锁等等
additionalAuthenticationChecks(user, (UsernamePasswordAuthenticationToken) authentication);
} catch (AuthenticationException exception) {
if (cacheWasUsed) {
// There was a problem, so try again after checking
// we're using latest data (i.e. not from the cache)
cacheWasUsed = false;
user = retrieveUser(username, (UsernamePasswordAuthenticationToken) authentication);
preAuthenticationChecks.check(user);
additionalAuthenticationChecks(user, (UsernamePasswordAuthenticationToken) authentication);
} else {
throw exception;
}
}
postAuthenticationChecks.check(user);
//比对密码
if (!cacheWasUsed) {
this.userCache.putUserInCache(user);
}
Object principalToReturn = user;
if (forcePrincipalAsString) {
principalToReturn = user.getUsername();
}
return createSuccessAuthentication(principalToReturn, authentication, user);
}
自此用户登陆彻底完成。
下面我们来看一下AbstractSecurityInterceptor权限管理的相关过程和源码解析:
我们首先来看这个的配置要:
<beans:bean id="securityInterceptor"
class="com.newtouch.security.web.access.intercept.FilterSecurityInterceptor"
p:validateConfigAttributes="false" p:authenticationManager-ref="authenticationManager"
p:accessDecisionManager-ref="accessDecisionManager"
p:securityMetadataSource-ref="securityMetadataSource" />
这里要自定义注入三个 authenticationManager 验证管理器,accessDecisionManager 授权管理器,securityMetadataSource 加载资源数据器 (将所有的资源和权限对应关系建立起来,即定义某一资源可以被哪些角色访问)
首先进入FilterSecurityInterceptor的doFiler方法:
public void doFilter(ServletRequest request, ServletResponse response,
FilterChain chain) throws IOException, ServletException {
FilterInvocation fi = new FilterInvocation(request, response, chain);
invoke(fi);
//这个方法是重点
}
public void invoke(FilterInvocation fi) throws IOException, ServletException {
if ((fi.getRequest() != null)
&& (fi.getRequest().getAttribute(FILTER_APPLIED) != null)
&& observeOncePerRequest) {
// filter already applied to this request and user wants us to observe
// once-per-request handling, so don't re-do security checking
fi.getChain().doFilter(fi.getRequest(), fi.getResponse());
} else {
// first time this request being called, so perform security checking
if (fi.getRequest() != null) {
fi.getRequest().setAttribute(FILTER_APPLIED, Boolean.TRUE);
}
InterceptorStatusToken token = beforeInvocation(fi);
//重点看这个方法,下面贴出源码
try {
fi.getChain().doFilter(fi.getRequest(), fi.getResponse());
} finally {
finallyInvocation(token);
}
afterInvocation(token, null);
}
}
这个方法走的是AbstractSecurityInterceptor的beforeInvocation
protected InterceptorStatusToken beforeInvocation(Object object) {
Assert.notNull(object, "Object was null");
final boolean debug = logger.isDebugEnabled();
if (!getSecureObjectClass().isAssignableFrom(object.getClass())) {
throw new IllegalArgumentException("Security invocation attempted for object "
+ object.getClass().getName()
+ " but AbstractSecurityInterceptor only configured to support secure objects of type: "
+ getSecureObjectClass());
}
Collection<ConfigAttribute> attributes = this.obtainSecurityMetadataSource().getAttributes(object);
//根据路径获取相应的权限配置 这个方法一般要自己实现
if (attributes == null || attributes.isEmpty()) {
if (rejectPublicInvocations) {
throw new IllegalArgumentException("Secure object invocation " + object +
" was denied as public invocations are not allowed via this interceptor. "
+ "This indicates a configuration error because the "
+ "rejectPublicInvocations property is set to 'true'");
}
if (debug) {
logger.debug("Public object - authentication not attempted");
}
publishEvent(new PublicInvocationEvent(object));
return null; // no further work post-invocation
}
if (debug) {
logger.debug("Secure object: " + object + "; Attributes: " + attributes);
}
if (SecurityContextHolder.getContext().getAuthentication() == null) {
credentialsNotFound(messages.getMessage("AbstractSecurityInterceptor.authenticationNotFound",
"An Authentication object was not found in the SecurityContext"), object, attributes);
}
Authentication authenticated = authenticateIfRequired();
//确认用户身份是否验证,如果没有验证在调用验证管理器去验证
// Attempt authorization
try {
this.accessDecisionManager.decide(authenticated, object, attributes);
//这个是授权方法 通过其子类去实现
//accessDecisionManager 有三种决策方法
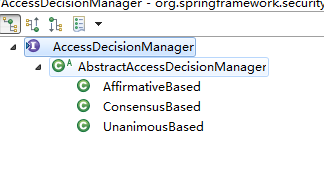
// AffirmativeBased 至少一个投票者必须决定授予访问权限
//ConsensusBased 多数投票者必须授予访问权限
// UnanimousBased 所有投票者都必须投票或放弃投票授予访问权限(无投票表决拒绝访问)
//我们重点看一下AffirmativeBased 这个类的decide的方法源码实现:
}
catch (AccessDeniedException accessDeniedException) {
publishEvent(new AuthorizationFailureEvent(object, attributes, authenticated, accessDeniedException));
throw accessDeniedException;
}
if (debug) {
logger.debug("Authorization successful");
}
if (publishAuthorizationSuccess) {
publishEvent(new AuthorizedEvent(object, attributes, authenticated));
}
// Attempt to run as a different user
Authentication runAs = this.runAsManager.buildRunAs(authenticated, object, attributes);
if (runAs == null) {
if (debug) {
logger.debug("RunAsManager did not change Authentication object");
}
// no further work post-invocation
return new InterceptorStatusToken(SecurityContextHolder.getContext(), false, attributes, object);
} else {
if (debug) {
logger.debug("Switching to RunAs Authentication: " + runAs);
}
SecurityContext origCtx = SecurityContextHolder.getContext();
SecurityContextHolder.setContext(SecurityContextHolder.createEmptyContext());
SecurityContextHolder.getContext().setAuthentication(runAs);
// need to revert to token.Authenticated post-invocation
return new InterceptorStatusToken(origCtx, true, attributes, object);
}
}
//AffirmativeBased 的方法decide放法:
public void decide(Authentication authentication, Object object, Collection<ConfigAttribute> configAttributes)
throws AccessDeniedException {
int deny = 0;
for (AccessDecisionVoter voter : getDecisionVoters()) {
int result = voter.vote(authentication, object, configAttributes);
//根据托票器来投票,返回结果,然后决策授权的结果,这个方法要决策成功与否
if (logger.isDebugEnabled()) {
logger.debug("Voter: " + voter + ", returned: " + result);
}
switch (result) {
case AccessDecisionVoter.ACCESS_GRANTED:
return;
case AccessDecisionVoter.ACCESS_DENIED:
deny++;
break;
default:
break;
}
}
if (deny > 0) {
throw new AccessDeniedException(messages.getMessage("AbstractAccessDecisionManager.accessDenied",
"Access is denied"));
}
// To get this far, every AccessDecisionVoter abstained
checkAllowIfAllAbstainDecisions();
}
到此授权结束。