步骤一:spring项目(java web项目)引入CXF jar包

步骤二:创建webservice服务器
1)创建一个服务接口
 1 package com.buss.app.login;
 2
 3 import javax.jws.WebMethod;
 4 import javax.jws.WebParam;
 5 import javax.jws.WebResult;
 6 import javax.jws.WebService;
 7
 8 /**
 9  * @author Administrator
10  * 备注:targetNamespace为命名空间 默认http://package倒序/
11  */
12 @WebService(targetNamespace = "http://login.app.buss.com/")
13 public interface LoginServiceI
14 {
15     @WebMethod(operationName="login")
16     @WebResult(name="ReturnInfo")
17     public String login(@WebParam(name="phone") String phone, @WebParam(name="pwd")String pwd);
18 }
2)是接口实现类
有一点注意:CXF不支持复杂类型返回值,现在流行的做法有两种:
返回XML格式或者JSON格式字符串,在客户端使用DOM工具类或者json工具类转换解析,相对于直接返回对象或者集合等复杂数据结构需要客户端引入相应工具库 比较省事
 1 package com.buss.app.login;
 2 import java.util.ArrayList;
 3 import java.util.List;
 4 import javax.jws.WebService;
 5 import org.jeecgframework.core.util.LogUtil;
 6 import com.buss.app.common.ReturnInfo;
 7 import com.buss.app.login.entity.Student;
 8 import com.google.gson.Gson;
 9
10 @WebService(serviceName = "LoginServiceImpl")
11 public class LoginServiceImpl implements LoginServiceI
12 {
13     public String login(String phone,String pwd)
14     {
15         LogUtil.info("登录手机号:"+phone+",密码:"+pwd);
16         Gson gson = new Gson();
17         List<Student> list = new ArrayList<Student>();
18         Student s = new Student();
19         s.setAddusername("测试");
20         s.setJob("科长");
21         s.setOrgname("省院");
22         Student s1 = new Student();
23         s1.setAddusername("测试");
24         s1.setJob("科长");
25         s1.setOrgname("省院");
26         list.add(s);
27         list.add(s1);
28         ReturnInfo rt = new ReturnInfo();
29         rt.setResult(list);
30         String json = gson.toJson(rt);
31         LogUtil.info("返回对象集合:"+json);
32         return json;
33     }
34 }
3)创建cxf-servlet.xml配置文件,将服务类加入到容器中
<?xml version="1.0" encoding="UTF-8"?>
<beans xmlns="http://www.springframework.org/schema/beans"
    xmlns:xsi="http://www.w3.org/2001/XMLSchema-instance" xmlns:jaxws="http://cxf.apache.org/jaxws"
    xsi:schemaLocation=" http://www.springframework.org/schema/beans
    http://www.springframework.org/schema/beans/spring-beans.xsd
    http://cxf.apache.org/jaxws http://cxf.apache.org/schemas/jaxws.xsd">

    <import resource="classpath:META-INF/cxf/cxf.xml" />
    <import resource="classpath:META-INF/cxf/cxf-servlet.xml" />
    <!-- 登录验证服务 -->
    <jaxws:endpoint id="LoginServiceI" implementor="com.buss.app.login.LoginServiceImpl" address="/LoginService" />
</beans>
在spring-mvc.xml中添加引入cxf配置
<!--集成cxf webservice接口-->
<import resource="classpath:cxf-servlet.xml" />
4)在web.xml中加入cxf servlet
<servlet>
    <description>Apache CXF Endpoint</description>
    <display-name>cxf</display-name>
    <servlet-name>cxf</servlet-name>
    <servlet-class>org.apache.cxf.transport.servlet.CXFServlet</servlet-class>
    <load-on-startup>2</load-on-startup>
  </servlet>
  <servlet-mapping>
    <servlet-name>cxf</servlet-name>
    <url-pattern>/cxf/*</url-pattern>
  </servlet-mapping>
至此,web service服务器就创建好了
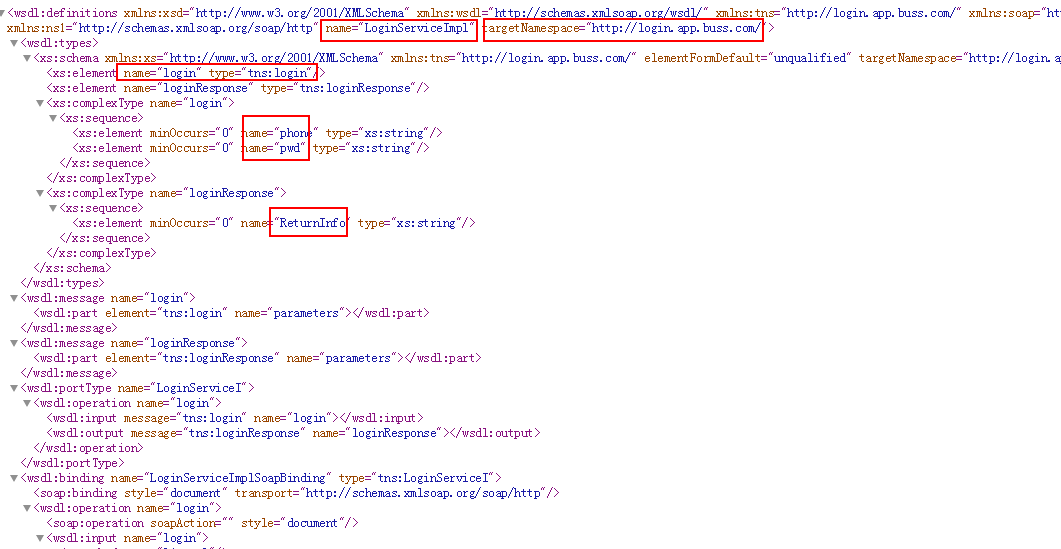
在浏览器中访问: http://localhost:8080/test/cxf/LoginService?wsdl ,(test是项目名称) 如果出现类似如下信息就配置成功了。
备注:常用注解
@WebService 必须,(name="UserService")可选,配置Service的名称,默认为类名。targetNamespace可选,默认为http:// package的倒序,可在一个自己的Constants里定义统一的namespace.
默认接口的所有方法均输出为WebService。
@WebResult 可选,配置方法的返回值在WSDL的名称,CXF默认为result。
@WebParam 可选,配置参数在WSDL的名称,CX比较笨,不会反射,默认为arg0,arg1....
@WebMethod 可选,有一个方法有此注释,则其他无注释的方法非WebService。
步骤三:创建客户端(根据客户端不同 调用手段也不同,如安卓端、Java端、C#端等)
不同客户端可以百度一下相应的调用方法。
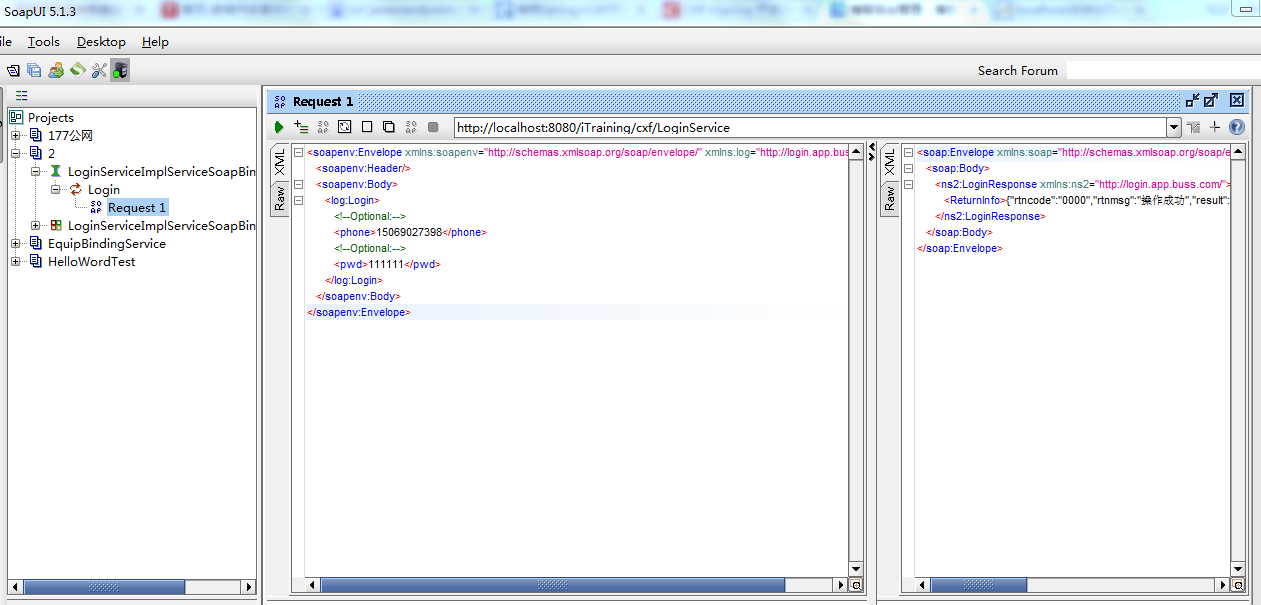
步骤四:测试,使用工具SopeUI测试即可
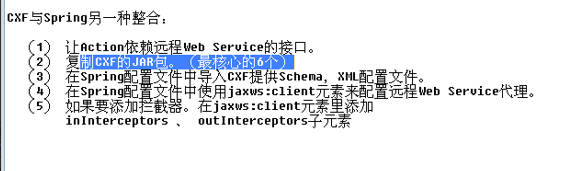
另外:一种常见的应用场景:Java WEB项目与其他系统整合,java web项目作为客户端调用其他系统。
1、不导包,拼装soap消息, 调用HttpClient 发送get或者post请求服务方的web service ,然后使用dom解析返回soap消息;(常用)
2、一种是导包+wsdl2java 生成客户端,但这样会引入过多jar 重量级
需要配置远程web service代理:
其中自动注入远程ws代理的配置有两种方式:
(1)bean方式,使用factory
<!-- WebService 客户端 spring 配置文件cxf与Spring集成,cxf里提供了一个工厂类org.apache.cxf.jaxws.JaxWsProxyFactoryBean,
    可以方便实现的调用WebService。serviceClass属性是接口类,address是webService的路径在其他bean里如果要调用webservice,
    只要将client这个bean注入到需要使用的bean里。-->
    <bean id="client" class="com.exp.service.outer.HelloWorld" factory-bean="clientFactory" factory-method="create" />
    <bean id="clientFactory" class="org.apache.cxf.jaxws.JaxWsProxyFactoryBean">
        <property name="serviceClass" value="com.exp.service.outer.HelloWorld" />
        <property name="address" value="http://localhost:8080/demo/webservice/HelloWorld" />
    </bean>
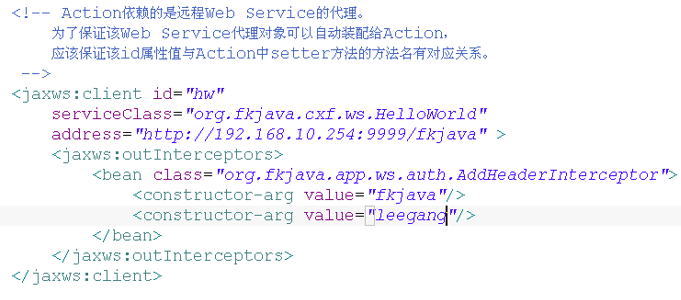
(2)jaxws:client