在上篇文章介绍了Web Api中使用令牌进行授权的后端实现方法,基于WebApi2和OWIN OAuth实现了获取access token,使用token访问需授权的资源信息。本文将介绍在Web Api中启用刷新令牌的后端实现。
本文要用到上篇文章所使用的代码,代码编写环境为VS 2017、.Net Framework 4.7.2,数据库为MS SQL 2008 R2.
OAuth 刷新令牌
上文已经搞了一套Token授权访问,这里有多出来一个刷新令牌(Refresh Token),平白添加程序的复杂度,意义何在呢
- 刷新令牌在设置时,有几个选项,其中有一个AccessTokenExpireTimeSpan,即过期时间,针对不同的客户端过期时间该设置为多久呢?
- 而且令牌一旦生成即可在过期时间内一直使用,如果修改了用户的权限信息,如何通知到客户端其权限的变更?
- 还有就是访问令牌过期后,客户端调用需要重新验证用户名密码进行交互,这样是不是有点麻烦了?
使用刷新令牌
刷新令牌(Refresh Token) 是用来从身份认证服务器交换获得新的访问令牌,允许在没有用户交互的情况下请求新的访问令牌。刷新令牌有几个好处:
- 可以无需用户交互情况下更新访问令牌:可以设置一个较长时间的刷新令牌有效期,客户端一次身份验证后除非管理员撤销刷新令牌,否则在刷新令牌有效期内均不用再次身份验证
- 可以撤销已通过身份验证的用户的授权: 只要用户获取到访问令牌,除非自己编写单独的处理逻辑,否则是没法撤销掉访问令牌,但是刷新令牌相对简单的多
这个在没有特定的业务场景比较难理解,下面还是一步一步操作一遍,动动手后会有更多收获。本文需要使用进行客户端和刷新令牌的持久化,需要用到EF和数据库客户端。
步骤一:设计客户端表、刷新令牌表,启用持久化操作
-
启用EntityFramework,安装 Nuget包
install-package Entityframework -
添加数据实体,项目右键,新建文件夹命名为Entities,然后文件夹右键,新增类命名为OAuthContext,代码如下:
using System.Data.Entity;

namespace OAuthExample.Entities
{
    public class OAuthContext : DbContext
    {
        public OAuthContext() : base("OAuthConnection") { }

        public DbSet<Client> Clients { get; set; }
        public DbSet<RefreshToken> RefreshTokens { get; set; }
    }
}
-
添加客户端、刷新令牌实体 ,在文件夹右键,分别新增Client类、RefreshToken类,代码如下:
Client 实体:
using System.ComponentModel.DataAnnotations;

namespace OAuthExample.Entities
{
    public class Client
    {
        [Key]
        public string Id { get; set; }

        [Required]
        public string Secret { get; set; }
        [Required]
        [MaxLength(100)]
        public string Name { get; set; }

        public ApplicationTypes ApplicationType { get; set; }

        public bool Active { get; set; }

        public int RefreshTokenLifeTime { get; set; }

        [MaxLength(100)]
        public string AllowedOrigin { get; set; }
    }

    public enum ApplicationTypes
    {
        JavaScript = 0,
        NativeConfidential = 1
    };
}
RefreshToken 实体:
using System;
using System.ComponentModel.DataAnnotations;

namespace OAuthExample.Entities
{
    public class RefreshToken
    {
        [Key]
        public string Id { get; set; }

        [Required]
        [MaxLength(50)]
        public string Subject { get; set; }

        [Required]
        [MaxLength(50)]
        public string ClientId { get; set; }

        public DateTime IssuedUtc { get; set; }

        public DateTime ExpiresUtc { get; set; }

        [Required]
        public string ProtectedTicket { get; set; }
    }
}
-
进行数据库迁移 ,在程序包管理器控制台分别运行如下命令:
PM> enable-migrations

PM> add-migration initDatabase

PM> update-database
-
实现仓储类,在项目中添加文件夹,命名为Infrastructure,然后添加类,命名为 AuthRepository ,代码如下:
using System;
using System.Collections.Generic;
using System.Linq;
using System.Threading.Tasks;
using OAuthExample.Entities;

namespace OAuthExample.Infrastructure
{
    public class AuthRepository : IDisposable
    {
        private OAuthContext context;

        public AuthRepository()
        {
            context = new OAuthContext();
        }

        public Client FindClient(string clientId)
        {
            var client = context.Clients.Find(clientId);

            return client;
        }

        public async Task<bool> AddRefreshToken(RefreshToken token)
        {
            var existingToken = context.RefreshTokens.Where(r => r.Subject == token.Subject && r.ClientId == token.ClientId).SingleOrDefault();

            if (existingToken != null)
            {
                var result = await RemoveRefreshToken(existingToken);
            }

            context.RefreshTokens.Add(token);

            return await context.SaveChangesAsync() > 0;
        }

        public async Task<bool> RemoveRefreshToken(string refreshTokenId)
        {
            var refreshToken = await context.RefreshTokens.FindAsync(refreshTokenId);

            if (refreshToken != null)
            {
                context.RefreshTokens.Remove(refreshToken);
                return await context.SaveChangesAsync() > 0;
            }

            return false;
        }

        public async Task<bool> RemoveRefreshToken(RefreshToken refreshToken)
        {
            context.RefreshTokens.Remove(refreshToken);
            return await context.SaveChangesAsync() > 0;
        }

        public async Task<RefreshToken> FindRefreshToken(string refreshTokenId)
        {
            var refreshToken = await context.RefreshTokens.FindAsync(refreshTokenId);

            return refreshToken;
        }

        public List<RefreshToken> GetAllRefreshTokens()
        {
            return context.RefreshTokens.ToList();
        }

        public void Dispose()
        {
            context.Dispose();
        }
    }
}
到这里终于完成了Client与RefreshToken两个实体表的管理,这里主要是实现一下Client和RefreshToken这两个实体的一些增删改查操作,在后面会用到。具体实现方式不限于以上代码。
这里有个小插曲,执行数据迁移的时候出现错误 “无法将参数绑定到参数“Path”,因为该参数是空值。”,卡了半个小时也没解决,最后卸载掉当前EntityFramework,换了个低版本的,一切正常了。
步骤二:实现Client验证
现在,我们需要实现负责验证发送给应用程序请求访问令牌或使用刷新令牌的客户端信息的客户端信息的逻辑,因此打开文件“ CustomAuthorizationServerProvider”修改方法ValidateClientAuthentication,代码如下:
public override Task ValidateClientAuthentication(OAuthValidateClientAuthenticationContext context)
        {

            string clientId = string.Empty;
            string clientSecret = string.Empty;
            Client client = null;

            if (!context.TryGetBasicCredentials(out clientId, out clientSecret))
            {
                context.TryGetFormCredentials(out clientId, out clientSecret);
            }

            if (context.ClientId == null)
            {
                //Remove the comments from the below line context.SetError, and invalidate context
                //if you want to force sending clientId/secrects once obtain access tokens.
                context.Validated();
                //context.SetError("invalid_clientId", "ClientId should be sent.");
                return Task.FromResult<object>(null);
            }

            using (AuthRepository _repo = new AuthRepository())
            {
                client = _repo.FindClient(context.ClientId);
            }

            if (client == null)
            {
                context.SetError("invalid_clientId", string.Format("Client '{0}' is not registered in the system.", context.ClientId));
                return Task.FromResult<object>(null);
            }

            if (client.ApplicationType == ApplicationTypes.NativeConfidential)
            {
                if (string.IsNullOrWhiteSpace(clientSecret))
                {
                    context.SetError("invalid_clientId", "Client secret should be sent.");
                    return Task.FromResult<object>(null);
                }
                else
                {
                    if (client.Secret != Helper.GetHash(clientSecret))
                    {
                        context.SetError("invalid_clientId", "Client secret is invalid.");
                        return Task.FromResult<object>(null);
                    }
                }
            }

            if (!client.Active)
            {
                context.SetError("invalid_clientId", "Client is inactive.");
                return Task.FromResult<object>(null);
            }

            context.OwinContext.Set<string>("as:clientAllowedOrigin", client.AllowedOrigin);
            context.OwinContext.Set<string>("as:clientRefreshTokenLifeTime", client.RefreshTokenLifeTime.ToString());

            context.Validated();
            return Task.FromResult<object>(null);
        }
上述操作,我们主要执行了一下验证步骤
- 在请求标头中获取clientId 和Client Secret
- 检查Client Id是否为空
- 检查Client是否注册
- 检查Client是否需要进行Client Secret验证的客户端类型,在此上下文中,NativeConfidential时需要验证Javascript不需要验证
- 检查Client是否处于活动状态
- 以上所有均为有效时,将上下文标记为有效,验证通过
步骤三:验证资源所有者凭证
现在,我们需要修改方法“ GrantResourceOwnerCredentials”以验证资源所有者的用户名/密码是否正确,并将客户端ID绑定到生成的访问令牌,因此打开文件“ CustomAuthorizationServerProvider”并修改GrantResourceOwnerCredentials方法和添加TokenEndpoint实现代码:
/// <summary>
        /// Called when a request to the Token endpoint arrives with a "grant_type" of "password". This occurs when the user has provided name and password
        /// credentials directly into the client application's user interface, and the client application is using those to acquire an "access_token" and
        /// optional "refresh_token". If the web application supports the
        /// resource owner credentials grant type it must validate the context.Username and context.Password as appropriate. To issue an
        /// access token the context.Validated must be called with a new ticket containing the claims about the resource owner which should be associated
        /// with the access token. The application should take appropriate measures to ensure that the endpoint isn’t abused by malicious callers.
        /// The default behavior is to reject this grant type.
        /// See also http://tools.ietf.org/html/rfc6749#section-4.3.2
        /// </summary>
        /// <param name="context">The context of the event carries information in and results out.</param>
        public override async Task GrantResourceOwnerCredentials(OAuthGrantResourceOwnerCredentialsContext context)
        {
            var allowedOrigin = context.OwinContext.Get<string>("as:clientAllowedOrigin");
            if (allowedOrigin == null)
            {
                allowedOrigin = "*";
            }
            context.OwinContext.Response.Headers.Add("Access-Control-Allow-Origin", new[] { allowedOrigin });
            //这里是验证用户名和密码,可以根据项目情况自己实现
            if (!(context.UserName == "zhangsan" && context.Password == "123456"))
            {
                context.SetError("invalid_grant", "The user name or password is incorrect.");
                return;
            }
            var identity = new ClaimsIdentity(context.Options.AuthenticationType);
            identity.AddClaim(new Claim(ClaimTypes.Name, context.UserName));
            identity.AddClaim(new Claim("sub", context.UserName));
            identity.AddClaim(new Claim("role", "user"));
            var props = new AuthenticationProperties(new Dictionary<string, string>
                {
                    {
                        "as:client_id", (context.ClientId == null) ? string.Empty : context.ClientId
                    },
                    {
                        "userName", context.UserName
                    }
                });
            var ticket = new AuthenticationTicket(identity, props);
            context.Validated(ticket);

        }

        /// <summary>
        /// Called at the final stage of a successful Token endpoint request. An application may implement this call in order to do any final
        /// modification of the claims being used to issue access or refresh tokens. This call may also be used in order to add additional
        /// response parameters to the Token endpoint's json response body.
        /// </summary>
        /// <param name="context">The context of the event carries information in and results out.</param>
        /// <returns>
        /// Task to enable asynchronous execution
        /// </returns>
        public override Task TokenEndpoint(OAuthTokenEndpointContext context)
        {
            foreach (var item in context.Properties.Dictionary)
            {
                context.AdditionalResponseParameters.Add(item.Key, item.Value);
            }
            return Task.FromResult<object>(null);

        }
通过上面代码,我们完成了如下操作:
- 从OWIN中获取到“Access-Control-Allow-Origin”并添加到OWIN上下文响应中
- 验证资源所有者的用户名/密码,这里是写死的,实际应用中可以自己扩展一下,验证完成后调用context.Validated(ticket),将生成token
步骤四:生成Refresh Token,并持久化
现在我们需要生成Refresh Token并实现持久化到数据库中,我们需要添加一个新的实现类。项目中找到Providers文件夹,右键添加类,命名为”CustomRefreshTokenProvider”,该类继承于”IAuthenticationTokenProvider”,实现代码如下:
using System;
using System.Threading.Tasks;
using log4net;
using Microsoft.Owin.Security.Infrastructure;
using OAuthExample.Entities;
using OAuthExample.Infrastructure;

namespace OAuthExample.Providers
{
    public class CustomRefreshTokenProvider : IAuthenticationTokenProvider
    {
        private ILog logger = LogManager.GetLogger(typeof(CustomRefreshTokenProvider));

        public void Create(AuthenticationTokenCreateContext context)
        {
            throw new NotImplementedException();
        }
        /// <summary>
        /// Creates the asynchronous.
        /// </summary>
        /// <param name="context">The context.</param>
        public async Task CreateAsync(AuthenticationTokenCreateContext context)
        {
            var clientid = context.Ticket.Properties.Dictionary["as:client_id"];

            if (string.IsNullOrEmpty(clientid))
            {
                return;
            }
            //为刷新令牌生成一个唯一的标识符,这里我们使用Guid,也可以自己单独写一个字符串生成的算法
            var refreshTokenId = Guid.NewGuid().ToString("n");

            using (AuthRepository _repo = new AuthRepository())
            {
                //从Owin上下文中读取令牌生存时间,并将生存时间设置到刷新令牌
                var refreshTokenLifeTime = context.OwinContext.Get<string>("as:clientRefreshTokenLifeTime");

                var token = new RefreshToken()
                {
                    Id = Helper.GetHash(refreshTokenId),
                    ClientId = clientid,
                    Subject = context.Ticket.Identity.Name,
                    IssuedUtc = DateTime.UtcNow,
                    ExpiresUtc = DateTime.UtcNow.AddMinutes(Convert.ToDouble(refreshTokenLifeTime))
                };
                //为刷新令牌设置有效期
                context.Ticket.Properties.IssuedUtc = token.IssuedUtc;
                context.Ticket.Properties.ExpiresUtc = token.ExpiresUtc;
                //负责对票证内容进行序列化,稍后我们将次序列化字符串持久化到数据
                token.ProtectedTicket = context.SerializeTicket();
                var result = await _repo.AddRefreshToken(token);

                //在响应中文中发送刷新令牌Id
                if (result)
                {
                    context.SetToken(refreshTokenId);
                }
            }
        }

        public void Receive(AuthenticationTokenReceiveContext context)
        {
            throw new NotImplementedException();
        }
        /// <summary>
        /// Receives the asynchronous.
        /// </summary>
        /// <param name="context">The context.</param>
        /// <returns></returns>
        /// <exception cref="System.NotImplementedException"></exception>
        public async Task ReceiveAsync(AuthenticationTokenReceiveContext context)
        {
            //设置跨域访问
            var allowedOrigin = context.OwinContext.Get<string>("as:clientAllowedOrigin");
            context.OwinContext.Response.Headers.Add("Access-Control-Allow-Origin", new[] { allowedOrigin });

            //获取到刷新令牌,hash后在数据库查找是否已经存在
            string hashedTokenId = Helper.GetHash(context.Token);
            using (AuthRepository _repo = new AuthRepository())
            {
                var refreshToken = await _repo.FindRefreshToken(hashedTokenId);


                if (refreshToken != null)
                {
                    //Get protectedTicket from refreshToken class
                    context.DeserializeTicket(refreshToken.ProtectedTicket);
                    //删除当前刷新令牌,然后再次生成新令牌保存到数据库
                    var result = await _repo.RemoveRefreshToken(hashedTokenId);
                }
            }
        }
    }
}
通过上面代码,我们完成了如下操作:
- 在CreateAsync 方法中
我们在此方法实现了刷新令牌的设置和生成,并持久化到数据。添加此方法后,在获取access token的过程中,需要将client Id添加到Authorization中,验证通过后,在响应报文中生成了refresh_token
- 在ReceiveAsync 方法中
- 我们在此方法实现了通过刷新令牌获取访问令牌的一部分,详见代码注释
步骤五:使用刷新令牌生成访问令牌
打开CustomRefreshTokenProvider类,添加实现接口方法ReceiveAsync 。代码见上
打开CustomAuthorizationServerProvider类,添加GrantRefreshToken方法的实现,代码如下:
/// <summary>
        /// Called when a request to the Token endpoint arrives with a "grant_type" of "refresh_token". This occurs if your application has issued a "refresh_token"
        /// along with the "access_token", and the client is attempting to use the "refresh_token" to acquire a new "access_token", and possibly a new "refresh_token".
        /// To issue a refresh token the an Options.RefreshTokenProvider must be assigned to create the value which is returned. The claims and properties
        /// associated with the refresh token are present in the context.Ticket. The application must call context.Validated to instruct the
        /// Authorization Server middleware to issue an access token based on those claims and properties. The call to context.Validated may
        /// be given a different AuthenticationTicket or ClaimsIdentity in order to control which information flows from the refresh token to
        /// the access token. The default behavior when using the OAuthAuthorizationServerProvider is to flow information from the refresh token to
        /// the access token unmodified.
        /// See also http://tools.ietf.org/html/rfc6749#section-6
        /// </summary>
        /// <param name="context">The context of the event carries information in and results out.</param>
        /// <returns>
        /// Task to enable asynchronous execution
        /// </returns>
        public override Task GrantRefreshToken(OAuthGrantRefreshTokenContext context)
        {
            //从原始票证中读取Client Id与当前的Client Id进行比较,如果不同,将拒绝次操作请求,以保证刷新令牌生成后绑定到同一个Client
            var originalClient = context.Ticket.Properties.Dictionary["as:client_id"];
            var currentClient = context.ClientId;

            if (originalClient != currentClient)
            {
                context.SetError("invalid_clientId", "Refresh token is issued to a different clientId.");
                return Task.FromResult<object>(null);
            }

            // Change auth ticket for refresh token requests
            var newIdentity = new ClaimsIdentity(context.Ticket.Identity);

            var newClaim = newIdentity.Claims.Where(c => c.Type == "newClaim").FirstOrDefault();
            if (newClaim != null)
            {
                newIdentity.RemoveClaim(newClaim);
            }
            newIdentity.AddClaim(new Claim("newClaim", "newValue"));


            var newTicket = new AuthenticationTicket(newIdentity, context.Ticket.Properties);
            //方法执行后,代码将回到CustomRefreshTokenProvider中的"CreateAsync"方法,生成新的刷新令牌,并将其和新的访问令牌一起返回到响应中
            context.Validated(newTicket);

            return Task.FromResult<object>(null);
        }
代码测试
使用PostMan进行模拟测试
在未授权时,访问 http://localhost:56638/api/Orders,提示“已拒绝为此请求授权”
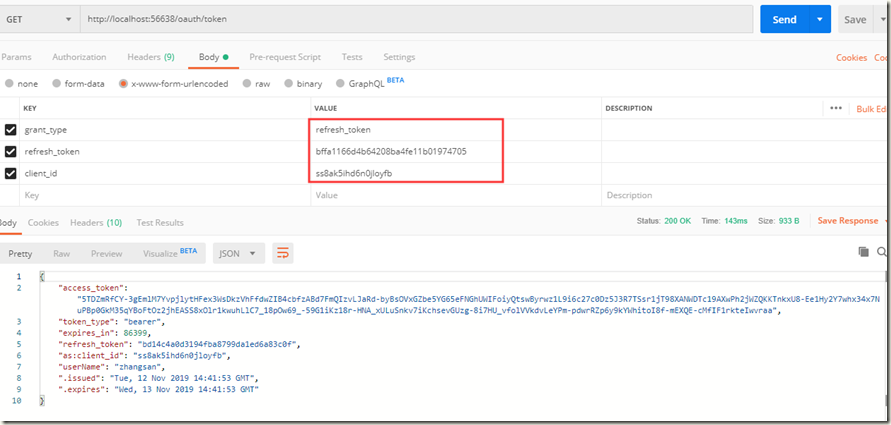
获取授权,访问 http://localhost:56638/oauth/token,获得的报文中包含有refresh_token
使用Refresh token获取新的Access token
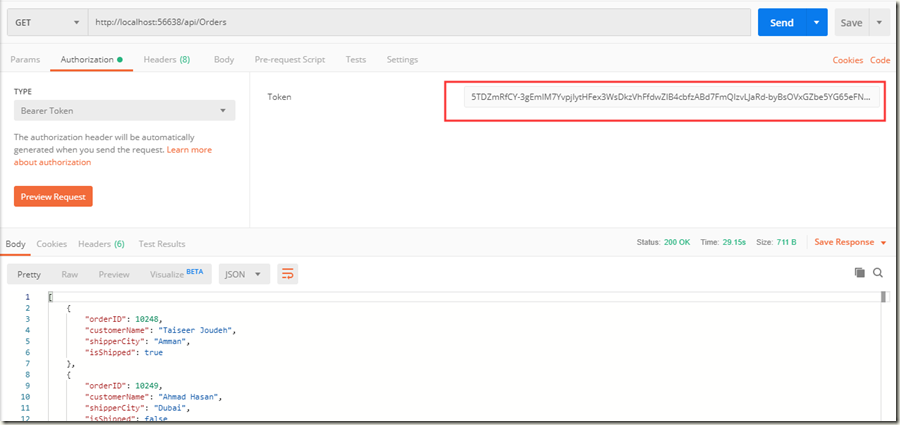
使用新的Access Token 附加到Order请求,再次尝试访问:
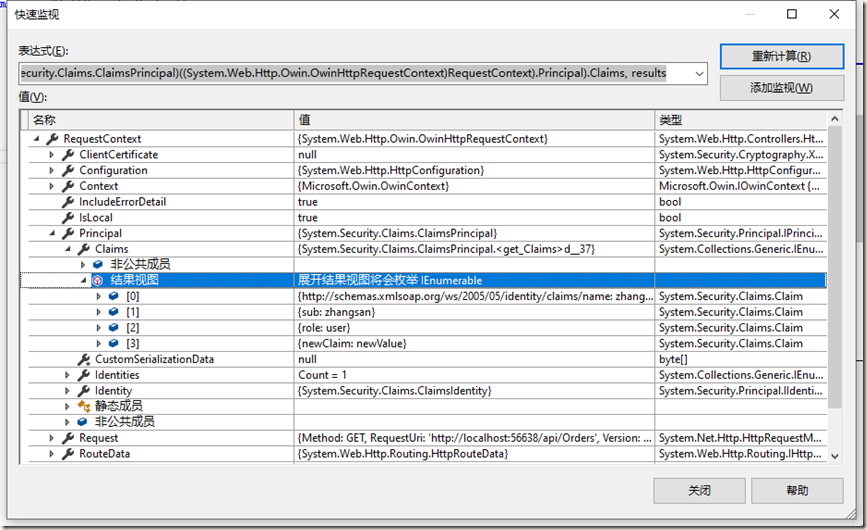
监视请求上下文中的信息如下,注意newClaim是刷新令牌访问时才设置的:
总结
dddd,终于把这两个总结搞完了,回头把之前webapi参数加密的合到一起,代码整理一下放到文末。
本文参照了很多文章以及代码,文章主要架构与下面链接基本一致,其实也没多少原创,但是在整理总结的过程中梳理了一边Access Token 和Refresh Token的知识,当你在组织语言解释代码的时候,才无情的揭露了自己的无知与浅薄,受益匪浅~
Token Based Authentication using ASP.NET Web API 2, Owin, and Identity
Enable OAuth Refresh Tokens in AngularJS App using ASP .NET Web API 2, and Owin
其他参考资料是在较多,有的看一点就关掉了。有的作为参考,列举一二
Web API与OAuth:既生access token,何生refresh token
在ASP.NET中基于Owin OAuth使用Client Credentials Grant授权发放Token
ASP.NET Web API与Owin OAuth:调用与用户相关的Web API
C#进阶系列——WebApi 身份认证解决方案:Basic基础认证
最后本文示例代码地址:Github


